🚨 Heads up! This course is no longer supported. We recommend checking out our Webflow Essentials course.
How to add different fonts to a website in Dreamweaver.
Questions


Student Gallery
Be the first to share something.
Course info
Overview
We’ll use Dreamweaver's handy templating tools to make updates to our site super easy. We’ll create our very own mobile 'burger menu' from scratch learning some basic Javascript & jQuery.
Now web design can sometimes be tricky so I am here to help - just message me if you get stuck. There are also exercise files so you can follow along. I even save a full copy of the website at the end of every video so that you can check yours again mine if you’re is not working quite right.
- You will need a copy of Adobe Dreamweaver CC 2017 or above. A free trial can be downloaded from Adobe.
- No previous web design skills are needed.
- No previous Dreamweaver skills are needed.
What am I going to get from this course?
- 39 lectures 3+ hours of well-structured content!
- You'll learn to build a responsive portfolio website from scratch.
- Learn how to take a design from Illustrator & create a professional website.
- How to use templates in Dreamweaver.
- Create mobile, tablet & desktop versions of the website.
- Build our own custom responsive navigation with burger menu.
- Introduction to Javascript & jQuery.
- How to publish your website to the internet.
- Ways to preview your designs straight to your mobile device.
- How to get the most from your portfolio Images.
- How to use beautiful web fonts in your designs.
- You will get the finished files so you never fall behind.
- Downloadable exercise files & cheat sheet.
- Forum support from me and the rest of the BYOL crew.
- All the techniques used by professional website designers.
What is the target audience?
- YES: This course is for beginners. Aimed at people new to the world of web design. No previous Dreamweaver experience is necessary.
- NO: This course is NOT suited to people experienced in using HTML & CSS.
Course duration approx 4 hours + your study.

Daniel Walter Scott
Founder of Bring Your Own Laptop & Chief Instructor
I discovered the world of design as an art student when I stumbled upon a lab full of green & blue iMac G3’s. My initial curiosity around using the computer to create ‘art’ developed into a full-blown passion, eventually leading me to become a digital designer and founder of Bring Your Own Laptop.
Sharing and teaching are a huge part of who I am. As a certified Adobe instructor, I've had the honor of winning multiple Adobe teaching awards at their annual MAX conference. I see Bring Your Own Laptop as the supportive community I wished for when I was first starting out and intimidated by design. Through teaching, I hope to bring others along for the ride and empower my students to bring their stories, labors of love, and art into the world.
True to my Kiwi roots, I've lived in many places, and currently, I reside in Ireland with my wife and kids.
Downloads & Exercise files
Transcript
Hi there, in this video we're going to change this ugly Times New Roman font to this lovely Open Sans Condensed font. And we're also going to have to change the spelling of this. I've just noticed that. You've probably been in this whole course, going, "Wow, change it." I'll change it before the end of this course, I promise. So let's go and add fonts using Dreamweaver.
So what I want to do now is change the font that's in here. Now I could find, say, my Desktop view, and you can see, ul, li, and the a tag. So that's the thing I want to change. How do I know it's that one I want to change? I go to 'Type' here, and I say 'Font Family', and I just pick another one. So I know, it does change. I don't want any of these fonts that are in the defaults, so I'm going to delete them, but that's how I figured out which one needs to be changed. But I could change this one, and it would work, I get to install my new font which is going to be Open Sans Condensed. But the problem with doing that is that I have to do it for this, and every bit of text in my whole document is going to have to go through, and then I have to find the Font Family for them.
So what designers do, especially at the beginning, is they'll define the font Globally. So they'll say, everything in this document, everything be Open Sans Condensed. So you pick whatever your Body Copy font is. So I'm going to look at my Illustrator file. That is a special use case, it's for the top, what I use the Condensed font here, for the Type, and down the bottom here, and I use it on preceding pages here. That's the Open Sans Condensed. I've decided that that's my main font. So, I'm now going to go through and set that as my default. You do it in Dreamweaver.
So in Dreamweaver, what we need to do is, we need to start the Body Tag. The Body Tag is, remember, if I click inside, anywhere here, the Nav, I'm inside the Header, which is inside the Container, which is all inside the Body, the Body is everything I see on my page. Remember, the Head is everything that the computer sees, and the Body is everything that the user sees. So if I Style this, everything in here may be Open Sans. So to do it, I'm going to be in-- no I'm not going to be in 'All Sources'. I'm going to be in 'styles.css', I'm going to go 'Globally'. And I'm going to click—
We don't have a Body Tag yet. We go to Selectors, and we pick Body. Now Body is one of those tags that already exist and doesn't need a full stop in front of it. Just the ones we create. The Classes that need it. So 'Body', I'm going to go to 'Type', or 'Text'. And we're going to go 'Font Family', and we could pick one of these. The only trouble with using-- say you do like Gill Sans, and you're like "Yes, Gill Sans is good." You can see, he comes on for the ride because everything's been changed to Gill Sans. But what's actually happening is, it's saying "Hey, person that's visiting my website, do you have Gill Sans on your machine?" "No? Well, do you have Gill Sans MT?" "No? Well then, do you have Myriad Pro?" And it kind of works its way down unless it finds one. It generally ends up at Arial. So you don't want that. You want more control, you want to actually say "Use the font I mean, not just a few of these." It's very uncommon to use these now.
So what we're going to do is we're going to go, we're going to bin Gill Sans, goodbye. And we're going to put in a new font. So let's go up to 'Font Family' and we're going to go to this one called 'Manage Fonts'. Now, this loads something called Adobe Edge Web Fonts. All these are, is that, are fonts from Adobe that they've given away for us to use commercially for free. It's got some helpful search options at the top there. We're going to use stuff that we've designed out of Illustrator. You can see in here, in Illustrator I've mainly tried to pick Web Fonts when I'm in designing. So if you're in Illustrator don't go off and pick random font from your machine. Make sure you're using Web Fonts. So I've done it, so both of these fonts are available as Web Fonts. But if I haven't, I can go through here and say, I want to look at some Heading Fonts. It gives me more Heading Fonts.
Say you want some Body Copy fonts, that's this one here, it's more kind of standardized fonts. I'm going to turn them both off, you can pick Script fonts, you can pick Sans Serifs. So you can decide, just to help you pick a Style. I'm going to turn these all off, and I'm going to search for a font. We're using Open Sans, and we're using the Condensed version. Why? Just because it's really good for headings especially, because it's a Body Copy font, because it's kind of skinny, you can fit a lot of characters on. So really long headings are more likely to finish on one line rather than breaking into two. But that's totally a Style, design choice as well.
So what I'm going to do is, I've picked this hit, that little tick in the corner, and you click 'Done', nothing happens. So you kind of activate it, then go to 'Font Family'. And it will appear down here. Now click it on, and then it will appear. A little warning will appear, probably. Mine's been disactivated; disactivated is not a word, deactivated. And it just says we've added a couple of things as well, as a warning. It just says we've had to activate the 'Normal', and the font-weight is '300'. Normally those wouldn't come on by default, but it's just done it for you to make this font work.
The other thing that's happened is-- that's it, we've got a font going, we don't have to worry about any more, but just to let you know, you've got this thing that appeared. So, in my 'Index', 'Source Code', at the top here, remember, we put in the link to JavaScript, and the link to SVN, and then our Style Sheet. This thing here is just being injected by Dreamweaver for us, to make it work. And basically what it's doing is, it's going off to download the font. You can see, edgefonts, Open Sans Condensed is being loaded for us. So, we don't need to do anything with it, we just have to leave it there. Let's do a 'Save All', let's just check if it works in a browser.
Awesome! Here he is. Go down the bottom here. The Layer's not quite right, well it's totally not right. But don't worry if yours is still working like this. We've got to fix that in the next video as well. There's a few other things we need to do to make it work. All right, let's get on to the next video.
How do I change the font across an entire page in Dreamweaver?
Set the font family on the 'body' selector in your stylesheet, rather than changing each text element individually. In the Dreamweaver workflow below, use Manage Fonts to activate Open Sans Condensed, then select it from the Font Family menu. Save all your files and check the result in a browser.
How to Add Web Fonts in Dreamweaver
Key takeaways
Set a global font first, then handle any special typography separately.
Understand why a list of desktop fonts may not deliver the typeface you intended.
Activate a web font in Manage Fonts, then apply it to your CSS selector.
Keep Dreamweaver’s generated font-loading code in place.
Check the font and the layout in a browser, including at narrower widths.
Choose the main font before changing your CSS
That default Times New Roman is not doing this design any favours. I want to replace it with Open Sans Condensed, which is the main font I have already used in my Illustrator layout.
The important word here is main. The design has a special type treatment at the top, but Open Sans Condensed appears in the supporting text, towards the bottom of the page and on other page designs. That makes it a sensible starting point for the website’s default typography.
If you are designing a website in Illustrator, choose fonts that are available as web fonts. Picking a random font installed on your computer can leave you with a lovely mock-up and a font choice you have not planned how to deliver on the website.
Why use the condensed version? Its narrower characters let more text fit into the available space. A long heading is more likely to stay on one line rather than wrap onto two. That is useful for this design, but it is still a style choice, not a rule that every website should follow.
Find the right CSS rule, but avoid styling every bit of text
You can start by selecting the text you want to change. In the navigation example, the relevant structure includes a ul, an li and an a element. The link is the bit of text we are interested in.
A quick way to check whether you have the correct rule selected is to open the text properties and temporarily choose another font family. If the navigation text changes, you have found a rule that affects it. Remove that temporary setting once you have confirmed it.
You could apply Open Sans Condensed directly to that navigation rule. It would work, but then you would need to repeat the process for the other text rules throughout the document.
A cleaner starting point is to define the font globally on the body. That gives the page a default font, with separate rules available for anything that needs a different treatment.
1. Create a global body selector
The body contains the page content people see. In this example, the navigation sits inside the header, the header sits inside a container, and that container sits inside the body.
The head, by contrast, holds information and resource references used by the browser. For our default text styling, it is the body we want.
Open the CSS Designer panel in Dreamweaver.
Select styles.css in Sources rather than leaving All Sources selected.
Select GLOBAL so the rule is not restricted to a particular screen-size condition.
Add a selector and enter body.
Open the Text properties and find Font Family.
Notice that body does not need a full stop in front of it. It is an existing HTML element, so this is an element selector. A class selector uses a full stop before its name.
Setting the font family here establishes the default for text within the body. Text with its own font-family rule can still use a different font, which is exactly what you want for those special design treatments.
2. Understand what the default font lists actually do
Dreamweaver’s Font Family menu includes groups of familiar fonts. You might select a group beginning with Gill Sans and see the page change immediately. Lovely, but there is a catch.
A font list is a sequence of alternatives. The browser tries the first font, then moves down the list if that font is unavailable.
For example, a list might ask for:
Gill Sans
Gill Sans MT
Myriad Pro
Other alternatives, including Arial
That does not mean everyone gets Gill Sans. It means they get the first available font in that list. The result can look different from the design you carefully put together.
For this project, I want more control: Open Sans Condensed, not whichever installed alternative happens to be available. Remove the temporary font choice before adding the web font.
3. Activate Open Sans Condensed in Manage Fonts
This workflow uses Dreamweaver’s Adobe Edge Web Fonts integration. Its font library is presented as free to use commercially, and the Manage Fonts window gives you tools for finding an appropriate typeface.
Open the Font Family menu and choose Manage Fonts.
If you have not already chosen a font, the filters help narrow the selection. You can explore fonts suited to headings or body copy, or browse styles such as script and slab serif. Clear those filters when you want to search the wider library.
For this design, we already know the name:
Search for Open Sans.
Choose Open Sans Condensed, rather than the regular Open Sans family.
Click the tick on the font tile to select it.
Click Done.
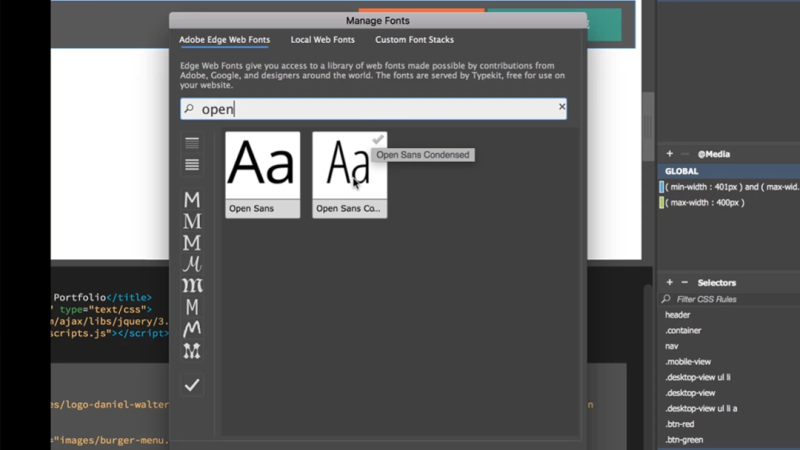
Choose the condensed family to match the typography planned in the design.
At this point, the page may look exactly the same. Do not worry. Activating the font and applying the font are two separate steps.
4. Apply the activated font to the body
With the body selector still selected, return to the Font Family menu. The activated font now appears among the available choices. Select Open Sans Condensed, and the page text should update.
Dreamweaver may display a notice explaining that it has also set the font style to normal and the font weight to 300. Those are the settings used for this font in the example. If the notice has been disabled, you may not see it.
The global font is now in place. You have not had to work through every navigation link and every other text element individually. Much better.
5. Leave the generated font-loading code in place
Applying the font does more than change a CSS property. Dreamweaver also adds font-loading code to the HTML document.
Open your page’s source code and look near the top, alongside the existing stylesheet and script references. Dreamweaver has inserted an additional reference that loads Open Sans Condensed through Edge Web Fonts.
You do not need to manually recreate that reference for this workflow. Leave the generated code in place, because it is what allows the browser to retrieve the font.
This is the practical difference between requesting a font that might already exist on someone’s computer and loading the web font your design actually uses.
6. Save everything and test in a browser
Choose Save All, then open the page in a browser. Check that the navigation text uses the new font rather than the original default typeface.
Also check the page at a narrower browser width. In this example, the font loads successfully, but the navigation still has layout problems at the smaller size.
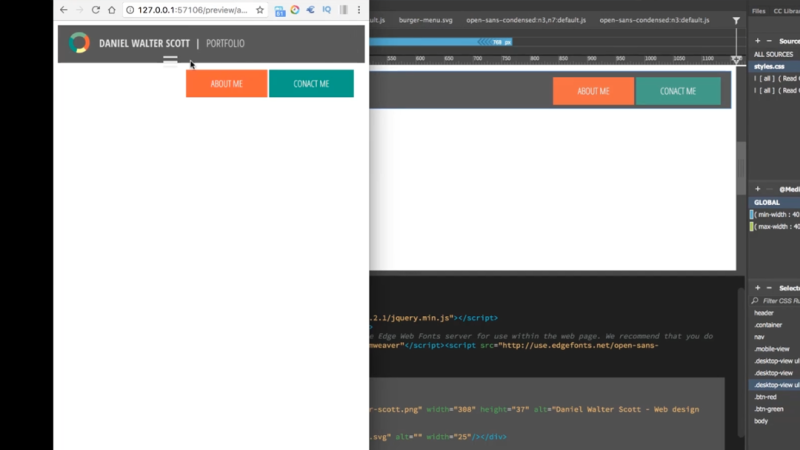
The font is applied, but the narrow layout still needs separate attention.
That does not mean adding the font failed. Typography and layout are separate things to check. A successful font change does not automatically fix the positioning or behaviour of the navigation.
The useful stopping point is simple: the intended web font is active, it is applied globally, the loading reference is preserved, and the browser confirms it works. Any remaining layout issues can then be tackled separately.
Key terms
Web font
A font loaded for use on a website, rather than relying only on fonts already installed on a visitor’s computer.
Font family
The CSS property that specifies which typeface to use. It can contain a list of alternatives that the browser tries in order.
Body selector
A CSS selector targeting the HTML body element. It is a useful place to establish the page’s default font.
Condensed font
A typeface with relatively narrow characters. In this design, Open Sans Condensed helps longer headings fit within the available width.
Font weight
A setting controlling how light or heavy the text appears. Dreamweaver applies a weight of 300 for the Open Sans Condensed setup used here.
FAQs
Why did nothing change after I selected a font in Manage Fonts?
Manage Fonts activates the font as an available choice. You still need to return to Font Family and select it for the CSS rule you want to style.
Should I add a full stop before body in CSS?
No. Use body because you are targeting an HTML element. A full stop is used for a class selector.
Why set the font on the body instead of the navigation links?
Setting it on the body establishes a default across the page, avoiding repeated font declarations for each text rule. You can still give particular elements a different font where the design calls for it.
Does adding a web font fix responsive layout problems?
No. The font can load correctly while the navigation or other elements still need layout adjustments. Check both the typography and the layout in the browser.
Written by Daniel Walter Scott — Founder of Bring Your Own Laptop & Chief Instructor
