How to create a corporate video in Adobe Premiere Pro
Questions

Student Gallery
Be the first to share something.
Course info
Overview
- You will need a copy of Adobe Premiere Pro CC 2017 or above. A free trial can be downloaded from Adobe.
- No previous video editing experience is needed.
- No previous Premiere Pro skills are needed.
- 13 lectures of well-structured, step by step content!
- You'll learn to make corporate video for YouTube, social media & your website.
- How to edit video in Adobe Premiere Pro
- Fixing or hiding bad video footage
- How to add fade, cross fade, black fade transitions.
- How to adjust loudness of audio so it sounds normal & balanced
- How to Sync separate audio with video
- How to fix color & add a vignette
- Adding & animating a logo intro
- Adding names or adding text over video - lower thirds
- How to export & make a mp4s
- You will get the finished files so you never fall behind
- Downloadable exercise files
- Forum support from me and the rest of the BYOL crew
- All the techniques used by video professionals
- This course is for beginners.
- Aimed at people new to the world of video.
- No previous Premiere Pro experience is necessary.
- For anyone that needs to put together video for work.

Daniel Walter Scott
Founder of Bring Your Own Laptop & Chief Instructor
I discovered the world of design as an art student when I stumbled upon a lab full of green & blue iMac G3’s. My initial curiosity around using the computer to create ‘art’ developed into a full-blown passion, eventually leading me to become a digital designer and founder of Bring Your Own Laptop.
Sharing and teaching are a huge part of who I am. As a certified Adobe instructor, I've had the honor of winning multiple Adobe teaching awards at their annual MAX conference. I see Bring Your Own Laptop as the supportive community I wished for when I was first starting out and intimidated by design. Through teaching, I hope to bring others along for the ride and empower my students to bring their stories, labors of love, and art into the world.
True to my Kiwi roots, I've lived in many places, and currently, I reside in Ireland with my wife and kids.
Downloads & Exercise files
Transcript
No transcription available for this video.
How do I start editing a video in Premiere Pro?
Start by creating a properly named Premiere Pro project in a dedicated folder, import your video clips, then create a sequence that matches your footage. The simplest and safest route is to create the sequence directly from a clip, which saves you guessing at frame size and frame rate.
How to Create a New Adobe Premiere Pro Project, Import Video, and Build Your First Timeline
Key takeaways
Create a project folder before you begin so everything stays organised.
Reset the Editing workspace if your Premiere Pro panels look a bit weird.
Import multiple clips in one go using Shift.
Use List View when you want a clearer view of a growing collection of footage.
Create a sequence from a video clip to automatically match its settings.
Learn the difference between the Project panel, Source Monitor, Program Monitor, and timeline.
Rename sequences carefully because the sequence name becomes important when exporting.
Create a new Premiere Pro project
Open Adobe Premiere Pro and choose New Project. You can also get there through File > New Project.
Give the project a useful name. Use something that makes sense six weeks from now when you are digging through folders trying to find that one corporate introduction video. A client name plus the project name is a good place to start.
Next, set the Location. Click Browse, choose where the project will live, and create a dedicated folder for it if needed. Keeping all the project files together from the beginning makes life much easier later on.
Once the name and location are set, click OK. You can safely leave the other project settings alone for now.
Reset the Editing workspace
Premiere Pro remembers how panels were arranged in the last project. So your screen may look completely different from somebody else’s, or from the layout used in a tutorial. That is normal, but it can be annoying when you are getting started.
To get a familiar editing layout, go to Window > Workspaces > Editing. If Editing is already selected, choose Reset to Saved Layout.
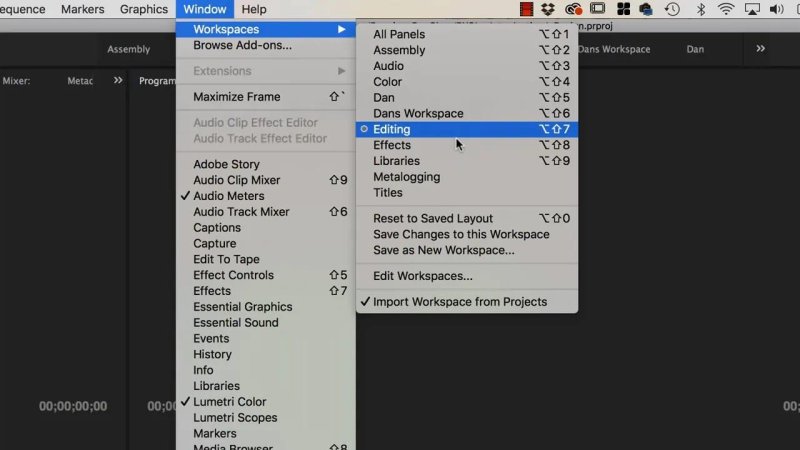
Resetting the Editing workspace puts the core panels back where they belong.
This is also the fix for the inevitable moment when you drag something, panels disappear, and Premiere Pro suddenly looks like it has been redecorated by a toddler. Go back to Window > Workspaces > Reset to Saved Layout and it all comes back.
Import your video clips
With the project open, choose File > Import. Navigate to the folder that contains the video footage.
To import several clips at once, click the first clip, hold Shift, then click the last clip. Premiere Pro selects everything in between. If that is not practical, import each file individually. It is a little slower, but it gets the job done.
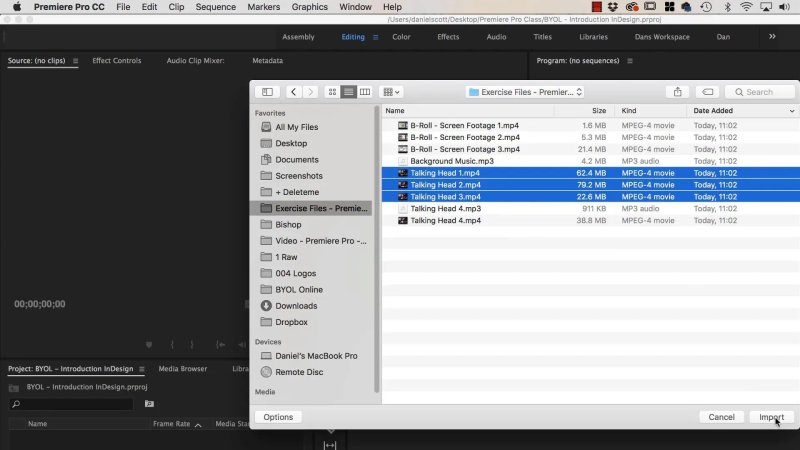
Select all related footage together to bring it into the project in one tidy import.
After importing, the clips appear in the Project panel, which is the panel that holds the media and assets used in the project.
Icon View versus List View
The Project panel can display footage in a couple of ways. Icon View shows thumbnails, which can be handy when clips look obviously different.
For talking-head footage, though, thumbnails often look nearly identical. Once you have a decent amount of media, Icon View can become a bit unwieldy. Try List View instead. It gives you a more practical list of filenames and clip information, making it easier to identify what you have imported.
Neither view is the one true correct answer. Use the one that helps you find things without squinting at a grid of almost identical faces.
Understand the project and the sequence
This is one of the parts that can feel a bit strange at first. You have created a project, imported video, and yet nothing seems to be happening. The timeline is empty and the big display is black.
That is because a project is just the container. Think of it like a book with no pages in it yet. The clips are stored in the project, but they are not an edit until you put them into a sequence.
A sequence is where the edit actually lives. It is the page in the book. It has settings such as frame size and frame rate, and it is where you arrange clips into the order that will eventually be exported.
Create a sequence in Premiere Pro
You can create a blank sequence through File > New > Sequence. Premiere Pro presents a large list of presets, which can feel rather daunting when you are new.
For standard HD work, HDV 1080p 25 is a dependable preset to use if your footage is 1080p at 25 frames per second. The 1080 refers to the frame height in pixels. The 25 refers to the frame rate.
Your footage might instead be 30 or 29.97 frames per second. That is completely fine. The point is that the sequence needs to suit the footage you are editing.
The better option: create a sequence from a clip
Rather than trying to guess which preset matches your camera footage, use the clip itself. In the Project panel, right-click a video file and choose New Sequence From Clip.
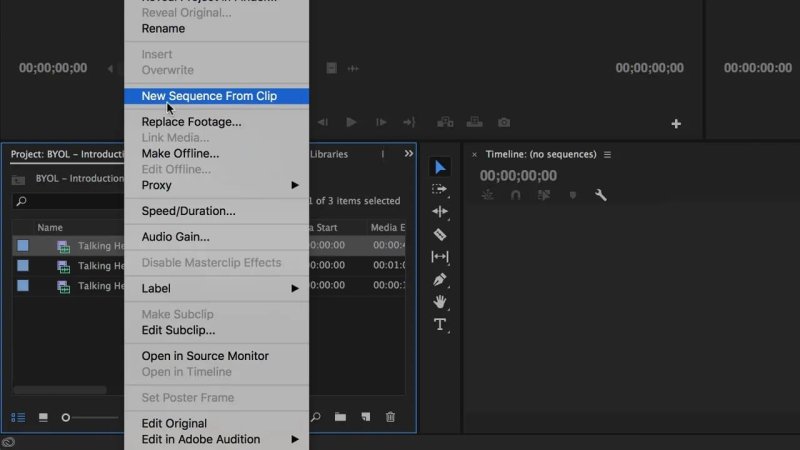
Creating a sequence from a clip removes the guesswork and matches the footage settings automatically.
This is the easy option because the clip already has a defined frame size and frame rate. If it is 1080 pixels high and recorded at 25 frames per second, the sequence will be set up to match it. No preset guessing required.
Once the sequence is created, the timeline wakes up, the Program Monitor is ready to display the edit, and Premiere Pro starts feeling like a video editor rather than a fancy empty box.
Rename the sequence straight away
A sequence made from a clip often takes the clip’s name, which can be confusing. In the Project panel, sequence icons are different from video clip icons, but giving them different names still makes life much easier.
Rename the sequence to something clear, such as Sequence while learning, or a meaningful edit name on a real job.
This matters because the sequence name, not the overall project name, is what will be used when you export your finished MP4. Give it a name you will be happy to see at the end.
Know the four core Premiere Pro panels
Before getting into the actual editing, it helps to understand what each section of the Editing workspace does. There are lots of panels in Premiere Pro, but these are the important ones at the start.
The Project panel
The Project panel contains all imported assets: video, audio, images, sequences, and eventually plenty of other useful things. This is where you organise and locate the clips you want to use.
The timeline
The timeline is the edit itself. Add clips here, place them in the desired order, and build the finished video from left to right.
Press the spacebar to play and stop playback. The vertical marker that moves through the timeline is the Current Time Indicator, usually called the CTI. Calling it the playhead is perfectly reasonable too, and frankly makes much more sense.
Click and drag the playhead to move to a different point in the edit. Move it back to the beginning, press spacebar, and playback starts from there.
The Source Monitor
The Source Monitor is where you inspect a clip before adding it to the timeline. Double-click a video file in the Project panel and it opens in the Source Monitor.
Use it to check what is in the clip. At this stage, it is only a preview. Nothing in the Source Monitor is part of the final video until you add it to the timeline.
The Program Monitor
The Program Monitor displays the sequence, which means it shows what the actual exported video will contain.
When the timeline is empty, the Program Monitor is black. Add a video clip to the timeline and it appears here. Put a second clip after the first and the Program Monitor plays one, then the other. That is the beginning of your edit.
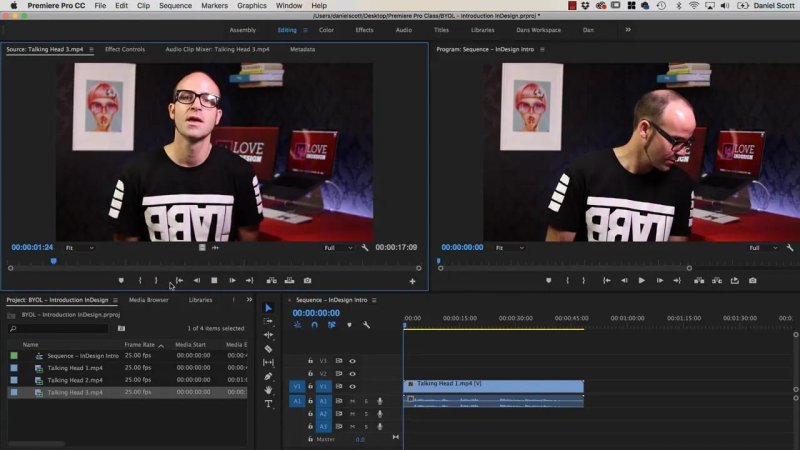
The Source Monitor previews a clip, while the Program Monitor reflects the sequence being built in the timeline.
Add a clip to the timeline
To add a clip after previewing it, click and drag it from the Project panel into the timeline. Once it is there, it becomes part of the sequence and appears in the Program Monitor.
Drag another clip after it and Premiere Pro plays through the first clip before moving into the next. It may not be beautiful editing yet, but it is a real sequence and it can be exported.
If you add a clip by accident, select it in the timeline and press Delete. Then move the playhead back to the beginning and carry on.
Key Terms
Project
A Premiere Pro project is the main file and working container for your edit. It holds references to your imported media, sequences, and organisational structure.
Sequence
A sequence is the timeline-based edit that contains your video and audio clips. Its settings determine the frame size and frame rate of the edit.
Frame rate
Frame rate is the number of still images displayed each second, such as 25, 29.97, or 30 frames per second. Matching the sequence to the footage avoids unnecessary problems.
Playhead
The playhead, also called the Current Time Indicator or CTI, marks the exact point in the timeline currently being previewed or edited.
Source Monitor
The Source Monitor is for checking an individual clip before adding it to the timeline. It is a preview area, not the final edit.
Program Monitor
The Program Monitor displays the contents of the active sequence. This is the preview of what will be exported.
FAQs
Should I create a sequence before importing video in Premiere Pro?
You can, but importing first is often easier. Once the footage is in the Project panel, create a sequence from a clip and Premiere Pro will match the sequence settings to that video automatically.
What does New Sequence From Clip do?
It creates a sequence using the selected clip’s frame size and frame rate. It is a practical way to avoid choosing the wrong sequence preset when starting an edit.
Why is my Program Monitor black in Premiere Pro?
A black Program Monitor usually means the sequence is empty or the playhead is positioned where there is no clip. Add footage to the timeline and move the playhead over it.
What is the difference between the Source Monitor and Program Monitor?
The Source Monitor previews an individual clip before it is added to the edit. The Program Monitor previews the active sequence, which is the video that will eventually be exported.
Why should I rename my Premiere Pro sequence?
A sequence created from a clip may inherit the same filename as that clip, making the Project panel confusing. More importantly, the sequence name is used when exporting, so a clear name keeps the final file organised.
Written by Daniel Walter Scott — Founder of Bring Your Own Laptop & Chief Instructor
