How to edit video in Adobe Premiere Pro
Questions


Student Gallery
Be the first to share something.
Course info
Overview
- You will need a copy of Adobe Premiere Pro CC 2017 or above. A free trial can be downloaded from Adobe.
- No previous video editing experience is needed.
- No previous Premiere Pro skills are needed.
- 13 lectures of well-structured, step by step content!
- You'll learn to make corporate video for YouTube, social media & your website.
- How to edit video in Adobe Premiere Pro
- Fixing or hiding bad video footage
- How to add fade, cross fade, black fade transitions.
- How to adjust loudness of audio so it sounds normal & balanced
- How to Sync separate audio with video
- How to fix color & add a vignette
- Adding & animating a logo intro
- Adding names or adding text over video - lower thirds
- How to export & make a mp4s
- You will get the finished files so you never fall behind
- Downloadable exercise files
- Forum support from me and the rest of the BYOL crew
- All the techniques used by video professionals
- This course is for beginners.
- Aimed at people new to the world of video.
- No previous Premiere Pro experience is necessary.
- For anyone that needs to put together video for work.

Daniel Walter Scott
Founder of Bring Your Own Laptop & Chief Instructor
I discovered the world of design as an art student when I stumbled upon a lab full of green & blue iMac G3’s. My initial curiosity around using the computer to create ‘art’ developed into a full-blown passion, eventually leading me to become a digital designer and founder of Bring Your Own Laptop.
Sharing and teaching are a huge part of who I am. As a certified Adobe instructor, I've had the honor of winning multiple Adobe teaching awards at their annual MAX conference. I see Bring Your Own Laptop as the supportive community I wished for when I was first starting out and intimidated by design. Through teaching, I hope to bring others along for the ride and empower my students to bring their stories, labors of love, and art into the world.
True to my Kiwi roots, I've lived in many places, and currently, I reside in Ireland with my wife and kids.
Downloads & Exercise files
Transcript
No transcription available for this video.
How do you edit out mistakes and join talking head clips in Premiere Pro?
Start by arranging your clips on the timeline, then remove false starts, filler words, and awkward endings by trimming clip edges or cutting with the Razor tool. Use audio waveforms to spot pauses quickly, close empty gaps, and lower playback resolution if Premiere Pro struggles to play smoothly.
How to Edit Talking Head Videos in Adobe Premiere Pro
Key Takeaways
Use enlarged audio waveforms to find speech, pauses, false starts, and mumbling faster.
Trim the beginning and end of a clip by dragging its red edge handles.
Use the Razor tool to cut out mistakes from the middle of a clip.
Learn a few useful shortcuts: C for Razor, V for Selection, + and - for zoom, and \ to fit the timeline.
Delete gaps between clips to build a clean, continuous talking head edit.
Reduce playback resolution to half or quarter without affecting export quality.
Start With Your Clips on the Timeline
The basic job here is simple: take several talking head recordings, keep the good takes, get rid of the ums, false starts, coughing, awkward pauses, and trailing bits, then push everything together into one clean edit.
Drop your first talking head clip onto the timeline and play it through with the spacebar. Do this before reaching for any tools. You are looking for obvious mistakes and natural points where the person begins and finishes speaking.
False starts are completely normal. You might have a few versions of “Hi there” before getting the take you actually want. Rather than worrying about recording perfectly, record enough material to give yourself a usable start and finish. The edit is where you clean it up.
Make the Audio Waveform Bigger First
One of the best habits in Premiere Pro is to enlarge the audio track before editing. The waveform gives you a visual map of the clip: the humps and valleys show where speech happens, while flatter areas usually reveal silence, pauses, or unwanted bits.
Hover around the audio track area, underneath the A1 label, find the horizontal divider, and drag it downward to make the track taller. Suddenly, it becomes much easier to see where a sentence ends, where a false start begins, or where someone is still mumbling after the useful take.
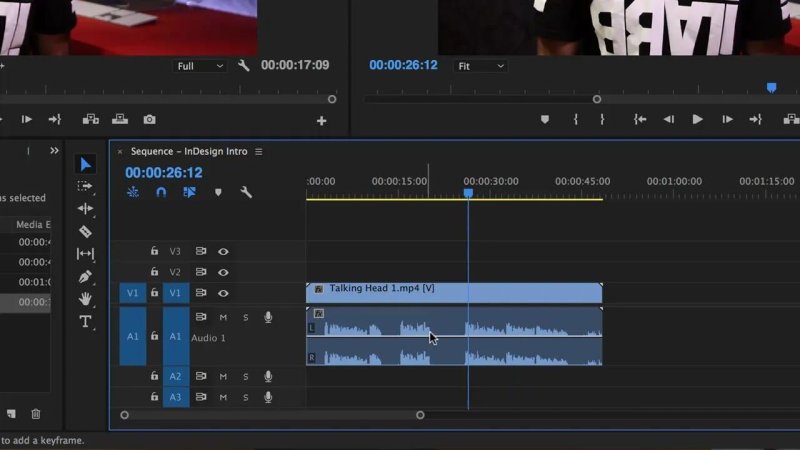
A larger waveform makes pauses, false starts, and spoken sections much easier to identify.
This is not about replacing your ears. You should still play back the edit. But waveforms make finding likely cut points much quicker than repeatedly scrubbing through every second of footage.
Technique One: Trim Clip Edges by Dragging
The easiest way to clean up a clip is to trim its beginning and end. Select the clip, then hover over its start or end until the red trim cursor with the arrow appears. Click and drag that edge inward to hide the unwanted material.
For the first clip, trim off the false starts at the beginning and the mumbling or awkward hold at the end. Once the useful section is left, click and drag the middle of the clip until it snaps right up to the beginning of the timeline.
Trimming Is Non-Destructive
Do not panic if you trim too far. Dragging an edge does not permanently delete the footage. It simply hides that section of the original clip. If you need more room again, drag the same edge back out.
Think of it like cropping or masking rather than throwing footage away. That gives you freedom to make a quick edit, test it, and adjust if the cut feels too tight.
Leave Enough Pre-Roll and Post-Roll When Filming
A clean edit is easier when the original footage gives you a little breathing room. Encourage people on camera to hold for a moment before speaking and after they finish. This extra material is called pre-roll and post-roll.
It gives you flexibility for cuts, fades, blurs, and transitions later. If someone immediately looks away, stands up, or starts laughing as soon as they finish, there is much less usable material at the end of the shot.
Zoom In for More Accurate Cuts
When a cut needs more precision, zoom into the timeline with the + key. Press it a few times and you can place the edit closer to the exact frame where speech begins or ends. Use - to zoom out again.
For example, an ending may feel just slightly too long because the speaker is still looking at the camera. Zoom in and drag the end of the clip in a little more. Then play it again. Small changes often make the difference between a cut that feels clunky and one that feels natural.
Technique Two: Cut a Clip With the Razor Tool
Trimming is brilliant when the unwanted footage is at the beginning or end. But what happens when the bad bit is in the middle? That is where the Razor tool comes in.
Place the playhead near the beginning of the part you want to remove. Select the Razor tool and click on the clip. Then move to the other side of the unwanted section and click again. You have now split the clip into separate pieces.
Switch back to the Selection tool, click the unwanted middle section, and press Delete. The Razor tool does not remove anything by itself. It simply puts a cut into the clip so you can delete or move an individual section.
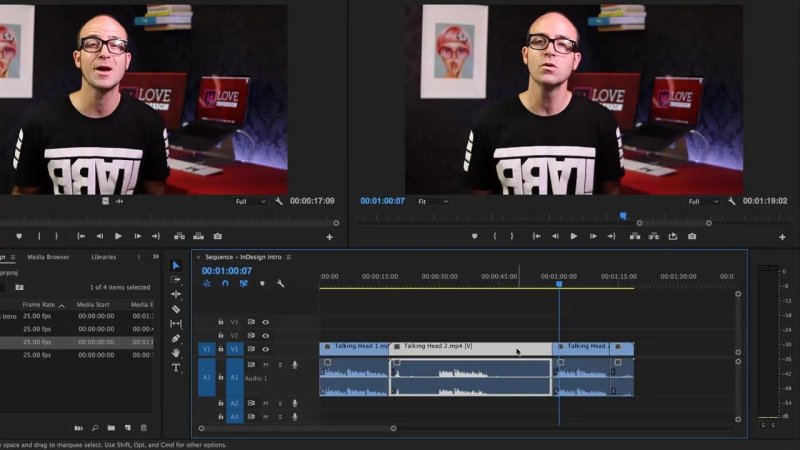
The Razor tool lets you isolate a false start or awkward section in the middle of a clip.
Useful Tool Shortcuts
C: Select the Razor tool.
V: Return to the Selection tool, also known as the move tool.
+: Zoom into the timeline.
-: Zoom out of the timeline.
\: Fit the whole timeline into view.
The C and V shortcuts are especially handy. Instead of travelling to the small tool panel every time, use C to cut, V to select, then delete the section you do not need.
Keep the Playhead Where You Want the Cut
Premiere Pro likes to snap clip edges to the playhead. That can be very helpful when the playhead is exactly where you want the cut. It can also be annoying when it is somewhere else.
A useful little workflow is to position the playhead just before the person starts speaking, then drag the start of the clip towards it. The edge should snap neatly into place. This gives you a quick way to line up a clean start without endless tiny adjustments.
Navigate Along the Timeline Without Grabbing the Wrong Handles
When you are zoomed in, you may not be able to see the end of a clip. Use the timeline navigation bar at the bottom to move across the sequence. Grab the middle of that bar and drag it left or right.
Do not grab its end handles unless you actually want to change your zoom range. Moving the centre lets you travel along the timeline while keeping the same level of magnification.
Bring in the Second and Third Talking Head Clips
Once Talking Head One is clean, drag Talking Head Two onto the timeline after it. Play it and look for the same issues: coughing, lip noises, multiple starts, repeated phrases, or an ending that runs on too long.
Use the Razor tool to remove unwanted parts from the middle, and use edge trimming for the beginning or end. Once the good section is ready, move it tight against the first clip.
Repeat the same process for Talking Head Three:
Drag it onto the end of the timeline.
Find the first usable moment of speech.
Trim or cut away the unused opening.
Remove an awkward ending if needed.
Move the good section against the previous clip.
There is no rule saying every edit must use the same technique. Use edge trimming when it is fast. Use the Razor tool when a mistake sits in the middle. They are the two main editing moves you will use constantly.
Delete Empty Gaps Between Clips
After deleting a piece with the Razor tool, there may be an empty gap in the timeline. Click the empty space so that it highlights, then press Delete. Premiere Pro closes that gap and pulls the later clips back into place.
This is a really useful way to keep the timeline tidy. If the clips are left separated, playback will stop on black frames or create an unnatural pause. Closing gaps keeps the talking head sequence moving.
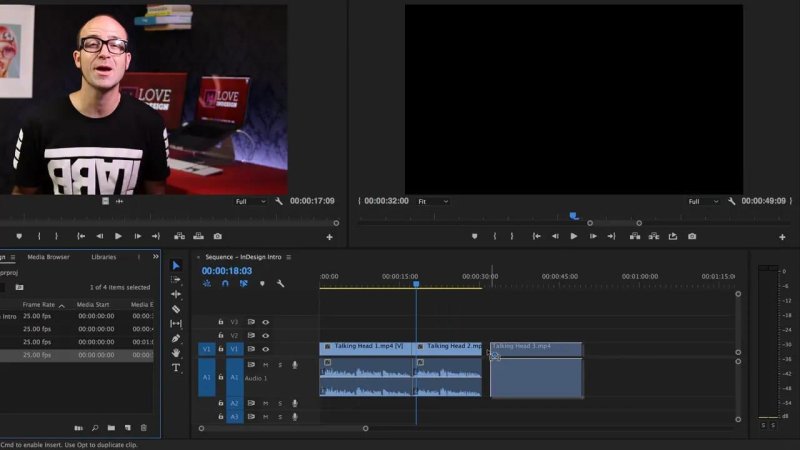
Closing empty space brings the remaining clips together into one continuous edit.
Use Backslash to See the Whole Edit
As you build the edit, the timeline can become awkward to navigate. Press the backslash key, \, to fit everything currently on the timeline into view.
It is essentially a quick “show me the whole sequence” command. Use it after moving clips around, closing gaps, or finishing a section, then zoom back in wherever you need to make precise edits.
Check the Cuts All the Way Through
Once all three clips are trimmed and pushed together, return to the beginning and play the full sequence. The goal is not merely to remove mistakes. You are checking whether each jump feels acceptable and whether the speech flows cleanly from one clip to the next.
At this stage, hard cuts may still feel a little abrupt. That is fine. Basic editing comes first. Transitions, B-roll, graphics, and other polish can come later. First, make sure the content itself is clean, concise, and in the right order.
Fix Choppy Premiere Pro Playback With Lower Resolution
Video editing can be demanding, especially after adding animation, lower thirds, text, or other effects. If playback begins stuttering, do not assume there is something wrong with your edit. Your computer may simply be struggling to play the sequence at full resolution.
In the Program Monitor, find the playback resolution menu, which may currently say Full. Change it to 1/2 or 1/4 resolution. The preview will look softer, but Premiere Pro should have an easier time playing it back.
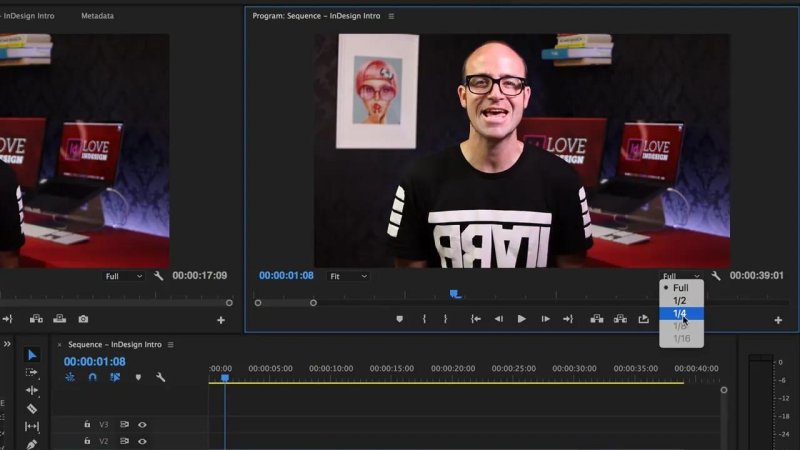
Lowering preview resolution can make a demanding edit play back more smoothly.
This setting affects only the preview while you work. It does not lower the quality of the final exported video. If your machine is having a rough time, edit at quarter resolution and keep moving.
Key Terms
Audio waveform
A visual representation of audio on the timeline. Larger peaks usually indicate speech or louder sounds, while flatter areas often indicate silence.
Trim
Adjusting the visible beginning or end of a clip by dragging its edge. The hidden footage remains available if you need to restore it later.
Razor tool
A Premiere Pro tool that splits a clip at a chosen point. It is ideal for removing mistakes or pauses from the middle of a recording.
Playhead
The vertical indicator that marks the current position in the timeline. It determines where playback begins and provides a useful snapping point for edits.
Pre-roll and post-roll
Extra footage recorded before someone starts speaking and after they finish. It gives you more flexibility for cleaner edits and transitions.
Playback resolution
The quality used for previewing footage in Premiere Pro. Reducing it helps performance during editing without changing final export quality.
FAQs
Is trimming in Premiere Pro permanent?
No. Dragging a clip edge hides footage rather than permanently deleting it, so you can drag the edge back out if you trimmed too much.
When should I use the Razor tool instead of trimming?
Use trimming for unwanted material at the start or end of a clip. Use the Razor tool when the part you need to remove is in the middle.
What are the main Premiere Pro editing shortcuts for this workflow?
Use C for the Razor tool, V for the Selection tool, plus and minus to zoom the timeline, and backslash to fit the full timeline into view.
Will changing playback resolution reduce my exported video quality?
No. Playback resolution affects only the preview in Premiere Pro. You can edit at half or quarter resolution while exporting at your intended full quality.
Written by Daniel Walter Scott — Founder of Bring Your Own Laptop & Chief Instructor
