How to export & make a mp4 using Adobe Premiere Pro
Questions

Student Gallery
Be the first to share something.
Course info
Overview
- You will need a copy of Adobe Premiere Pro CC 2017 or above. A free trial can be downloaded from Adobe.
- No previous video editing experience is needed.
- No previous Premiere Pro skills are needed.
- 13 lectures of well-structured, step by step content!
- You'll learn to make corporate video for YouTube, social media & your website.
- How to edit video in Adobe Premiere Pro
- Fixing or hiding bad video footage
- How to add fade, cross fade, black fade transitions.
- How to adjust loudness of audio so it sounds normal & balanced
- How to Sync separate audio with video
- How to fix color & add a vignette
- Adding & animating a logo intro
- Adding names or adding text over video - lower thirds
- How to export & make a mp4s
- You will get the finished files so you never fall behind
- Downloadable exercise files
- Forum support from me and the rest of the BYOL crew
- All the techniques used by video professionals
- This course is for beginners.
- Aimed at people new to the world of video.
- No previous Premiere Pro experience is necessary.
- For anyone that needs to put together video for work.

Daniel Walter Scott
Founder of Bring Your Own Laptop & Chief Instructor
I discovered the world of design as an art student when I stumbled upon a lab full of green & blue iMac G3’s. My initial curiosity around using the computer to create ‘art’ developed into a full-blown passion, eventually leading me to become a digital designer and founder of Bring Your Own Laptop.
Sharing and teaching are a huge part of who I am. As a certified Adobe instructor, I've had the honor of winning multiple Adobe teaching awards at their annual MAX conference. I see Bring Your Own Laptop as the supportive community I wished for when I was first starting out and intimidated by design. Through teaching, I hope to bring others along for the ride and empower my students to bring their stories, labors of love, and art into the world.
True to my Kiwi roots, I've lived in many places, and currently, I reside in Ireland with my wife and kids.
Downloads & Exercise files
Transcript
No transcription available for this video.
How do I export an MP4 from Premiere Pro?
Select the sequence you want to export, then choose File > Export > Media. Set the format to H.264, leave the preset on Match Source - High Bitrate, choose where to save the file, and click Export.
How to Export an MP4 from Premiere Pro
Key takeaways
Premiere Pro exports sequences, so the correct timeline must be selected first.
H.264 is the go-to format for creating a widely compatible MP4.
Match Source - High Bitrate is a solid default preset for most projects.
The output name determines both the export filename and its save location.
Export time depends heavily on video length and how much animation is in the edit.
Select the Sequence Before Exporting
Exporting from Premiere Pro is super easy, with one little hitch that catches people out all the time.
You might go to File > Export and find the options are greyed out. That usually does not mean anything is broken. It means Premiere Pro does not know which sequence you want to export.
Premiere Pro exports a sequence, not the project as a whole. A project can contain more than one sequence, so click inside the timeline or make sure the sequence is active before opening the export menu. Once the correct sequence is selected, go to File > Export > Media.
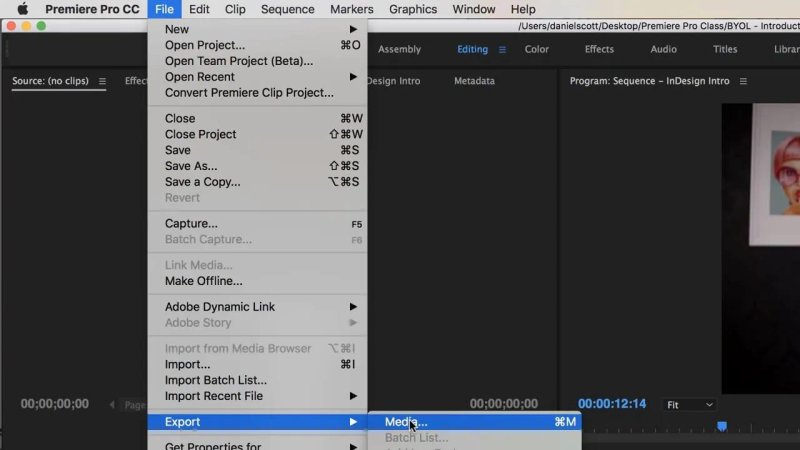
If Media is unavailable, click into the sequence timeline first so Premiere Pro knows what to export.
Choose H.264 to Create an MP4
The Export Settings panel has plenty of options, but for a standard video that plays nicely on computers and uploads easily to YouTube or other social platforms, focus on one setting: Format.
Set the format to H.264. This is the codec setting that produces an MP4 file, and it is the format used for the vast majority of everyday video exports.
MP4 is a practical choice because it is widely supported. It is the kind of file you can double click, play in a normal media player, share with someone else, or upload without creating unnecessary hassle.
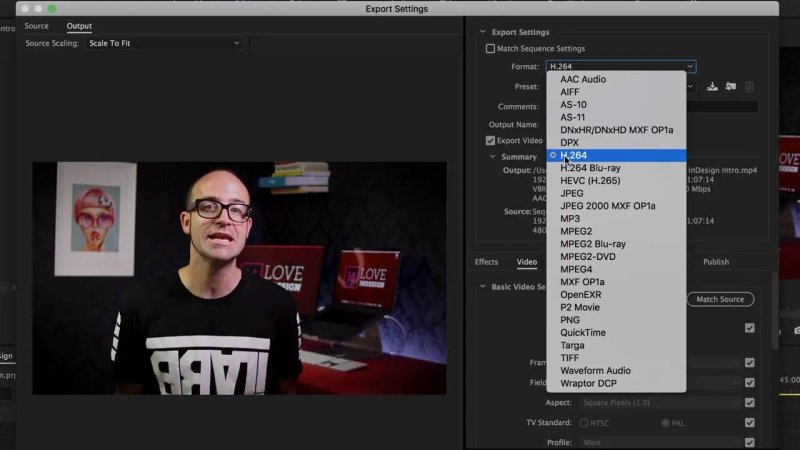
Choose H.264 in the Format menu to export a broadly compatible MP4 file.
Use the Match Source - High Bitrate Preset
Once H.264 is selected, leave the preset as Match Source - High Bitrate.
That is the easy, reliable option for most exports. It matches the essential settings of the sequence rather than requiring you to manually work through a pile of technical controls. Unless there is a very specific delivery requirement, there is no need to overcomplicate this part.
The settings can look a bit nerdy, but the basic workflow is simple:
Select the sequence.
Open File > Export > Media.
Set Format to H.264.
Choose Match Source - High Bitrate.
Set the Output Name and Save Location
Next, set where the MP4 will go. In the Export Settings panel, click the blue text beside Output Name.
Premiere Pro uses the sequence name as the starting filename, which is handy, but this is also where you choose the folder. Pick a location you will actually remember, such as a project folder or the desktop, then save.
It is worth taking a second here. A perfectly exported video is not much use if it disappears into a random folder and takes ten minutes to find later.
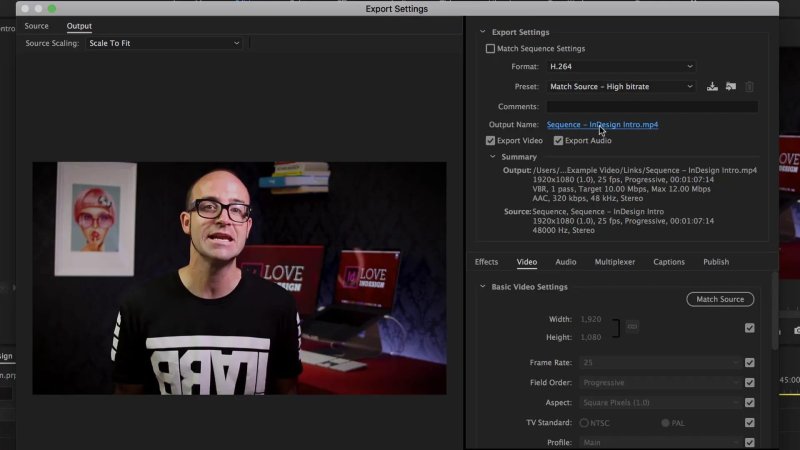
Click Output Name to decide exactly where the finished MP4 will be saved.
Click Export, Not Queue
With the format, preset, filename, and destination sorted, click Export. Premiere Pro will render the sequence and create the MP4 directly.
There is also a Queue button, but for a straightforward export, use Export. That starts the job right away.
How Long Does Premiere Pro Exporting Take?
This is the bit where Premiere Pro can be a little cheeky. The estimated time remaining can jump all over the place. It might say 50 seconds, then a minute and a half, then half an hour, then suddenly 10 seconds.
Do not put too much faith in that estimate. What matters more is the complexity of the edit.
Simple cuts and basic changes usually export fairly quickly.
Longer videos naturally take more time.
Lots of animation, movement, and elements flying in can make rendering take much longer.
A short, straightforward video may only take a minute or two. A longer or heavily animated project can become a go-and-get-lunch job, or even something to leave rendering while you sleep.
Find and Check Your Finished MP4
When the export is complete, open the folder you chose under Output Name. The finished MP4 should be sitting right there with the sequence name you gave it.
Open it and give it a quick check. On a Mac, you can select the file and press the spacebar for a preview. On a PC, double click the file to open it in the usual video player. Skip through it briefly to make sure it looks right and plays as expected.
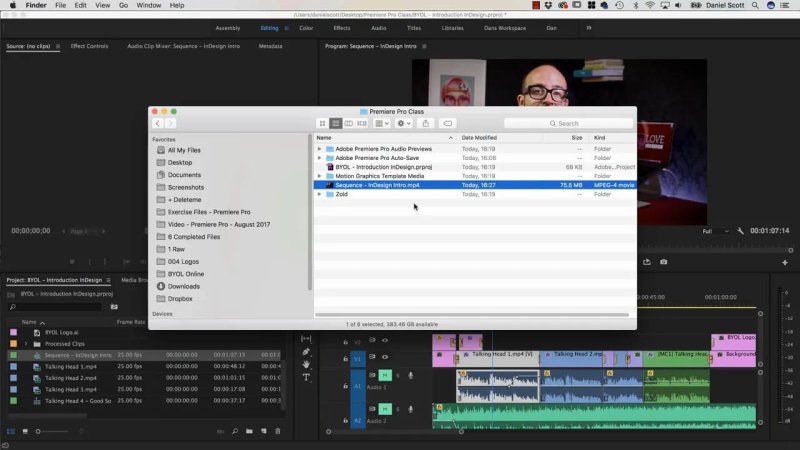
The finished MP4 appears in the folder selected during export, ready to play or upload.
Key Terms
Sequence
A sequence is the timeline containing the clips, audio, graphics, and edits that make up a finished video. Premiere Pro needs an active sequence before it can export.
H.264
H.264 is a video codec commonly used for web-friendly MP4 exports. It is a dependable choice for videos that need to work across common players and social platforms.
MP4
MP4 is a widely supported video file type. It is suitable for playback, sharing, and uploading to platforms such as YouTube.
Preset
A preset is a saved group of export settings. Match Source - High Bitrate provides a useful default by matching the sequence while keeping quality high.
FAQs
Why is Export greyed out in Premiere Pro?
Premiere Pro needs an active sequence to export. Click into the timeline for the sequence you want, then return to File > Export > Media.
Which Premiere Pro format creates an MP4?
Choose H.264 in the Format menu. This creates an MP4 file that is suitable for common media players and social media uploads.
What export preset should I use for an MP4?
Use Match Source - High Bitrate as a simple default. It is a solid choice for most standard video projects.
Why is my Premiere Pro export taking so long?
Export time increases with longer videos and more complex animation. Simple edits generally render faster than timelines with lots of moving graphics and animated elements.
Written by Daniel Walter Scott — Founder of Bring Your Own Laptop & Chief Instructor
