How to create a page load animation in Webflow
Questions


Student Gallery
Be the first to share something.
Course info
Overview
You can get Webflow by clicking here.

Daniel Walter Scott
Founder of Bring Your Own Laptop & Chief Instructor
I discovered the world of design as an art student when I stumbled upon a lab full of green & blue iMac G3’s. My initial curiosity around using the computer to create ‘art’ developed into a full-blown passion, eventually leading me to become a digital designer and founder of Bring Your Own Laptop.
Sharing and teaching are a huge part of who I am. As a certified Adobe instructor, I've had the honor of winning multiple Adobe teaching awards at their annual MAX conference. I see Bring Your Own Laptop as the supportive community I wished for when I was first starting out and intimidated by design. Through teaching, I hope to bring others along for the ride and empower my students to bring their stories, labors of love, and art into the world.
True to my Kiwi roots, I've lived in many places, and currently, I reside in Ireland with my wife and kids.
Certificates
We’re awarding certificates for this course!
Check out the How to earn your certificate video for instructions on how to earn yours and click the available certificate levels below for more information.
Downloads & Exercise files
Transcript
No transcription available for this video.
How do you create a page load animation in Webflow?
Use a Page Load trigger in Webflow’s Interactions panel to start a custom timed animation. Give your text a class, set a Move action as its initial position below the layout, then add another Move action back to zero. Adjust easing, timing and container overflow to create a polished reveal.
Page Load Animation in Webflow: Create a Custom Hero Text Reveal
Key takeaways
Build a custom page load animation rather than relying on presets.
Separate the starting state from the animated destination.
Use easing to give simple movement a bit of personality.
Combine movement and opacity, or reveal text through an overflow-hidden wrapper.
Coordinate two text elements with action groups and small delays.
Spot the common settings that make an animation run backwards or out of sequence.
A heading popping into place is a handy first custom animation. There are only a few moving parts, but they teach you plenty: how page triggers work, how to define an initial state, and why the same movement can feel either lively or a little bit PowerPoint.
We’ll use two lines of hero text, Dan’s and Portfolio, and make them rise into position when the page starts loading. Along the way, we’ll try a fade-in, then use a wrapper to make the text appear to jump out of the ground. Much more fun.
1. Set up the hero text and its wrapper
I’m using a fresh site to keep the classes manageable. You can do this in an existing portfolio or another website just as easily, but a simple page makes it easier to see what’s happening.
The starting layout has a background, a navigation bar, a container and a hero section. The background happens to be a fairly enthusiastic gradient. You certainly don’t need that part.
Add a Div Block inside the hero section.
Place a text block inside it containing Dan’s.
Add a second text block containing Portfolio.
Give each text block its own descriptive class, such as Text Dan and Text Portfolio.
Style the text so its normal layout is the finished arrangement you want.
The div is simply a wrapper for the things we’re going to animate. Later, it will also control which parts of the moving text remain visible.
Keep independently animated text in separate elements. If both lines live in one text block, you won’t have the same straightforward control over each line’s movement and timing.
For this setup, assign classes before creating the animation actions. That makes the targets identifiable in the Interactions panel. The same approach can be used with an image, a button or a list, not just text.
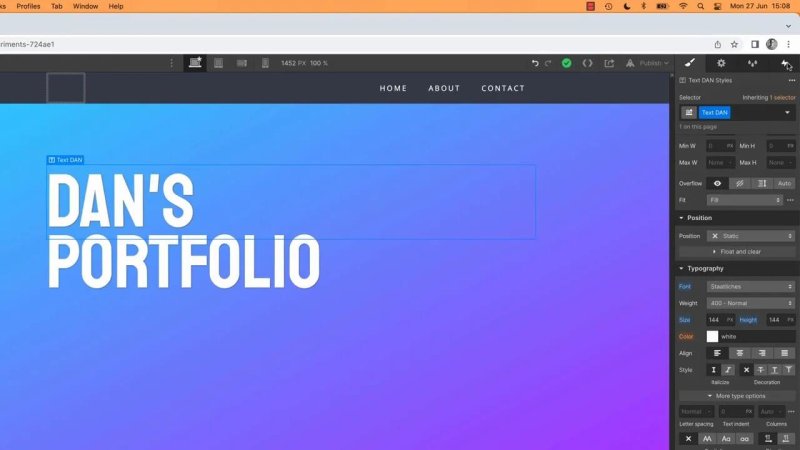
Start with the text arranged in its final position, then animate it back into that layout.
2. Create a Page Load trigger and a custom animation
Select the first text element, then open the Interactions panel using the lightning bolt icon.
Webflow distinguishes between element triggers and page triggers. An element trigger responds to something associated with an element. Here, we want the page loading to start the animation, so we’ll use a page trigger.
Under Page trigger, add a Page Load trigger.
Find the When page starts loading section.
Select the action to Start an animation.
Add a new timed animation.
Name it Hero text animation.
There are a few stages here: choosing the trigger, choosing what it should do, and creating the animation it will run. If the panel feels a little tricky at first, read the labels carefully. They’re quite explicit about what Webflow needs next.
Now we have a named animation, but it doesn’t do anything yet. We need to add actions.
3. Define the initial position and the destination
This is the important bit: where the text starts is not the same as where we want it to move.
We want Dan’s to begin below its normal position, then rise back into place. That requires two Move actions.
Set the first Move action as the initial state
Make sure the first text element is selected.
Add a Move action to the timed animation.
Check that the action shows the correct target class.
Enter a positive Y value to position the text below its normal layout.
Enable Set as initial state.
The Move settings include X, Y and Z axes. We’re using Y because this is a vertical reveal. In my example, the starting offset is around 234 pixels, but the useful value is whatever moves your text far enough down for the effect you want.
Without the initial-state setting, Webflow treats that downward position as somewhere to animate to. The text moves down instead of coming up. Easy mistake. I make it too.
An initial state establishes the starting appearance, so it doesn’t have the same timing controls as a normal animation action.
Add a second Move action back to zero
Keep the same text element selected.
Add another Move action.
Explicitly enter 0 for its Y value.
Use the animation’s play control to test the movement.
Zero means no vertical displacement from the element’s normal layout position. So the sequence is: start below the layout, then move back home.
Type the destination value, even if the field already appears to show zero. A faded value can be a placeholder rather than a value you’ve actually set. If Webflow warns that an action has no value, don’t ignore it.
Keep checking both the target name and the warning indicators as you add actions. A single timed animation can control several different elements, so it’s quite possible to add an action to the wrong one.
4. Adjust duration and easing
Select the second Move action, not the initial state. This is where you control how long the movement takes and how it feels.
Try a one-second duration as a starting point. Then change the easing.
Linear versus ease in and out
Linear movement runs at a constant speed. It works, but it can feel rather mechanical. That’s the slightly PowerPoint-like version.
Ease in and out starts slowly, moves faster through the middle, then slows as it reaches the destination. It feels a little more like something with weight and friction, rather than text travelling along a conveyor belt.
I often start with an in-and-out option when experimenting. It’s a useful way to get a feel for easing before trying something more expressive.
Try Back, Elastic and Bounce
In Out Back: Adds a little movement in the opposite direction before the main movement. That preparatory motion is called anticipation.
Elastic: Gives the movement a springy feel. A longer duration, such as two seconds, can suit it better than it suits a simple slide.
Bounce: Changes the sense of how the text arrives. Whether it feels right depends on the direction of travel.
Bounce Past: Can give an upward reveal a playful jumping quality.
A bounce that feels sensible when something comes down from above can look like anti-gravity when the text rises from underneath. You might like that. Just make it a deliberate choice.
Duration and easing need to be tested together. Two seconds can feel far too long for one easing option and quite nice for another with more going on. There isn’t one magic combination.
Play the animation, change one setting, and play it again. Once you have something useful, save it.
5. Reopen and preview the page animation
If you leave the animation editor, you don’t need to select the text to find the page trigger again. The trigger belongs to the page.
Open the Interactions panel.
Open the existing Page Load trigger.
Select Hero text animation.
Select the action you want to adjust.
Remember that the first Move action is the initial state. The second is the one with duration and easing controls.
You can test the animation inside its editor or save it and enter Webflow’s preview mode. Both are useful: the editor helps while tuning settings, and page preview lets you see the result in the layout.
6. Add opacity for a fade-and-move effect
Before hiding the text behind its wrapper, it’s worth trying opacity. It introduces another useful idea: several actions can run together inside the same animation.
There’s no need to build a separate animation for the fade. Add the opacity actions to Hero text animation.
Select the first text element.
Add an Opacity action.
Set opacity to 0% and mark it as the initial state.
Add another Opacity action for the same target.
Explicitly set that action to 100%.
Try a duration of 0.5 seconds for the fade.
If you only add the zero-opacity initial state, the text will move, but you won’t see it. It needs the second action to become visible again.
Make the fade and movement start together
After adding opacity, the animation may fade the text in first and move it afterwards. That might be exactly what you want, but it isn’t the combined reveal we’re trying here.
Select the timed Move action and change its start setting from After previous action to With previous action, so the movement begins alongside the fade.
The action list shows grouped actions with a surrounding band or outline. Separate groups run in sequence; actions inside the same group begin together, subject to their individual delays.
Delay the fade if the text becomes visible too low down
Even when the actions start together, the result may look odd. If the movement spends a lot of time below the finished position, especially with an elastic easing, the fade can reveal the text too early.
Try simplifying or shortening the movement. Alternatively, add a 0.5-second delay to the opacity action so the text begins moving before it starts appearing.
There’s a bit of playing around here. The delay, movement duration and easing all affect where the text is when it becomes visible.
For the final jumping reveal, I’m removing both opacity actions. We’ll hide the starting position with the wrapper instead. If you make the same choice, delete both the initial opacity action and the timed fade action, then save.
7. Use overflow hidden to reveal text from behind the wrapper
The effect of text emerging from the ground isn’t another interaction setting. It comes from the container’s styling.
Leave the animation editor and return to the Style panel.
Select the div wrapping the two text blocks.
Give it a descriptive class, such as Div Hero Animation.
Find Overflow and set it to Hidden.
Preview the page load animation.
With overflow visible, you can see text even when its animated position is outside the wrapper. With overflow hidden, anything outside the wrapper’s boundaries is clipped.
Now the text begins below that visible area and rises into it. Instead of seeing it sitting down the page before it moves, you get the reveal.
Add padding if the wrapper clips too much
Overflow hidden can also cut off parts you want to keep. Check the lettering at its final position, and check any overshoot produced by the easing.
Add a little bottom padding if the lower parts of the text are clipped.
Add a little top padding if the text jumps beyond the wrapper during the animation.
The goal is to hide the starting position while leaving enough room for the visible movement. Preview after each adjustment rather than judging only the static layout.
8. Animate the second text line
Open the Page Load trigger and return to Hero text animation. We’ll add Portfolio to that same animation.
Select the Text Portfolio element.
Add a Move action with a positive Y offset that puts it below the wrapper’s visible area.
Mark this action as the initial state.
Add a second Move action for Text Portfolio.
Explicitly enter Y = 0 as the destination.
It’s tempting to mark the finished position as the initial state because that’s where the text currently sits. But for this reveal, that reverses the animation. The initial state needs to be down below; the timed action needs to bring it back to zero.
If you get it backwards, correct those two actions directly. Dragging a numeric control can create lots of small changes in the undo history, so undoing a long adjustment may be less tidy than simply entering the right values.
Choose whether the lines run together or in sequence
At first, one line may rise and then the other. There’s nothing wrong with that. Sequential movement is one possible design.
To make the timed Move actions run together, either:
Set the second line’s timed action to With previous action.
Drag its timed action into the same action group as the first line’s timed Move action.
You can also reorder actions within a group to keep the list tidy. That doesn’t change their sequence because they share a start point. Moving actions between separate groups does affect the order.
9. Match the motion, then add a small stagger
If one line feels full of life and the other feels rather plain, compare their easing settings. If one arrives too quickly, compare their durations.
For a consistent starting point, try In Out Back on both timed Move actions and give both a duration of one second.
Even with matching settings, the motion won’t necessarily feel identical. Dan’s starts farther away in this example, so it has to cover more distance in the same amount of time. That gives it a different apparent speed.
A small delay can make the two lines feel coordinated without being perfectly simultaneous. Try delaying one line by 0.2 or 0.25 seconds, then preview it.
Delay does not shorten duration. A one-second action with a quarter-second delay waits before starting, then still takes one second to run. Use delay for the start time and duration for the movement time.
A large delay can make the lines feel disconnected. A small one keeps them part of the same reveal while adding a bit of rhythm.
10. Check the animation before saving
We’ve used two moving text elements, and briefly added opacity to one of them. A timed animation can contain many more actions, and each target doesn’t need the same number. One element might have several animated properties while another only moves.
Before finishing, check these essentials:
Name the animation: Hero text animation is easier to find than an unnamed new animation.
Name your classes: Make each target easy to recognise.
Check the initial states: Both lines should start below their final positions.
Enter destination values explicitly: Don’t rely on faded placeholders.
Check action groups: Decide which actions run together and which run afterwards.
Check easing, duration and delay: These are separate controls.
Check the wrapper: It should hide the starting positions without clipping the intended movement.
It also helps to separate the trigger from the target in your head. Here, the page owns the trigger and the text elements are the animation targets. A parent div is useful for clipping, but it isn’t what starts this page load animation. In other element-trigger setups, a parent can be used to trigger movement on its children.
Save the animation and preview the page again. Once the starting states and action groups are right, the rest is the enjoyable bit: tuning a simple rise until it has just the right amount of bounce.
Key terms
Page Load trigger
A page-level interaction that starts an action as the page loads. This example uses the When page starts loading option.
Timed animation
A named collection of animation actions. It can control multiple properties and multiple elements in one coordinated sequence.
Initial state
The starting appearance or position applied before the timed movement. For this reveal, it places the text below its normal layout position.
Easing
The way an animation’s speed changes during its duration. Linear maintains a constant speed, while other options add acceleration, slowing, anticipation or spring-like motion.
Duration and delay
Duration is how long an action takes to run. Delay is how long it waits before starting.
Overflow hidden
A styling setting that clips content outside a container’s boundaries. It lets the wrapper hide displaced text until the animation brings it into the visible area.
FAQs
Why does my Webflow text animation move down instead of up?
Check which Move action is marked as the initial state. The downward Y offset should be the initial state, and the timed Move action should explicitly return the text to Y = 0.
Why do my fade and movement happen one after the other?
The later action is probably set to start After previous action. Change it to With previous action, or place the timed actions in the same group, to make them begin together.
How do I hide text before it rises into place?
Wrap the text in a div and set that div’s overflow to Hidden. Position the text below the wrapper’s visible area in its initial state, then animate it back to zero. Add padding if the wrapper clips the lettering or overshoot.
Do I need to select an element to edit a Page Load trigger?
No. The trigger belongs to the page, so you can reopen it from the Interactions panel without selecting a text element first. Select the appropriate target when adding new actions to the animation.
Why does Webflow say my Move action has no value when the field shows zero?
The displayed zero may be a placeholder rather than an explicitly set value. Enter zero yourself for the destination so Webflow has a defined movement value.
Written by Daniel Walter Scott — Founder of Bring Your Own Laptop & Chief Instructor
