How to Straighten the Horizon in Photoshop

Daniel Scott
@dan
In this post, we’re diving into image editing and how to fix some of those frustrating, crooked horizon lines!
In this quick and easy step-by-step guide, I’ll show you how to fix them in an “almost non-destructive” way and, with the help of generative AI. Level everything up without losing details, depth, or content. Cool, huh?
This post is based on my Photoshop Essentials and Advanced courses. When you become a BYOL member, you gain access to this course as well as my 30+ additional courses on Illustrator, Photoshop, Lightroom, InDesign, Figma, and more. As a BYOL member you will also enjoy personalized support, earn certificates, and tackle exciting community challenges. Head here to sign-up!
Alright, photographers and image editors, let’s shift our eyes into the horizon!
Why is the horizon line important in photography?
When we edit a photo, we are communicating with the viewers to make a clear and impactful message —we are working with emotions!
Balance and stability are the most important reasons to pay attention to tilted horizon lines. Our brain loves order and symmetry. When we stare at a landscape, a cityscape, or architectural photography, a perfectly levelled horizon immediately gives the composition a sense of balance and harmony, keeping us focused on the image before us. If key elements in a photo look askew, even if slightly, we get distracted. We may even feel uneasy and the whole experience is lost. There are exceptions, we will peek at one of them near the end of this post.
A tilted horizon will damage the photo’s perspective, creating the illusion that other elements in the composition are distorted, or leaning towards a side.
Levelled horizons show the photographer’s or editor’s technical skills and attention to both details and composition as a whole. Always take a step back and carefully observe your work before printing or publishing, handing it to a client, or sharing it with your team. That’s professional good practice.
Last but not least, a straight horizon guides the whole composition, making it easier for image editors to frame and crop, making sure that certain elements get highlighted while keeping everything perfectly balanced.
This is our job as image editors and visual creatives.
How we used to straighten horizons in Photoshop – before AI.
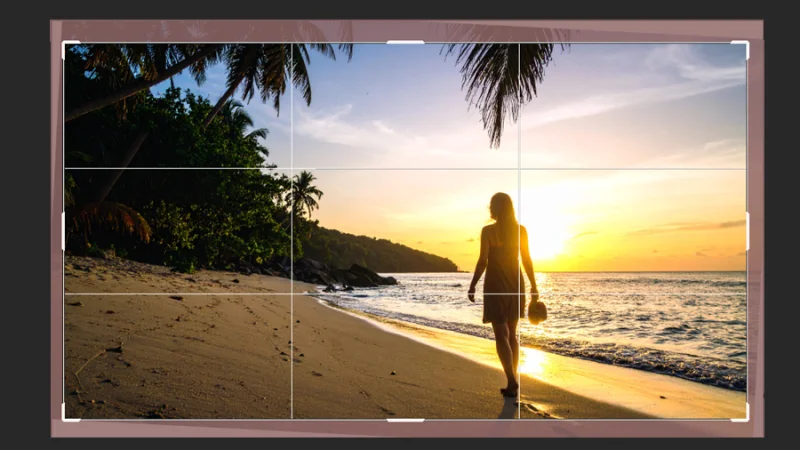
Let’s begin with a warm and relaxing beach sunset photo. Take a step back and see if everything feels right. If you’ve noticed the slightly tilted horizon line, you are a natural talent! I’ll show you a less-efficient way to fix this photo and then we will learn how Generative AI and Cropping can make it easier, non-destructive, and more creative.

Did you spot the tilt in the horizon line? Practice this kind of attention to detail, it’s gold for image editors.
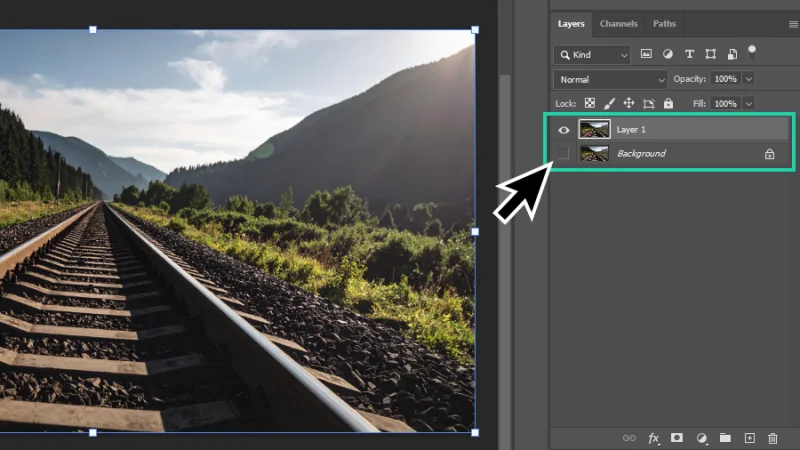
First, we protect the original photo by duplicating it. You can use the shortcut Command + J (Mac) or Control + J (PC). This is a smart non-destructive workflow!

Always protect the original shot. Safety is just a shortcut away!
Next, to make sure we get an accurately levelled horizon, we can bring a horizontal guide to assist our work, dragging it from the top Ruler.
If you can’t see the Rulers below the top menu bar and next to the left toolbar, you can activate them by moving your mouse to View on the top menu bar and clicking on Rulers. There is a shortcut, of course: Command + R (Mac) or Control + R (PC). Once you have the Rulers in view, click hold and drag the guide from the top one and set it near the photo’s horizon line, as you can see below.
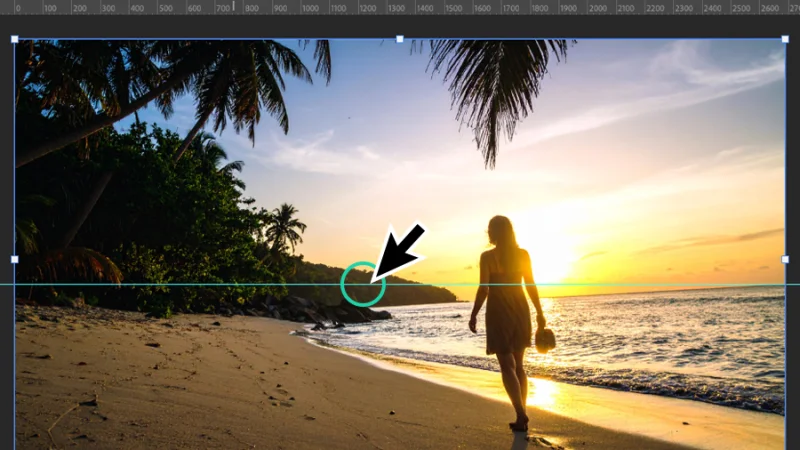
Guides are great! Use them as much as you need!
Next, we manually rotate the image until the horizon line is aligned with the guide. To do this, we click Edit on the top menu bar, then hover the mouse cursor over Transform and then select Rotate.
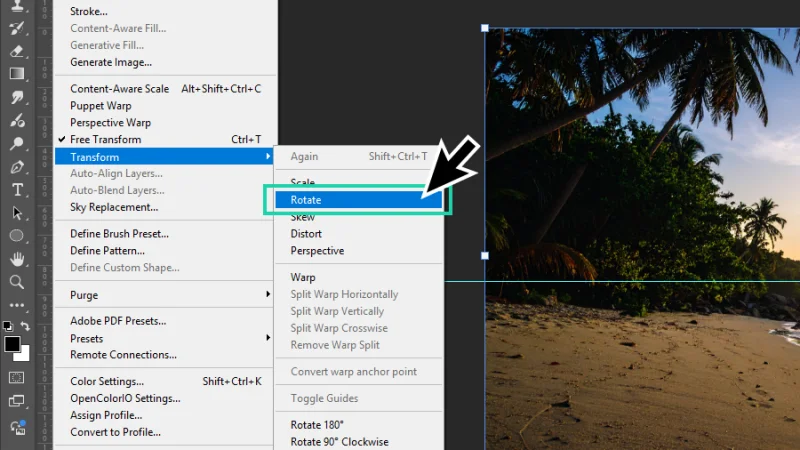
I’m showing you the ‘beginner’ way to do it, and then the best way to straighten horizon lines.
Recent versions of Photoshop already allow you to rotate the layer once the image is selected and the bounding box is visible.
To rotate, bring the cursor close to one of the corner handles until it changes into a curved arrow, click and hold the left mouse button and slowly drag the mouse until the horizon is fixed. Hit Enter to finish transforming the image.
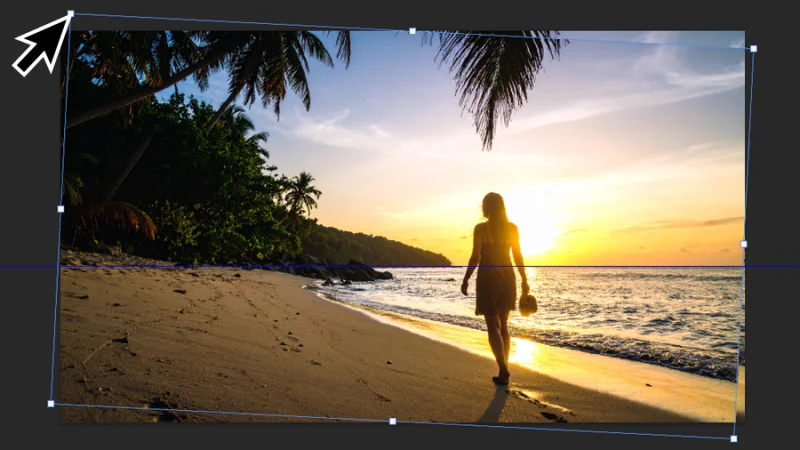
Drag the corner handles to rotate the photo. Can you tell the parts that get lost in the rotation?
As you can see above, as you rotate the image, some parts end up outside the artboard’s limits and others leave a gap between the layer and those limits. We now have to reframe the photo to hide those gaps. We do it using the Crop tool. Dragging the Crop handles, we give our photo new edges, but as you can see below this removes existing content from the composition.
In this example, it’s not too serious, but in some cases, elements like balance, context, or the whole purpose of the photo can be affected.
Summing up, the non-destructive approach to this method can be limited to the duplicating of the original photo. The editing process removes parts that may be important on some projects. We need a plan B, right?
Cropping will remove the gaps, but will also ‘steal’ extra content from the photo.
How to straighten horizons in Photoshop, with the help of Generative AI
Let’s change scenes and jump into the photo of a railroad track in the heartland, extending all the way to the horizon line —two lines converging into a point in the distance. Does this image look balanced to you or does it feel that something is about to collapse to the right?

Wow, this photo makes my head drop to the side, what’s wrong in it?
Let’s get this fixed – the Pro way! We start by duplicating the original image, saving it from accidents caused by lack of patience, coffee, or both. Do you remember the shortcut? You got it! Command + J on a Mac and Control + J on a PC.
Always go non-destructive! It’s how Pros do it! Be a Pro!
Next, we bring up the Crop tool. You already know where to find it, but I’ll add the shortcut as a bonus: that’s the C key on your keyboard. In the Crop tool options bar, below the top menu bar, click the Straighten icon to start leveling the horizon line.
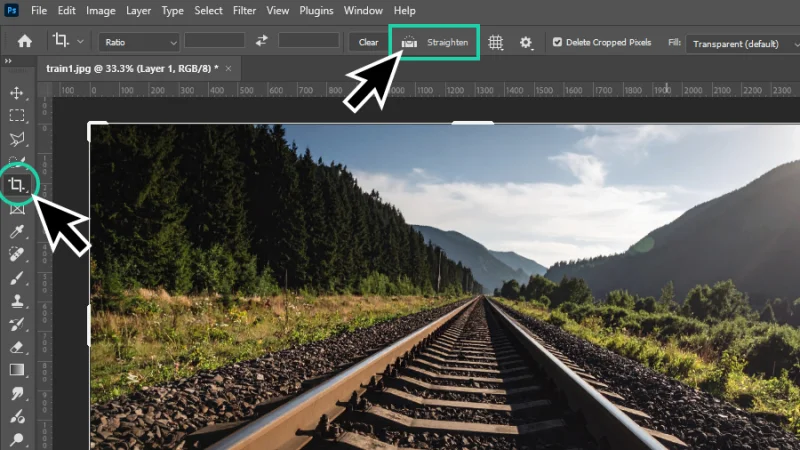
This time we will combine the Crop tool with the Straighten feature.
Now, we need to find the horizon line in the photo. If it is not clear, a similar reference aligned with the horizon will be enough. In this case, one of the railroad ties should do the trick. Click and hold the left mouse button and drag a line along the railroad tie, as below. You will see an angle indicator to show the adjustment that will take place.
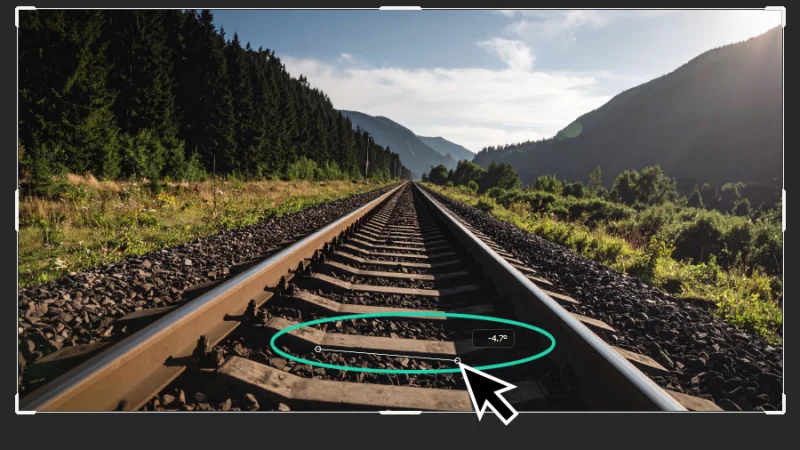
If you don’t have a clear horizon line to follow, look for a similar and clear reference to assist you.
Once you release the left mouse button, Photoshop immediately aligns the horizon and sets a cropped frame. If you hit Enter the work is done, but that’s not what Pros do. Pros bring up the help of Generative AI!

What’s different about this technique, other than automatic rotation? Ah, let’s see the next step!
Before drawing the line to measure the tilt angle in the railroad tie, let’s go back to the tool options bar and from the Fill drop-down menu, select Generative Expand.
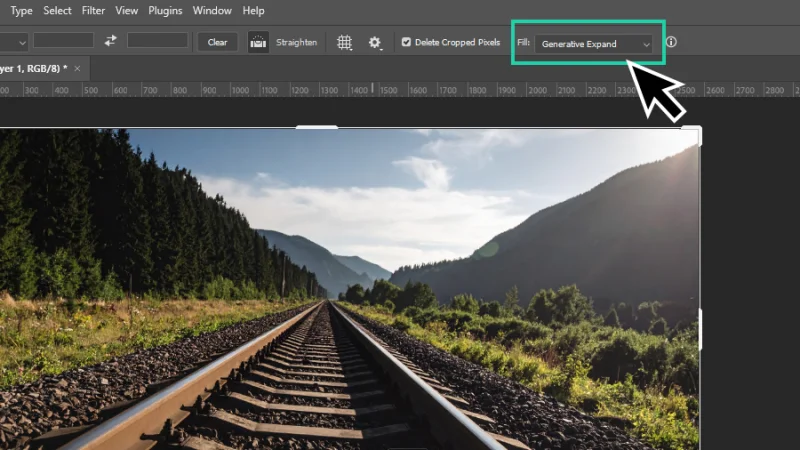
Now things are starting to sound awesome!
Now we can level the horizon as we did before. Next, we expand the Crop grid by dragging the Crop handles to cover the whole artboard, including the gaps. Click the check mark on the tool options bar or hit Enter to finish.
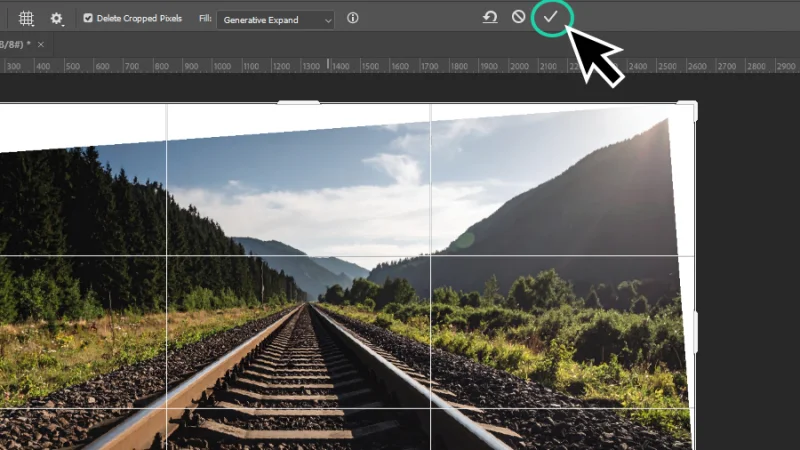
Roll the drums, please…
Photoshop’s Generative AI will read the image and fill the gaps, keeping your image ratio untouched and overall contents still present. Doesn’t it look so much better now?
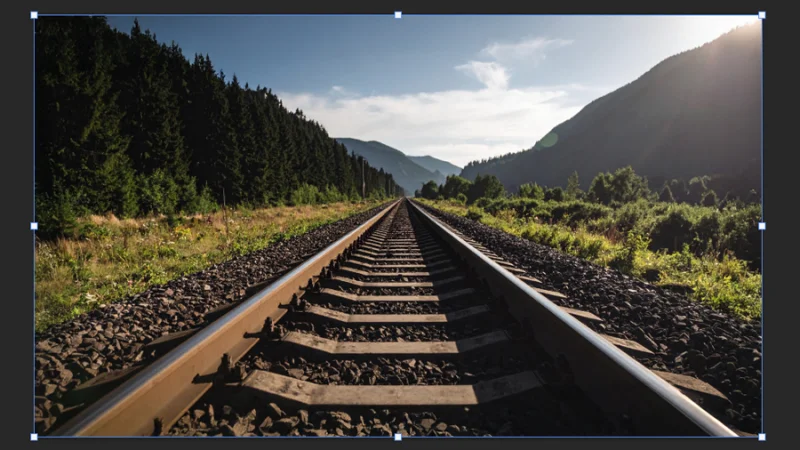
Is this awesome or is this awesome? Now we have a levelled image, keeping its initial composition!
The ‘Fast and Curious’ bonus!
Now let’s have a quick look at one of the exceptions for what we explored today.
When should we take a levelled horizon and tilt it like crazy? When we want drama, intensity, and call for a strong, emotional response from the viewer.
Take this action shot of a race car burning the road. It looks good, intense, cool depth of field, warm colors, lots of grit, sparks, and smoke! How about the horizon line? It looks perfectly balanced, right?

Wow, this looks intense, with all the sparks and lighting effects, but can we make it more intense?
But what happens if we break the rule and tilt it?

Can you tell the differences? All I did was tilt the horizon line a bit.
Oh, yeah! Now there is a whole different dynamic, there’s a lot more movement, we can almost hear those tires screeching and the engine roaring! The tilt and asymmetry enhances the illusion of speed, high pressure, and danger, making us grind our teeth in excitement.
This example is just to show you that knowing the rules is the best way to also know how to efficiently break them, so fuel up your creativity and go for it!
And There We Have It!
Wow, we started off peacefully and relaxed and finished with a tight race to the end. I hope you all appreciate this apparently basic technique that can act as a true professional-level tool for the best image editor. Keeping an eye close to the horizon is the best start for a winning project, so practice a lot and have fun!
What 's Next?
To go deeper with Illustrator, join BYOL and you will gain access to my Photoshop Essentials and Advanced courses as well as my 30+ additional courses on Figma, Lightroom, Premiere Pro, Webflow, and more. As a BYOL member you will also enjoy personalized support, earn certificates, and tackle exciting community challenges. Get started here.
See you in class! – Dan
Popular posts

Adobe MAX 2025 - File Download
Daniel Scott
-1750161634.webp)
Modeling Shortcuts in Blender
Daniel Scott
Plugins in Illustrator
Daniel Scott
-1748277302.webp)
How to Straighten the Horizon in Photoshop
Daniel Scott
Go from zero to design hero with our awesome courses!


- Powered by Marvin
- Terms of use
- Privacy policy
- Cookie policy
-
- © Bring your Own Laptop Ltd 2026