How to Trim Video in Canva

Daniel Scott
@dan
In this post, we will explore one of Canva’s most exciting features: Video! You will be amazed by how quickly and easily you can create eye-catching videos whether you're sharing them on social media, enhancing your presentations, boosting your design portfolio, and adjust for fun! In this step-by-step guide, I’ll show you how to add content clips into a new video project, trim and edit them, and create transitions like a Hollywood pro!
This post is based on my Canva Essentials course! When you become a BYOL member, you gain access to this course as well as my 30+ additional courses on Illustrator, Photoshop, Lightroom, InDesign, Figma, and more. As a BYOL member you will also enjoy personalized support, earn certificates, and tackle exciting community challenges. Head here to sign-up!
Ready on the set! Lights, Canva, action!
Step 1 - How to Create a New Video Design in Canva
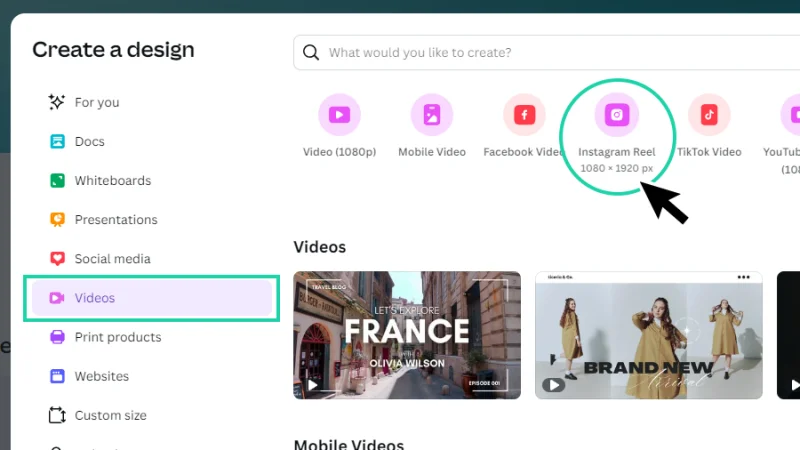
Let’s get started! Jump into the Canva Homepage and click on the Create a design button. Inside the Create a design panel, pick Videos, and then choose the format you want to work with. I’ll choose a vertical 1080 x 1920-pixel Instagram Reel, you can go for a different one, it’s perfectly fine! You can also explore the suggested templates Canva offers for each format, but for learning purposes, the best choice is starting with a blank page and gradually adding our elements. Click the video format icon and Canva will open a new project for you.
You’ll be surprised with how quick and easily Canva gives you the chance to publish your own videos online!
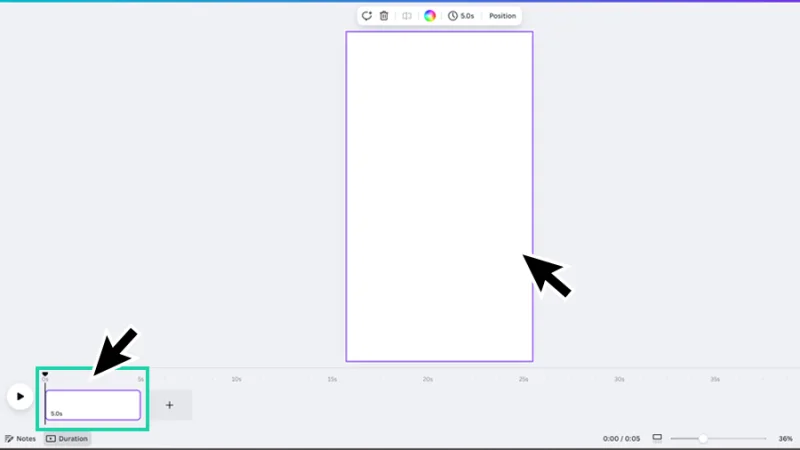
Let’s have a quick look at the Video workspace. As you can see below, Canva sets up a blank page in the center, also visible in the timeline at the bottom.
Think of this blank page as your video monitor, this is where you will see the magic happen. Each clip you bring into the project will be editable in this timeline and Canva arranges them in pages. There are things you can edit directly on the video monitor, like changing clip dimensions or editing text. Edits like trimming and transitions are done in the timeline. We’ll get the hang of this in just a few steps, don’t worry!
The taskbar above the page allows us to change the page’s background color or clip (or page) timing – defaults are set to white and 5 seconds.
There is also a Position settings button available that opens a Layers panel, if you are more familiar with this term. We won’t be diving into layers in this post, but keep in mind that you can arrange clips, text, and other elements in a specific layer order as you assemble your video.
Canva’s Video project interface couldn’t be simpler and more intuitive. It’s perfect for quick edits.
Step 2 – How to Add Video Clips to a New Project in Canva
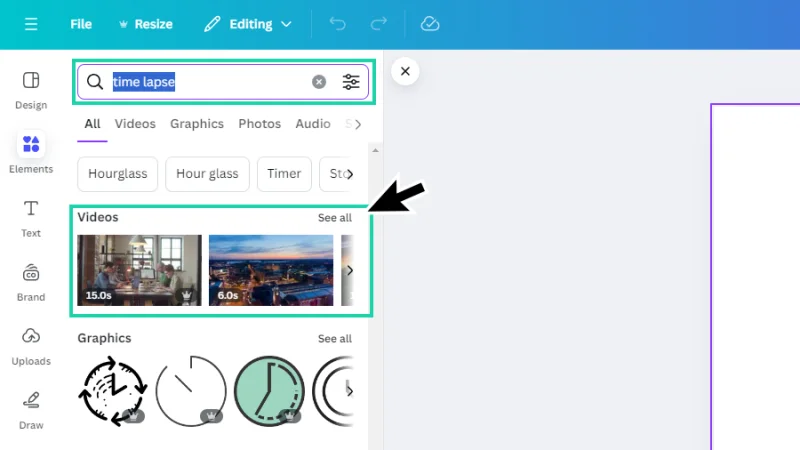
Let’s start bringing clips into our project! To keep things simple, in this guide, we’ll use videos from Canva’s Elements resources, but you can upload your own videos into Canva and pull them into a new project. Let’s click on Elements on the left toolbar and, inside the fly-out panel, type some keywords in the search field to let Canva know the theme or subject we are looking for. Scroll down to Videos and click on See all to expand the options Canva has found for us.
Canva has a massive image, graphics, and video resource collection.
Before moving on, once we type these keywords, a Filter option pops up on the right side of the search field to help us narrow down our search results. We can ask Canva to show us videos with a specific dominant color or orientation (square, vertical, and horizontal). If you have a Pro paid subscription, you will also find the Price filter, that allows you to choose between free and Pro resources.
Pro tip: There are some advantages to subscribing to the Pro version, but you can use the 30-day trial period to take my Course and figure out what’s best for you or your business, and then decide if you should keep using the Free version (which works pretty well) or upgrade to Pro.
Moving on, let’s browse the videos window. If we hover with the mouse cursor over the thumbnails, a preview will autoplay to help us understand each video’s content.
To bring the clip into the blank page, click once on the thumbnail and it will be placed on both the center and timeline pages. The clip’s dimensions may need to be adjusted to fit the center page, your video monitor. If we click and drag the thumbnail into the timeline page, the clip is placed on both center and timeline pages and automatically adjusts to fit the monitor’s dimensions.
Let’s single-click the thumbnail and learn how to resize a clip on the center page. If you have a look at the image below, you’ll see a bounding box around the new clip. The round corner handles allow us to resize the video content to fit the page – or even expand it beyond the page’s limits if we want to focus on a certain detail and leave the rest outside the frame. The side handles allow us to crop the clip without changing its content size – we are just setting what stays visible or hidden inside the frame. Cropping in Canva is non-destructive, so you can always come back to the initial clips and edit them.
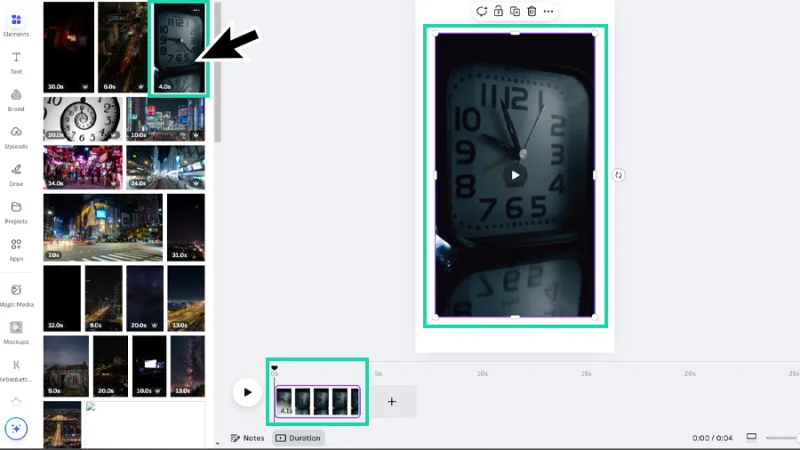
One click on the video’s thumbnail and our video editing is up and running.
Next, we click, hold, and drag the corner handles to resize the clip to fit the center page edges. Once again, if we drag the thumbnail into the timeline page, Canva helps us with this process.

Resizing and cropping in Canva works the same way for both photos and videos.
Now let’s bring a second clip into our project. First, a warning: if we single-click a thumbnail to add a new clip to the page, both clips will overlap on the same page. This is cool if you want to playback more than one clip at once on the same screen, like a mosaic, but if you are editing a video sequence like it’s done on Premiere Pro, you will need to add a new page for the second clip, and another for the third, and so on. Let’s see the long and the easy drag-and-drop way to do it. For the long way, we move the mouse to the timeline and click on the Add page (the blank timeline page with a ‘+’ sign) button. Next, we move to Elements, look for the second video content, and click, hold, and drag the thumbnail down to the new page.
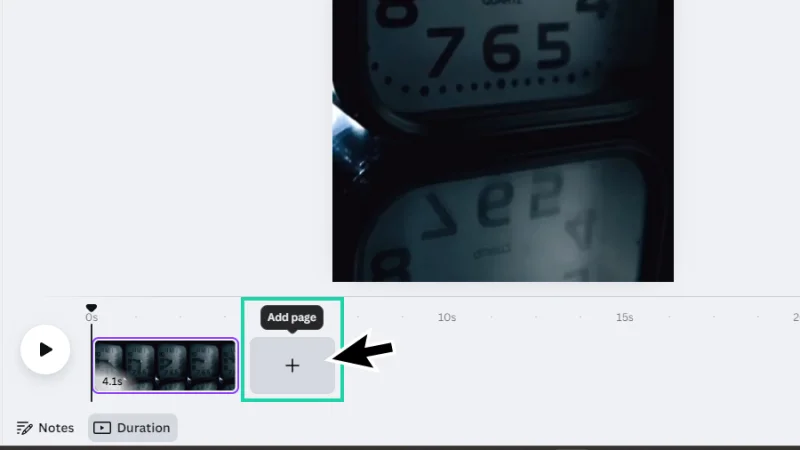
To add a new clip to a Canva video project, we must create a new page on the timeline.
The easy way to do it: click, hold, and drag the thumbnail directly into the timeline’s Add page button. A new page gets created and the new clip is automatically resized to fit the format. Cool, huh?
I’ll add two more clips (and pages) to the timeline and quickly show you the basics of editing on the timeline.
Step 3 – How to Navigate the Video Timeline in Canva
As we can see below, each timeline page or clip displays its own duration and preview. Below these, we can find a counter showing the timeline’s playhead position and the video’s total running time. If we click the Duration button, time marks disappear and we have a clean view of the imported clips as simple thumbnails.
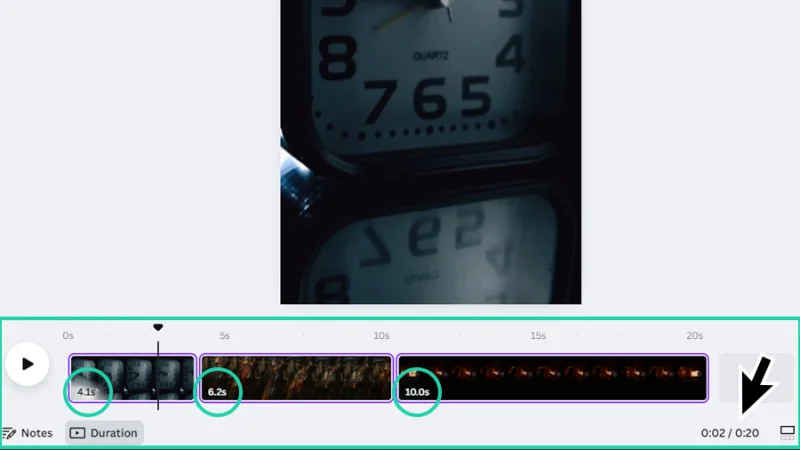
This is your basic timeline view. Pages, playhead, and counter. We are good to go!
If you’ve never worked with a video editing app and are wondering what a playhead is, it is that down arrow icon placed on top of the timeline, assisted by a thin vertical line, that dashes across the timeline when we play the video preview. The playhead indicates the specific point in the timeline we are viewing or editing and it is our best friend while trimming clips. We click and hold the arrow icon to navigate across the timeline and pick specific frames.
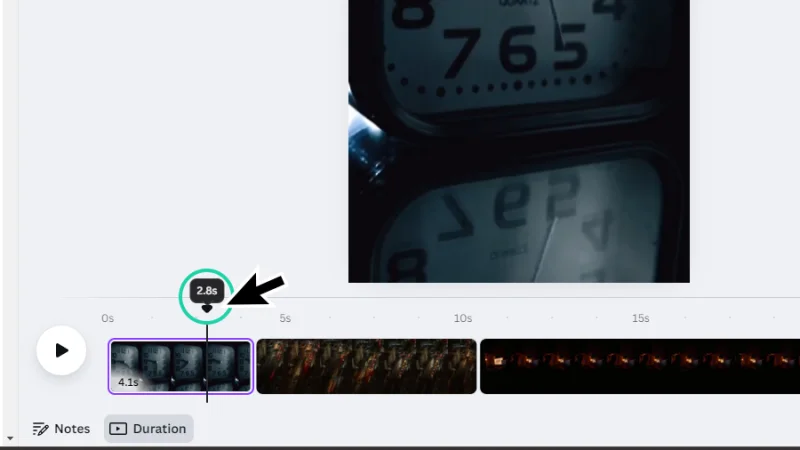
Use the playhead to accurately set a position for the cut to happen.
Timeout #1
Want to start creating video content for your own YouTube channel? Canva can give you valuable help. Check out these tips and tricks on getting started.
Step 4 – How to Trim Video Clips in Canva
Once we have the exact point where we need the cut to take place, it’s time to sharpen the blades and start editing our video! Trimming is a non-destructive way to do it in Canva and is used to remove unwanted content or shorten a clip’s duration.
When we trim a clip from the start, we are setting the clip’s in-point. If we do it from the end, we are setting the out-point. We use the Trim handles to cut our videos without losing the original content. To find these handles, all we need to do is hover the mouse cursor over a clip’s start or end and they pop up. Easy!
We use the playhead to pick the second clip’s out-point. Notice my clip has an original duration of 6,2 seconds. To make the trim, we simply click and drag the right Trim handle to the left. It will snap to the playhead when they touch. That’s it!
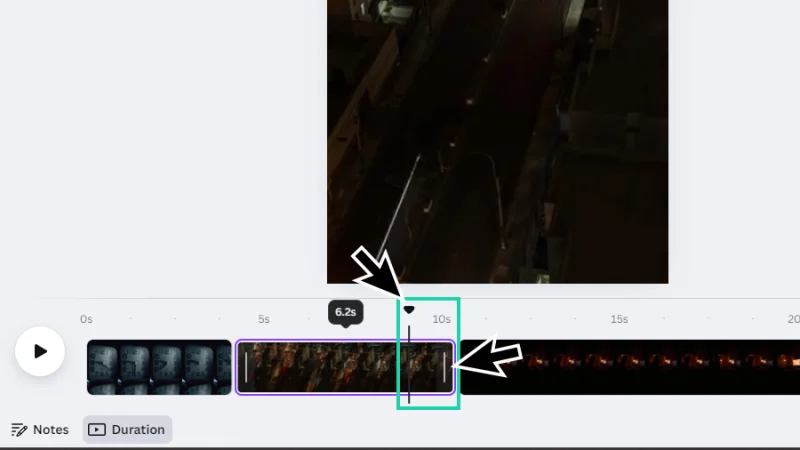
The playhead indicates the timeline location of the new out-point. What’s to the right of it will be cut.
My clip has a new duration of 4,8 seconds. The trimmed content is kept hidden and won’t be rendered when we export the video. If, for some reason, we need some of that content back, all we need to do is adjust the right Trim handle to a new position. Awesome!

Trimming a clip can help set a video’s pace and enhance storytelling.
There is another way to cut clips in Canva: Splitting. Although it is a destructive process, there are advantages to this approach.
Splitting allows us to cut a clip’s content into multiple pieces and reorder them to create a new edit, add specific effects or transitions to each individual piece, or simply permanently remove material that we won’t use at all, saving on project file size and computer resources.
To split a clip, we drag the playhead to the point where the cut will take place, click on the three dots button that pops up when we hover with the mouse cursor, and select Split page from the menu. There is also a cool shortcut for splitting a clip: gently striking the S key on both Mac or PC. Fun!
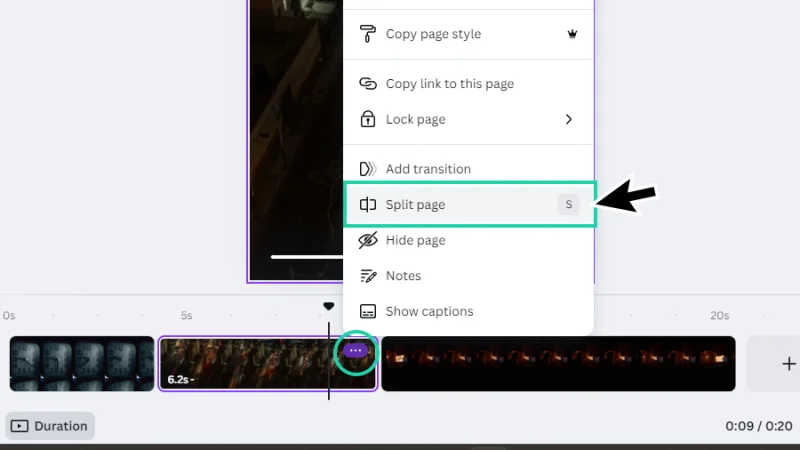
Split page is a destructive editing approach. Any deleted content gets lost for good.
We can also use the taskbar above the center page to trim a clip inside our project. With a clip selected on the timeline, we click on the Trim button (the one with a scissor and clip duration). The Trim panel expands and we can use the Trim handles on the sides to set a new in-point and out-point to our clip. I’ll perform the same trim as before and set the new duration to 4,2 seconds. Either way works fine, do it from this panel or from the timeline, whatever you prefer.

Be accurate, there is no playhead for the trim handle to snap in the taskbar Trim panel.
There is one cool thing that we can do up in the taskbar that we are not able to when we trim on the timeline: let’s say we need this clip to last exactly 5 seconds, but we are still not sure which part should be left out.
We can adjust the Trim handles to set a 5 second running time, click and hold any position inside that time window, and drag it left or right across the clip to search for the best content. New in and out-points will be set and the 5 second duration won’t be changed.
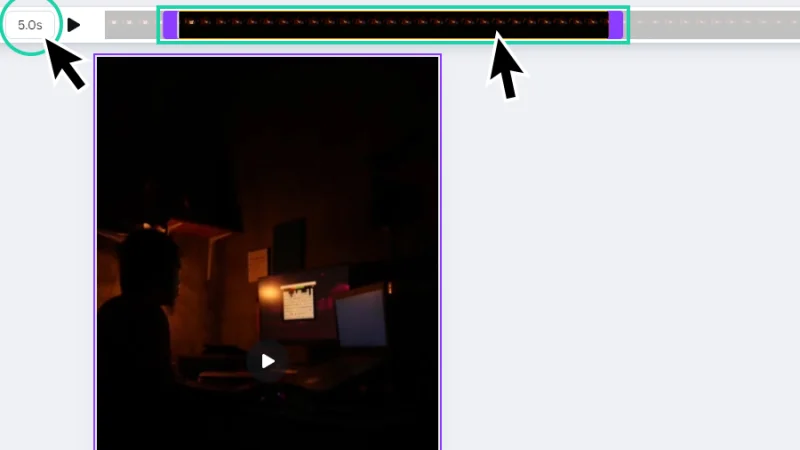
Can’t make up your mind? Canva will help you preview your trimmed clip inside a time frame. Cool!
Step 5 – How to Add a Transition to Video in Canva
One last quick step before we finish, just to give you an idea on how to add a transition between two video clips.
Let’s start by selecting one of the clips placed on our project’s timeline. The transition will be set to meet the out-point (look at us, talking like pros) of the selected clip. Next, we right-click the clip with our mouse and select Add Transition from the menu that pops up.
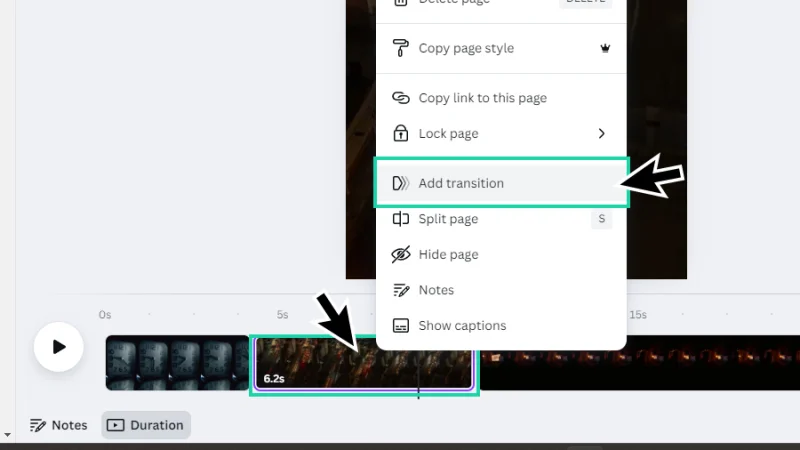
Adding transitions adds style and helps viewers flow across different scenes.
There is one other way to access the Transitions panel. With a clip selected, click on Edit up on the taskbar and, inside the Page panel, scroll down and click on Transition.
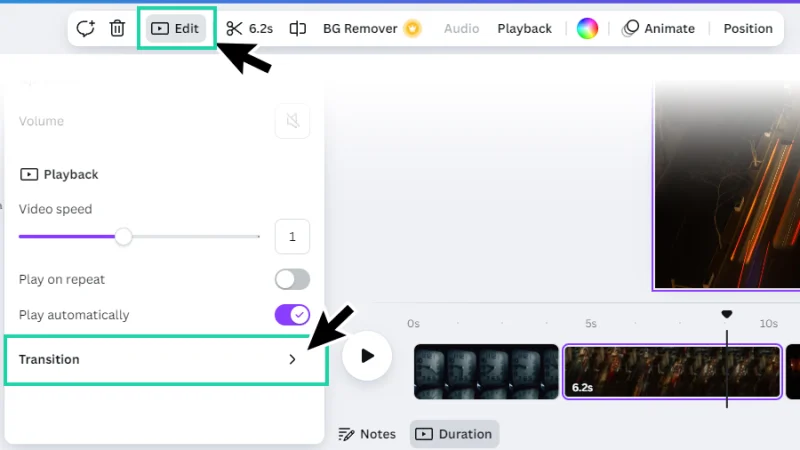
Edit opens a lot of incredible video adjustments and filters, including Transitions.
Once inside the Transitions panel, pick any option you like. All except Chop! It is a crime to use Chop! Well, it isn’t, but maybe it should be, I don’t know. Don’t use Chop! That’s it. Moving on, we can also adjust the transition’s duration by adjusting the slider or typing a value in the field next to it.
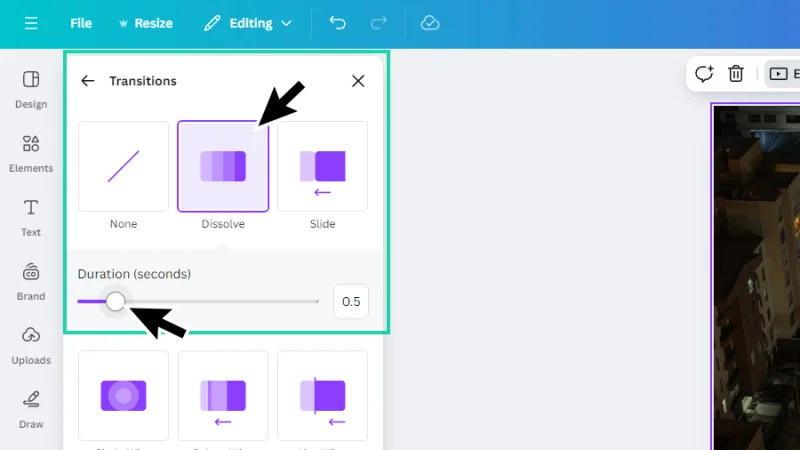
Dissolve is much better than Chop! Chop is only great with a duration of zero.
Alright, our transition is set and two clips are now connected by a subtle dissolve animation. You can confirm this on the timeline: a new icon is connecting clip 2’s out-point and clip 3’s in-point. To edit this transition, we simply click this icon and the Transitions panel pops up on the left of our screen.
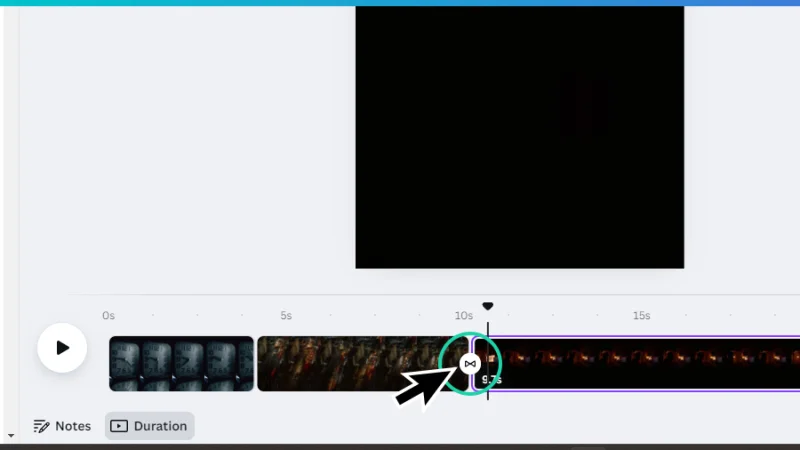
Click on the transition icon to jump back into the Transitions panel.
Timeout #2
Are you ready to start creating your own videos? Check out this beginner’s guide about using green screens in your homemade or professional video production.
Bonus Step – How to Make a Split Screen Video in Canva
There’s nothing complicated about it and I may have mentioned it before. Do you remember what happens when you single-click a video thumbnail from Elements? The clip gets placed on a page and may need to be resized. What if you add a second clip the same way, without creating a new page? Both clips overlap! What if we add a third, or a fourth? The very same thing, these clips will all play at the same time, inside the same page, instead of spreading in sequence across the timeline.
This means that if we line them up, we get a cool split screen like the one in the image below. Cool, right?
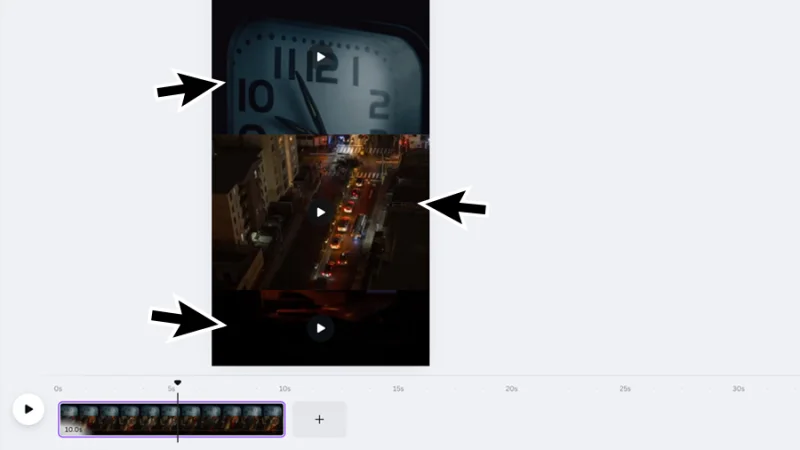
It is so easy to create a split screen effect in Canva!
And There We Have It!
Video editing is a blast in Canva! It’s been great showing you some of these steps and sharing a sample of how easy it is to create your video content, bring it to Canva, trim, split, and edit clips, add awesome transitions, all to get yourself a deserved round of applause from a happy audience! Awesome!
What 's Next?
Join BYOL and have fun learning Canva as well as my 30+ additional courses on Illustrator, Photoshop, Lightroom, InDesign, Figma, and more. As a BYOL member you will also enjoy personalized support, earn certificates, and tackle exciting community challenges. Get started here.
See you in class! – Dan
Popular posts
Adobe MAX 2025 - File Download
Daniel Scott
-1750161634.webp)
Modeling Shortcuts in Blender
Daniel Scott
Plugins in Illustrator
Daniel Scott
-1748277302.webp)
How to Straighten the Horizon in Photoshop
Daniel Scott
Go from zero to design hero with our awesome courses!


- Powered by Marvin
- Terms of use
- Privacy policy
- Cookie policy
-
- © Bring your Own Laptop Ltd 2026