- This course has been archived because the content is no longer up-to-date or relevant to most students
- You can watch the new, up-to-date course by clicking here.
Class Project 09 - Making things liquid & distorted in Adobe Illustrator CC (Design your own font)
Questions


Course info
Overview
- You will need a copy of Adobe Illustrator 2018 or above. A free trial of the software can be downloaded from Adobe.com.
- 39 lectures 5+ hours of well structured content.
- Drawing with Shapes & Lines
- Drawing with the Shape Builder
- Creating a custom logo
- Working with Brushes
- Drawing with the pen, pencil & curvature tool
- Learn how to work with type & fonts.
- How to mask images & graphics.
- How to distort, bend, warp & liquefy illustrations.
- How to make your own repeating wallpaper patterns.
- How to create stencil style images from real drawings.
- How to use free Illustrator templates.
- How to save, print & export for Print, web & social media.
- Lots of real world exercises for you to practice.
- Loads or class projects for you to complete.
- Printable PDF Cheat sheet.
- You will get the finished files so you never fall behind.
- Downloadable exercise files.
- Forum support from me.
- Techniques used by professional graphic designers.
- Professional workflows and shortcuts.
- A wealth of other resources and websites to help your accelerate your career.
- No previous Adobe Illustrator experience is necessary.
- This course is for people completely new to Illustrator. No previous design, drawing or illustration experience is necessary.
- This is a relaxed, well paced introduction that will enable you to produce a large range of drawing, illustration & logo work. Only basic computing skills are necessary - If you can send emails and surf the internet then you will cope well with this course.
Course duration 8 hours + your study.


Daniel Scott
Founder of Bring Your Own Laptop & Chief Instructor
instructorI discovered the world of design as an art student when I stumbled upon a lab full of green & blue iMac G3’s. My initial curiosity around using the computer to create ‘art’ developed into a full-blown passion, eventually leading me to become a digital designer and founder of Bring Your Own Laptop.
Sharing and teaching are a huge part of who I am. As a certified Adobe instructor, I've had the honor of winning multiple Adobe teaching awards at their annual MAX conference. I see Bring Your Own Laptop as the supportive community I wished for when I was first starting out and intimidated by design. Through teaching, I hope to bring others along for the ride and empower my students to bring their stories, labors of love, and art into the world.
True to my Kiwi roots, I've lived in many places, and currently, I reside in Ireland with my wife and kids.
Downloads & Exercise files
Transcript
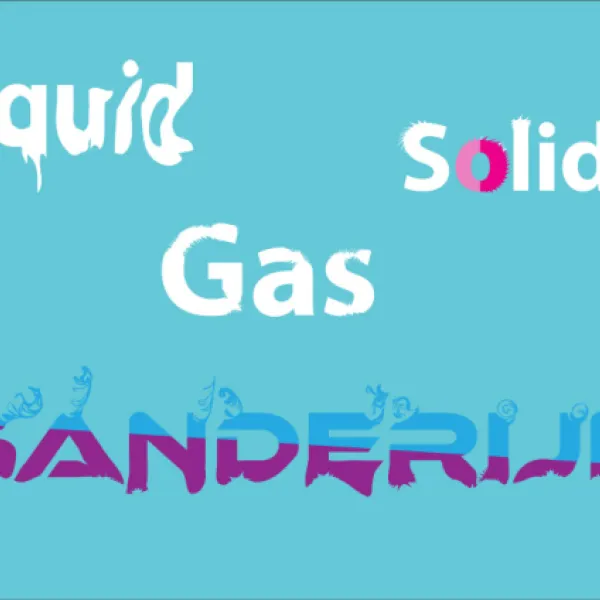
Hi there, in this video we're going to use a very exciting fun tool, called Liquify. We're going to take this. I'm calling it an ice cream. Then we're going to smash it a bit using different techniques, using Liquify Tool. We'll also deal with the Text at the end as well. Let's get in there, and learn the Liquify Tool.
To get started, I've got a file ready for us. You don't need to open it, because all it is, it's a blue background. It is called Liquify. We can't even find it, 'Liquify1. ai'. So blue background, we're going to draw our ice cream real quick, or ice block. I'm going to grab the 'Rectangle Tool' Not too worried about the Fill and Stroke at the moment. This is going to be my ice cream, and this is going to be the stick. I want to make sure they're lined up next to each other. So, 'Black Arrow', I'm going to use 'Line Panel' just to get it to line up. Then I want the top, using the 'White Arrow', I'm going to select these two top corners, drag these down. Bottom one, just going to do-- I'm going to zoom in a little bit. I'm going to just do this little one, it's down the bottom here. Awesome!
Next thing I want to do is cut it in half to have that kind of like half-sy look. So I've got a line, straight up and down. I have to use 'Line Segment Tool' and I held 'Shift' while I dragged it down to get it to go straight. Again, I want to line them all up center. Now with them all selected, I'm going to grab my 'Path Finder'. Where are you, Path Finder? You are that one, that one. Shape Builder, don’t know why I called it Path Finder. I'm going to do a couple of things first, minus these ends off. Then I'm going to fill in these bits with that color. I'm going to go 'Fill', and go-- what color do I want? I'm going to go to 'Color Mixer'. Down here, just pick a chocolatey looking color. It's a tough one to do. Click on this one. Now I'm going to back here, pick a slightly darker color. By default you're either at CMYK or RGB, depending on what you decided for that document. Actually I decided, so it's going to be RGB.
RGB has another way of working, HSD. I think I've used it before in this course. I like it because it has this Brightness Slider. It's the same as RGB, just a different way of interacting with it. I'm going to make it a little darker, click it over here. I'm going to pick a stick color. Click in there. I'm going to not like that, so I'm going to go back and pick another one. I like to stretch out these tutorials. I'm going to pick a slightly darker color for the other side of the stick. We're practicing, right? Change the Strokes, I'm going to go to 'None'. Actually, to do the Strokes, you can't be on the Shape Builder Tool. 'Black Arrow', everything selected, then go to 'Stroke'. That's going to be my popsicley thing. Cola flavor, or chocolate flavor, whatever you like. I'm going to make a few versions of this. I'm going to have it about that sort of size, I'll have one. I'm going to rotate it. Turn it around it a little bit more. So we have one there, to there. I'm holding 'Alt' while I'm dragging. I've got my 'Black Arrow', I've got everything selected. Start dragging, hold 'Alt'. You get a duplicate. I want six of these in total. Any which way, you can do. You can just copy and paste if you like. Let's actually get started in the Liquifying.
The Liquify Tools are all hidden underneath this Width Tool. There's a bunch of them in here. We're going to start with the Warp Tool. Click on that one. By default, I'm not sure your brush is going to be the exact same as mine. It's probably not. Let's double click the 'Warp Tool' and you can just kind of copy what I have here. There's the Brush Size. That's the main ones. So, Brush Size, I'm going to make mine, say '50 points' by '50 points'. Intensity is quite important. We're going to leave that at '50' at the moment, but some of the other tools, we're going to get some intensity. Now what I'm going to do is click, hold, and drag. I'm doing this kind of drippy, drippy thing. That's what I'm trying to do, at least. So that is the Liquify Tool.
Let's have a look at some of the other ones. Let's use the Twirl Tool, it's quite cool. Now Twirl Tool, by default, is way too strong. Actually they're kind of all right. You can double click it if you're finding it a bit too strong, and turn the Intensity down to, say '20%'. What I like doing with this, is I like clicking it, it's going a bit back. Click and drag slowly. You get these kind of cool little things going on. Experiment with it. I'm going to do the top up here. I'm going to click, hold, and as it's going I'm dragging to get this kind of cool thing going on. That is my Twirl one. I'm just going to go through these. You can obviously stop the video, just go through them yourself.
I'm going to go to 'Pucker'. This one probably needs a bigger brush, but if I double click it I'm going to probably need, like 150 and 150. What it does is-- that one's not really strong, even at 20%, it goes… it shrinks down. You can kind of see what it does. We have to play around with the sizes and intensity quite a bit. This one here probably just needs 2%. That might be a bit lower. 2% is fine, just kind of squiggle it down. Let's have a look at one of the other tools. 'Bloat'. Let's have a look at this one. Let's have a look at another one. By double clicking on it, hold him down. Scallop, Crystallize, and Wrinkle, all have very similar—they work slightly different, but just practice with them. We've only given you six, even though there's seven to go through. So you might have to make a duplicate of the last one. Scallop kind of does that, kind of pushes it in. Crystalize does the same thing but kind of pushes it out, rather than in on itself. Then we'll double use the last one, Wrinkle. Wrinkle just kind of wrinkles the edges. This one's a bit weird, you got to kind of like-- probably I have to turn the intensity up on Wrinkle. Because we had clicked 2%, right? let's go up to 50%. I'll zoom in to have a little look, and what it's doing.
Watch this, if I click on it, it kind of wrinkles the outside. So that's far too much intensity, but you're getting the feel for these Liquify tools, right? Pretty cool. Either some fun stuff with-- let's do some Type. I'm going to open up 'File', 'Open', there's 'Liquify2'. This is a part of our exercise, or your project. I want to do one together. We'll do this top thing, then you'll do your own.
To do the Liquify Tool with text, it won't work if the text is still editable text. So what I need to do is, I need to go to 'Type' and go to this one that says 'Create Outline', we looked at it earlier. Click on that, then you can go through your tools, and I want you to go through, and kind of, I don't know, do something liquidy, gasy, and solidy with all of these ones. It's kind of like water, and the different constitutions. We'll do, maybe Twirl for liquid. Remember, you're going to have to go and change some of these intensities because that's probably real quick. Double click, play around Brush sizes. Play around, I can't help myself, I want to play around with this one too. I'm going to go to '10%'. I'll do Liquid with you. Do you have to have it selected? I don't think so. I've selected off in the background with the Black Arrow, and now I can do it.
What I might do is kind of, through it, and then-- can't even read it anymore. You might do something nicer. So do Liquid, do Gas, do Solid. Then down here, I'd like you to type out your name. Not my name. Make a font. Pick a color, make it nice and big, then start playing around with it. We're outlining it first. Then send me a copy. Post it in the project, in the comments. I'd love to see a screen shot of what you're up to.
All right, that is going to be it, my friends, for the Liquify Tool
- Powered by Marvin
- Terms of use
- Privacy policy
- Cookie policy
-
- © Bring your Own Laptop Ltd 2026