Exporting Photoshop PDF & JPEG artboards for clients
Questions

Student Gallery
Be the first to share something.
Course info
Overview
- How to structure content for multisize social imagery
- The best workflows for social, print, ad banners, and video
- The top tools for non-destructive design
- How to master layers, artboards, Smart Objects, and libraries
- How to become the master of productivity in your office
Course duration 1.5 hours

Daniel Walter Scott
Founder of Bring Your Own Laptop & Chief Instructor
I discovered the world of design as an art student when I stumbled upon a lab full of green & blue iMac G3’s. My initial curiosity around using the computer to create ‘art’ developed into a full-blown passion, eventually leading me to become a digital designer and founder of Bring Your Own Laptop.
Sharing and teaching are a huge part of who I am. As a certified Adobe instructor, I've had the honor of winning multiple Adobe teaching awards at their annual MAX conference. I see Bring Your Own Laptop as the supportive community I wished for when I was first starting out and intimidated by design. Through teaching, I hope to bring others along for the ride and empower my students to bring their stories, labors of love, and art into the world.
True to my Kiwi roots, I've lived in many places, and currently, I reside in Ireland with my wife and kids.
Downloads & Exercise files
Transcript
So it might be client approval, or the JPEGs in this case are gonna be the finals for our static banner adss, the video. After this we'll look at exporting for your colleagues. And then the last one will work with exporting. For those of you who are working with, say, web developers or app developers, and you are, you're designing graphics for them. Alright, so let's get started with the client exporting. Alright, so getting it out to our clients.
We're gonna do PDFs first and then we'll do JPEGs. So I've got my four art boards. I'm gonna go to file, I'm gonna go to export and boards to PDF. Super simple. I'm gonna click browse and put mine onto the desktop if I can find it. Okay.
Give it a name and you can decide on a few things. Okay? Just work, whatever works for you. Okay? So we're gonna do a multi-page document. You could do separate PDFs for each art board.
So you'd end up with four files in our case, encoding what sort of quality. I'm gonna crank mine right up 'cause I want, I'm not worried about file size. I want it to look great and, um, depends on, I'm gonna turn this on just so you can see it. It'll give the art board a name within the PDF. Um, I'll turn this on. I don't turn it on very often, but I'll turn it on just uh, for now so you can kind of see you might work great for what you are doing.
So it flashes through it a bit and eventually it'll say this, uh, upwards was successful. Thank you very much. So now on my desktop, there's my banner pdf. Okay, I'm gonna double click it to open it. It's gonna open up in the wrong screen over here. Here you go.
Okay. So the difference between, uh, turning that name on, okay, you see it added that the font's probably be a little big. Let's have a look. There's my rectangle, there's my square, there's my leaderboard and there's my skyscraper. If you want it just to the edges without this, uh, big random name. Turn off that last thing where we added the names for the boards.
Cool. We can send it off now maybe for client approval. Maybe you're not doing banner ads, we're just doing it for like concept. Okay? You're sending it to your colleague or your boss. You know what to do with PDFs.
Let's look at jps now. So back in Photoshop here, there's a, there's loads of ways of getting jps out of Photoshop. Now I'm gonna show you what I feel is the best. Okay, so we're gonna go to file and we're going to use export. And there's this one called Export as it's got a bad name, but it is by far the, has the most options in it. What's really cool about it is that, um, unlike Safer Web doesn't separate all the outboards out this export as does.
You can see rectangle, square, leaderboard and skyscraper. Couple of things that are useful, I can select them all. So I've got the first one selected, hold shift, grab the last ones, they're all selected. I can say actually I don't want them all to be PNGs. I want 'em all To be JPEGs and I can decide maybe they're gonna be 80% quality and you hit export and you're gonna get four separate JPEGs, but a little bit extra. What you can do is you can say, actually my friend, I need a high res version.
Or say, uh, say a high DPI or if you're doing kind of app design, maybe it's at two x. Okay, so you need a double size version. So I'm gonna hit, I've got 'em all selected. I'm gonna hit plus and I'm gonna say I want another version that is, you can see I can have a half size. I can say, uh, times double the size, three times the size. Okay?
So I'm gonna pick a double and it's gonna add the suffix to the end. If you're a bit of a web designer or a developer, you're gonna understand that and that could be really handy for dealing with high rears or retina images, even if you just want two different size versions. It doesn't have to be very fancy or web developer, okay? It just means you can have a half size and full size click export. I'm gonna put it onto my desktop. I'm gonna click open.
It's going to zap away a little bit. And when it's done, it should be on my desktop. I should have put it into a folder. Okay, mine, I just dumped here on the desktop. But you can see I've got leaderboard and I've got a leaderboard. Same name, but it's been appended with this extra at two x.
Okay? Just indicate that that is the double high resolution version. Let's open both of these. Gonna get a view, view, the actual size. So small version, big version, small version, big version. Super easy to do.
Just hit that little plus while you're exporting. Alright? It's exporting PDFs and jps all in the same sort of place, upwards to PDF. But use this export as when you're generating JPEGs, gives you a few little extra tricks up your sleeve while you're working. Alright, that's it for this video. Let's look at some more exporting in the next video.
How do I export Photoshop artboards as PDFs or JPEGs for a client?
Use File > Export > Artboards to PDF to create a client approval document, or File > Export > Export As to produce separate JPEGs. You can combine artboards into one multi-page PDF, apply JPEG settings to several artboards at once, and export additional sizes, including double-size versions, in the same operation.
Exporting Photoshop Artboards for Clients: PDFs and JPEGs
Key takeaways
Create one multi-page PDF or a separate PDF for each artboard.
Choose whether artboard names appear on your PDF pages.
Export multiple artboards as individual JPEGs with shared quality settings.
Generate standard and double-size images together using export scales.
Check the exported files before sending them to your client.
Getting your designs out of Photoshop is straightforward once you know which export option to use. For client work, I use two routes: PDFs for approval and presentation, and JPEGs for individual images, such as finished static banner ads.
Our example has four artboards: a rectangle, a square, a leaderboard and a skyscraper. They all belong to the same banner campaign, but each needs to come out in its own format and shape. The useful bit is that you don’t have to export them one at a time.
Export artboards as a PDF for client approval
If you’re sending a set of concepts for approval, a PDF lets you put everything into one document. This isn’t limited to banner ads, either. The same approach works for designs you need to send to a client, colleague or boss for review.
Choose your destination and document layout
In Photoshop, go to File > Export > Artboards to PDF.
Click Browse and choose where to save the export.
Give the file a name, such as banner.pdf.
Choose a multi-page document or separate PDFs for the artboards.
I’m using a multi-page document here. With our four artboards, that gives us one PDF containing four pages. If you choose separate PDFs instead, you’ll get four individual files. Pick whichever works best for the way you’re sharing the designs.
Set the quality and decide whether to include names
The PDF export dialogue also gives you encoding and quality options. For this approval document, I turn the quality right up. File size isn’t my main concern here; I want the designs to look great.
There’s also an option to include the artboard name in the PDF. I don’t usually turn this on, but it can be useful if you want each page labelled with its format.
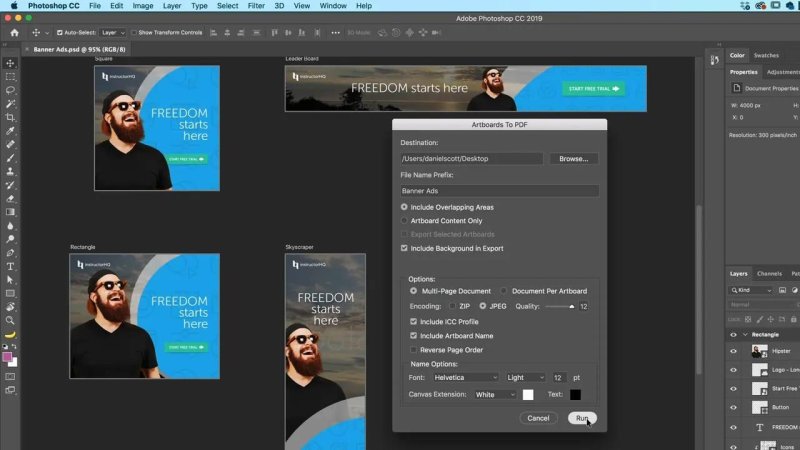
Choose the PDF layout, quality and artboard naming options before exporting.
Run the export and wait for Photoshop’s success message. Then open the saved PDF and check the pages.
With names enabled, you’ll see labels such as Rectangle, Square, Leader Board and Skyscraper above the artwork. They’re quite prominent in this example, and they add space around the design.
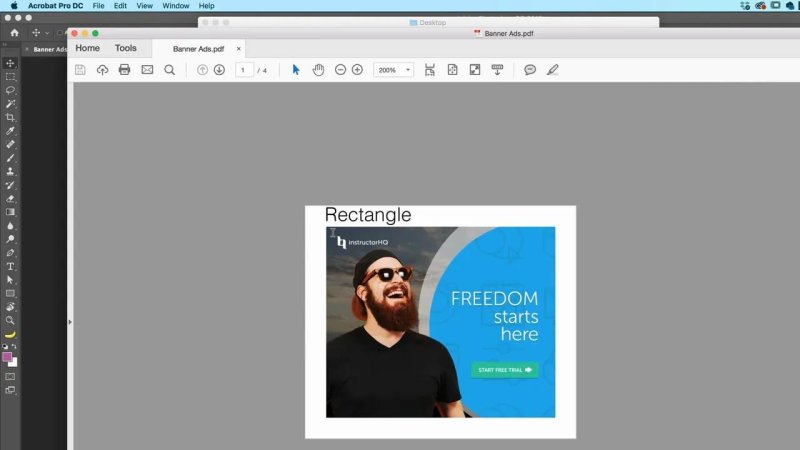
Including artboard names adds a visible heading above the artwork.
If you want the PDF page to finish at the artwork’s edges, without that extra heading, turn off the artboard name option and export again. It’s a small setting, but it makes a noticeable difference to the presentation.
Export separate JPEGs with Export As
Photoshop has several ways to create JPEGs. My preference for this job is File > Export > Export As. The name isn’t particularly exciting, but the options are handy.
The big advantage here is that Export As treats the artboards as separate outputs. Unlike the Save for Web route demonstrated for comparison, it lists our rectangle, square, leaderboard and skyscraper individually, ready to export.
Apply the same settings to all four artboards
Open File > Export > Export As.
Select the first artboard in the list.
Hold Shift and select the last artboard to select the whole group.
Change the format from PNG to JPEG.
Set the quality. In this example, I use 80%.
Click Export and choose the destination folder.
That produces four separate JPEGs, one for each artboard. Selecting the group first means you can change the format and quality together rather than repeating the same settings four times.
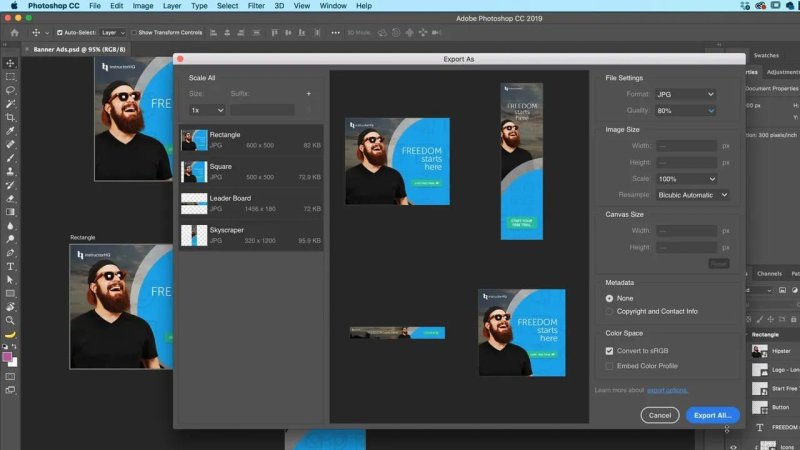
Select the artboards together to apply one set of JPEG settings to the whole batch.
Export standard and double-size versions together
There’s another useful trick inside Export As: you can generate more than one size in the same export.
Perhaps you need a standard image and a higher-resolution version for a high-density or Retina display. Or perhaps you simply need a small version and a large version. It doesn’t have to be a complicated web development job.
Add an extra export scale
Keep all the required artboards selected in Export As.
Click the little plus button in the scale options to add another version.
Choose the additional scale, such as 2x for double size.
Check the suffix that will be added to the filename.
Export the files to your chosen folder.
The scale options include half size, double size and three times the size. For this example, I keep the standard version and add a 2x version.
Photoshop adds an @2x suffix to the double-size file. So the leaderboard export has its regular filename, while the larger version has the same base name with @2x added. That makes the two versions easy to distinguish.
Here, 2x means double the image dimensions. The practical result is a larger image, not simply a different label on the same-sized file.
Check the exported sizes
Once the export finishes, open the standard and @2x versions and use your image application’s Actual Size view. You can then compare the smaller image with the double-size one.
I used the desktop as the destination in this example, which leaves all the exports loose in one place. A dedicated folder would have been tidier, especially when exporting several artboards at multiple sizes.
The simple client export workflow
For client delivery, the two commands to remember are Artboards to PDF for a review document and Export As for separate JPEGs.
Choose the PDF layout and whether you want labels, then set up your JPEG format, quality and any extra sizes. Open the finished files before sending them off. That’s all you need to turn a multi-artboard Photoshop document into a useful approval PDF and a set of individual image exports.
Key terms
Artboard
A separate design area within a Photoshop document. In this example, each banner format has its own artboard.
Multi-page PDF
A single PDF containing multiple pages. Exporting our four artboards this way puts each design on its own page within one file.
Export As
Photoshop’s export dialogue for creating individual image files from the artboards. It lets you set the format, quality and additional export scales.
2x and @2x
2x is an export scale that doubles the image dimensions. The @2x filename suffix identifies that larger version.
FAQs
Can I export every Photoshop artboard into one PDF?
Yes. Go to File > Export > Artboards to PDF and choose the multi-page document option. You can also choose separate PDFs if you need one file per artboard.
How do I remove artboard names from the exported PDF?
Turn off the option to include artboard names in the Artboards to PDF dialogue, then export again. This removes the added headings so the pages can finish at the artwork’s edges.
Can I export JPEGs at two sizes at once?
Yes. In Export As, use the plus button in the scale options to add another size. Keep the standard scale and add 2x to create both regular and double-size versions in one export.
Written by Daniel Walter Scott — Founder of Bring Your Own Laptop & Chief Instructor
