Setting up printable page sizes
Questions


Student Gallery
Be the first to share something.
Course info
Overview
- Create a quote & invoicing form.
- Cleaning & formatting messy imported data.
- Inventory spreadsheet.
- Pivot tables
- Regional Sales Report
- Profit & loss spreadsheet.
- GST & Tax calculations
- Graphs for use in Word, PowerPoint, InDesign & Illustrator
- Creating spreadsheets that work within Word documents.
- This course is designed for people who have little or no previous experience in Microsoft Excel. You will start right at the beginning and cover all the basics.
- Only basic computing skills are necessary - if you can send emails and surf the internet then you’ve found the right training.
- By the end of the course, you will be producing real world results with Excel.
- No previous Microsoft Excel experience necessary.
- You'll need Excel 2016 installed on your laptop. The standard installation of Excel 2016 or the Microsoft Office 365 version is fine.
Course duration 2 hours

Daniel Walter Scott
Founder of Bring Your Own Laptop & Chief Instructor
I discovered the world of design as an art student when I stumbled upon a lab full of green & blue iMac G3’s. My initial curiosity around using the computer to create ‘art’ developed into a full-blown passion, eventually leading me to become a digital designer and founder of Bring Your Own Laptop.
Sharing and teaching are a huge part of who I am. As a certified Adobe instructor, I've had the honor of winning multiple Adobe teaching awards at their annual MAX conference. I see Bring Your Own Laptop as the supportive community I wished for when I was first starting out and intimidated by design. Through teaching, I hope to bring others along for the ride and empower my students to bring their stories, labors of love, and art into the world.
True to my Kiwi roots, I've lived in many places, and currently, I reside in Ireland with my wife and kids.
Downloads & Exercise files
Transcript
In this video we're going to take this very boring, plain old Excel spreadsheet, and turn it into this page sized boring Excel spreadsheet, just so that we can be using actual US letter sizes, or A4 sizes, we'll look at changing the measurements, the default inches to millimeters as well, getting ready to build our quote in this tutorial series, so let's go and do that now.
First up, let's create, this first option here, it says 'Blank workbook', and we get our kind of standard Excel layout. Now we want to change this to be more of a page layout, because we're going to be printing this, making PDFs, emailing it, that type of thing. So what we need to do is go along the top here to 'View', and switch along to this third option here called 'Page Layout'. You can toggle back to 'Normal' if you prefer, but 'Page Layout' is going to allow us to kind of get our page size, so there's no point using these cells that are already here, because they're not going to be able to print on one sheet.
The other thing to double check when we get started is the size of our page, and maybe these margins from the edges here. I'm based in Europe, so I'm going to use 'A4' or 'Letter'; I'll use 'Letter' because most of you, my students are based in the US, but let's go along to 'Page layout', and along here it says 'Size', we can switch this from 'A4' which is the default here, for me in Ireland, over to 'US Letter'.
The other thing we might do is, I've got mine set to inches, you might be setting yours to metric, you might want centimeters and millimeters, you do that over on 'File', down to 'Options', then you go to 'Advanced Options', and somewhere along here, scroll... there it is, 'Ruler units', yours might be set 'Default', so it will pick which country you're in, but say I do stuff for the US all the time, and for you, I have to switch between these two, you might switch it to 'Centimeters' or 'Millimeters'. I'm going to force mine to 'Inches'. Let's click 'OK'.
Next thing I want to do is, I'm still under 'Page Layout', I'm going to go to 'Margins', and I'm just going to make them a little bigger. I'm going to go to 'Wide', that just puts the edges away from-- bit of a space, margins between the edges of the page. This looks better, we don't have a lot of detail in a quote so we can kind of center in on the page a little bit more. Great!
So that's how to set up your page sizes, change the measurements, get your margins right, now we're going to go in the next video and look at adding images to our quote.
How do I make an Excel spreadsheet fit a printable A4 or US Letter page?
Switch the worksheet to Page Layout view, choose the paper size you actually need, and set margins that give the content some breathing room. You can also change Excel’s ruler units to inches, centimetres, or millimetres so the layout is easier to build accurately for printing, PDF export, and emailing.
How to Set Up Printable Page Sizes in Excel
Key Takeaways
Use Page Layout view to see the boundaries of each printed page.
Choose A4 or US Letter before designing the worksheet.
Keep important content inside a single page rather than using cells far off to the right.
Change Excel ruler units in File > Options > Advanced.
Use wider margins when a clean, centred quote layout matters more than fitting lots of data.
Start With a Blank Workbook
Open Excel and select Blank workbook. You will get the familiar endless grid of cells, which is great when you are analysing data but not ideal when you are building something that needs to look good on paper.
For a quote, invoice, proposal, or any document you intend to print, save as a PDF, or email, it pays to think of the worksheet as a page from the very beginning. That stops you from building content across columns that will never fit on one printed sheet.
Switch Excel to Page Layout View
Go to the View tab on the ribbon and select Page Layout, the third view option. Excel will display the worksheet as individual pages, including the white printable area and the space between pages.
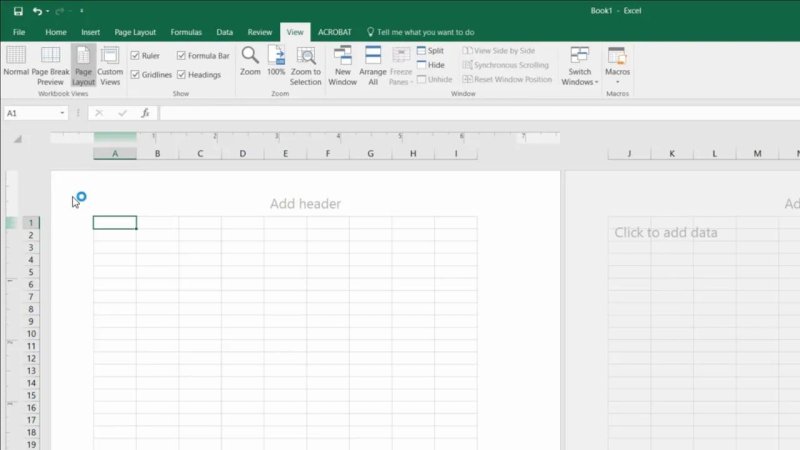
Page Layout view makes the printable page boundary obvious before you start building your document.
This view is the useful one for designing a polished one page document. Rather than treating every visible cell as available space, you can immediately see where the page ends. You can switch back to Normal view whenever you prefer, but Page Layout view is the better working view for print-focused layouts.
As a simple rule, avoid placing the main content of your quote way over to the right. Those distant cells may exist in the worksheet, but they will fall onto another printed page.
Choose the Correct Paper Size: A4 or US Letter
Before adding any detail, check the page size. The default can depend on where your computer is set up. For example, A4 is the common default in Ireland and much of Europe, while US Letter is standard for many documents in the United States.
Go to the Page Layout tab, select Size, then choose the paper format you need. If the people receiving the document are primarily based in the US, choose Letter. If you are producing it for European printing, A4 will generally be the appropriate choice.
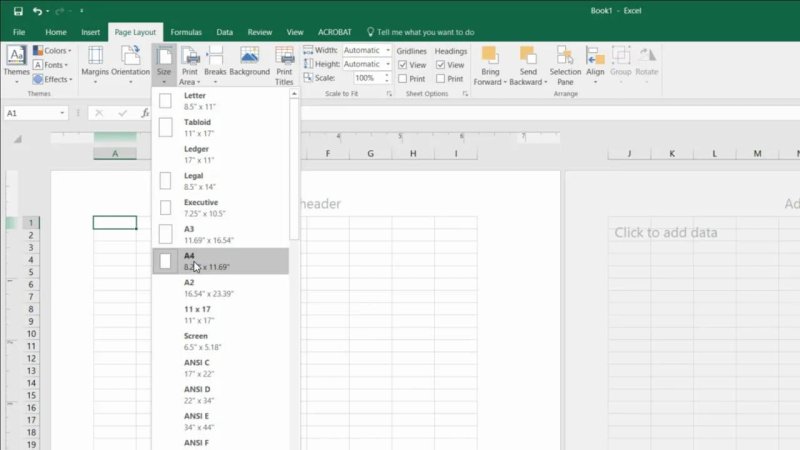
Set the paper size first so the space available for the finished layout is real, not guesswork.
This is a small decision that has a big effect later. A quote designed around A4 can shift unexpectedly when printed on Letter, and the reverse is true as well. Set the target paper size before arranging images, headings, pricing, and contact details.
Change Excel Ruler Units to Inches, Centimetres, or Millimetres
Excel can display measurements according to your regional defaults, but you do not have to stick with them. If you work across US and European documents, or simply prefer working in a particular unit, set the ruler units manually.
Follow this path:
Select File.
Choose Options.
Open Advanced.
Scroll down until you find Ruler units.
Select the unit that suits the work: inches, centimetres, or millimetres.
Select OK to apply the change.
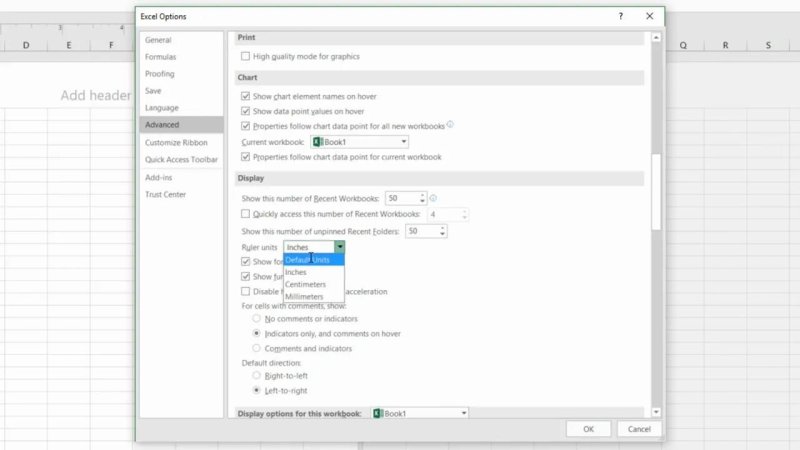
Choose ruler units that make positioning and sizing feel natural for the documents you produce.
The default option uses the settings for your country, which may be perfectly fine. But if you regularly produce documents for different regions, being able to switch units is handy. Use inches for US-oriented work, or centimetres and millimetres when metric measurements make more sense.
Set Wider Margins for a Cleaner Quote Layout
Stay on the Page Layout tab and open Margins. Choosing Wide increases the blank space between your content and the edge of the page.
For a quote, that is usually a good thing. You are not trying to cram a massive report onto a single sheet. A little extra space around the edges makes the document feel more deliberate, easier to read, and better centred on the page.
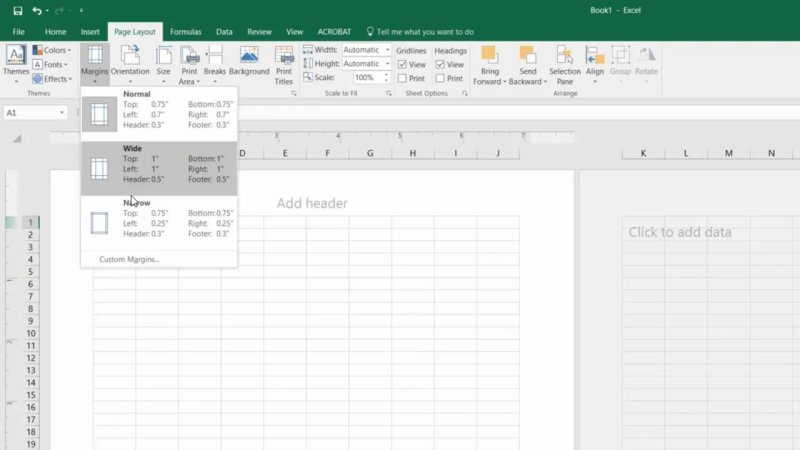
Wider margins give a simple quote layout room to breathe and keep the page from feeling crowded.
Margins are also practical. Content positioned too close to the page edge can feel cramped and may be awkward on some printers. Starting with wider margins gives you a neat frame to work within.
A Quick Printable Excel Setup Checklist
Before you begin designing the actual quote, run through these essentials:
Start with a blank workbook.
Switch to View > Page Layout.
Confirm whether the document should use A4 or US Letter.
Set your preferred ruler units through File > Options > Advanced.
Choose Wide margins for a less crowded page.
Keep the important content within the visible first page.
With the printable area sorted, the worksheet is ready to become a proper quote layout rather than just a boring old spreadsheet. The next practical step is adding images and visual branding to the page.
Key Terms
Page Layout view
An Excel worksheet view that shows pages as they will be laid out for printing. It helps you work within real page boundaries instead of an unlimited cell grid.
Paper size
The physical dimensions of the printed sheet, such as A4 or US Letter. Choosing the correct size early prevents layout surprises when the document is printed or saved as a PDF.
Margins
The blank space between page edges and worksheet content. Wider margins can make a short business document look cleaner and more balanced.
Ruler units
The measurement system Excel uses for layout-related rulers, such as inches, centimetres, or millimetres. These can be changed in Excel Options under Advanced settings.
FAQs
Which paper size should I use in Excel: A4 or US Letter?
Use the paper size expected by the person or organisation printing the document. A4 is widely used in Europe, while US Letter is common in the United States.
Where can I change page margins in Excel?
Open the Page Layout tab and select Margins. For a clean quote or proposal, the Wide preset provides more space around the content.
How do I change Excel from inches to millimetres?
Go to File > Options > Advanced, scroll to Ruler units, select millimetres, and click OK.
Why should I use Page Layout view in Excel?
Page Layout view shows the actual printable page area, making it much easier to create a worksheet that fits neatly on one page for printing, PDF export, or emailing.
Written by Daniel Walter Scott — Founder of Bring Your Own Laptop & Chief Instructor
