🚨 Heads up! This course is no longer supported. We recommend checking out our Webflow Essentials course.
Adding more pages
Questions
Student Gallery
Be the first to share something.
Course info
Overview
- You'll need a laptop (Mac or PC)
- Dreamweaver CC installed. Dreamweaver can be downloaded from theAdobe website here.
Can I use this tutorial with Adobe Dreamweaver CS4, CS5 or CS6?

Daniel Walter Scott
Founder of Bring Your Own Laptop & Chief Instructor
I discovered the world of design as an art student when I stumbled upon a lab full of green & blue iMac G3’s. My initial curiosity around using the computer to create ‘art’ developed into a full-blown passion, eventually leading me to become a digital designer and founder of Bring Your Own Laptop.
Sharing and teaching are a huge part of who I am. As a certified Adobe instructor, I've had the honor of winning multiple Adobe teaching awards at their annual MAX conference. I see Bring Your Own Laptop as the supportive community I wished for when I was first starting out and intimidated by design. Through teaching, I hope to bring others along for the ride and empower my students to bring their stories, labors of love, and art into the world.
True to my Kiwi roots, I've lived in many places, and currently, I reside in Ireland with my wife and kids.
Downloads & Exercise files
Transcript
Um, we're gonna have this, our homepage, which is on the screen now, and we're gonna have two other pages. We'll have our BAAs page and our Contact us page. Um, um, great. So we've got our first page. Um, you can see at the top here, um, I've actually changed this here. It did say, I think Dreamweaver tutorial website or something like that.
So we've changed that to be more specific for this homepage. Vintage camper, uh, camper rental, Sydney. Okay, more specific for this page, right? So this is the homepage to make an additional page. It's very common to do this quite simple file save as. Okay, so index html was our homepage and it has to be called that.
That, uh, homepage definitely has to be called index, otherwise it won't be found, but every other page can be called, um, something else. Okay, unique. There are a few rules, okay? You can't use things like spaces. I couldn't call this about us, okay? Because, um, what happens is, um, a little zoom.
There it is, okay? With a about of spaces it doesn't like it ends up putting a percent twenties in there and some browsers will work around it and most browsers won't. It'll come up with an error. So you need to have no spaces, or you can use a hyphen or an underscore. So it's up to you. I prefer hyphens, okay?
And, um, hyphens as a general rule lot better anyway, because, uh, things like screen readers, um, that help people that are disabled read screens, okay? Reads out links and comments and stuff. Um, what the hyphen will do is that the screen reader tends to read them as separate words. It'll say about us if I use an underscore, okay? It tends to read them out as a solid word, trying to read the word about us as one solid word. So let's put in hyphens up to you.
Um, all right. Next thing is, is it Save? Okay, so we've got our index page and our About Us page, they look exactly the same. So there's a couple of things we need to do. First of all, to go through and change, we need to have a unique title on every page. So a homepage was called Vintage Camper Rentals.
So this one's gonna be called a Vintage Camper About Us. Okay? Not very exciting for the About Us page. It's when you get into different pages, more of your product pages or specific vehicles that you can get a little bit more creative with the titles. All right, so we've done that. We'll save it.
I've got some copy that's already been created for this website. Okay? And if you're following along using our exam example files, you'll find them, um, after you've downloaded them, um, I've put mine on my desktop. So desktop, Mac, pc, you'll find your desktop, find Dream movie exercise files, open up text. And towards the bottom there you've got the homepage text that we used. Uh, early tutorial.
We're gonna use this camper rental one. Let's open this one up. Okay, let's select all of this text. And remember, um, in a previous tutorial, I think it was, uh, number three, and it said about washing the text. Okay? So you need to copy it and paste it into, on a Mac, into Notepad, sorry, on a Mac into, uh, text edit and on a PC into Notepad.
For this tutorial though, I've gone through and washed it already, so I can guarantee that's clean just to save a bit of time for us teaching. Alright, so I'm gonna go through, I'm gonna delete all this text and put in the text from that page. Okay? It's come through all as paragraph text. I can see that by down the bottom here, it's in a P tag. And you can see down here, um, it's written paragraph.
So what I need to do is have my, uh, break it up into the different tags. So we've got this first tag, which is going to be my H one. Okay? So it's called heading one. And you can see down here the tag select is called an H one, and I can check in my code view. Okay, there he is, there he is an H one tag.
Okay, that is the most important thing on this page. It's about camper rentals, okay? And this one's gonna be camper rental. Let me make it a little bit, bit about us. Now, an H two, it's gonna be this thing here, okay? This is the second most important part on the page.
Um, and you can change it to, um, heading two, a little shortcut that I just used and I forget, I use them. If you hold control, um, two or command two on a Mac, um, it will update it. So if I go command 1, 2, 3, you'll see it'll toggle between the headings, okay? If you're not really for shortcuts, don't worry, just use these buttons down here. All right, so we're got heading one, we've got some paragraph text, and we've got heading two. We've changed the title Unique for this page.
Let's hit file save and let's do the third page. So file save as. Okay, this one's gonna be the Contact Us Contact hyphen us html. Now it's all going into that same folder with the index pages. Hit save. Now remember, the first thing, it needs a unique title at the top there.
So I'm gonna call this one. Ah, very exciting. It's gonna be called, uh, vintage Camper Contact page. Very exciting. All right. Um, so, and we're gonna go bring in the text and for the Contact Us page.
So on my one, it's on my desktop, okay? On my desktop Inside Dream, we've exercise files under text, and down the bottom there we've got vintage, um, vintage three contact us. So I'm gonna copy all of this. You should go and wash it, okay? Stick in a notepad or text edit on a Mac. But I know that I've already washed this stuff for my students, so it's nice and clean, ready to go into Dreamweaver, not causing us any trouble.
Let's copy go into Dreamweaver and I'm gonna select all of this and paste it. All right? Um, so remember our H ones. So this first bit is our heading one. The most important thing, and I don't really have a heading two for this page. Um, we're gonna do some styling later on when we look at CSS to make all this stuff look a lot nicer and kind of break it up.
But that's the most important. This is the regular paragraph stuff. All right, let's hit save. So file, save, uh, the, so the next thing we're gonna do is add a navigation so that you can jump between these three pages. Okay? So we've got an index page and a about us page and the contact us page.
Alright, thanks for this. Um, see you in the next tutorial.
How do you create additional pages in Dreamweaver?
Open an existing page, choose File > Save As, and save a copy with a new filename, such as about-us.html. Then give the new page a unique title, replace its content, and apply the appropriate headings and paragraphs. Save each page in the same website folder, ready to connect with navigation links.
How to Create More Pages for Your Website in Dreamweaver
Key Takeaways
Create About Us and Contact Us pages without rebuilding your existing layout.
Use clear filenames with hyphens instead of spaces.
Give every page its own descriptive title.
Clean copied text before bringing it into Dreamweaver.
Structure content with H1, H2 and paragraph tags before worrying about styling.
Once you have a homepage, creating the next few pages is quite simple. We’re going to use our Vintage Camper Rentals homepage as the starting point, then create an About Us page and a Contact Us page.
The aim is to get three separate pages ready for navigation. They’ll share the same starting layout, but each will have its own filename, title and content. Making everything look a little nicer with CSS comes later. For now, we want the structure right.
1. Start with Your Existing Homepage
Open your homepage in Dreamweaver. In this exercise, that file is called index.html. Keep that name for the homepage in this site setup, so it can act as the default starting page.
Before making any copies, check the page title at the top of the document window. Replace a generic title, such as “Dreamweaver Tutorial Website”, with something specific to the page. For our example, a title describing vintage camper rentals in Sydney is much more useful.
There are three different things to keep track of as we work:
Filename: the saved HTML file, such as index.html.
Page title: the title set in Dreamweaver’s Title field.
Main heading: the H1 text within the page content.
Changing one doesn’t automatically take care of the others. That’s particularly important when you’re copying an existing page.
2. Use Save As to Create the About Us Page
With the homepage open, choose File > Save As. Save the new file as about-us.html in the same website folder as index.html.
This gives you a separate page based on the homepage. At first, the two pages will look exactly the same. That’s fine. We’ve copied the starting layout; next we’ll make the content specific to About Us.
Choose a filename without spaces
Avoid a filename such as “about us.html”. Spaces are encoded as %20 in URLs, which makes addresses less tidy and can introduce avoidable complications. A simple filename without spaces is the better habit.
You can separate words with a hyphen or an underscore. I prefer hyphens, so we’ll use about-us.html.
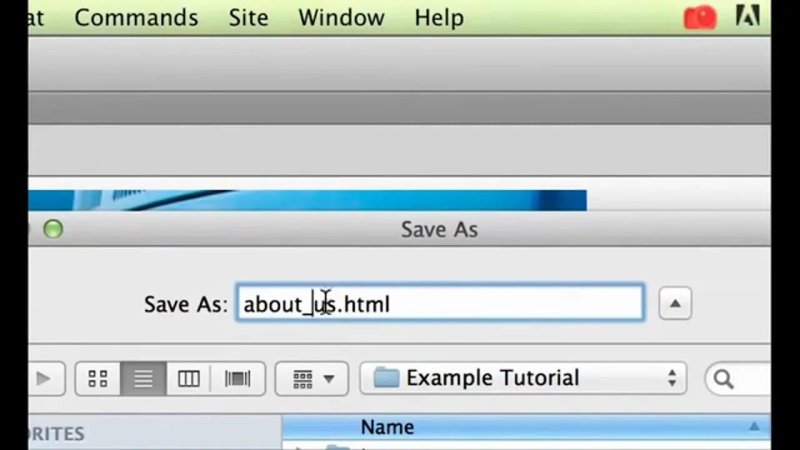
Use a hyphen or underscore to separate words in the new page’s filename.
Hyphens also make the word boundaries clearer. They can help assistive technology interpret the words separately, although pronunciation depends on the tool and its settings. The practical rule for this exercise is simple: use clear words separated by hyphens.
3. Give the New Page a Unique Title
Now that about-us.html exists, change its title in the Title field at the top of Dreamweaver. For this example, use Vintage Camper About Us.
Not terribly exciting, but it describes the page. When you get to product pages or individual vehicles, you have more scope to make the titles specific to what each page contains.
Every page needs its own title. Save As copies the existing title along with the rest of the document, so make changing it one of your first jobs each time.
Choose File > Save after updating it.
4. Bring in Clean About Us Text
If you’re using the exercise files, open the Dreamweaver exercise files folder and then the text folder. Find the camper rental copy intended for the About Us page and copy it.
Before bringing text from a word processor into Dreamweaver, it’s worth “washing” it. That simply means passing it through a plain-text editor to remove unwanted formatting.
Copy the source text.
Paste it into Notepad on Windows or TextEdit in plain-text mode on a Mac.
Copy the plain text from there.
Return to Dreamweaver and replace the old page copy with the cleaned text.
The supplied exercise copy has already been cleaned, so it’s ready to use. For your own content, keep this step in mind rather than bringing unwanted formatting into the page.
Replace the text that belongs to the homepage, while keeping the shared elements you’re reusing. After pasting, the new copy may all appear as ordinary paragraph text. We’ll sort that out next.
5. Apply H1, H2 and Paragraph Tags
The text needs a little structure. Dreamweaver’s Format control lets you assign the correct tag to each part of the content.
Set the main heading to Heading 1
Select the first heading and choose Heading 1. For our About Us page, we’ll make the wording Camper Rental About Us.
This is the main heading for the page, so it gets an H1 tag. You can confirm that in the tag selector at the bottom of the document window, or switch to Code view and check the H1 markup directly.
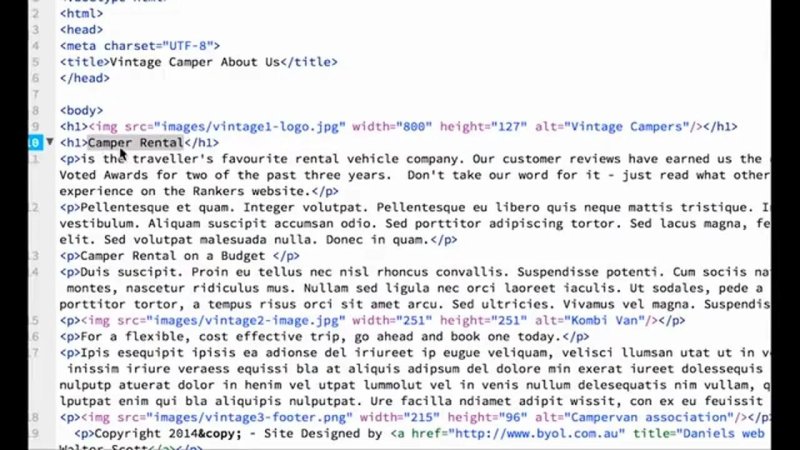
Code view lets you check that the heading really uses an H1 tag.
Set the subheading to Heading 2
Select the secondary heading and choose Heading 2. This identifies the next level of content beneath the main heading. Leave the regular body copy as Paragraph, which uses a P tag.
If you like shortcuts, use Ctrl + 1, Ctrl + 2 or Ctrl + 3 on Windows, or Command + 1, Command + 2 or Command + 3 on a Mac, to apply the corresponding heading level in this Dreamweaver workflow.
Not keen on shortcuts? No problem. Use the Format control instead. The important thing is the resulting structure, not how quickly you select it.
Save the completed About Us page.
6. Create the Contact Us Page
With the About Us page saved, choose File > Save As again. This time, name the file contact-us.html and save it alongside index.html and about-us.html.
Repeat the same process:
Change the page title to Vintage Camper Contact Page.
Open the Contact Us copy from the exercise files’ text folder.
Clean the text through a plain-text editor if necessary.
Replace the copied About Us content with the contact content.
Set the first heading, Contact Vintage Camper Rentals, to Heading 1.
Keep the remaining content as ordinary paragraphs.
Choose File > Save.
This contact page doesn’t need an H2 because there isn’t a separate secondary section to label. Don’t add a heading level just because another page has one.
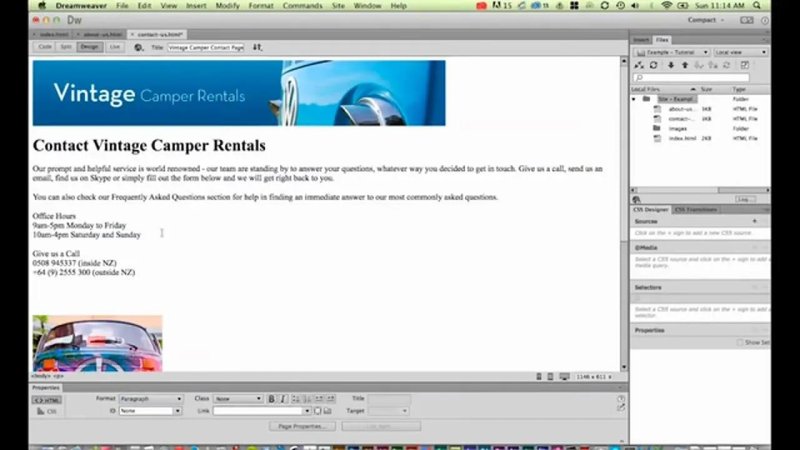
The Contact Us page now has its own content while retaining the shared page elements.
The contact details may still look fairly plain. That’s all right. CSS can handle their appearance and spacing later; the job here is to get the content and tags in place.
7. Check Your Three Pages Before Adding Navigation
You should now have these three files in the same website folder:
index.html: the homepage.
about-us.html: the About Us page.
contact-us.html: the Contact Us page.
Open each one and check that its title and content belong to that page, rather than the page it was copied from. Confirm the main heading is an H1, any genuine subheadings use H2, and ordinary text remains in paragraphs.
Great, that gives us three separate pages ready to work with. The next step is adding navigation so people can move between them.
Key Terms
Save As
Saves the current document under a new filename. Here, it lets us create another page from an existing layout without replacing the original file.
Page title
The document title entered in Dreamweaver’s Title field. Give each page a title that describes its own content.
H1 and H2
HTML heading levels used to structure content. H1 identifies the main heading in this exercise, while H2 identifies a secondary heading.
P tag
The HTML element for a paragraph. Regular body copy should remain paragraph text rather than being assigned a heading level.
Washing text
Removing unwanted formatting by passing copied content through a plain-text editor before using it in Dreamweaver.
FAQs
Do I need to create every Dreamweaver page from scratch?
No. Use File > Save As to create a copy of an existing page, then change the filename, title and content. This reuses the starting layout while keeping each page separate.
Should I use spaces in HTML filenames?
For this workflow, avoid spaces and use hyphens between words, such as about-us.html and contact-us.html. Spaces appear as %20 when encoded in a URL.
Does the Contact Us page need an H2?
Only if its content includes a secondary section that needs a heading. The example contact page uses an H1 followed by paragraph text, with further visual styling left for CSS.
Written by Daniel Walter Scott — Founder of Bring Your Own Laptop & Chief Instructor
