🚨 Heads up! This course is no longer supported. We recommend checking out our Webflow Essentials course.
Connect CSS to all HTML pages
Questions
Student Gallery
Be the first to share something.
Course info
Overview
- You'll need a laptop (Mac or PC)
- Dreamweaver CC installed. Dreamweaver can be downloaded from theAdobe website here.
Can I use this tutorial with Adobe Dreamweaver CS4, CS5 or CS6?

Daniel Walter Scott
Founder of Bring Your Own Laptop & Chief Instructor
I discovered the world of design as an art student when I stumbled upon a lab full of green & blue iMac G3’s. My initial curiosity around using the computer to create ‘art’ developed into a full-blown passion, eventually leading me to become a digital designer and founder of Bring Your Own Laptop.
Sharing and teaching are a huge part of who I am. As a certified Adobe instructor, I've had the honor of winning multiple Adobe teaching awards at their annual MAX conference. I see Bring Your Own Laptop as the supportive community I wished for when I was first starting out and intimidated by design. Through teaching, I hope to bring others along for the ride and empower my students to bring their stories, labors of love, and art into the world.
True to my Kiwi roots, I've lived in many places, and currently, I reside in Ireland with my wife and kids.
Downloads & Exercise files
Transcript
So what we're gonna do is do a File Savers. So I'm gonna do File Savers save over the top of my Contact Us page there. So I'm gonna give you the exact same name and this is gonna replace it forever. So when you do do this, make sure that um, you're not destroying anything, uh, that you don't have another copy of somewhere else. But I have this text in another, um, word file so I can use that text again. So let's save over the top.
It's gonna say Replace, I say Yes. Okay, now, now we're looking at the contact dust page. Now it looks exactly the same as my homepage, so I'm gonna go through, I should go through now and copy and paste the text back in. But to cheat, I'm just gonna come in here and add, uh, contact us. Contact us, just so we know we're on a different page. Um, and I should go and bring all the texts back in, but I'm not going to.
So I've got my index page here, my homepage, I've got this Contact Us page, which I've added all my lovely, lovely contact last details. Okay? So I'll paste that in, format it up and use any class styles that I want to, to get it, um, looking nice. But the next thing I need to do is when I'm using an old page is I need to make sure that I go through and change the document title. Now, when I started these tutorials in an earlier version of Dreamweaver, the title used to be up here in this gray bar, just above the image vintage campers. Okay?
In this version 14.2. So 2014 0.2, they've moved it down here, okay? Um, so you gotta make sure that, um, every document title okay, needs to be unique for every page. So my homepage was called Vintage Camper Rental Sydney. Okay? This one's going to be called Vintage Camper Contact Us Page.
Alright, we're gonna go through and do this exact same thing for the About Us page. So I'm gonna do a save as of this and I'm gonna make this my About Us page. Okay? I'm gonna replace it and this one now is gonna be called About Us. Okay? And this is all How about Us details, okay?
So I'd go through now and place my text and put any images I need to into this page. So I've got three pages, my index, my Contact Us, and My About Us because they use the same physical names as we did before. Our navigations should still work. So let's give that a go. Oh, one thing I forgot to do is the About Us Page needs its own unique document titles. Remember in earlier versions it's up top in the gray bar and here it's down the bottom.
So this is the Vintage Camper about Us. Great. So I'm gonna save it, file save, and I'm gonna preview in a browser and we're gonna see if these pages all at least look similar. So we've got a homepage about Us page and we've got a contact us page. Great. Alright, uh, that's it for this tutorial.
I'll see you in the next one.
How do I make all my pages use the same layout in Dreamweaver?
Use File > Save As to save your styled home page over each older page, keeping the original filenames so your navigation still works. Back up the unique content first, then restore each page’s text and images, give it a unique document title, and test the links in a browser.
Dreamweaver Tutorial: Making All Your HTML Pages Work Together
Key Takeaways
Reuse your finished home page instead of rebuilding the same layout on every page.
Keep a separate copy of any content before replacing an existing file.
Update both the visible page content and the document title.
Preserve existing filenames, then check your navigation in a browser.
Why Your Home Page Looks Right but Other Pages Do Not
You’ve spent quite a bit of time getting your home page looking nice. The structure is in place, the styles are working, and everything looks good in the browser. Then you click Contact Us or About Us, and you’re back to the old design.
In this example, those older pages don’t have the home page’s div structure and styling. They contain the right information, but they haven’t been brought into the finished layout.
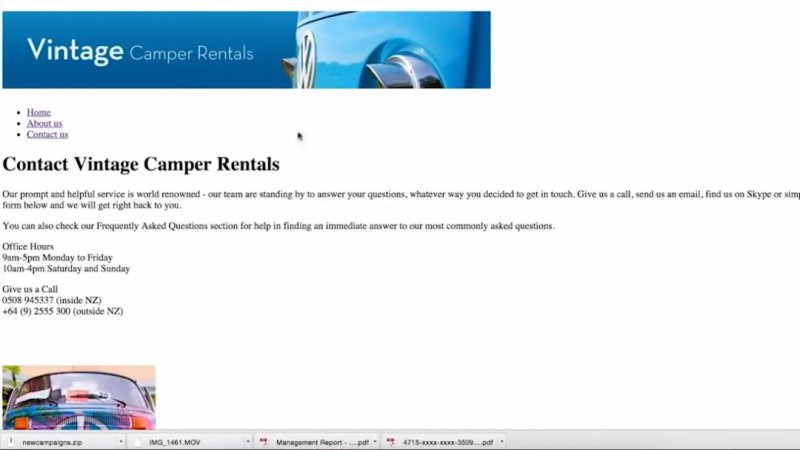
The older contact page has the content, but not the finished home page layout.
We’re going to take a little shortcut. Because the only unique part of these pages is their text, it’s quicker to reuse the styled page and put the correct content back in than to rebuild the structure on each one.
1. Keep a Copy of Your Page Content
Before using Save As, make sure you have another copy of anything you need to keep. Saving over an existing page replaces that file. Don’t confirm the replacement if it contains the only copy of your contact details or About Us text.
For this example, I have the text saved separately in a Word document, so I can paste it back into the new layout afterwards. Make sure you have your own content safely stored before continuing.
2. Save the Styled Home Page as Your Contact Page
Open the finished home page in Dreamweaver. This is the page whose structure and styling you want to reuse.
Choose File > Save As.
Select the existing Contact Us page, using its exact filename.
Save the file.
Confirm the replacement when prompted, provided your original content is backed up.
Once that’s done, the document you’re editing is the Contact Us page, even though it still looks exactly like the home page. That’s what we want at this stage: the finished layout is now in place.
Replace the Home Page Content
Change the visible heading to Contact Us, then replace the copied home page text with your contact details. Format the content and apply any existing class styles you need to make it look right.
A quick heading change is useful for checking that you’re on a different page, but it isn’t the finished job. Make sure you bring back the actual contact information rather than leaving copied text or temporary content behind.
3. Give the Contact Page Its Own Document Title
There’s another easy thing to miss when copying a page: the document title comes across too. Changing the heading in the page content does not change that title.
Every page needs its own unique document title. In the camper rental example, the home page is titled Vintage Camper Rentals Sydney. The contact page becomes Vintage Camper Contact Us Page.
The title field’s location depends on your Dreamweaver version:
Earlier versions: the title field was in the grey bar above the page design.
Dreamweaver 2014.2: the title field is in the lower Properties area.
Update the contact page’s title, then save your changes.
4. Repeat the Process for the About Us Page
Now we can do the same thing for About Us. You can use the newly styled contact page as the starting point because it already has the shared structure.
Choose File > Save As again.
Save over the existing About Us page using its exact filename.
Confirm the replacement after checking that its original content is safe.
Change the visible heading to About Us.
Replace the contact content with your About Us text and add any images that belong on that page.
Give the document its own title, such as Vintage Camper About Us.
Choose File > Save.
That last title change is worth a deliberate check. It’s very easy to finish the visible page and forget that it still has the previous page’s document title.
5. Check All Three Pages in a Browser
You should now have three pages: your index page, your Contact Us page and your About Us page. Because you’ve kept the same filenames as before, the existing navigation should still point to the correct files.
Preview the site in a browser and click through Home, About Us and Contact Us. Check that:
Each navigation link opens the intended page.
All three pages use the same overall layout and styling.
The visible heading and content match the page you opened.
Each page has its own document title.
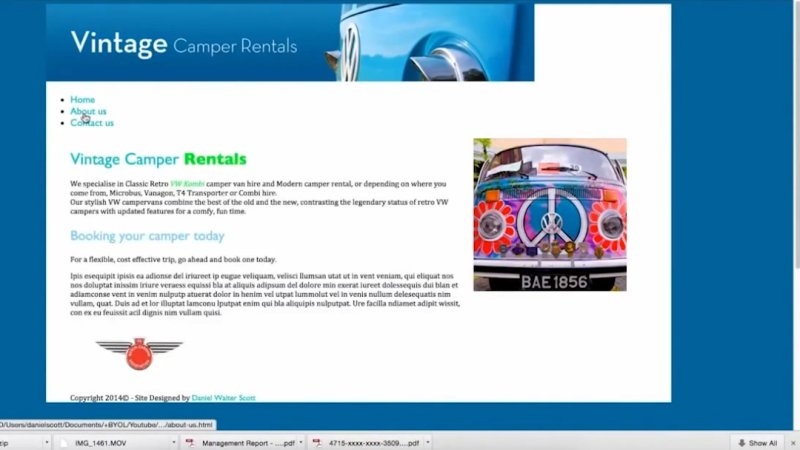
The contact page now uses the same overall design as the home page.
Great, the pages now look like they belong to the same site. The shortcut is simple: reuse the structure you’ve already built, then carefully change everything that makes each page unique.
Key Terms
Save As
Saves the current document under a selected filename. Choosing an existing file and confirming replacement overwrites that file.
Div structure
The HTML containers used to organise areas of the page. Here, reusing that structure helps carry the finished layout across to the other pages.
Class styles
Reusable CSS styles you can apply to page content to keep its formatting consistent.
Document title
The page title shown by the browser, separate from the heading displayed within the page itself.
FAQs
Will Save As remove my old page content?
Yes. If you save over an existing page and confirm the replacement, that file is overwritten. Keep a separate copy of its unique text and any other content you need before doing this.
Why keep the original page filenames?
Your existing navigation links already point to those filenames. Replacing the pages without changing their names allows those links to keep working, although you should still test them in a browser.
Do I need to change both the heading and the document title?
Yes. They are separate parts of the page. Update the visible heading for the page content, then change the document title so each page has its own unique title.
Written by Daniel Walter Scott — Founder of Bring Your Own Laptop & Chief Instructor
