
How to Add Watermarks in Lightroom

Daniel Scott
@dan
In this post we will be exploring watermarks in Adobe Lightroom. I’ll explain why watermarks are important for your work as a photographer, image editor, or graphic designer. I’ll also cover how you can fully customize text and graphic watermarks in a quick and easy step-by-step guide.
This is based on one of the classes from my Lightroom Essentials course. When you become a BYOL member, you gain access to the full Lightroom Essentials Course as well as my 30+ additional courses on Photoshop, Illustrator, Figma, and more. As a BYOL member you will also enjoy personalized support, earn certificates, and tackle exciting community challenges. Head here to sign-up!
I’ll throw a little Watermark skills bonus closer to the end, so make sure you sit back and relax, fire up your laptops, and follow me!
Let 's go!
Why are Watermarks Important?
There are two good reasons for you to apply watermarks on your photos and designs: Protection and Brand Promotion and Recognition.
Protection used to be the most common reason why professional photographers and image editors overlay watermarks on their work. Watermarks visually discourage the unauthorized download or use of your images without permission or proper payment. In other words, they help protect your Intellectual Property (IP) rights.
Brand promotion and recognition is the second reason why professionals include watermarks in their images. Online sharing and social media come as challenges to IP rights, but they also offer great opportunities to introduce yourself to potential clients, display and promote your work, and enhance your brand’s consistency and visibility.
Pro tip: What is Intellectual property? IP establishes ownership of the creations of the mind. Its protection ranges from inventions and industrial design (patents) to creative art works like books, music, film and photography (copyright). Make sure you know your country’s IP legislation – and also international IP laws if you are working for clients from other countries – and protect your work accordingly. Ask for IP expert help, if you have to, this will save you a lot of trouble!
Types of Watermarks
Watermarks can be text-based or graphic and, good news: we can apply both of them to our photos in Lightroom!
Text-based watermarks are great for subtlety, providing general copyright information like author’s name, website URL or copyright year date. These can be used to promote brand names, but as minimalistic as possible, to avoid distracting the viewers away from the image. Finally, text-based watermarks can include an email address or social media handle for future contact.
Graphic watermarks are great for identity. Based on logos or symbols, these are visually more appealing to the viewer and strong brand promoters but may hurt image aesthetics if they get too complex and distracting. They can be unique and decorative, confirming you as a creative professional that breathes passion into every detail. Graphic watermarks can also pair text with logos and symbols.

This handsome gentleman loves laptops, birdwatching, and watermarks on his photos!
How to Add Watermarks in Lightroom
Let’s learn how to do this magic! We’ll use the photo below, available for download inside the Lightroom Essentials Course Exercise files. We apply watermarks to images we want to share with someone, so let’s begin by clicking on the Export button, on the top right of your workspace!
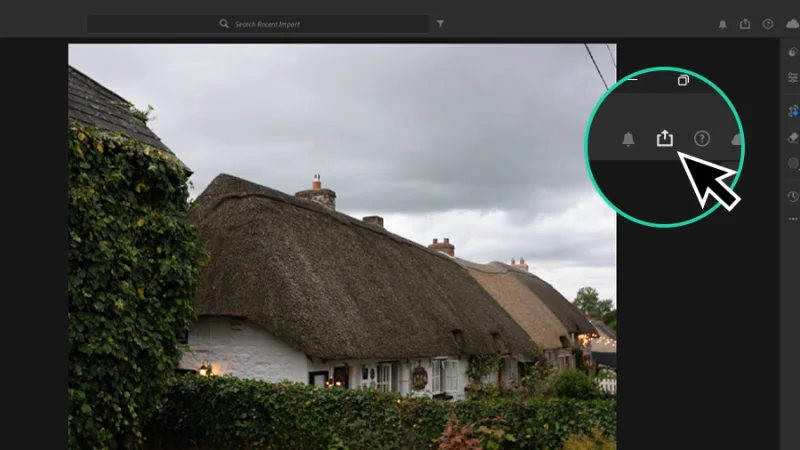
It all begins with the Export option - if you are in a rush, go for that Shift + E shortcut!
In the Export panel, we find different options, from JPG file size, shareable Link, and review invitations. We will focus on Custom Settings for this blog’s purpose and click on this item. There’s also a cool shortcut for the Export panel’s Custom Settings and you can smash it directly from the workspace: Shift + E on both Mac and PC.
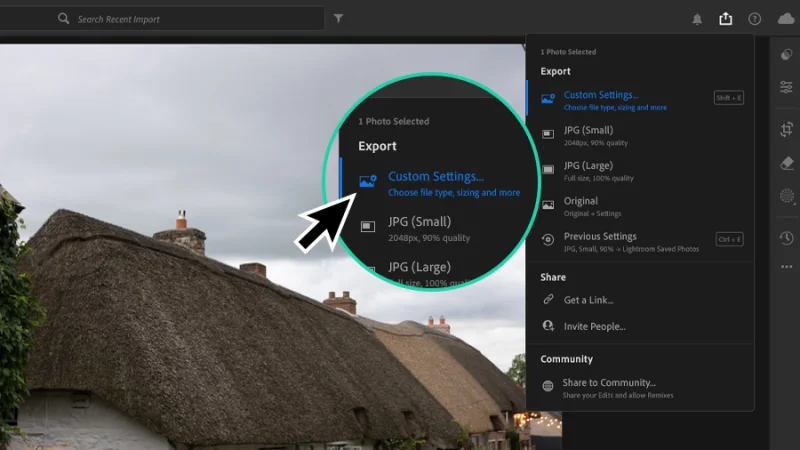
We can quickly export our photos or open the Custom Settings panel and find additional tools.
Next, inside the Custom Settings panel, we look for the Include Watermark option and check it by left-clicking the checkbox with our mouse. Lightroom considers your username as watermark’s default text content. If you make changes to this default option, the last set watermark will be automatically applied the next time you come back to Lightroom. When all settings are properly adjusted, we can click on Export 1 Photo to finish the sharing process.
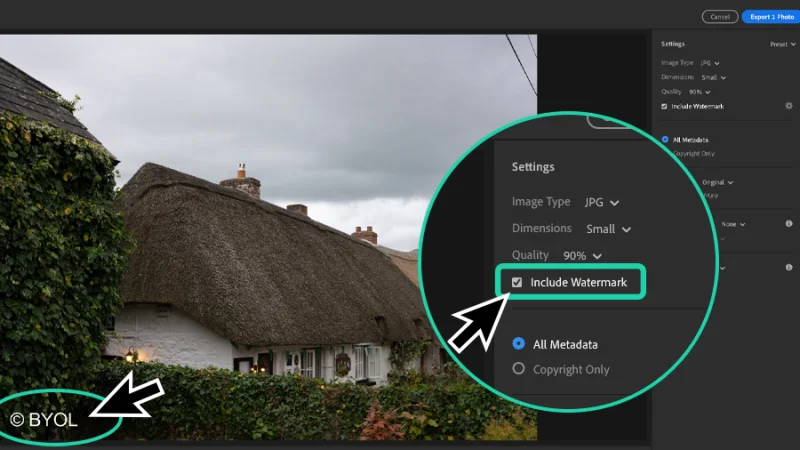
Lightroom’s default text watermark content is your username, but we can edit it, quick and easy.
How to Edit a Text-based Watermark
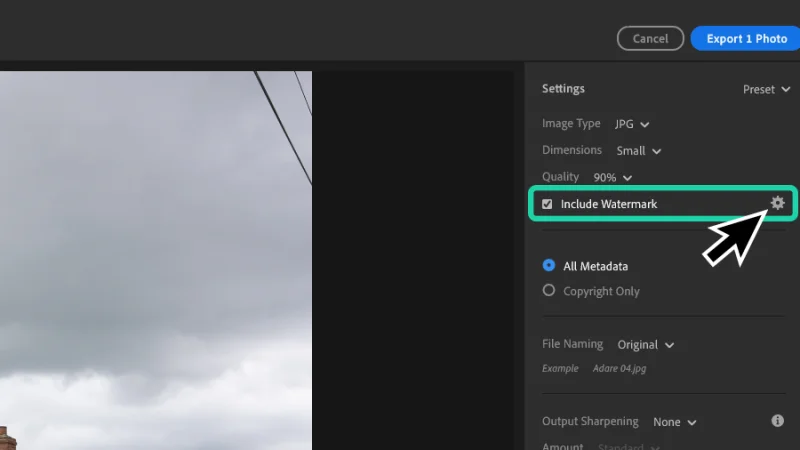
Let's update our text-based watermark before exporting our photo. To do this, we click the Customize Watermark icon next to the Include Watermark checkbox.
We can change Text and Graphic settings to fully customize our watermarks.
The first option we can set inside the Customize Watermark panel allows us to select between types: Text or Graphic. Let’s stay with Text for now.
Immediately below, we find the watermark’s Text field. This is where we can type our watermark’s content. We benefit from a live preview update over the image as we enter the new text message.
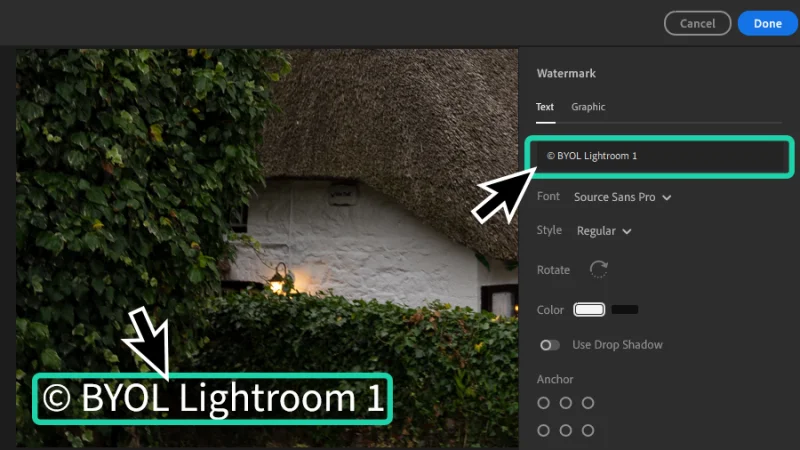
Manually type the new watermark text content.
You are promoting your brand, so stay consistent with your visual guidelines. Watermark customization also allows us to update the text’s font and style.
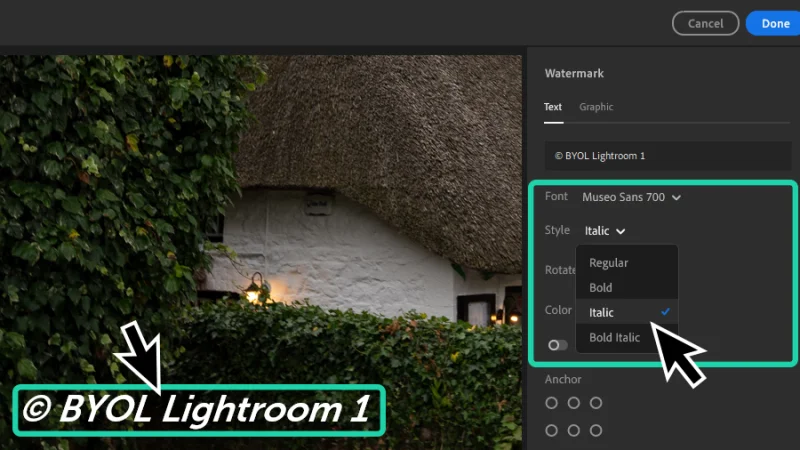
Watermark changes are previewed in real-time. How cool is that?
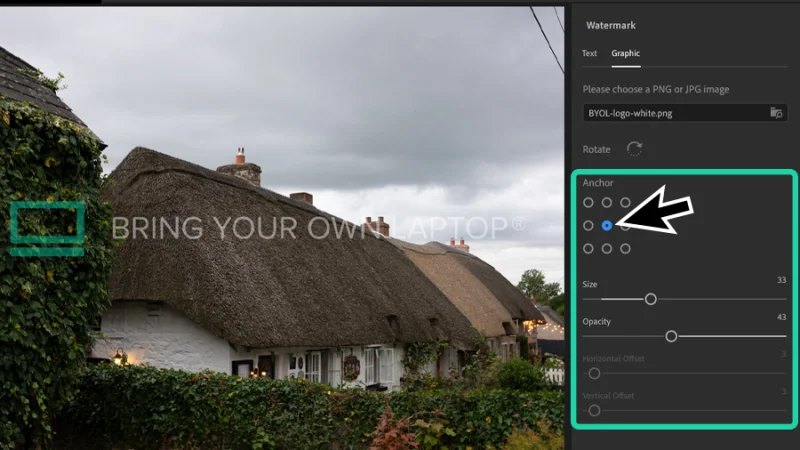
Next, to match light or dark image backgrounds, you can pick white or black for your watermark color or add a subtle drop shadow to enhance contrast. Referring to the watermark’s placement over the photo, you have one-click preset points to quickly choose the best position: Top, Center, Bottom, and Left or Right. Awesome!
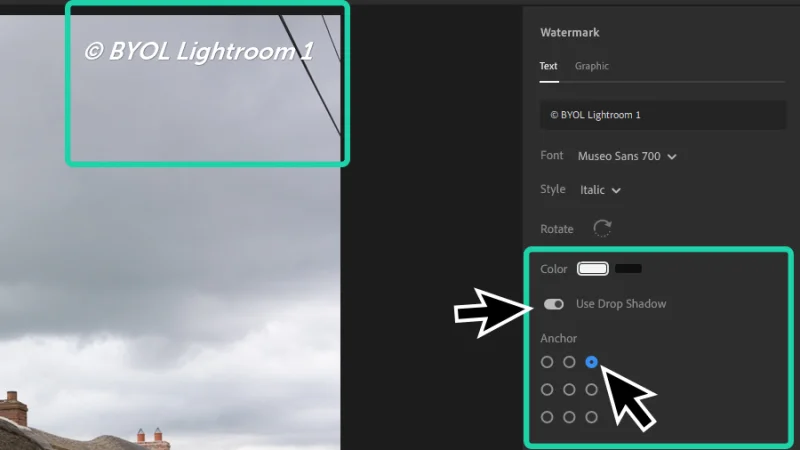
Check your photos before picking the best color, drop shadow, and anchor placement for your watermarks.
Finally, you can determine the watermark’s size and opacity. Keep things balanced and subtle. Remember that you need your watermark to be visible enough to protect your photo, but not strong enough to hurt its visual impact.
Finally, to fine tune the watermark’s placement over the image, you can offset its position both horizontally and vertically until you are completely satisfied with the result.
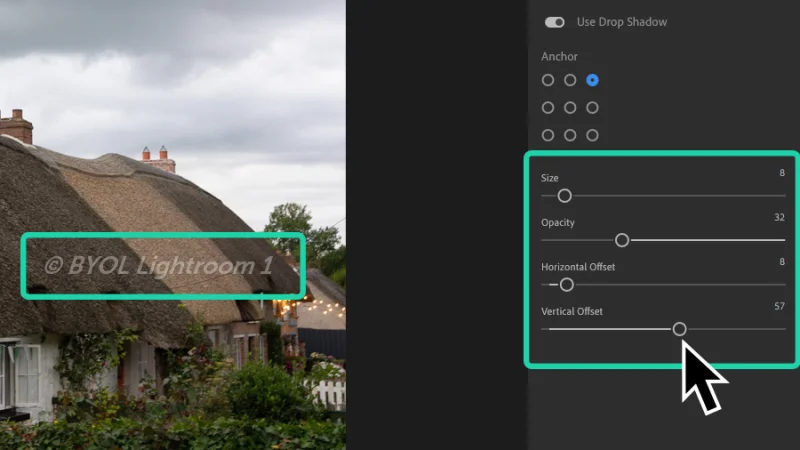
We must find a delicate balance in size and opacity when we’re adding watermarks to images.
Timeout #1
Get inspired with these watermark designs and try to point out those designs that can add style along with efficiency and subtleness and those that could look more distracting. It’s good exercise!
How to Edit a Graphic Watermark
Now let’s place a Graphic watermark over our photo. Lightroom does not include built-in graphics for our watermarks, so this will require some previous work on other tools, like Photoshop or Illustrator. Once you have your logo or symbol designed, make sure it is exported as .jpg or .png, for these are the supported formats. Choose .png format when you have transparent layers or backgrounds on your graphic.
Your graphic artwork is ready, let’s use it as a watermark on our photo. Once again, hit Shift + E on your Mac or PC to open the Custom Settings panel, check Include Watermark, and click on the Customize Watermark button.
Inside the Customize Watermark panel, click on Graphic from the first available option.

Let’s take a shot at Graphic watermarks. Added risks included in this option.
Next, we click on the Browse field or icon to open our Browse window and pick the graphic artwork you’ve saved as .jpg or .png. Click Open to select the graphic and close the Browse window. The file name appears in the field and we have our graphic watermark’s live preview over the photo to support further editing.
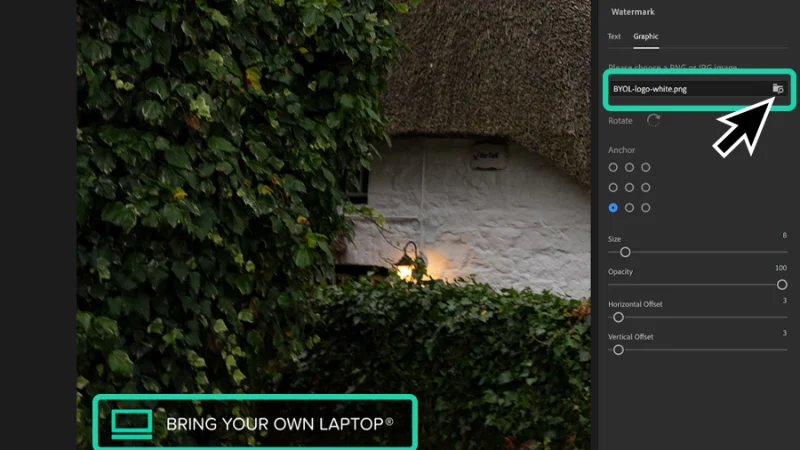
Awesome, our graphic’s transparent background will allow for a smoother blend with the photo.
As with Text watermarks, we can adjust Graphic watermarks’ size and opacity, to keep them balanced and subtle, and pick their preset placement over the photo using the one-click anchor points.
Watermarks may feel a bit like a touch-and-go process, but every detail matters when you are selling your brand!
Bonus: How to Batch Apply Watermarks to Multiple Images
Alright, you’ve made it this far, you deserve a time-saving special awesome bonus treat. Quick and Easy!
· Select a group of photos you want to share.
· Hit Shift + E
· Edit your watermark in the Customize Watermark panel
· Hit the Export Photos button
· Done!
I left the Rotate watermark option for this example so I could add another surprise closer to the end – and because I don’t like it much, too!
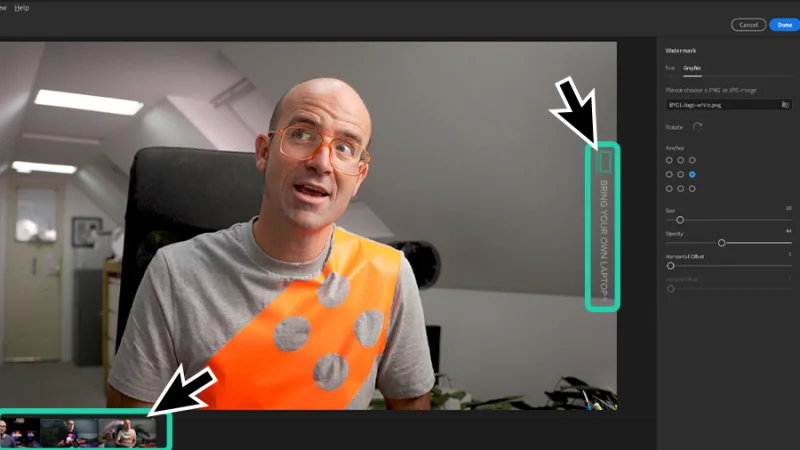
Yes, it looks a bit weird, but I had to show you that we can rotate our watermarks.
Timeout #2
If you want to dive deep into the complexities of Digital Copyright, and get answers on questions like how to protect photos you post online, take some time exploring this vast resource.
There we have it!
Wrapping up, these are some valuable takeaways on Watermarks in Lightroom!
Pros:
· Ownership: Watermarks identify an image’s creator and copyright holder, helping to prevent unauthorized use.
· Brand Promotion: In the era of online sharing, your watermark introduces you to the world – be creative… and subtle!
Cons:
· Noise alert: It’s not brand advertising, it’s a watermark. If you make it too complex or intrusive, you may damage your image’s visual appeal and distract viewers from its essential goal.
· Partial protection: “image thieves” can sometimes find a way to crop and clone your image, but watermarking your work will always be good practice!
What 's Next?
Go further with Lightroom by joining BYOL. As a BYOL member, you will gain access to my Lightroom Essentials course as well as my 30+ additional courses on After Effects, Photoshop, Illustrator, and more. As a BYOL member you will also enjoy personalized support, earn certificates, and tackle exciting community challenges. Head here to sign-up!
See you in class! – Dan
Popular posts

Adobe MAX 2025 - File Download
Daniel Scott
-1750161634.webp)
Modeling Shortcuts in Blender
Daniel Scott

Plugins in Illustrator
Daniel Scott
-1748277302.webp)
How to Straighten the Horizon in Photoshop
Daniel Scott
Go from zero to design hero with our awesome courses!


- Powered by Marvin
- Terms of use
- Privacy policy
- Cookie policy
-
- © Bring your Own Laptop Ltd 2026