How to break apart smart objects in Photoshop
Questions
Student Gallery
Be the first to share something.
Course info
Overview
Join Adobe certified instructor Daniel Scott to learn:

Daniel Walter Scott
Founder of Bring Your Own Laptop & Chief Instructor
I discovered the world of design as an art student when I stumbled upon a lab full of green & blue iMac G3’s. My initial curiosity around using the computer to create ‘art’ developed into a full-blown passion, eventually leading me to become a digital designer and founder of Bring Your Own Laptop.
Sharing and teaching are a huge part of who I am. As a certified Adobe instructor, I've had the honor of winning multiple Adobe teaching awards at their annual MAX conference. I see Bring Your Own Laptop as the supportive community I wished for when I was first starting out and intimidated by design. Through teaching, I hope to bring others along for the ride and empower my students to bring their stories, labors of love, and art into the world.
True to my Kiwi roots, I've lived in many places, and currently, I reside in Ireland with my wife and kids.
Downloads & Exercise files
Transcript
I'm gonna do some fixing for no good reason. Save it, close it. Okay. And okay, but back in my upwards here. Okay, this file, you can see it's, oh, it's all hidden inside of that. It's really nice.
But sometimes you're like, actually come out. Just show yourself. I want you in there. What you can do is you can right click the name and there's this one here. It says, convert to layers. Insignificant name or, you know, not very exciting or, I dunno, I find it really useful.
Convert to layer just means, hey, the problem is it's going to, going back at its like full transformation. You know it was, 'cause it's a big image that we scale down to the smaller size and it's gonna go, here you go. There's the big quality version that was inside and that's really helpful. Gives you the full, full quality one's. Put it in a nice little group. There's the levels, there's that first layer, another layer, just a handy little quick, little trick.
Okay? It's a one way street, so maybe I might wanna duplicate that smart object first. And it doesn't matter if it's a smart object or a library object, it doesn't matter. You can right click it and go to that one there. Uh, frame to layers, convert to layers, and that should work. Alright, that's it.
Short one. Good one. I'll see you in the next video.
How do you unpack a Smart Object into editable layers?
Right-click the Smart Object’s name in Photoshop’s Layers panel and choose Convert to Layers. This brings its contents into the main document as a group of editable layers. Duplicate the object first if you want a backup, and be aware that conversion can restore the contents to their original size.
How to Convert Smart Objects to Layers in Photoshop
Key takeaways
Use Convert to Layers to unpack a Smart Object or library object.
Access the individual image and adjustment layers directly in your main document.
Expect scaled-down content to return to its original, larger size in this workflow.
Duplicate the original object before converting if you might need it again.
Why unpack a Smart Object?
Smart Objects are handy for keeping things tucked away. Your Layers panel might show a single item, while inside that item there are several separate layers.
That is nice and tidy, but sometimes you want those layers back in the main document. You want to work with them directly, rather than opening the object each time. That is where the rather unexcitingly named Convert to Layers command becomes really useful.
What happens to the layers inside?
Take a placed image of a cup of green tea. Open its Smart Object and there are two layers inside. Add a Levels adjustment layer, make an adjustment, then save and close the object.
Back in the artboard document, all three layers are still tucked inside that one object. The adjustment has not disappeared; it is simply part of the contents.
Converting the object to layers brings those contents out into the main document. In this example, that means the two original layers and the Levels adjustment layer, organised in a group.
How to convert a Smart Object or library object to layers
Duplicate the object if you want a backup. Treat this as a one-way unpacking operation, and keep the original if you may need it later.
Find the object in the Layers panel. Use the Smart Object or library object you want to unpack.
Right-click its layer name. This opens the layer context menu.
Choose Convert to Layers. Photoshop brings the contents into the document as a group.
Expand the group. You can now access the individual layers, including any adjustment layers inside.
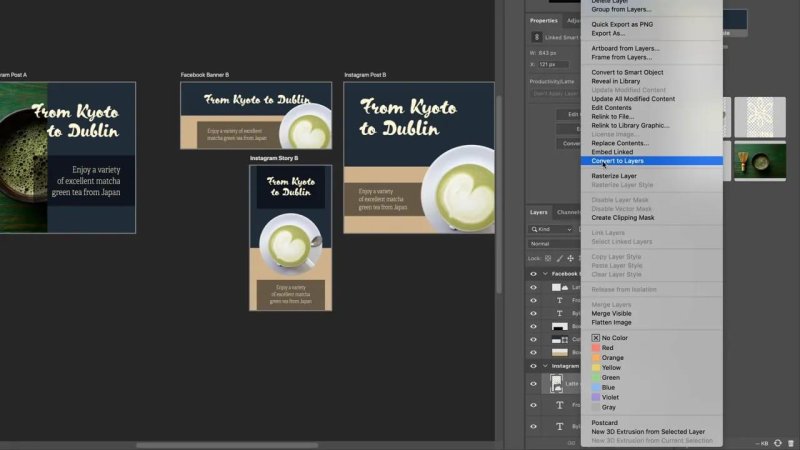
Convert to Layers is tucked into the layer’s right-click menu.
The same command works for the Smart Object and library object shown here. There is no separate unpacking process to learn for each.
Be prepared for the original image size
There is one important catch: the unpacked content can come back at its original size rather than keeping the smaller transformation used in your layout.
In this example, the original image is large and has been scaled down to fit the design. After conversion, the cup appears much larger within the artboard because the full-size contents are back.
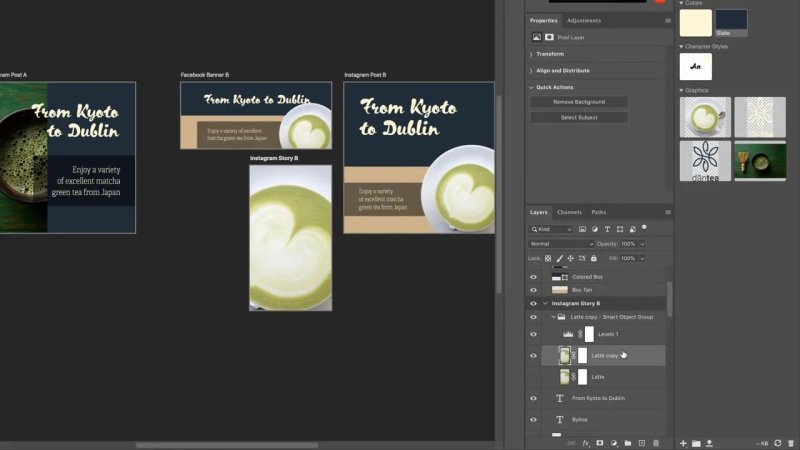
The layers are accessible, but the image has returned at its larger original size.
That can be useful: you have the full-quality source content available again. Just do not expect the unpacked result to look exactly like the scaled-down object without further resizing.
It is a small command, but a handy one whenever you want the contents out of their container and back where you can work with them.
Key terms
Smart Object
A Photoshop layer that holds source content, which can include multiple layers. You can open it to edit those contents separately.
Convert to Layers
The command used here to unpack a Smart Object or library object into a group of layers in the main document.
Adjustment layer
A layer used to apply an adjustment, such as Levels or Curves. In this example, the Levels adjustment remains available after unpacking.
Transformation
A change to an object’s size or appearance in the layout. The relevant transformation here is scaling a large source image down to fit an artboard.
FAQs
Does Convert to Layers keep the adjustment layers?
Yes. In this example, the Levels adjustment appears in the resulting group alongside the two original layers.
Why did my image become larger after conversion?
The object had been scaled down in the layout. Unpacking it restored the larger source contents rather than retaining that smaller transformation.
Should I duplicate the Smart Object first?
Yes, if you want to preserve the original object. Keeping a duplicate gives you a backup before you unpack its contents.
Written by Daniel Walter Scott — Founder of Bring Your Own Laptop & Chief Instructor
