Photoshop Artboard productivity hacks
Questions


Student Gallery
Be the first to share something.
Course info
Overview
Join Adobe certified instructor Daniel Scott to learn:

Daniel Walter Scott
Founder of Bring Your Own Laptop & Chief Instructor
I discovered the world of design as an art student when I stumbled upon a lab full of green & blue iMac G3’s. My initial curiosity around using the computer to create ‘art’ developed into a full-blown passion, eventually leading me to become a digital designer and founder of Bring Your Own Laptop.
Sharing and teaching are a huge part of who I am. As a certified Adobe instructor, I've had the honor of winning multiple Adobe teaching awards at their annual MAX conference. I see Bring Your Own Laptop as the supportive community I wished for when I was first starting out and intimidated by design. Through teaching, I hope to bring others along for the ride and empower my students to bring their stories, labors of love, and art into the world.
True to my Kiwi roots, I've lived in many places, and currently, I reside in Ireland with my wife and kids.
Downloads & Exercise files
Transcript
I can't really demo them here without uh, actually showing you the tricks and tips. But trust me, watch the video. They're good. Alright, let's do it. Alright. First thing we're gonna do is we are going to convert this to an art board.
Now, an art board is just multiple pages within a document. 'cause what we wanna do is transfer this to a bigger document that I'm creating that has lots of different art boards or lots of different pages depending on how you wanna refer to them. Okay? So first of all, we need to convert it to an art board. And that's a weird thing 'cause at the moment it's just a pile of layers in a Photoshop document. But we wanna kind of group them together in this art board.
To do it, you gotta a layer new and you go to art board. It's in a strange place. So screenshot that, check it out in your notes, scribble around it. Check. And I am now an art board. Now I'm gonna call my art board Facebook.
You should copy me if you're following along. Facebook banner A. Okay. And it's gonna be the same size as that. It is at the moment. It's 2000 pixels wide click.
Okay. And nothing really changes except the name appears at the top. You can also see the layer structure changes. Okay? There's this new thing here. It's kind like a layer, but it's actually a group.
You can see all of these guys are indented. Can use a little chevron arrow thing there to kind of show you that they're all inside of that. So that's how you make an outboard. What I'd like to do is transfer this to another document that I'm working on that has lots of like combining outboards. Now, before I open it up, I wanna close down these other things I've been working on. So this is a new feature weirdly, um, and I love it.
And a vial. There's one called close others. It just means close everything. But this one that I've got in front of me, okay? And yours might ask you to save and you can say yes or no. It's just a tutorial, I guess.
If you wanna keep them, say yes and put them somewhere and maybe in your documents. Um, but we won't need them again in this course. So you can say no. All right, so I've got this guy. I've closed everything out using my suite. New, uh, Photoshop 2020 feature.
Now what I wanna do is open up, um, my other document that has got some extra pages in it. Okay, file open. We're gonna open this one called social media. So I've started making a document, okay? It has a few, you know, Instagram posts and you can kind of get a sense for what we are doing here. We're trying to do bigger documents.
I've kept it small enough so that we can handle it together in this class. Give everybody going. But you can imagine if you are doing uh, social media banners or ad banners, you can end up with like hundreds of variants of these things. So, uh, art boards are super helpful because they're all separate documents, okay? All exportable separately, but they're all in the same thing. So you can see some visual consistency.
You can copy images from one art board to another. What we wanna do now is work out how to get this one to this one. The first thing you need to do is convert it to an art board, which we just did. Next way of doing it is it's up to you. Everyone's got their own technique. Probably everyone's Gonna do this way is you grab the name, click hold, drag drag, drag, drag, drag hover above this for some random amount of time and then kind of keep holding the mouse down.
Let go and then get it in line by grabbing the name again. Cutting, getting it down. Then you'd be like, yep, is there another way? There is, okay, do I prefer that way? I do half and half. I get, I don't know why.
But anyway, let's say you want another way. 'cause that way is weird. Um, it is, it's the way we all do it. Uh, but over here, just right click Facebook banner and go to duplicate. The good thing about this is you can say, I would like it to go to the destination is 'cause I've got this other file open. Okay, there it is.
The social media tab. There I can say, actually put it in that one for me. Where stick in the canvas. It's gonna randomly try and put it somewhere, but that's okay. Let's go check it out. And randomly over there we go.
And I'm gonna drag the name up to you. You can do the drag, drag, drag method or the duplicate method. Alright, so I've got them all together. Now I wanna show you some tricks of just making art boards better to work with. 'cause they can be tricky, right? So one of the easiest ones and I use the most is see these little chevrons.
'cause you can see the dark boxes here are the artboards. So I've named them all nicely, okay? Um, but if you want to kind of, they're a little bit hard to work with and this one's not too big, but it's big enough, right? It's confusing. What you can do is instead of closing them down individually, okay, what you can do is just hold down the command key on a Mac or control key on a pc and they all fly together. So hold control down on a pc, click them, they all open or closed it's command and just click it once on a mac does the same thing.
Cool. Huh? One of the other really nice ways of working is up here. There's this filters option. This thing here you've never clicked on, right? You have no idea what these all do.
There's are super helpful. Um, change it from kind to upward, okay? And what it's going to do is depending on what you've got clicked, so I'm gonna click on this, uh, t image here and you'll notice click on it. Okay? You'll notice it jumped to the pod, uh, Instagram post A, which is the name of this art board. Okay?
If I click on this, uh, Instagram post B, and I click on this black box, can you see it jumps to that one? So it just keeps you a layers panel. Layers panel even really manageable, okay? By just switching it from kind to up upward and it just doesn't matter where you are, it just automatically jumps across. Okay? If you click on it, all the different ones handy.
Yeah. Now one thing with it though, it can confuse you if you are like, what the, where did everything go? Just when you're finished with, uh, some of these filters, I'm gonna go back to kind for the moment, um, just to help this tutorial run, okay? But, uh, another really helpful trick when using art boards is the auto nests. So we've all probably done this, right? Where we've grabbed something, you're like, I just wanna move it over here a little bit, just a little bit, a little bit.
Ah, and it's jumped out and it's, who knows where it's ended up. Oh, it's ended up back in there, but it's ended up over here now and over here. You've all done it right? And you're like, I just want it a little bit to the edge and it flies all over the place. So how Do you get around that? I'm gonna undo it.
Okay, what you can do is you can say, all right, Instagram post A. There he is there, okay, T okay, I would like you, I'm click on this little icon here. Okay? It's called auto nesting. It's got a big long name, but it just says I, I prevent auto nesting. Okay?
It's by default it tries to move around, which is quite cool, but a lot of the time you're like, just stay where you are please. So if I click on that, nothing really changes except that looks, um, I wanna say depressed. It's a button pushed down, but he's not that sad. Uh, the little lock icon appears here, but it's not actually lock. Well look, it still moves around, but look what happens. I can grab it and just go.
Actually you can go anywhere you like. Okay, well, anywhere you like, you can go down here. It's still on that app board though, which is really handy if you just wanna use like, the slither of things, you know? Uh, anyway, I find that useful. Uh, you can do it for the whole app board. Okay?
You can say, uh, all of these guys, uh, don't move off. Okay? I've just done one last trick for making, uh, boards more livable. Okay? Is, let's say I need a new one. Let's say I've kind of got this one to a good point and I want another one kind of similar to it.
Um, you can use the art board tool, right? And click on this guy and say Plus, and you're like, oh, then you gotta copy all the bits across. It doesn't work if I undo that. If you hold down the option key on a Mac or the alt key on a PC and click the same button plus look duplicates, it brings all these buddies along. Um, yeah, I'm not sure why we need all these, but you get the idea. Hold down option on a Mac alt on a PC and it will, um, duplicate it plus bring all his buddies along.
We don't need any of that. That's a undoable, um, thing. I just wanted to show you it. And those are my tricks. Chevrons hold command or control. If your Mac or pc, you can filter by going up to kind and select art boards and it will only do the one you've selected and you can click on things and say, actually buddy, you do not auto nests.
Just stay where you are. Okay? I'm gonna turn it off. I'm gonna go back to Kind and I will see you in the next video.
How do I make Photoshop artboards easier to work with?
Start by converting your design into an artboard, then use a few handy controls to keep things manageable. You can transfer whole artboards between documents, collapse their layer groups together, filter layers by artboard, stop images jumping between artboards, and duplicate a layout with all its contents intact.
Photoshop Artboard Tips and Tricks
Key takeaways
Convert an existing layered design into an artboard without rebuilding it.
Bring separate designs together in one Photoshop document.
Tidy the Layers panel with a modifier-click and an artboard filter.
Keep images attached to the right artboard while adjusting their position.
Duplicate an entire layout instead of copying its contents piece by piece.
Artboards are brilliant for social media designs and advertising banners. You can keep different sizes and variations together, compare them side by side, and reuse images without constantly switching files.
They can also be a little frustrating. You move an image towards an edge and it jumps into another artboard. You add a new artboard and discover it is completely empty. Your Layers panel becomes a very long list of things you would rather not scroll through.
A handful of small tricks makes all of that much more livable.
What are Photoshop artboards useful for?
Think of artboards as separate pages inside one Photoshop document. Each has its own design area and contains its own layers, but all of them share the same workspace.
For example, you might have a Facebook banner alongside several Instagram posts. Rather than managing every variation in a separate file, you can keep them together and see whether the colours, images and typography feel consistent.
Artboards can be exported separately, so keeping the designs together does not mean they have to become one combined output. You get the convenience of a shared document while retaining distinct layouts.
That becomes particularly helpful when a small set of social media graphics grows into dozens, or even hundreds, of banner variations.
1. Convert an existing design into an artboard
Suppose you already have a finished Facebook banner in an ordinary Photoshop document. It is a pile of layers at the moment, and you want to bring the whole design into a larger social media document.
First, turn it into an artboard:
Open the existing design.
Choose Layer > New > Artboard.
Give it a useful name, such as Facebook banner A.
Keep the dimensions appropriate to the existing design, then click OK.
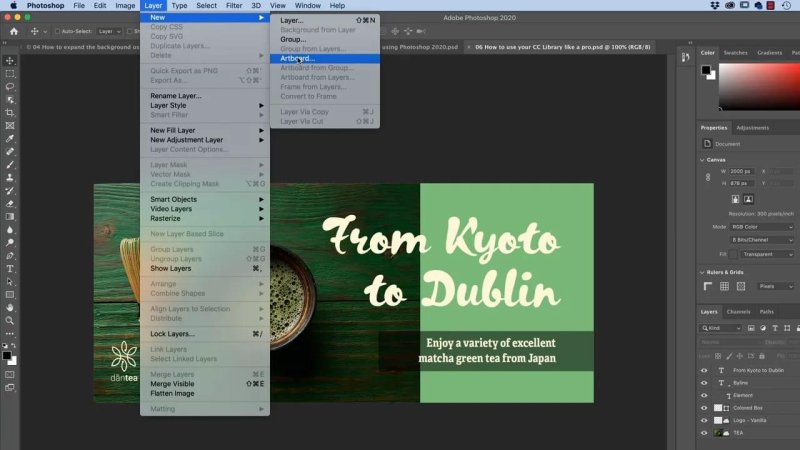
The Artboard... command is tucked away under Layer, then New.
In this example, the banner is 2,000 pixels wide. That is the size of this particular design, not a rule for every Facebook banner.
Visually, very little changes. The artboard name appears above the artwork, and the Layers panel gains an artboard container with the design layers indented beneath it.
That container behaves rather like a group: click its little chevron to show or hide the layers inside. Your design is now gathered into an artboard, ready to transfer as a whole.
A quick housekeeping trick: Close Others
If you have lots of unrelated documents open, choose File > Close Others. It closes the other documents while leaving the active one open.
This was introduced as a Photoshop 2020 feature, and it is a handy way to clear the decks before combining files. Photoshop may ask whether to save changes, so keep anything you need before closing it.
Next, use File > Open to open the destination document. In this example, that is a file called Social Media, already containing several artboards.
2. Transfer an artboard to another document
There are two useful ways to bring the Facebook banner into the Social Media document. Neither is compulsory. I tend to use a bit of both.
Method A: Drag the artboard across document tabs
Click and hold the artboard’s name above the artwork.
Drag it onto the destination document’s tab.
Keep holding the mouse button while the destination document becomes active.
Move into its workspace and release.
Drag the artboard’s name again to position it where you want it.
It works, but the drag, hover, wait, keep holding routine can feel a bit odd. If that is not your favourite way of doing things, there is another option.
Method B: Duplicate into the destination document
In the source document’s Layers panel, right-click the artboard name.
Choose the Duplicate command.
In the dialogue box, select the other open document as the destination.
Confirm the duplication.
Switch to the destination document and reposition the artboard by dragging its name.
The destination document needs to be open so you can choose it in the dialogue box.
Photoshop may place the duplicate somewhere you would not have chosen. That is fine. The important bit is that the artboard and its contents have arrived together; you can tidy its position afterwards.
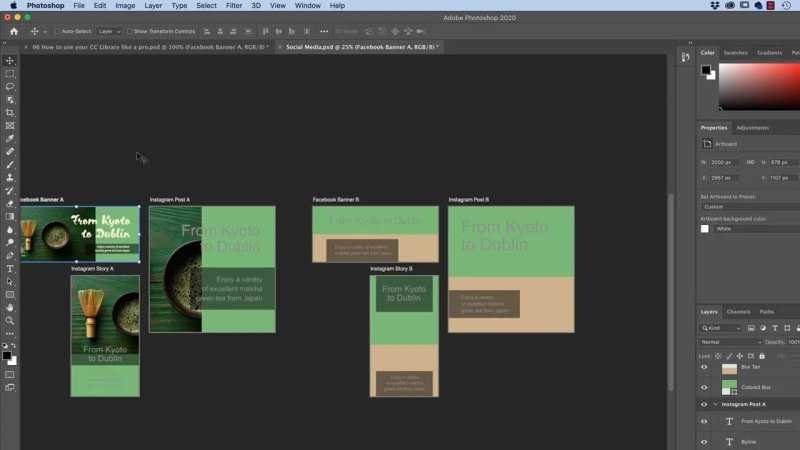
Keeping the banner and post variations together makes their shared visual style easier to compare.
3. Collapse or expand artboard groups together
Once the designs are together, the Layers panel can get busy very quickly. Even a fairly modest document becomes awkward when every artboard is expanded.
You do not have to close them one at a time:
Mac: hold Command and click an artboard’s chevron in the Layers panel.
Windows: hold Control and click an artboard’s chevron.
The artboard groups expand or collapse together. One modifier-click, and suddenly the panel is much less of a jumble.
Clear names help here too. Labels such as Instagram post A, Instagram post B and Facebook banner A make the collapsed list useful rather than mysterious.
4. Filter the Layers panel by artboard
There is another very helpful control at the top of the Layers panel: the filter dropdown, usually set to Kind.
Change it from Kind to Artboard.
Open the filter dropdown at the top of the Layers panel.
Select Artboard.
Click an element on the artboard you want to work with.
The Layers panel focuses on the artboard containing that selected element. Click an image in Instagram post A and its layers appear. Select an element in Instagram post B and the panel switches to that artboard instead.
This keeps the layer list manageable without requiring you to scroll through every other layout in the file.
If you suddenly think your layers have disappeared, check the filter. They may simply be excluded from the current panel view. Change the dropdown back to Kind when you want to return to the broader layer list.
5. Stop images jumping between artboards with Prevent Auto-Nesting
This is the one that saves a lot of irritation.
You grab an image and move it just a little towards the edge. A little more. Then, whoops, Photoshop decides it belongs somewhere else. Now you are trying to work out which artboard has collected it.
That behaviour comes from auto-nesting, which can change a layer’s artboard membership as you drag it around. Sometimes that is useful. Sometimes you just want the thing to stay with its original artboard, please.
To prevent it:
Select the layer you want to keep attached to its current artboard.
In the Layers panel’s lock controls, click Prevent Auto-Nesting.
Move the layer to adjust its placement.
A small lock indicator appears, but this is not a position lock. You can still move the image around. What changes is that it remains associated with its original artboard rather than automatically jumping into another one.
That is particularly handy when you want only a sliver of an image visible along an artboard edge. You can move most of the image beyond the boundary without accidentally reassigning it.
You can also apply this at the artboard level to keep its contents from automatically moving out. Turn it off again when you want the normal auto-nesting behaviour back.
6. Duplicate an artboard with all its contents
Once a layout is working nicely, you will often want another version that starts from the same design.
With the Artboard Tool active, clicking a plus button beside an artboard creates a new blank artboard. That is useful for a fresh layout, but not so helpful when you want all the existing bits to come along.
The trick is to hold a modifier key while clicking that same plus button:
Mac: hold Option and click the plus button.
Windows: hold Alt and click the plus button.
Now Photoshop duplicates the artboard with its contents. The images, text and other layers all come along, ready for you to make a variation.
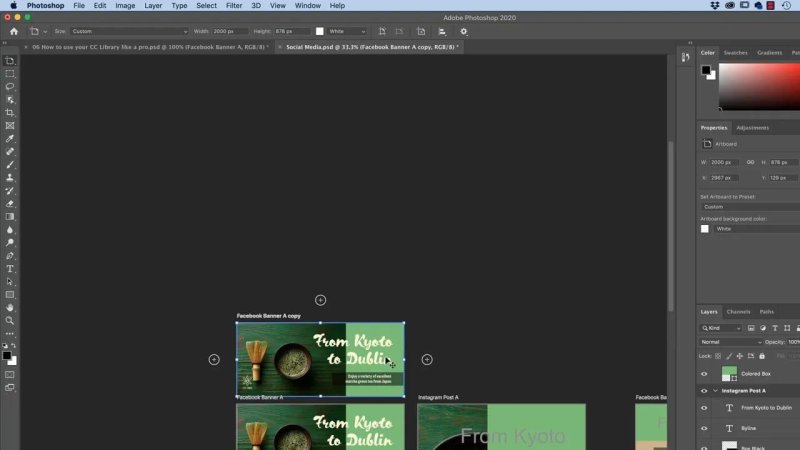
Option-click (Mac) or Alt-click (PC) the plus button to bring the whole design along.
No copying the text separately. No rebuilding the image placement. Just a duplicate of the layout you already like.
A few small habits make artboards much friendlier
Convert existing designs before combining them, give the artboards sensible names, and use the Layers panel controls to keep the document manageable.
When an image needs to sit partly outside a boundary, prevent auto-nesting. When you need another version of a design, Option-click or Alt-click the plus button.
Those are small changes, but they remove a surprising amount of fiddling. Artboards really are good once you stop having to wrestle with them.
Key terms
Artboard
A separate design area within a Photoshop document, rather like a page. Multiple artboards let you organise related layouts together and export them separately.
Chevron
The small arrow beside an artboard container in the Layers panel. Clicking it expands or collapses the list of layers inside.
Artboard filter
A Layers panel filter that focuses the layer list on the selected artboard. Switch back to Kind when you want to leave that filtered view.
Auto-nesting
Photoshop’s automatic reassignment of layers as you move them between artboard areas. Prevent Auto-Nesting keeps a layer associated with its current artboard without stopping you from moving it.
FAQs
Can I turn an existing Photoshop design into an artboard?
Yes. Choose Layer > New > Artboard, name it, check its dimensions and confirm. The design layers are gathered inside an artboard container in the Layers panel.
How do I copy an artboard into another Photoshop document?
Open both documents, right-click the source artboard in the Layers panel and choose Duplicate. Select the other document as the destination, then reposition the copied artboard as needed.
Why does my image move into another artboard when I drag it?
Auto-nesting can reassign a layer as you drag it between artboard areas. Select the layer and enable Prevent Auto-Nesting to keep it attached to its current artboard while still allowing movement.
How do I duplicate an artboard rather than create a blank one?
With the Artboard Tool active, hold Option on Mac or Alt on Windows while clicking the plus button beside the artboard. This duplicates the artboard and its contents.
Written by Daniel Walter Scott — Founder of Bring Your Own Laptop & Chief Instructor
