In Photoshop How to change all fonts at once
Questions

Student Gallery
Be the first to share something.
Course info
Overview
Join Adobe certified instructor Daniel Scott to learn:

Daniel Walter Scott
Founder of Bring Your Own Laptop & Chief Instructor
I discovered the world of design as an art student when I stumbled upon a lab full of green & blue iMac G3’s. My initial curiosity around using the computer to create ‘art’ developed into a full-blown passion, eventually leading me to become a digital designer and founder of Bring Your Own Laptop.
Sharing and teaching are a huge part of who I am. As a certified Adobe instructor, I've had the honor of winning multiple Adobe teaching awards at their annual MAX conference. I see Bring Your Own Laptop as the supportive community I wished for when I was first starting out and intimidated by design. Through teaching, I hope to bring others along for the ride and empower my students to bring their stories, labors of love, and art into the world.
True to my Kiwi roots, I've lived in many places, and currently, I reside in Ireland with my wife and kids.
Downloads & Exercise files
Transcript
We kind of took, we looked at aboard earlier. Remember, uh, in this one we're gonna click kind and we're gonna say, I wanna show only my layers that have the kind with type in it. Coha two. Good. Okay. And you can say, actually I want all of this.
Okay, I'm gonna select the first one, hold shift, and grab the last one so they've all selected. And then in my character panel, don't use this character style 'cause it'll work. But everything I'll show you, everything's gonna be that same size, okay? It's not what I want. Um, I want it to be specific, different sizes. Uh, so in here I'm gonna say, I would like you to be, uh, font.
Uh, the one we're gonna use is capper. What was it called? Kaka. Okay. If you don't have kaka, pick any font you like. Okay?
Kaka you probably have by now 'cause you would've synced it using, uh, my Sneaky trick earlier when we were opening the illustrator file. It should be on your machine. You can see all the fonts at Kaka all at once. Wai, they retain their size. Uh, let's say we wanna change all the colors of them as well to match our brand colors. Look at this.
Click on vanilla and they all go our vanilla color Wai. Now another thing you might wanna do is that I had this kind of like headline font different from the body copy font. So all the bylines that I've written in here wanted to be a different font. So this thing kind of works and I can hold shift and it's not, well actually I can click the first one, hold command and I could keep going through Command on a Mac, control on a PC and just click them all, but it gets better. So these filters, there's a really nice one in here that says I want you to find by, uh, name. So gimme the ones that have all called byline.
This only works if you are a file layer namer, uh, which you might not be. You might have layer 52. That's not gonna be helpful. 52 copy. 52, copy new. Okay, but I've named all mine so I can select them all and then go up to here.
And I'm gonna use another font just for those ones called, can't remember what it's called. It's called Adele or something. Yeah, look, I've written it down. A d Lost it again. Come on brain. There it is.
Adele condensed Thin. So I'm gonna use Glee and it goes and updates them all. Even the ones that we kind of came in from. The other file we've updated from bold to thin and that's how you kind of work with fonts in Photoshop. Like that. Really wanted to do is show you these cool filters that, um, get ignored.
So we're gonna go back to kind turn the type off, so we're back to kinda regular old, uh, jumbled up layers. Alright, let's get onto the next video.
How do I change every font in a Photoshop file at once?
Use the Layers panel filters to show only Type layers, select the filtered results, then change the font and colour in the Character panel. This updates every selected text layer together while keeping the individual font sizes already used throughout the design.
How to Change All Fonts at Once in Photoshop Using Layer Filters
Key takeaways
Filter Photoshop layers by Kind to isolate every text layer in a busy file.
Update a whole document’s font family and brand colour in a few clicks.
Avoid Character Styles when you need text layers to retain their different sizes.
Use the Name layer filter to target specific groups, such as bylines or captions.
Clear the filter afterwards to return to the full Layers panel.
Why layer filters make font changes much faster
Changing fonts across a multi-artboard Photoshop file can be a bit painful. You might have headlines, body copy, captions, bylines, labels, and all sorts of little text elements scattered through a long stack of layers.
The useful trick is not to hunt through those layers one by one. Instead, use layer filters in the Layers panel. They let you temporarily show just the layers you need, select them all, and make one consistent update.
This is especially handy when adapting a design to a new brand. You can swap the font family, apply a brand colour, and still preserve the hierarchy created by different text sizes.
Filter the Layers panel to show Type layers only
Start in the Layers panel. At the top, open the filter menu and choose Kind. Photoshop then shows a row of layer-type icons.
Click the Type icon, represented by a T. Your long, jumbled layer stack now becomes a tidy list containing only text layers. Backgrounds, shapes, adjustment layers, smart objects, and images are temporarily hidden from the layer list.
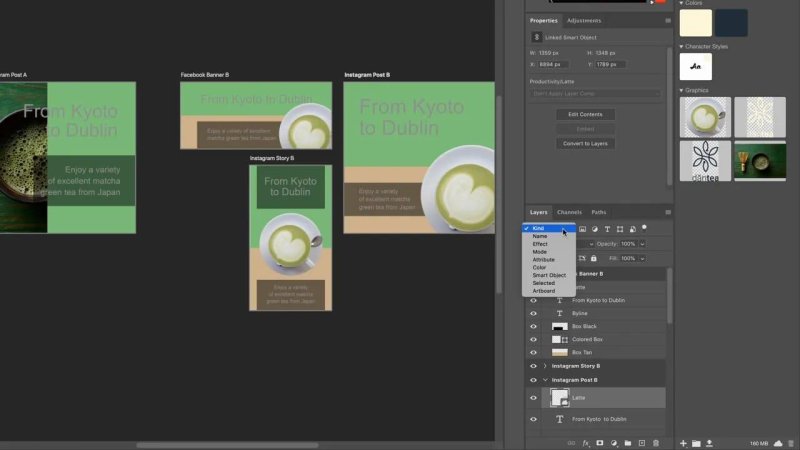
The Kind filter is the quick route to every editable text layer in a complex document.
Once only your Type layers are visible, select the first one, hold Shift, and select the last one. That selects the whole visible range.
At this point, every text layer in the file is selected and ready for a global update.
Change the font without flattening your text hierarchy
With all of the filtered text layers selected, go to the Character panel and choose the new font family. In this example, the font is changed to Capelka, but any available font will do.
The important bit is that the font changes while each text layer keeps its existing size. A large heading remains large, body copy stays smaller, and the spacing hierarchy of the design remains intact.
It is tempting to use a Character Style for this, but that is not the right move when your document needs different font sizes. Applying a shared style can make all selected text conform to the same settings, which is exactly what you do not want here.
Use the Character panel directly when the goal is simple: change the font family while retaining the individual formatting choices already built into the layout.
Apply a brand colour to every selected text layer
While those Type layers are still selected, you can update their colour too. Choose the text colour in the Character panel and set it to the relevant brand colour. In the example, the type is changed to a vanilla colour.
Photoshop applies that colour across every selected text layer at the same time. It is a very quick way to bring a supplied file into line with a brand palette without manually editing each heading and paragraph.
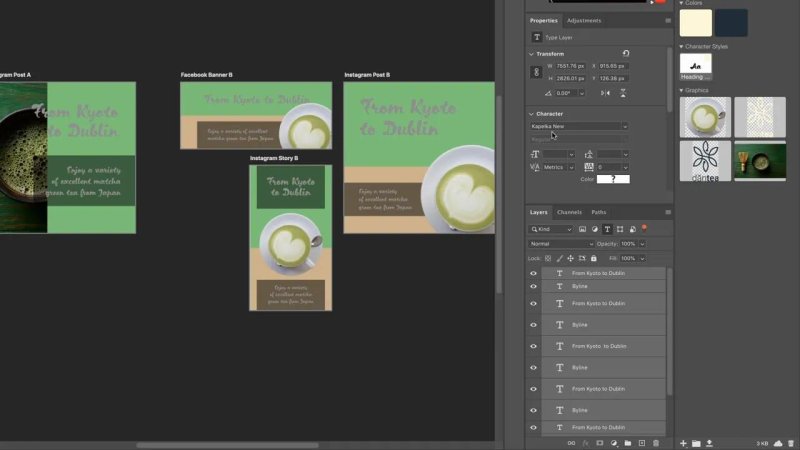
A single font or colour change bring the text across multiple artboards into the same brand system.
Use layer names to change only selected text groups
Sometimes you do not want every piece of text to use the same font. For example, headlines may need one typeface while bylines use a condensed, lighter font.
You could hold Command on a Mac or Control on a PC and click individual layers to create a selection. That works, but it gets tedious quickly.
The better option is filtering by layer name.
Find all layers with the same name
In the Layers panel filter menu, choose Name. Then enter the shared name used for the text layers you want to change, such as byline.
Photoshop narrows the list to layers matching that name. Select all the visible filtered results, then use the Character panel to apply the font you want. In the example, all byline layers are changed to Adele Condensed Thin.
This also updates text that may have arrived from another file, including text that previously used a heavier weight. The result is a consistent byline treatment across the complete set of designs.
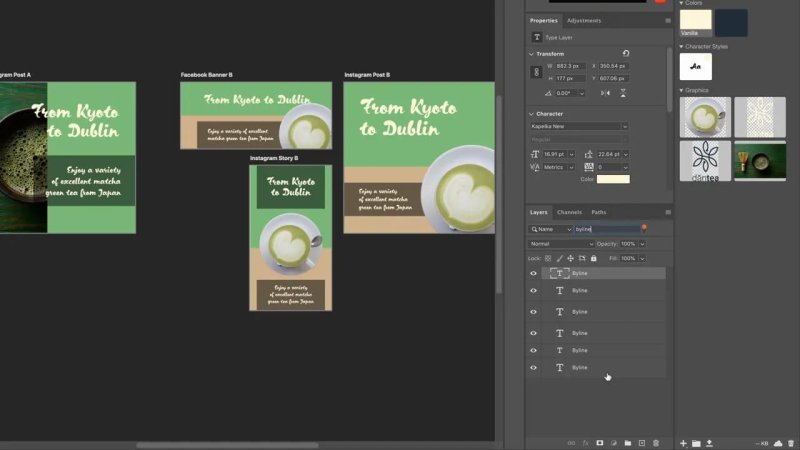
Consistent layer names make it easy to target a specific text role, such as bylines, across an entire project.
Layer naming is what makes this workflow brilliant
Name filtering only works if your layers have useful names. If the layer stack is full of names such as “Layer 52”, “Layer 52 copy”, and “Layer 52 copy new”, Photoshop cannot help you identify the text role you need.
A little layer discipline goes a long way. Name text layers according to what they are, not merely what Photoshop happened to call them.
headline
body-copy
byline
caption
button-label
With a sensible naming system, a last-minute typeface update stops being a tedious layer-by-layer job. You can isolate the right text category, select it, and update it in one go.
Reset the Layers panel when you are finished
When the edits are complete, return the Layers panel to normal by going back to the Kind filter and switching the Type filter off. Your full layer stack appears again.
That is the whole workflow: filter, select, update, then clear the filter. It is one of those small Photoshop features that is easy to overlook but incredibly useful when working with text-heavy design files.
Key Terms
Layer filter
A control in Photoshop’s Layers panel that temporarily limits visible layers by properties such as kind, name, effect, colour, mode, or attribute.
Kind filter
A layer filter that groups layers by type. Choosing Type shows only editable text layers.
Character panel
The Photoshop panel used to control type settings including font family, weight, size, leading, tracking, and colour.
Character Style
A saved collection of type settings. It can be useful for consistency, but it is not ideal when selected text layers must retain different sizes.
FAQs
Can I change the font on multiple Photoshop text layers at once?
Yes. Filter the Layers panel to show Type layers, select the filtered layers, and choose a new font in the Character panel.
Will changing the font change every text layer to the same size?
Changing the font family through the Character panel retains the existing sizes of the selected text layers. Avoid applying a shared Character Style if those sizes need to stay different.
How can I change only bylines or captions in Photoshop?
Use the Name filter in the Layers panel and search for the shared layer name, such as byline or caption. Select the matching results and apply the required font settings.
Why are Photoshop layer names important?
Clear layer names allow you to filter and update related elements together. Generic names make it much harder to find a specific set of text layers quickly.
Written by Daniel Walter Scott — Founder of Bring Your Own Laptop & Chief Instructor
