This course has been archived. See the updated course here.
How to export animated GIF infographic animation from After effects
Questions


Student Gallery
Course info
Overview
- You will need a copy of Adobe After Effects, Illustrator & Photoshop CC 2017 or above. 90% of the course will be done in After Effects but a few things are better done in Illustrator & Photoshop. A free trial can be downloaded from Adobe.
- No previous motion graphic skills are needed.
- No previous After Effects, Illustrator or Photoshop skills are needed.
- 48 lectures 5+ hours of well structured content.
- You'll learn to take Excel spread sheets and animate this in After Effects.
- You’ll learn how to make animated pie charts, line charts & bar graphs.
- You’ll learn how to create percentage counters.
- You’ll learn how to animate icons making beautiful infographics.
- You’ll learn how to create 'voice over' infographics.
- You’ll learn all the animation techniques needed to bring your data to life.
- You will have the finished files so you never fall behind.
- Downloadable exercise files & cheat sheet.
- Forum support from me and the rest of the BYOL crew.
- Techniques used by professional motion graphic designers.
- A wealth of other resources and websites to help your new career path.
- No previous After Effects experience is necessary.
- This course is for people completely new to After Effects. No previous animation or motion graphic design experienced is necessary.
- This is a relaxed, well paced introduction that will enable you to produce impressive video for your business or organization. Only basic computing skills are necessary - If you can send emails and surf the internet then you will cope well with our course.
- There is a 100% refund if you don’t find this course useful. Just message me, no questions asked, I’ll refund your payment in full.
Course duration 5.5 hours + your study.

Daniel Walter Scott
Founder of Bring Your Own Laptop & Chief Instructor
I discovered the world of design as an art student when I stumbled upon a lab full of green & blue iMac G3’s. My initial curiosity around using the computer to create ‘art’ developed into a full-blown passion, eventually leading me to become a digital designer and founder of Bring Your Own Laptop.
Sharing and teaching are a huge part of who I am. As a certified Adobe instructor, I've had the honor of winning multiple Adobe teaching awards at their annual MAX conference. I see Bring Your Own Laptop as the supportive community I wished for when I was first starting out and intimidated by design. Through teaching, I hope to bring others along for the ride and empower my students to bring their stories, labors of love, and art into the world.
True to my Kiwi roots, I've lived in many places, and currently, I reside in Ireland with my wife and kids.
Certificates
We’re awarding certificates for this course!
Check out the How to earn your certificate video for instructions on how to earn yours and click the available certificate levels below for more information.
Downloads & Exercise files
Transcript
Hi there, in this video we're going to look at creating this. This is an animated GIF that can go out via Social Media and be shared by Facebook and Instagram. It's not a video, so it just plays by itself. We love them. This is the way to do it to keep the file size nice and small. We're going to look at the way to do it. And you don't want bending like this, the file size is huge. Let's go and look at all the tricks and tips to make a GIF. And to make it super small where you're sharing social goodness.
First thing we'll do is open up something to export as a GIF. Under '10 Exporting', let's open up this one that says 'Pie Chart GIF'. Open that up. It's an After Effects project. So what we're going to do is go through the process. We'll show you the do's and don’ts for animated GIFs. The actual physical process is not that hard, but there's a few things you need to take into account because file size can blow GIFs out of the water, and there's things you can do to minimize that. So, we're going to export this one as is. It's like that little thing going on here. How long is it going to be? The length is quite important, 5 seconds is quite long for a GIF, 20 seconds is really long, anything more than that is probably not going to work. So the shorter it is the better it is.
So that's one of the things we need to do. So all I've done is, in my Work Area, I've dragged the end of it because that's kind of where it finishes, I'm happy for that to lift it from there on. So I'm going to 'Composition', let's go to 'Add to Adobe Media Encoder'. And in here, all we need to do is make sure it's mp4, which is this drop down here, 'H264'. Leave everything pre-set. What you'll notice is, I'll just show you in here. You don't have to go in. You'll notice it is clipped to my Work Space area automatically. You can see down here, it's already clipped, and it's clipped to my Work Area. If you want the whole thing, you can switch it there. So that's the only thing we need to do.
Where are we going to put it? I'm going to put mine on my 'Desktop', in our 'AFX Files'. This is going to be 'Pie Chart Full Color'. I'm going to 'Save' this one here. And we're going to do another version, or get him to render at the same time. So jump back into After Effects, because some of the problems with this one is that we added a Vignette. You can see at the top here, I'm going to unlock it. And it's added this Gradient effect all the way through. So if I delete that, it's going to reduce the colors a lot. Looks like just one or two colors but there's actually thousands of colors that make up this gray blend. So I'm going to get rid of the Vignette. Try not to use any Gradients.
Some of the other things you can do is get rid of things like Motion Blur, because, watch this, when these things are moving, can you see, it's actually generating a whole bunch of other colors, it's not just that kind of purple that we're using. There's a bunch of mixtures of that in the background to make this Blur happen. See this major switch here for Motion Blur? It cuts down the colors to just this, plus the background, plus a little bit of in between colors, but not as many as this. So Motion Blur off can save file size as well. So it's up to you whether you can live without having Motion Blur. Animated GIFs, you just have to, really. The smaller the file size, the faster it loads. And the better it does in Social Media.
So I'm going to export this one as well. Let's go to that 'Media Encoder'. That's why I love the Adobe Media Encoder, you see we don't have to-- you can render from After Effects, the option just underneath. You can go to there, and that will stop After Effects working while it's rendering, whereas this, you can queue more up here, and when you're ready, hit Play and go back to After Effects and start working. I'm going to save them on to my Desktop again. And what will I call this one? I'll call this one 'Simple Colors'. Click 'Save'. And we're going to hit 'Play', and we'll just render them both out.
The one thing you'll notice down here, can you notice, it's playing through? It's rendering this one, and it's taking a while, why? Because it has to render Motion Blur, and all these extra colors, mainly the Motion Blur. So it chugs along doing it, we'll speed it up now. We're back, and I just want to show you, can you see how fast the second one goes? That's because there's no Motion Blur and no Gradient. So After Effects likes it more as well. So let's go now and convert them into a GIF. To do it, the best way is to use Photoshop. So I've got Photoshop open here. This can be a bit stressful on your machine. You'll notice I've closed down After Effects and Media Encoder. The less open, the better for this. It depends on how hard core your GIF is.
So we're going to 'File', 'Open', and on our Desktop, we have 'AFX Files'. In here there's the two, so there's 'Simple Color', and the 'Full Color'. Let's look at doing the Full Color one first. First of all, look at the file size, it's for the mp4. They're exactly the same files but this one has Vignette and Motion Blur on it, so it's physically nearly twice the size. But let's open it in Photoshop, all we're going to do is click 'Open', and then go to 'File', 'Export', and go to this one here. You have to use 'Save for Web'. If you're using the new fancy one, 'Export As', you're not allowed to. So 'Save for Web (Legacy)'. So that took ages to open. If you find yours takes long to open, don't worry, it does.
So let's first of all just export it as is just to see some comparable sizes. So what we want to do is stick it on a Preset, let's start with the top here, the GIF. 128 colors did it. So at least we know we're all on kind of the same page. It's going to take a little while to readjust this whole thing. And what we can do, you can have a maximum of 256 colors in a GIF. That's why you get that kind of like weird grainy look from a GIF. The lower you go, the smaller the file size, the quicker it will play. So 128, in this case, I'm going to go all the way to the maximum, 256. So this square here is all the colors that it can use. And let's just click 'Save'. Put mine on my 'Desktop', 'After Effects Files' and let's click 'Save'.
This can take a little while as well depending on how big your GIF is. Let's do the second version, so 'File', 'Open', there's another mp4. And that is the 'Simple Color' version. And let's go to 'File', 'Export', 'Save for Web'. Everything with this runs fast, because everything's easier. Pick everything, it's going to use the same as last time so I don't need to change anything. It's going to wait for it to stop. [?? 00:06:20] All right, let's hit 'Save'. Same thing, 'Save'. Kick back, relax. So let's go and check the file sizes.
So on my 'Desktop', 'AFX Files'. Here is my two GIFs, there's one, and there's the other one. And you can see the difference in size. So still quite a simple animation but without the Motion Blur and the Vignette it's a lot smaller. So, what is it? So it's about a third the size. In terms of file sizes if you get near 2MB, you're getting too big. So this one, I can live with this. The only trouble with it, I guess, is that it will take longer to load. Say you're putting up for Facebook or Instagram, it just won't load very quickly because the file size is so big. So the lower the better. I think there are some restrictions on file size for Instagram. That's a double check. But they both look good.
I'm previewing mine on a Mac by hitting 'Space bar'. If you're on a PC, not sure, maybe right click and open it up in Internet Explorer. That will be able to preview it for you. But this is good, it's an animated GIF, I can share it around. Let's look at some of the other things you can do to get the file size down.
In here, in Photoshop, I'm going to close down the Full colored one. Using my Simple colored version, I'm going to go to 'File', 'Export'. 'Save for Web'. And what you want to do is play around with the Image Size. Mine's at full HD, there's never a need for full HD animated GIFs. So I'm going to have to wait for this thing to stop spinning. And now I'm going to put it down to a better size. You might also play around with the Format. We know that Instagram and Facebook like a more of a square format. So you might design it in After Effects because this one here would do really well as a square one because there is nothing really going on in the sides here. So I can adjust that. It's probably easiest to do it in After Effects before you come in here.
So in here, what size does it need to be? I don't know. Have a look at recommended sizes for your specific Social Media application. But let's say I want mine to be 500 pixels high. The other thing we need to double check down the bottom here is looping. Now mine looped once, that's by default. If you want yours to keep looping that's pretty much how everyone wants their GIFs, if you tick this one here, it will just keep playing, and playing, and playing.
The other thing we might do is that we're using 256 colors but we just don't really need it, because it's not that big a deal, or not a lot going on. So I get to 128, that generally does exactly what I needed to. Looks fine, that keeps the file size down. Once this is finished we'll click 'Save'. I'm going to save it out here. This is going to be my 128 colors, let's just see the difference. In here, my 'Exercise Files', '128', you can see it's a lot smaller. So it's about half the size, a little less. And it's still looking pretty good, there's enough colors making it happen. And it now loops. Awesome! So that's how to make an animated GIF.
Let's look at things you can't do. Our little Bar Graph was perfect, but if you use one of the Exercise Files in here, so I'm going to do this in Photoshop, I've made a little live action version. So this, in your Export Files, see this one called 'Large GIF.mp4', so I've made this little video. It's only 1 second long. I just wanted to show you the difference between simple stuff. Like our lovely Bar Graph which just have simple colors, even with a Vignette. And then this thing here, which is live action, which has got millions of colors. Let's see what happens.
In Photoshop, 'File', 'Open', let's find him. He is in my 'Exercise Files 10'. 'Large GIF'. First of all, it might not open. It will definitely open here, sorry. It might not open in 'Export', 'Save for Web'. You might be sitting here for a million years for this thing to load especially if it's more than a couple of seconds long. I've done things with longer stuff, with full action and my Photoshop, just won't do it. So this is fine. We're going to do the exact same settings as we had before. We'll leave that at 'HD'. Colors wise, we'll put it to as many as we can use. You might not be able to hear it but my poor little laptop, the fans have come on, and the machine's cooking trying to do this whole stuff. Let's hit 'Save'. I'm going to call it 'Large GIF', and stick it in here in my 'Exercise Files'. Doubly fast than I expected.
Let's have a little look at how big it is. 'Desktop', 'After Effects Files'. And in here is my animated GIF. Hey, it's only 17 whole Megabytes. So our early one, what did we get it down to? Our smallest one was 0.1MB and this is up to 17, and it's only 1 second. This one here is about 5 seconds long. So there's just some things you can't do. Live action's not good, simple colors are great. Now let's have a little look at one last thing, two last things before we go. One is that, we went through Photoshop remember, we did 'File', 'Open' and we did 'Export', 'Save for Web' to get our GIF. In a previous version of Adobe Media Encoder remember, we used it for After Effects, we say 'Send to Media Encoder', it opens up in here, we pick mp4, and then we pass it on to Photoshop to make.
There was actually an option here that said 'Export as animated GIF'. Animated GIFs became super lame, and nobody wanted to do them because video was cool and new. So they've removed it from this. Double check that on your version of Media Encoder. This was made in 2017. So check that when you got the new versions that they haven't put it back in here. I imagine they will because it is becoming popular again. So just check, you might be able to skip that step. I said there were two more things, that was one of them.
The last one is to check out this man. His name is James Curran. I love his-- he does animated GIFs, period. So, he has-- we'll have a look at some of his stuff. The cool thing about his is that they loop perfectly forever. They've got some sort of like hypnotic, I don't know what's about them, but I can watch them for hours, maybe not hours, but you can just look at his to get an idea of pure animated graphics. And that loop perfectly. There's just some brilliant loops that he's come up with. It's only a few seconds long, but you can just keep on going. There's lots of stuff in here, so have a quick little look. I love the stuff he did. So go and check out his for ideas of how… especially how he gets his looping. If you want to actually see his technique on YouTube, there is 'How to Create GIFs, Adobe Creative Cloud'. This one here is the 13th of April, 2016. And that's got him with an interview, it's quite long, but it's really cool. I found that he's cool anyway.
All right, my friends, that is the low-down on animated GIFs. Let's get on to our class project next. Exciting.
How do you make a small animated GIF in After Effects?
Trim the animation to a short loop, export the work area as an H.264 MP4 through Adobe Media Encoder, then open that MP4 in Photoshop and use Save for Web (Legacy) to create the GIF. For a smaller file, simplify gradients and motion blur, reduce the image dimensions and use only as many colours as the design needs.
How to Export an Animated GIF from After Effects Without a Huge File Size
Key takeaways
A few seconds of animation is much easier to turn into a practical GIF than a long sequence.
Gradients and motion blur can add thousands of colour variations to an otherwise simple design.
Photoshop’s Save for Web settings let you control image size, colour count and looping.
Simple animated graphics work far better as GIFs than live-action footage.
Start with the animation, not the export settings
Making a GIF is straightforward. Making one that looks good and loads quickly is the tricky bit. A small, colourful chart can become a neat looping graphic, but its file size can balloon if you carry over every visual effect from the After Effects composition.
First, decide where the animation should end. In After Effects, drag the end of the work area to the point where you want the GIF to loop. Shorter is better: five seconds is already quite long for a GIF, and twenty seconds is very long. You do not need to export empty time after the action has finished.
Think about the loop while you edit, too. If the final moment leads naturally back to the first, the finished GIF will feel much more satisfying when it repeats.
Make a simpler version before you render
For the chart animation, I made two versions to compare. The first kept its vignette and motion blur. The second removed both.
The vignette looks like a gentle grey blend, but that blend contains lots of subtly different colours. Motion blur creates more in-between shades around moving objects. GIFs have a limited colour palette, so all those variations give the export much more work to do.
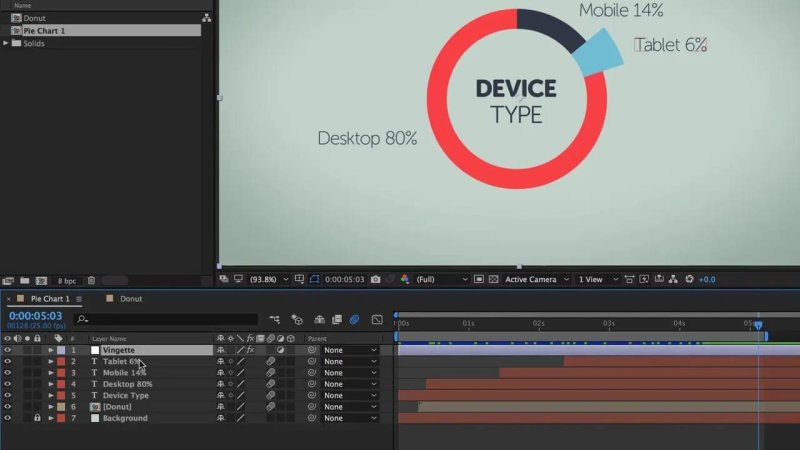
That soft shading looks simple, but it introduces a great many colour variations.
If the design still works without a gradient or motion blur, switch them off. In this example, the simplified version rendered faster in After Effects and produced a much smaller GIF. It is a visual trade-off, so keep an effect when it genuinely earns its place.
Export an MP4 from After Effects
Set the work area to the portion of the composition you want to use.
Choose Composition > Add to Adobe Media Encoder Queue.
In Media Encoder, choose H.264 to make an MP4. The existing preset can stay as it is for this workflow.
Check that the export is clipped to the work area. If you need the entire composition instead, change that range in the export settings.
Choose a destination and filename, then start the queue.
Media Encoder is handy when you want to compare versions. Queue the full-colour and simplified compositions, then render them together. Unlike rendering directly through After Effects, this also lets you get back to work in After Effects while Media Encoder handles the queue.
Convert the MP4 into a GIF in Photoshop
Open the rendered MP4 in Photoshop with File > Open. Then choose File > Export > Save for Web (Legacy). For this workflow, that is the Photoshop export option you want rather than the newer Export As command.
Be patient if Save for Web takes a while to appear. Processing an animation can be demanding, especially if it is large or visually complex. Closing After Effects and Media Encoder before this step may give Photoshop a bit more breathing room.
Choose the colour palette
Start with a GIF preset such as GIF 128 Dithered, then compare the result with the number of colours your design actually needs. A GIF can use up to 256 colours. More colours may help preserve detail, but they can also increase the file size. Fewer colours generally mean a smaller export, though pushing the count too low can make blends look grainy or banded.
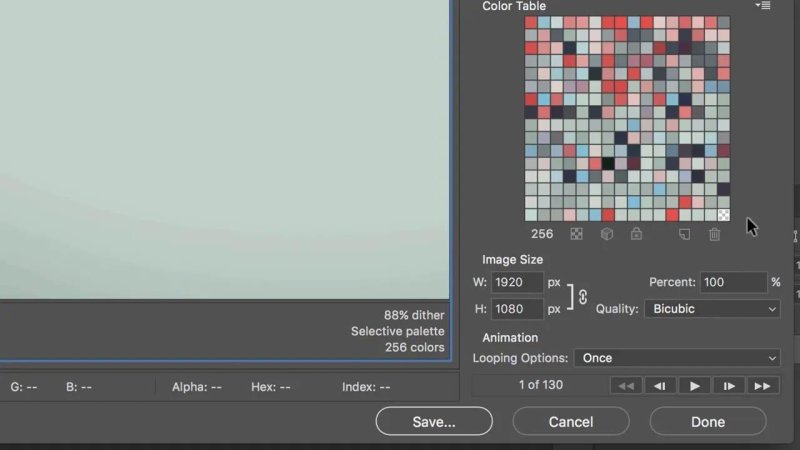
The colour table, dimensions and looping controls are the settings worth checking before you save.
On the simple chart, dropping from 256 to 128 colours still looked good and helped bring the file size down. Do not assume the maximum is automatically the best choice. Check the preview and use the smallest palette that keeps the important details looking right.
Reduce the dimensions and set the loop
Image size matters just as much. The example began at full HD, which was far more than this GIF needed. In Save for Web, I reduced it to 500 pixels high. Choose dimensions that suit where you plan to use the graphic rather than exporting at full composition size by habit.
It is also worth considering the shape of the composition earlier in After Effects. This chart had little happening at its sides, so a squarer layout could have made good use of the space for a social post. Check the current size and format requirements of the platform you are targeting before you settle on a canvas.
Finally, look at Looping Options near the bottom of Save for Web. The initial export in this example played once. If you want the familiar continuously repeating GIF, choose Forever before saving.
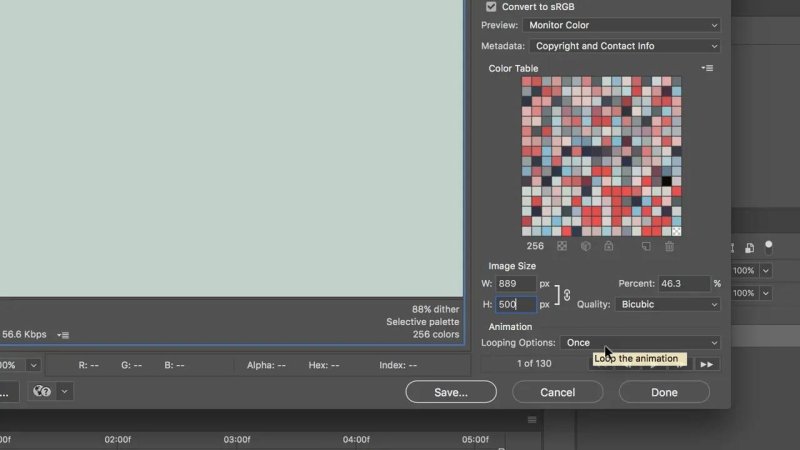
Set the animation to repeat here if a single play is not what you had in mind.
Check the result, not just the preview
Save the GIF, open the exported file and check three things: does the animation look clean, does it loop as intended, and how large is the file? The simplified chart GIF was roughly a third of the size of the version with the vignette and motion blur. Reducing its dimensions and palette brought it down further while keeping the chart readable.
For this example, getting close to two megabytes felt too large for comfortable sharing. That is a practical judgement, not a universal platform limit. A larger file may take longer to load, and social platforms can have their own changing requirements. Check those requirements before uploading.
Know when GIF is the wrong fit
The chart succeeds because it uses a few clear colours and simple movement. Live-action footage is another story. A one-second clip of a person speaking, exported at HD with the available GIF colours, produced a file of about 17 MB. The much longer simple chart could be reduced to around 0.1 MB.
That is the difference between a graphic built from broad areas of colour and footage full of changing detail. Photoshop may also take much longer to process a complex clip, or struggle to complete a longer one. If your source is live action, do not expect the same tiny GIF you can get from a clean animated infographic.
One last check, and a little looping inspiration
This process uses Media Encoder for the MP4 and Photoshop for the GIF. Animated GIF export was not available in the version of Media Encoder used here, but export options change between versions. Check the format list in your own installation: if it offers animated GIF directly, you may be able to skip the Photoshop step.
For ideas beyond export settings, have a look at the looping animated graphics by James Curran. His short animations are a brilliant reminder that a loop can be the creative idea, not merely a playback setting. There is also an Adobe Creative Cloud interview titled How to create animated GIFs that explores his approach.
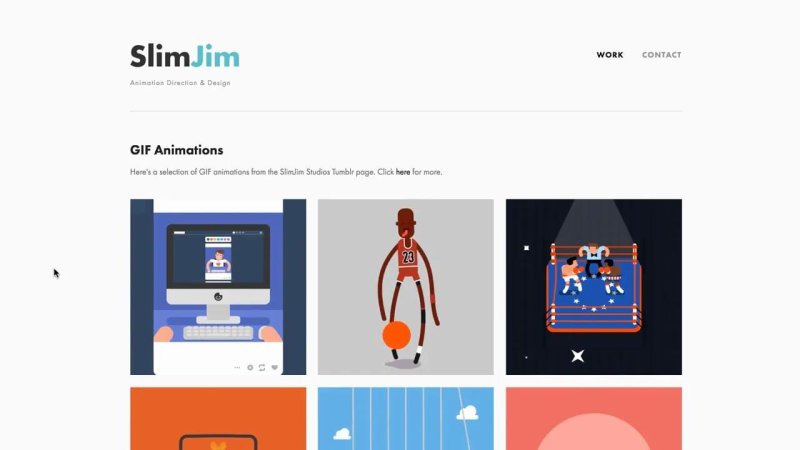
Short, graphic animations offer plenty of ideas for making a loop feel intentional.
Keep the movement brief, the artwork simple and the loop worth repeating. Then use the export settings to preserve what matters without making everyone download colours and pixels they will never miss.
Key terms
Work area
The selected span of an After Effects composition to export. Trimming it prevents unused time from being included in the GIF workflow.
Colour palette
The set of colours available to the GIF. Reducing the palette can shrink the file, provided the design still looks good.
Motion blur
An effect that softens moving elements. It can introduce extra in-between colours that make an animated GIF larger.
Looping options
The Save for Web setting that controls whether the GIF plays once or repeats continuously.
FAQs
Can After Effects export a GIF directly?
The workflow here exports an H.264 MP4 through Adobe Media Encoder, then converts it to a GIF using Photoshop’s Save for Web (Legacy). Check your version of Media Encoder for a direct animated GIF option before taking the extra step.
Why is my animated GIF so large?
Length, dimensions and visual complexity all contribute. Try shortening the animation, reducing its size and colour count, and removing gradients or motion blur where the design allows.
How do I make the GIF repeat forever?
In Photoshop’s Save for Web (Legacy) window, set Looping Options to Forever before saving the GIF.
Written by Daniel Walter Scott — Founder of Bring Your Own Laptop & Chief Instructor
