This course has been archived. See the updated course here.
Animating TIP - Puppet tool in After Effects
Questions


Student Gallery
Be the first to share something.
Course info
Overview
- You will need a copy of Adobe After Effects, Illustrator & Photoshop CC 2017 or above. 90% of the course will be done in After Effects but a few things are better done in Illustrator & Photoshop. A free trial can be downloaded from Adobe.
- No previous motion graphic skills are needed.
- No previous After Effects, Illustrator or Photoshop skills are needed.
- 48 lectures 5+ hours of well structured content.
- You'll learn to take Excel spread sheets and animate this in After Effects.
- You’ll learn how to make animated pie charts, line charts & bar graphs.
- You’ll learn how to create percentage counters.
- You’ll learn how to animate icons making beautiful infographics.
- You’ll learn how to create 'voice over' infographics.
- You’ll learn all the animation techniques needed to bring your data to life.
- You will have the finished files so you never fall behind.
- Downloadable exercise files & cheat sheet.
- Forum support from me and the rest of the BYOL crew.
- Techniques used by professional motion graphic designers.
- A wealth of other resources and websites to help your new career path.
- No previous After Effects experience is necessary.
- This course is for people completely new to After Effects. No previous animation or motion graphic design experienced is necessary.
- This is a relaxed, well paced introduction that will enable you to produce impressive video for your business or organization. Only basic computing skills are necessary - If you can send emails and surf the internet then you will cope well with our course.
- There is a 100% refund if you don’t find this course useful. Just message me, no questions asked, I’ll refund your payment in full.
Course duration 5.5 hours + your study.

Daniel Walter Scott
Founder of Bring Your Own Laptop & Chief Instructor
I discovered the world of design as an art student when I stumbled upon a lab full of green & blue iMac G3’s. My initial curiosity around using the computer to create ‘art’ developed into a full-blown passion, eventually leading me to become a digital designer and founder of Bring Your Own Laptop.
Sharing and teaching are a huge part of who I am. As a certified Adobe instructor, I've had the honor of winning multiple Adobe teaching awards at their annual MAX conference. I see Bring Your Own Laptop as the supportive community I wished for when I was first starting out and intimidated by design. Through teaching, I hope to bring others along for the ride and empower my students to bring their stories, labors of love, and art into the world.
True to my Kiwi roots, I've lived in many places, and currently, I reside in Ireland with my wife and kids.
Certificates
We’re awarding certificates for this course!
Check out the How to earn your certificate video for instructions on how to earn yours and click the available certificate levels below for more information.
Downloads & Exercise files
Transcript
Hi there, in this tutorial we're going to make things all floppy and real, like this, using the Puppet Tool. Let's go in there.
So we're going to do this in a separate Comp. So up here, 'New Composition'. We're going to call this one 'Puppet Tool'. Everything's going to be the same. I'm going to use some off gray, don't know why. And we're going to bring in some files. I'm going to show you different ways of bringing them in. Here's my exercise files here, Puppet1 and Puppet2. We've been bringing them in, in a kind of official way. You can actually just drag them on to the page there. You can see, they've come through, I'm going to put them in my files. If you're on a PC, works the same way. You just need to have the window open in front of it, just drag it in. Off you go.
So what I've got is Puppet1. We're going to put them right in this space. Puppet1's at the bottom, we're going to lock it because it's the cogs, we're not actually going to turn those. You can easily turn those into animated cogs. What we're going to do is our example, where we get this to fly and be a bit bendy. We'll zoom out a little bit, so we can see everything.
So, first of all we're going to add our little bit of animation. So, on this we're going to hit 'P' for Position. And we're going to start the stopwatch, and we'll start them over here. And after about that much, 10 frames. He's going to be, maybe a little bit longer. 14 frames. I'm going to drag him in, holding 'Shift', so it goes perfectly straight. It's up to you. So you can start dragging first, and then hold 'Shift'. So we got the first bits. And what we might do is we might add some Easing now. We've added Easing to the beginning and end. The whole way through this. So what we're going to do in this case is we're actually going to add Easing to this last one because I want it to start fast and slow down here at the end.
So I'm going to add 'Velocity', and I'm going to get it to slow down to '75' because that's my favorite. So now, it's going to zoom along, then kind of slow down, and stop there. If it doesn't, if I click it again, go to 'Keyframe Velocity' and we're going to change the speed here to '0'. And now it should do it. Great! Awesome! So, what we're going to do is get that little tail and the bend. So it's going to zoom along, come around, stop, and we want it kind of bending out.
To do it we need to add some Puppet Points. And it's hard to do when it's off screen so we're going to move it, so it's kind of half way there. Grab the Puppet Tool, which is this guy there. Click on that, and we need three in this case. We need one there, one in the middle, and one at the end. You can have as many as you want depending on much control you want over it. The less pins, the easier it is, and more natural it looks. Now these are actually adding Keyframes at the same time. So if I click on the Puppet Tool, and hit you… here are my secret shortcuts showing me all the Keyframes if I move this all the way. Here's all the Keyframes that have been made. I kind of made them at the wrong stage. I want them to be all the way over here at the beginning. It's just easier to do obviously on its own screen, than it's off screen.
So, first up, I want to grab this guy, stroke up my Puppet tool. I'm going to drag this one, and kind of drag-- oops, undo. I've got them all selected down here, so I'm going to click off. I'm going to grab this guy. And I grab this guy. And then, if you slide along, it's kind of what's happening. It's kind of zooming across, so let's hit 'space bar'. So now what we need to do is when it gets close to this end part here, we need to just move the Keyframes around. So I'm going to grab this one, straighten it back up. To be honest, I probably should have left one more Keyframe in the head there to stop it bending, but, hey ho, we're getting there.
You can see, it's not doing the flippity flop that I want. So I'm going to line it back up here. And actually what I wanted to do is go a little bit past where I wanted it. So it's going to go like that. And after a couple of more frames, it's going to kind of flop back. Here we go, floppity flop. Not too far. And another couple of frames we're going to get it go just a bit back further. We're getting close to it's kind of final rest. And we go there.
Now, the timing is all going to be a bit mixed up when you first do it. So we're going to have to play around with it. So let's not get too excited. Let's click off. And space. It's not our best but you get the idea, right? That's what we're going to do. So what do I need it to do? We're going to have to play around with the timing of these. So I'm going to select them all, hold down 'Alt'. And just drag them out, because it feels like it needs more. What does it need less? I'm holding 'Alt', and it kind of compresses them while I'm dragging them. And that might be it, so,,, cool. There…
It's getting there, maybe just these three out. Now I'm just playing around with timing. This is what will happen to all your projects. You'll spend ages with this kind of last part where you're just 'finesse'ing it. There's no exact rules because it depends on the shape of the object, how fast it's moving, and what you kind of want it to feel like. I think, probably I need to bring this whole thing across because it's taking too long to slide across. Maybe too far. It's a little bit painful to watch, I know. Maybe this one I need. Needs to be longer. Just having it a bit too fast. Yes, I'm liking it.
Now I'm just wiggling around, and playing. I guess I can edit it, and make it perfect on the first time and you'd be doing, and going, "Mine doesn't look that good." I'm doing it for you, my people. There's a lot of playing around with this type of stuff. Especially with Puppet tool, because you want to-- we're kind of faking real life. And there's a lot of wiggling around. It's quite cool if you get like, say it's a glass of water, and it's flopping in, you can get that water to flop back and forth as you'd imagine it would. If you've got a person, say this little icon here, it's kind of pop in, sliding in, over here. It could kind of bend as it comes in.
And that is going to be it for the Puppet Tool. Let's get on to the next tutorial.
How do you make an object bend naturally with the Puppet Tool in After Effects?
Add Puppet pins to the parts of your artwork you want to control, then animate those pins alongside the layer’s Position. For a convincing floppy finish, let the flexible part trail during the move, swing past its resting position when the object stops, and bounce back with progressively smaller movements.
After Effects Puppet Tool: Make Your Animation Bend, Flop and Settle
Key Takeaways
Combine Position animation with Puppet pins to create a bendy entrance.
Ease the final Position keyframe so the object starts fast and slows to a stop.
Start with a few pins, adding more only where you need extra control.
Use overshoot and smaller return movements to make the object settle naturally.
Refine the timing rather than expecting the first attempt to feel perfect.
A graphic sliding into place is fine. A graphic sliding into place with a little floppy finish has much more personality. The Puppet Tool gives you a way to bend the artwork itself, so a cable, a strand of hair or another flexible detail can react to the movement.
For this example, we’ll use an orange plug with a long cable, placed over a separate layer of coloured cogs. The plug will zoom in from the left, slow down, and leave its cable flopping back and forth before coming to rest. Nice and bendy.
1. Set Up the Composition and Artwork
Create a separate composition using Composition > New Composition, and call it Puppet Tool. Keep your existing composition settings for this exercise. I’m using a light grey background, but the colour isn’t important to the animation.
Bring in the two artwork files, Puppet 1 and Puppet 2. You don’t have to use an import dialogue every time: you can drag files straight from your file browser into After Effects. This works on both Mac and PC. Just have the file browser open in front of the application and drag the files in.
Put Puppet 1, the cogs artwork, at the bottom of the layer stack.
Keep Puppet 2, the plug and cable artwork, above it.
Lock the cogs layer so you don’t accidentally move it while working on the plug.
The cogs stay still here. You could animate their rotation separately, but the focus is the plug’s entrance and the cable’s bend.
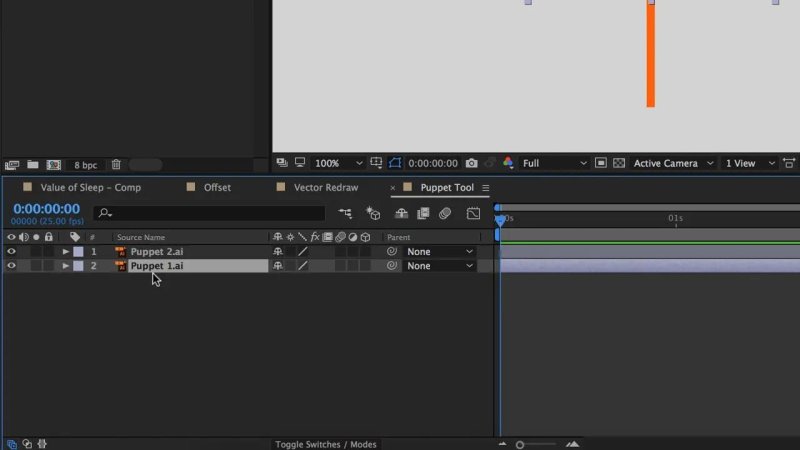
Keep the plug and cable separate from the stationary cogs so you can animate them independently.
2. Animate the Plug Sliding Into Place
Get the main movement working before worrying about the floppy bit. Zoom out enough to see the area outside the composition, then select the plug layer.
Press P to reveal Position.
Move the playhead to the beginning and click the Position stopwatch to create a keyframe.
Move the plug off the left side of the composition.
Advance roughly 14 frames and drag the plug into its final position.
To keep the movement perfectly horizontal, start dragging first, then hold Shift. That order matters when you’re constraining the drag.
Fourteen frames is a starting point, not a magic number. You’ll probably adjust it once the cable animation is in place.
Ease Only the Final Position Keyframe
For this entrance, I want the plug to start quickly and slow down at the end. Rather than easing both Position keyframes, apply easing only to the final one.
Open Keyframe Velocity for that last keyframe and set the incoming influence to 75%. That’s a setting I like for this sort of stop. If the plug isn’t slowing all the way to a standstill, check that the incoming speed is set to 0.
Preview with the spacebar. At this stage, the whole plug and cable should slide in as one rigid shape, then stop. The Puppet animation will add the flexible movement on top.
3. Add Puppet Pins to Control the Cable
It’s awkward placing pins on artwork that’s off the edge of the composition. Move the playhead to a point during the entrance where the plug is visible, then select the Puppet Tool. Its icon looks like a drawing pin.
For this shape, start with three pins:
An upper pin near the plug and the top of the cable.
A middle pin partway down the cable.
An end pin at the cable’s tip.
You can add as many pins as you need, but don’t go mad with them. Fewer pins make the animation easier to manage and can give you a more natural-looking bend. More pins are useful when you need tighter control over a particular area.
Move the Initial Puppet Keyframes to the Beginning
Here’s the little catch: placing Puppet pins also creates their initial keyframes at the current time. If you added them while the plug was halfway through its entrance, those keyframes won’t be at the start.
Select the plug layer and press U to reveal its animated properties. You’ll see the Position keyframes and the Puppet pin keyframes. Move the initial Puppet keyframes back to the beginning of the timeline.
That gives you a starting pose at the beginning, even though you placed the pins while the artwork was conveniently visible.
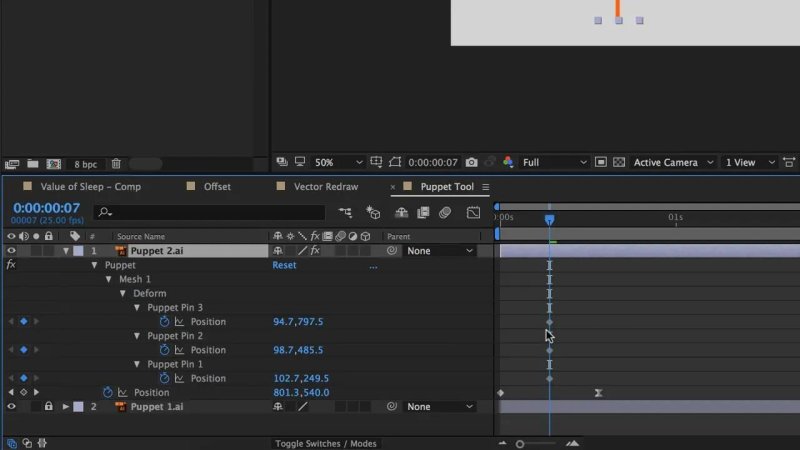
Press U to find the pin keyframes, then move their initial poses to the start of the animation.
4. Bend the Cable During the Entrance
With the Puppet Tool still active, drag the cable’s lower pin to create a trailing bend. As the plug moves to the right, the cable should feel as though it’s lagging behind rather than travelling as a stiff stick.
Before dragging an individual pin, click away from any selected keyframes. If you still have a group selected in the timeline, you can end up changing more than you intended. Undo, clear the selection and try again if necessary. No drama.
Scrub through the entrance to check the shape, then move close to the point where the plug stops and bring the cable back towards straight.
Pay attention to the plug itself, too. In this example, the head bends a little more than I’d like. An extra pin in the head would help keep that area steady while the cable moves. That’s a good reason to add another pin: you’ve spotted a specific part that needs more control.
5. Add Overshoot and a Smaller Bounce Back
Simply bending the cable and returning it to straight doesn’t quite give us the floppy finish. The cable needs to carry on moving after the plug slows down.
Build a short sequence of poses around the stop:
Swing past the resting position. Move the cable tip a little beyond where you ultimately want it to finish.
Flop back. Advance a couple of frames and move the tip back in the opposite direction. Keep the movement controlled.
Add a smaller return. Advance another couple of frames and bend it back again, closer to its final resting position.
Settle. Finish with the cable in its resting pose.
The important bit is that the movement gets smaller as it settles. A big swing followed by a smaller swing gives the cable that loose, flexible feel without leaving it wobbling forever.
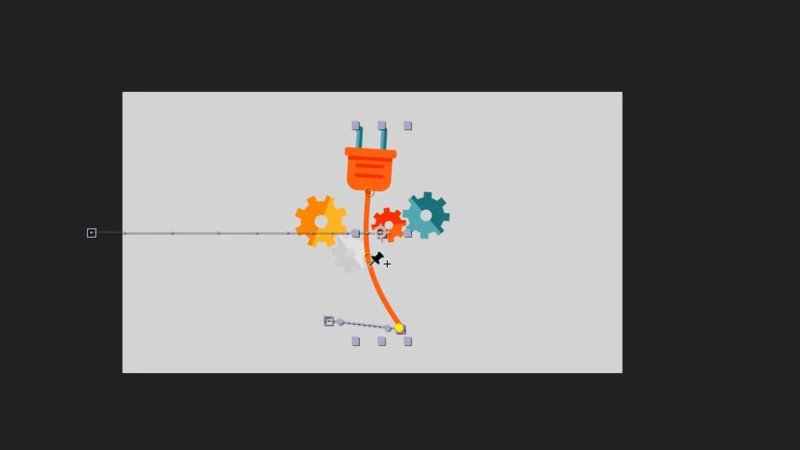
Push the cable past its resting position before bringing it back for the floppy finish.
6. Refine the Timing Until It Feels Right
Your first preview may not be your best. Mine certainly isn’t always. The poses can be right while the timing still feels a bit odd.
Select the Puppet keyframes you want to retime, then hold Alt and drag an end keyframe to spread them out or compress them. This lets you change the duration of the selected sequence together.
Try a few passes:
Spread the keys out if the cable’s reaction feels too rushed.
Compress the keys if the flop feels slow or disconnected from the stop.
Adjust only the last few keys if the entrance works but the settling needs attention.
Revisit the Position timing if the plug’s slide takes too long or stops before the cable’s reaction feels connected to it.
Preview after each change. Sometimes shortening the motion helps; sometimes it needs a bit longer. You’re judging the combined movement, not just how tidy the keyframes look.
There isn’t an exact timing rule for every project. It depends on the object’s shape, how fast it’s moving and what you want it to feel like. A lot of the work happens in this final stage, nudging things around until the motion feels believable.
You’re faking real life, and that takes a bit of fiddling. Don’t treat that as a sign you’ve done something wrong. It’s part of working with the Puppet Tool.
Use the Same Technique for Other Flexible Details
The plug is just one example. The same approach can help a glass of water slide into place while the water flops back and forth, or let a character icon’s hair bend as the character comes in.
The pattern stays the same: animate the overall entrance, use pins to control the flexible detail, then give that detail a little overshoot and a diminishing return. Start simple, preview often and spend your effort on the timing. That’s where the floppy bit starts to feel real.
Key Terms
Puppet Tool
An After Effects tool that lets you deform artwork using control points called pins. Animating those pins makes parts of the artwork bend over time.
Puppet pin
A control point placed on the artwork. Its position helps determine how the surrounding shape bends.
Keyframe
A saved property value at a particular time. Here, keyframes define the plug’s Position and the positions of its Puppet pins.
Easing and influence
Easing changes how movement accelerates or slows around a keyframe. The influence setting controls how strongly that easing affects the approach to or departure from the keyframe.
Overshoot
A movement that passes beyond the intended resting position before returning. For the cable, it creates the first swing in the floppy finish.
FAQs
How many Puppet pins should I use?
Start with three for this plug and cable: one near the top, one in the middle and one at the tip. Add another only if you need extra control, such as keeping the plug head from bending.
Why did my Puppet keyframes appear halfway through the animation?
Puppet pins create their initial keyframes at the time where you place them. Press U on the selected layer to reveal the animated properties, then move those initial Puppet keyframes to the beginning.
Why does the cable still look stiff?
Returning the cable directly to straight can miss the floppy effect. Add a pose beyond its resting position, a bounce in the opposite direction and a smaller return, then adjust the spacing between those keyframes.
Should I ease both Position keyframes?
Not for this particular entrance. Ease only the final Position keyframe so the plug starts fast and slows to a stop. Use 75% incoming influence as a starting point and check that the incoming speed is zero.
Written by Daniel Walter Scott — Founder of Bring Your Own Laptop & Chief Instructor
