This course has been archived. See the updated course here.
Animation TIP - Over shoot in After Effects
Questions


Student Gallery
Be the first to share something.
Course info
Overview
- You will need a copy of Adobe After Effects, Illustrator & Photoshop CC 2017 or above. 90% of the course will be done in After Effects but a few things are better done in Illustrator & Photoshop. A free trial can be downloaded from Adobe.
- No previous motion graphic skills are needed.
- No previous After Effects, Illustrator or Photoshop skills are needed.
- 48 lectures 5+ hours of well structured content.
- You'll learn to take Excel spread sheets and animate this in After Effects.
- You’ll learn how to make animated pie charts, line charts & bar graphs.
- You’ll learn how to create percentage counters.
- You’ll learn how to animate icons making beautiful infographics.
- You’ll learn how to create 'voice over' infographics.
- You’ll learn all the animation techniques needed to bring your data to life.
- You will have the finished files so you never fall behind.
- Downloadable exercise files & cheat sheet.
- Forum support from me and the rest of the BYOL crew.
- Techniques used by professional motion graphic designers.
- A wealth of other resources and websites to help your new career path.
- No previous After Effects experience is necessary.
- This course is for people completely new to After Effects. No previous animation or motion graphic design experienced is necessary.
- This is a relaxed, well paced introduction that will enable you to produce impressive video for your business or organization. Only basic computing skills are necessary - If you can send emails and surf the internet then you will cope well with our course.
- There is a 100% refund if you don’t find this course useful. Just message me, no questions asked, I’ll refund your payment in full.
Course duration 5.5 hours + your study.

Daniel Walter Scott
Founder of Bring Your Own Laptop & Chief Instructor
I discovered the world of design as an art student when I stumbled upon a lab full of green & blue iMac G3’s. My initial curiosity around using the computer to create ‘art’ developed into a full-blown passion, eventually leading me to become a digital designer and founder of Bring Your Own Laptop.
Sharing and teaching are a huge part of who I am. As a certified Adobe instructor, I've had the honor of winning multiple Adobe teaching awards at their annual MAX conference. I see Bring Your Own Laptop as the supportive community I wished for when I was first starting out and intimidated by design. Through teaching, I hope to bring others along for the ride and empower my students to bring their stories, labors of love, and art into the world.
True to my Kiwi roots, I've lived in many places, and currently, I reside in Ireland with my wife and kids.
Certificates
We’re awarding certificates for this course!
Check out the How to earn your certificate video for instructions on how to earn yours and click the available certificate levels below for more information.
Downloads & Exercise files
Transcript
In this tutorial we're going to look at Overshooting the mark. You can see this one gets bigger but then needs to get a little smaller, and bigger again, a little bounciness. We need to do it to this, to learn, then we're going to jump to our 'Value of Sleep'. And we're going to do it to our Icon there as well. All right, let's go and learn how to Overshoot.
Let's get something to Overshoot. First of all, we're going to not work on this project, okay? We're going to actually work on a separate little job. And we can do it in its own little Comp. You know we have one Composition, that little Icon here. And it's our Comp that we see down the bottom here. You can have more that one Comp, more than one page in a document. So 'New Composition'. 'Composition', 'New Composition'. Give it a name, this one's going to be called Overshoot. It's going to be great, and we're going to make it 5 seconds long. Background color is going to be black. Click 'OK'. I show you this because I want you to know you can have more than one Comp in a project.
So here's my handy dandy main Comp. But I'm going to work on this other project in here. It's like a separate little group. That's where we're going to do our project. So what I'd like to do is, let's jump into Illustrator. In Illustrator, let's go to 'Open' and in your Project Exercise Files there's one called Icon Pop. And let's grab 'Animation Overshoot', not Offset. What are we doing in here? We're just practicing because I want this thing, I want to drag it into My Library. If you can't see your Libraries, go to 'Window', ' Libraries'. Drag it in, it's that part. There's that part I want to use in my Animation. You can draw all of these in After Effects. It's just that the tools aren't very good to do it. So everybody draws in Illustrator, not everyone, but most people.
Now I don't want this big box, I just want the color from it. So with it selected, hit the '+' button, 'Fill Color'. Thank you very much. Let's rebuild you now in After Effects. So that credit card is kind of like a separate little exercise. So what we're going to do is we're going to show you how to build another Comp inside your project. Think of a Comp as a little group. You can see it down here, Google group of Layers. But you can have more than one Comp. So I'm going to go 'Composition', 'New Composition'. I'm going to call this one Overshoot. Make it about 5 seconds long, works for me. Background color, I'm not worried about. And what we're going to do is put in a background color. Remember, it has to be 'Layer', 'New', 'Solid'. Color wise, you might have to scroll up in your Libraries to be able to see the colors at the top. Click the little 'Eyedropper' tool, click the 'Blue'. Click 'OK'. We've got a Layer there, I'm going to right click it. Give it a name, call it 'Background'. We'll lock it, so we don't wreck it. We'll zoom out a little bit, actually I'm going to go to 'Fit'. So we can see everything. I'm going to build little Compositions, the credit card thing goes there. The actual green credit card thing goes there.
What we'll do is we'll do a little Scale Overshoot. But you can do a Slide-in Overshoot, anything you like. Now there's two ways of doing it. We'll do it manually first, it's not that hard. But there's an automatic way afterwards. The only trouble is the automatic way doesn't work every time. So let's do it the manual way first, then we'll look at automatic. So here we'll Twirl down, we'll find 'Transform'. We'll do 'Scale', turn the stopwatch on. Make sure the Play Head's at the beginning. And we're going to set the Scale down to 0. And then, after some time, about that time. Mines at 14 frames. I'm going to Scale it up to just past where we need it to be. So 120, maybe. Maybe a little bit less, we may have to play around with it. It really depends on your Artwork. Then I want it to go back, kind of bounce back. Not to 100% but maybe 90. That password should be--
You can kind of see what we're doing here. We're going Overshoot, back, but we're Overshooting back pass where we need it to be, which is 100%. And then now, I'm going to go up to 105. And then, one last one, which is going to be 100. Now we got to play around with the timings I'm going to have to add Easing, because at the moment-- you get a kind of a sense of what we're going to do, right? It's not that hard to do. We're going to select them all, and go to 'Keyframe Velocity'. 75. 75. The only trouble with that is that it's quite intense. So what I might do is, undo, and I say-- remember, I never used Easy Ease. It's going to work in this case, it's quite a bit with Overshoot. Now timing wise, I'm selecting all these guys. I'm just kind of creeping this in. Time to get my kind of idea of how the timing's going to work. You're going to have to play around with it yourself.
What you can do though, say it's all happening too slowly. You can select all the Keyframes instead of trying to move them all along you can select all the Keyframes, grab the last one, well, not yet holding 'Option' key on a Mac, or 'Alt' key on a PC, and grab the last Keyframe, and just drag it to the left. You can see they're kind of compressed. And it makes it heaps easier to reset the timing rather than trying to move them individually. So now, goes in… Hold the last one. Now it's going to go… I'm not sure why I add the sound effects. Anyway, that is a manual way of doing Overshoot. Same principle for moving it forward. Go past where you want it to be, back a little bit, a little bit… Eventually it rests in the middle. We'll hit 'Save'. And this Artwork here, I'm going to right click it, give it a name. I'm going to call this one Manual Overshoot. I'm going to do an automatic one with an Expression.
So, what I'd like to do is just turn the Eyeball off on it. And bring in Artwork1 again. I could drag it in from here, or it's already over here, in my files. Artwork1, here we go. It's not in the exact same position, I know, I'm not worried. So to automatically do it Keyframe at the beginning, Play head at the beginning. I'm still going to have to set the basic Keyframes for this to work. So we're going to Twirl this down, and we're going to go to 'Transform'. We're going to go to 'Scale'. I'm going to start it at 0, and then after some time, like this we're going to-- mine's at 16 frames. Scale it up to 100%. So we have to do that, but that's all we have to do. No Easing, no extra bumps.
Now we need to add what's called an Expression. Expression is what After Effects calls Coding. We're not going to get into too many Expressions in this course. Just the handy ones. And to set Expressions, first of all we need to grab the code, I've already got it, it's in your exercise files. I didn't write it, I borrowed it from someone. And when I said borrowed it, I stole it. But it's okay, they said it's okay to steal. They put it up on the internet for people to share. So in your Exercises Files, there's one in here called Expressions. And there's one in here called Expression - Overshoot, open it up. Select all of the stuff that's in here, copy it. I've left all the credit for the people that did make it. And it's an edit of an edit of somebody else's edit. And I've got it pretty sweet now. So what you do is, over here, see the little stopwatch here?
To get an Expression applied to the Scale here you hold down the 'Alt' key on a PC, or the 'Option' key on a Mac. Click it once, it then goes red. And that isn't the Expression in here, so I want to delete what's in there. And paste that random stuff that we found. And just click out anywhere else. There's this big Expression applied to this Scale. Go back, be prepared Okay, not that great, but if you tidy these up a little bit it start to look pretty sweet, right? Now we're good. So that saves us having to try and time the Bounce in and out. We don't have to play around with how far these are apart. We don't have to play around with Easing, it's really handy.
The only trouble is that it doesn't work every time. It works if you have two Keyframes but if you have to have a few different Keyframes, say this credit card kind of moves up, then left and right, and you want it to bounce, it's not going to work. It only works if there are only two Keyframes. So we're going to close this one down now and apply this to our original animations. It's just a little test case. So we're in this Overshoot Comp. I'm going to close it down, back to my main Comp. And what we're going to is, we're going to apply it to this little Bounce. It was looking cool without Easing, but we're going to go and replace it.
Now the one thing we need to do is, first of all let's look at the Icons for Scaling. Remember, with the Layer selected, to view, it's going to show me my Icons. It's not going to work because we've applied Easing to it. So we need to remove this Easing because it messes with our Script or our Expression. To get rid of them, the easiest way is to hold down 'Command' key on a Mac, and click them. Or 'Control' key on a PC. Just gets it back to diamonds. Now we're going to insert our Expression. Remember, we hold down a key and click the stopwatch. And that key is called, that's right, Alt on a PC, Option on a Mac. Give it a click.
In here, I'm going to replace this, delete it. Paste in our lovely Expression. And then drag our Time Line back. And prepare ourselves for… a little bit slow. Can you see, it's going really slow. So we're just going to bring these two together. Select just one of them, bring them together. Nice. You can decide on how far apart these are. Awesome. Now in this case it's probably not appropriate to do it to the Star Burst because we don't want that to bounce back. We like it to kind of just continue on and then stop.
That my friends is Overshoot. But before we go, this has been annoying me. These need to be in there, you need to be in there. When you drag them out from the Libraries-- Libraries is messy, just kind of dumps them into your Project window. Now it's tidy, and I'm happy. 'Save'. And let's move on to the next video.
How do I make an object overshoot and bounce into place in After Effects?
Create scale keyframes that go beyond the final value, then bounce back past it in progressively smaller amounts until the object settles at 100%. You can build this manually for complete control, or use an overshoot expression when the animation only has two keyframes.
How to Create an Overshoot Animation in After Effects
Key takeaways
Create separate compositions to test animation techniques without wrecking the main project.
Build a convincing scale overshoot with values such as 0%, 120%, 90%, 105%, and 100%.
Use easing and timing adjustments to make the bounce feel polished rather than harsh.
Compress selected keyframes with Option or Alt dragging to retime the entire animation quickly.
Use an expression overshoot for simple two-keyframe movements, but stick with manual keyframes for more complex motion.
What an Overshoot Animation Does
Overshoot is that little bit of bounciness that makes an animation feel more alive. Rather than simply arriving at its final size or position and stopping dead, the object goes slightly too far, comes back a little too far in the other direction, and gradually settles where it belongs.
For a scale animation, an icon might grow beyond its intended size, shrink below it, then make a couple of smaller corrections. It is a small detail, but it gives a flat graphic a much more natural, energetic entrance.
You can use the same principle with position too. Move an object past its target, pull it back beyond the target in the opposite direction, then reduce each bounce until it rests in the middle. The technique is not limited to icons, cards, or buttons. It works anywhere a clean animation needs a bit of personality.
Set Up a Safe Practice Composition
Before changing a main animation, make a separate composition for testing. A composition is basically a separate little group of layers within the same After Effects project, much like having more than one page in a document.
Choose Composition > New Composition.
Name it something useful, such as Overshoot.
Make it around five seconds long.
Choose a background colour, or add one as a solid layer after creating the composition.
For this example, use a simple credit-card graphic. Artwork can be created directly in After Effects, but Illustrator is often the easier place to draw clean vector assets. Bring the artwork into the Creative Cloud Library, then drag it into After Effects.
Create the background as a proper layer with Layer > New > Solid, sample the intended colour with the eyedropper, rename the layer Background, and lock it. Locking it is a small thing, but it stops accidental edits while you work.
Build a Manual Scale Overshoot
The manual method is the one worth learning first. It is straightforward, works reliably, and gives you control over every part of the bounce.
Select the object, twirl open Transform, and enable keyframes for Scale. Put the playhead at the beginning and set the first scale keyframe to 0%.
Move forward a short distance. Around 14 frames is a useful starting point for this example. Set the scale to a value larger than the final size, such as 120%. The exact amount depends on the artwork, so expect to play around with it.
Then add the settling keyframes:
0% at the beginning
120% for the first big overshoot
90% for the bounce back
105% for the smaller second overshoot
100% as the final resting value
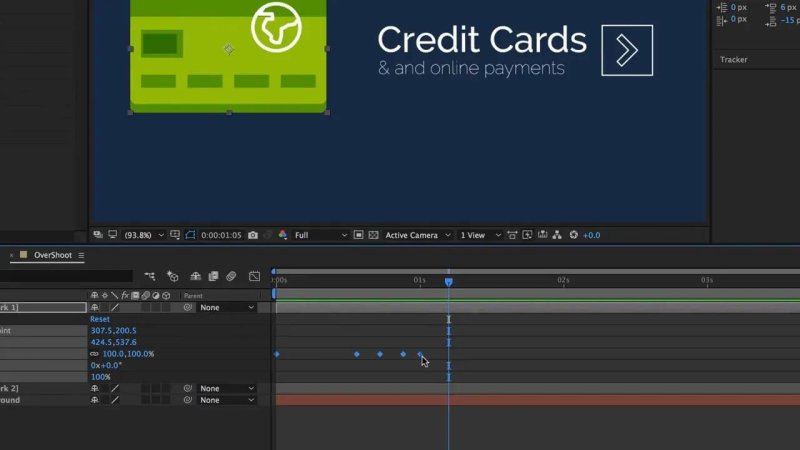
The manual overshoot is simply a series of scale values that jump past 100 percent, then settle back into place.
That sequence is the whole idea. Go too far, come back too far, then make each correction smaller. Once you understand that pattern, you can apply it to position, rotation, sliders, or pretty much any animated value.
Add easing without making it too intense
At this point, the animation has the right values but can still feel a bit stiff. Select the scale keyframes and apply easing. You can experiment with Keyframe Velocity, such as 75% incoming and 75% outgoing influence, but that can be quite intense.
For this sort of overshoot, regular Easy Ease often does the job nicely. It is not always the preferred option for every animation, but it works well here.
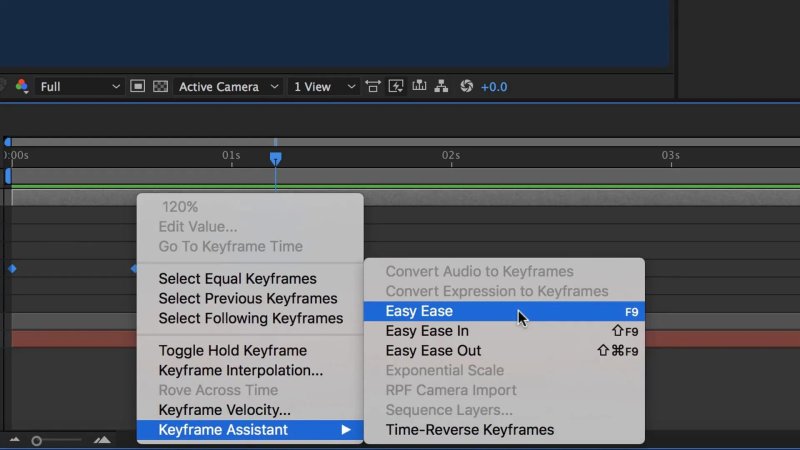
Easy Ease is a quick way to soften the bounce before refining the timing.
Refine the timing
The keyframe values create the bounce, but the timing creates the feel. Move the keyframes closer together or farther apart until the movement feels right. This part is very much about experimenting, because the ideal timing changes with the artwork and the style of the animation.
If the whole overshoot feels too slow, do not waste time shifting every keyframe individually. Select all the keyframes, hold Option on Mac or Alt on PC, then drag the last keyframe to the left. The selected keyframes compress together like a concertina.
That is a very handy way to speed up the entire action while preserving the relative spacing between every bounce. Dragging the last keyframe further right does the opposite and slows the action down.
Use an Overshoot Expression for a Simple Animation
There is also an automatic option: an expression. In After Effects, expressions are bits of code applied to a property. For overshoot, an expression can create the bounce for you, meaning you only need the essential start and end keyframes.
Start with a fresh copy of the artwork so you can compare it with the manual version. On the Scale property, set just two keyframes:
Set Scale to 0% at the beginning.
Move forward in time, such as 16 frames.
Set Scale to 100%.
Do not add easing or any extra bounce keyframes. The expression will take care of that part.
Apply the expression
Open the supplied overshoot expression file, select all the code, and copy it. Then go back to After Effects.
Hold Alt on a PC or Option on a Mac and click the Scale stopwatch. The property becomes expression-enabled and its value area turns red. Delete the existing expression text, paste in the overshoot expression, then click elsewhere to apply it.
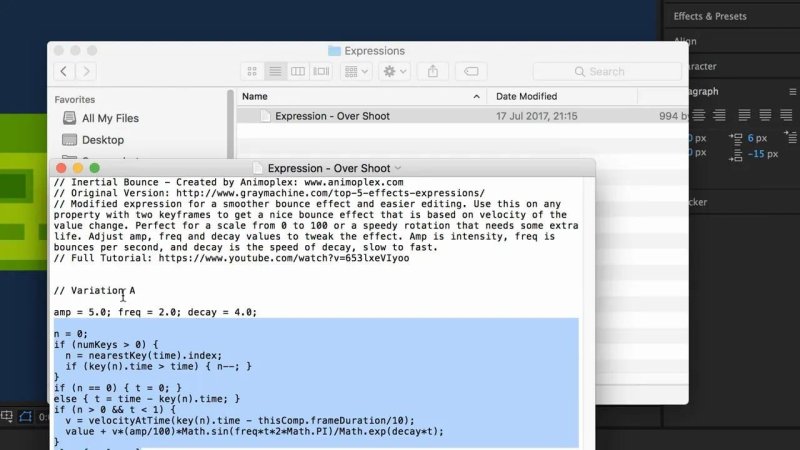
Copy the complete overshoot expression before applying it to the Scale stopwatch in After Effects.
The result may need timing work, but you do not need to manually create or ease every smaller bounce. Simply adjust the distance between the two original keyframes to control how quickly the effect happens.
When the Expression Works and When It Does Not
The expression method is handy, but it is not a replacement for the manual approach. It works best when the property has only two keyframes, such as scaling an icon from 0% to 100%.
It does not work well when the object needs to follow several different keyframes. For example, if a card moves up, then left, then right, and you want each change to bounce, the simple two-keyframe overshoot expression will not give you what you need.
That is where manual overshoot is better. You can decide exactly where the object goes past the mark, how much it rebounds, how many bounces it has, and when it finally comes to rest.
Apply Overshoot to the Main Animation
Once the test works, return to the main composition and apply the technique to the icon that needs a little pop. Press U with the layer selected to reveal its animated properties and keyframes.
If you are switching an already-eased scale animation to an expression, remove the existing easing first. Easing can interfere with the expression. Select the affected keyframes and use Command-click on Mac or Control-click on PC to return them to standard diamond keyframes.
Then Option-click or Alt-click the Scale stopwatch, paste the expression, and preview the result. If it feels slow, bring the two keyframes closer together. That little adjustment can take an overshoot from sluggish to sweet very quickly.
Not every element needs the same treatment. A central icon can benefit from bouncing into place, while a starburst or decorative accent may look better continuing its movement and stopping cleanly. Use overshoot where it supports the motion, not just because it is available.
Keep the Project Tidy
When assets are dragged in from Libraries, they can land in the Project panel in a fairly messy way. Before moving on, rename layers clearly, place assets where they belong, and keep related items organised. A tidy project is much nicer to work in, especially once the timeline starts filling up.
Key Terms
Overshoot
An animation principle where an object moves beyond its final target, then makes smaller corrections before settling. It creates a lively, bouncy sense of motion.
Keyframe
A point on the After Effects timeline that records a property value at a specific time. Multiple keyframes tell After Effects how a property should change over time.
Easy Ease
An After Effects keyframe interpolation option that smooths acceleration and deceleration. It is useful for taking the harsh edge off an overshoot animation.
Expression
Code attached to an After Effects property to automate behaviour. An overshoot expression can generate a bounce from a simple two-keyframe animation.
FAQs
What scale values should I use for an overshoot animation?
A solid starting sequence is 0%, 120%, 90%, 105%, then 100%. Adjust the larger values and spacing to suit the size and character of the artwork.
Can I use overshoot on Position instead of Scale?
Yes. Move the object slightly beyond its destination, then move it back past the destination in smaller amounts until it settles at the intended position.
Why is my overshoot expression not working properly?
Make sure the animated property has only two keyframes and that existing easing has been removed. This simple expression is intended for a basic start-to-end movement rather than a path with several direction changes.
How do I speed up all overshoot keyframes at once?
Select all the keyframes, hold Option on Mac or Alt on PC, and drag the final selected keyframe left. The keyframes compress proportionally, making the animation faster without individually moving every keyframe.
Written by Daniel Walter Scott — Founder of Bring Your Own Laptop & Chief Instructor
