This course has been archived. See the updated course here.
CC Libraries are amazing in After Effects - start using them now
Questions


Student Gallery
Be the first to share something.
Course info
Overview
- You will need a copy of Adobe After Effects, Illustrator & Photoshop CC 2017 or above. 90% of the course will be done in After Effects but a few things are better done in Illustrator & Photoshop. A free trial can be downloaded from Adobe.
- No previous motion graphic skills are needed.
- No previous After Effects, Illustrator or Photoshop skills are needed.
- 48 lectures 5+ hours of well structured content.
- You'll learn to take Excel spread sheets and animate this in After Effects.
- You’ll learn how to make animated pie charts, line charts & bar graphs.
- You’ll learn how to create percentage counters.
- You’ll learn how to animate icons making beautiful infographics.
- You’ll learn how to create 'voice over' infographics.
- You’ll learn all the animation techniques needed to bring your data to life.
- You will have the finished files so you never fall behind.
- Downloadable exercise files & cheat sheet.
- Forum support from me and the rest of the BYOL crew.
- Techniques used by professional motion graphic designers.
- A wealth of other resources and websites to help your new career path.
- No previous After Effects experience is necessary.
- This course is for people completely new to After Effects. No previous animation or motion graphic design experienced is necessary.
- This is a relaxed, well paced introduction that will enable you to produce impressive video for your business or organization. Only basic computing skills are necessary - If you can send emails and surf the internet then you will cope well with our course.
- There is a 100% refund if you don’t find this course useful. Just message me, no questions asked, I’ll refund your payment in full.
Course duration 5.5 hours + your study.

Daniel Walter Scott
Founder of Bring Your Own Laptop & Chief Instructor
I discovered the world of design as an art student when I stumbled upon a lab full of green & blue iMac G3’s. My initial curiosity around using the computer to create ‘art’ developed into a full-blown passion, eventually leading me to become a digital designer and founder of Bring Your Own Laptop.
Sharing and teaching are a huge part of who I am. As a certified Adobe instructor, I've had the honor of winning multiple Adobe teaching awards at their annual MAX conference. I see Bring Your Own Laptop as the supportive community I wished for when I was first starting out and intimidated by design. Through teaching, I hope to bring others along for the ride and empower my students to bring their stories, labors of love, and art into the world.
True to my Kiwi roots, I've lived in many places, and currently, I reside in Ireland with my wife and kids.
Certificates
We’re awarding certificates for this course!
Check out the How to earn your certificate video for instructions on how to earn yours and click the available certificate levels below for more information.
Downloads & Exercise files
Transcript
Hello, beautiful people. In this video we are going to look at CC Libraries and why they're awesome for your Infographic and Data Visualization work. You can seem them over here. We're going to bring in colors, and icons, and all sorts of cool stuff. We're going to work a little bit with Illustrator. Let's go and check out the awesomeness now in this video.
First things first, we're going to open up the file I've got the icons in. I am not in After Effects, or anything, just in the Finder in Mac. So if you're on a Windows PC just go to your Desktop and try find the exercise files. Open up '01 Icon Pop'. Open up '01 icons.ai', an Adobe Illustrator file. Now when it comes to Illustrator and After Effects they just can't live without each other. Illustrator is designed to make icons, and graphics, and illustrations, and After Effects can do it kind of badly. So even though you might not have any Illustrator skills it's not going to be that hard for what we need to use it for.
So these are icons that somebody else has made. Check out one of my Illustrator courses if you want to get into this in more detail. But what we're going to do is under-- we're going to reset our 'Workspace' just to make sure it's like yours. So I'm getting started, 'Reset Essentials'. Now, first thing we want to do is, we're going to look at something called Libraries. So you might be using the Adobe Creative Cloud now but ignoring these libraries. They keep popping up, and you're like, 'Ugh, go away." This is the video that's going to convince you they're super awesome, and you start using them, especially with After Effects.
So first thing we're going to do is, you'd probably go to 'My Library', and like me, it's probably filled with junk or empty, if you're not using it. So we're going to go down to 'CSS', 'My Library'. If you can't see Libraries, go to 'Window', here he is there, 'Libraries'. And click 'My Library', go down, 'Create New Library'. And this one here is going to be 'Infographic Animation Course BYOL'. And what I'll do is, I'll add a link to the screen right here. This link, that link there. That will link you to this Library. Click on the link, it will take you through you'll have to sign up with your Adobe password. And magically, you'll have this exact same one we're creating here. If you don't want to do that, don't worry, don't have to. We'll create our own as we go along.
So we've created our New Library. It says 'Drag and Drop Assets', it's easy. So what we're going to do is, I say, you, so I've selected it all, I'll grab my Black Arrow, I've selected a box around it all. Grab them all, just dump it in there. I'm going to double click the word 'Artwork1' and this is going to be 'Icon1 - House'. I never name them, I just leave them the way they come through as, but we're going to be super official here. I want you to do what I say, but not as I do type thing. So we're going to drag these along. I'm going to speed this up, or at least Tayla or Jason. So, ready, steady, go. That's the reason I don't rename them, takes forever. But I’m going to share this with you, so I want to make it look nice.
So why is this so good? You're like, "Awesome, you've chucked them into that box there." What's really cool is, we jump to After Effects now, hold on. And in here, there's Libraries. And the cool thing about Libraries is in here, there's my Infographic one that I've made. And these are all my icons, I can start dragging them out. You still might not be super impressed. What you can do though is you can right click it, and say I want to edit it. Opens it up back in Illustrator. It's not the same thing, it's like a copy of that original one. But I can go into here, and I can say actually, this thing here, if you know Illustrator you can start editing things. I'm not sure what I'm doing, I'm wrecking it. If I hit 'Save', up there, he's there, and I go over here, a lot better there, I wrecked it. So I'm going to go back into here, I'm going to undo all that wrecking. Hit 'Save' again, close it down.
You'll notice that it's here, it's fine. So it's connected between all these products so it's great for things like logos for your business. I've got ones in here for lots of different projects and companies because it saves me having to go off and find them on my hard drive. Now what I'm going to do for this course to make life a little easier with Libraries is that they're kind of tied in with all these panels that I use quite a bit. Now what I've got actually is another screen, it's just over here. You can't see it but there's a big screen next to this screen. And I often will put these panels over there. And what you can do is, let's say, the Library grab the word 'Library', click, hold, and drag it. You can go away, and drag over to this panel here. You can't see it here, but that's where I've stuck it. But what I'm going to do is, so you can keep seeing what I'm doing, is I'm dragging it. You can see all these weird things, that means, it's going to go above, below, next to it. I want it next to it, this bit here. So I'm going to have these guys so when we get to 'Character', 'Panel', 'Paragraphs', and over here, under 'My Libraries', it's a bit small. Drag it out. Here we go there, so I can see my stuff. And I want to make it just a little wider.
So, CC Libraries are awesome for some like that's pretty cool, the other nice thing is that Premiere, the exact same Library appears. Photoshop. So you're kind of connecting them all together. Doesn't have to be icons, you can drag stuff from Photoshop, you can drag videos in here, you can drag any sort of thing. By any sort of thing, let's go check out what else we can drag. Let's jump back into Illustrator.
So here in Illustrator, I'm going to grab my White Arrow. I'm going to click on this kind of circle on the outside. You can see, that's the Fill color. I would like that to be part of this Library. And you can do it by clicking this '+' button down the bottom. By default, you've probably got all of these selected. It will bring in the graphic, which is my icon. The Fill and Stroke color. I don't need the Stroke color because it's white. And I don't need the Graphic, because I already got it. I'm going to click it. It's just the color swatches. It's a perfect swatch to match that. If you've got your brand colors for your company you can go and do that. I'm going to go through and add all these colors. These are the colors I'm going to use for my project. We're not going to now, but you can add things like Paragraph Styles, and bunches of text Character Styles, all sorts of awesome things end up in Libraries.
One more thing before we go is that if you're using Libraries, and you are in a company, you're like "Oh, it's really awesome, imagine if I can share it with someone." Up under 'Libraries' here, there's little swipy lines here, the hamburger menu. Click on that, and go to 'Collaborate'. Collaborate and Share Links, they kind of sound the same. Collaborate would mean I can share it with my colleague next to me. So Malcolm's there, and I say, collaborate with him. And he can add, remove, delete, and edit. So I trust him, he knows what he's doing. I wouldn't though. Malcolm is an amazing developer, but not with my library. But anyway, let's say I just need to share. I'm like, "Malcolm's going to ruin this" I need to just share a link, that means, he can get it, he can see it, but can't mess with it. So it's up to you how you want to do it. That link I had earlier in this, is the one I went 'Share Link'. And I went and turned it on to be Public. You can click on that, and work through it, it's not hard to do. So now back over to After Effects. Now why do we come back over here? I'm not sure. We're done with this video, let's move on to the next one.
How do you use CC Libraries for Infographics in After Effects?
Use Adobe Creative Cloud Libraries to collect your infographic icons, colours and other reusable assets in Illustrator, then access the same library in After Effects. You can drag graphics into your composition, edit library artwork in Illustrator and share your collection with colleagues without repeatedly hunting through folders on your hard drive.
How to Use CC Libraries for Infographics in After Effects?
Key Takeaways
Create a dedicated CC Library for your infographic or animation project.
Add Illustrator icons and reuse them in After Effects.
Edit library artwork in Illustrator and save changes back to the library.
Store matching colour swatches alongside your graphics.
Choose between collaboration and link sharing to control who can change your collection.
Why CC Libraries Are Worth Using
If you have been ignoring the Libraries panel every time it pops up, I understand. Perhaps your default library is empty. Perhaps it is full of random bits you added once and never organised. Either way, a project library is where this feature starts becoming genuinely useful.
For infographic and data visualisation work, you often need the same icons, colours and logos in more than one Adobe application. CC Libraries put those reusable assets within reach across applications, rather than leaving you to find the right file on your hard drive every time.
Illustrator and After Effects make a particularly good pair. Illustrator is designed for creating icons, graphics and illustrations. After Effects is where we bring those graphics into an animation. You can make artwork in After Effects, but for this sort of icon work, Illustrator is the more natural place to start.
And no, you do not need to become an Illustrator expert first. We are using existing icons here, so the Illustrator skills required are fairly modest.
1. Open Your Icons in Illustrator
Start by locating your Illustrator artwork in Finder on a Mac or File Explorer on Windows. For the exercise files used here, open the 01 Icon Pop folder and then 01icons.ai.
The document contains a row of ready-made circular icons. The aim is to turn those individual graphics into a reusable collection for an infographic animation.
If you want a tidy starting workspace, use Window > Workspace > Reset Essentials. This puts the panels back into their Essentials arrangement before you begin.
2. Create a Dedicated CC Library
Rather than adding everything to the default My Library collection, create a library specifically for the project.
Open Window > Libraries if the Libraries panel is not visible.
Open the library dropdown, which may currently display My Library.
Choose Create New Library.
Give it a recognisable project name, such as Infographic Animation Course BYOL.
Create the library so it is ready to receive assets.
You can also access a collection through a shared library link. That route takes you through Adobe sign-in before giving you access to the shared collection. But a shared starting library is not essential: creating your own lets you build the collection as you go.
3. Add Each Icon as a Separate Asset
With your new library selected, adding artwork is wonderfully straightforward: select it and drag it into the panel.
Choose Illustrator’s Selection tool, the black arrow.
Drag a selection box around all the parts of one icon.
Drag the selected artwork into the Libraries panel.
Double-click its default name, such as Artwork 1, and give it a useful name, such as Icon 1 House.
Repeat for the remaining icons.
Select the complete individual icon, not the entire row, if you want each graphic to be available separately.
I will admit that renaming every asset is not always my favourite job. It takes longer than simply throwing everything into the panel. But if you are sharing the library, sensible names make the collection much nicer to use. This is very much a “do as I say, not always as I do” situation.
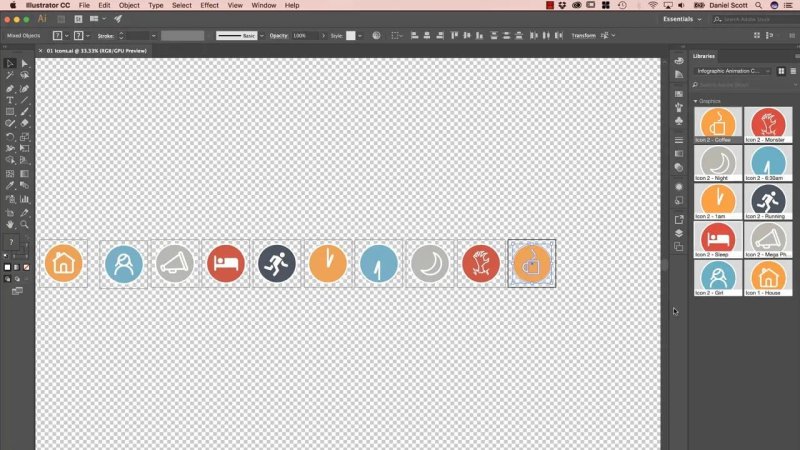
Each icon is stored separately, ready to reuse without reopening the full artwork file.
4. Use Your Illustrator Icons in After Effects
Now switch to After Effects and open the Libraries panel. Select the infographic library you just created. There are your icons, available in the other application.
Drag an icon from the library into your composition to use it in the design. In this example, an orange cup icon is added to a composition about the value of sleep for creatives.
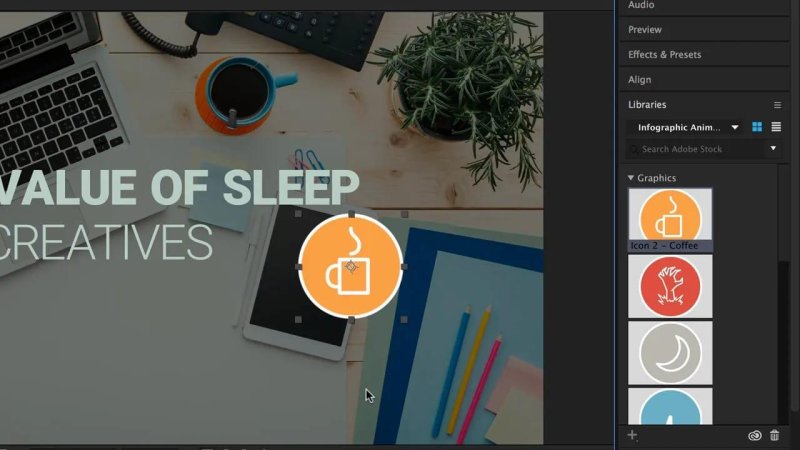
The Illustrator artwork is available directly inside After Effects through the same library.
That is already handy, but the real benefit is not just moving a graphic from one application to another. It is keeping a useful collection available wherever you need it.
I use libraries for different projects and companies, including business logos. It saves the repeated trip through folders to find the same assets again.
Edit the Library Artwork in Illustrator
If an icon needs changing, you can open it for editing from the library:
Right-click the graphic in the After Effects Libraries panel.
Choose Edit to open the library artwork in Illustrator.
Make your changes in Illustrator.
Save the artwork.
Return to After Effects to see the updated graphic.
There is an important distinction here: the library asset is a copy of the artwork you originally added. Editing it this way opens the library version, not the original document containing the full row of icons.
For a simple demonstration, removing the steam from the cup and changing its shape updates the library thumbnail and the placed graphic in After Effects after saving. If you have enthusiastically wrecked the icon rather than improved it, undo those changes in Illustrator and save again. The restored artwork comes through too. Lovely.
5. Make Room for the Libraries Panel
A useful panel is not particularly useful if it is constantly hidden behind another one. In After Effects, Libraries may share space with panels you need regularly, such as Character and Paragraph.
You can rearrange it to suit your workspace:
Click and hold the Libraries panel tab, then drag it out of its current group.
Use the docking highlights to position it beside another panel rather than above or below it.
Drag the panel boundaries to give the library enough width to display its contents clearly.
If you have a second screen, you can move the panel there instead. I often keep panels on another display, but docking Libraries alongside the text controls also works nicely when you want everything on one screen.
The same library is available in other Adobe applications, including Photoshop and Premiere Pro. Your collection does not have to stop at Illustrator icons: it can also include Photoshop artwork, video assets and other supported content.
6. Add Matching Colour Swatches
Graphics are only part of an infographic’s visual identity. Keeping the project colours in the same library gives you a matching palette alongside the icons.
Back in Illustrator, add a colour from one of the icons:
Choose the Direct Selection tool, the white arrow.
Select the coloured outer circle of an icon.
Check that its fill is the colour you want to store.
Click the plus button at the bottom of the Libraries panel.
Keep Fill Colour selected.
Deselect Graphic if the icon is already in your library, and deselect Stroke Colour if you do not need it.
Click Add.
That adds a colour swatch rather than another copy of the graphic. In this example, there is no need to add the white stroke colour, so only the coloured fill is collected.
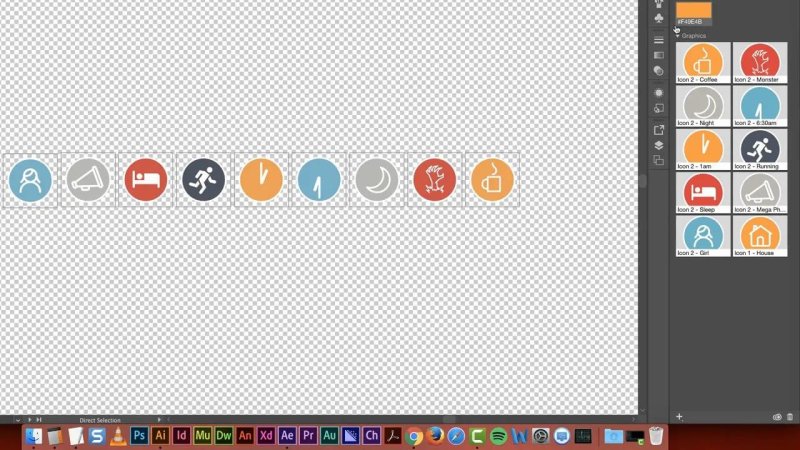
Store the fill colour on its own to build a palette without duplicating the artwork.
Repeat the process for the other colours you want to use. The same approach is useful for company brand colours: collect the intended swatches once and keep them with the associated artwork.
Libraries can also hold text, paragraph styles and character styles. We are not setting those up here, but they are worth remembering when your reusable design material extends beyond graphics and colours.
7. Choose Between Collaborate and Share Link
Once you have a useful collection, you will probably want to share it. Open the Libraries panel menu, the little hamburger-style menu, to find the sharing options.
Collaborate and Share Link sound similar, but they serve different purposes.
Collaborate: Let Colleagues Change the Library
Choose Collaborate when a colleague needs to help maintain the collection. In the workflow shown here, a collaborator can add, remove, delete and edit assets.
This is for someone you trust with the library, not simply someone who needs access to an icon. Your colleague might be an amazing developer, but that does not automatically mean you want them rearranging your design assets.
Share Link: Give Access Without Editing the Collection
Choose Share Link when someone needs to access the collection without changing your library. They can see and access what you have shared, but they cannot edit the source collection through that link.
To make the collection publicly accessible through a link, open Share Link and turn on the public sharing option. This is the approach used for distributing the course library.
The practical choice is simple: collaborate to maintain the library together; share a link to distribute it without giving away editing control.
A Small Setup Job That Makes Reuse Easier
You do not need an enormous asset-management project to get started. One dedicated library, a handful of clearly named icons and the right colour swatches are enough to make this workflow useful.
Build the artwork in Illustrator, bring it into After Effects through Libraries, and keep the collection close at hand. Once the same assets are available across your Adobe applications, that panel you used to dismiss starts earning its space.
Key Terms
CC Libraries
Adobe Creative Cloud collections for reusable assets such as graphics, colours and text styles. The same collection can be accessed across Adobe applications.
Library asset
An item stored in a library, such as an icon or logo. Artwork added from Illustrator becomes a library copy that can be opened for editing.
Fill and stroke
The fill is the colour inside a shape, while the stroke is its outline. The Libraries add menu lets you collect those colours separately from the graphic.
Character and paragraph styles
Reusable text-formatting settings that can also be stored in Libraries. They extend the collection beyond icons and colour swatches.
Collaborate and Share Link
Two ways to provide library access. Collaboration allows shared maintenance, while link sharing provides access without allowing changes to the source collection.
FAQs
Do I need advanced Illustrator skills to use CC Libraries with After Effects?
No. With existing artwork, you can start by selecting complete icons, dragging them into a library and naming them. Creating or substantially changing the illustrations requires more Illustrator knowledge, but collecting them does not.
Does editing a library icon change the original Illustrator document?
The library artwork is a copy of the original selection. Using Edit from the Libraries panel opens that library version, rather than the original Illustrator document from which you added it.
Can I store colours without adding the graphic again?
Yes. Select the relevant artwork, click the plus button in Libraries and choose only the fill or stroke colour you need. Deselect Graphic before clicking Add to avoid adding another artwork asset.
How can I share a library without letting someone edit it?
Use Share Link rather than Collaborate. Link sharing gives access to the collection without permission to change your source library, while collaboration is intended for colleagues who need to help manage its contents.
Written by Daniel Walter Scott — Founder of Bring Your Own Laptop & Chief Instructor
