This course has been archived. See the updated course here.
Matching composition to video size
Questions


Student Gallery
Be the first to share something.
Course info
Overview

- This course is for absolute beginners
- You'll need a copy of Adobe After Effects CC 2015 or above. A free 30 day trial can be download from Adobe here.
- Create beautiful motion graphics
- Animate compelling infographics
- Choose the correct video settings.
- You’ll learn how to exporting your video easily.
- You’ll be able to create slick type animations.
- Rendering your video for Youtube & Vimeo.
- Create titles for interviews.
- Add music to your motion graphics.
- Trim & editing video.
- Add watermarking your video.
- Fixing shaky footage.
- Color correct & fix any bad footage.
- Add a vignette to your video.
- Learn how to use your skills from Illustrator & Photoshop
- How to use green screen footage
- How to mask like a pro.
- How to animate infographics like bar graphs, line graphs & pie charts.
- How to use camera to make 3D type.
- Animating static images using parallax
- Plus basic character animation.
- + More…
- This course is for people who want to start earning money as a motion graphics designer.
- This course is for beginners wanting to learn to use After Effects for motion graphics and infographics.
- No previous After Effects or animation skills are necessary.
- This course is NOT for people who have a good understanding of After Effects already. This is for new people only.
Course duration 5 hours+ your study.

Daniel Walter Scott
Founder of Bring Your Own Laptop & Chief Instructor
I discovered the world of design as an art student when I stumbled upon a lab full of green & blue iMac G3’s. My initial curiosity around using the computer to create ‘art’ developed into a full-blown passion, eventually leading me to become a digital designer and founder of Bring Your Own Laptop.
Sharing and teaching are a huge part of who I am. As a certified Adobe instructor, I've had the honor of winning multiple Adobe teaching awards at their annual MAX conference. I see Bring Your Own Laptop as the supportive community I wished for when I was first starting out and intimidated by design. Through teaching, I hope to bring others along for the ride and empower my students to bring their stories, labors of love, and art into the world.
True to my Kiwi roots, I've lived in many places, and currently, I reside in Ireland with my wife and kids.
Downloads & Exercise files
Transcript
Hi, in this video were going to look at making a comp automatically form the video that you might already have. So in the first video there, or the last one we look at making a new composition and that might be because you're just going to start new composition, you're going to start making your own type animation, its going to be full on motion graphics, no actual live video. But you might be using after effects slightly differently, you might have an existing video that you're going to sex up with after effects. So instead of making a comp and then trying to put the video in it, were going to make a comp from that video automatically. The reason this is good is if you make a comp like we had on the first video there or the last video and then try to put the video in it, you might find that it’s the wrong size, it might be a slightly different frame rate and things don’t quite match up and you end up having to stretch things and move things around. So you may as well just make a comp that’s exactly the same as the video.
This is really good, mainly because what happens, people often they’ll make a comp following my advice using the HD version and they might have some video footage that is lower quality, it might be 720, which is standard definition and they'll try and scale it up and there's no real point in doing that, you may as well just keep whatever version you’ve got, if you're scaling it up its just going to make the file size bigger but no extra quality.
So to do it, lets import our video, so I've got something existing here, were going to go import, were going to go to file, now on your desktop or wherever you downloaded the exercise files, if you haven’t yet, there's some exercise files to download and unzip and you can play along. You can use your own videos obviously but if you want to, check out the website and download the exercise files. So lets open him up, and in here we’re looking for the one called particle background mp4, so just a video that I've made. Were going to actually make this particle thing later on, its quite cool. But were just going to use it as a background graphic at the moment for our type animation that were going to do next.
So I've got a video, there's my first comp, he's a little bit used to this now we can delete him. But well just ignore him. There's my video, to make a comp from him, right click him, go to new comp from selection, and you see its given the exact same name, this is the little icon that were looking for, this little tape wheel here. or this film reel, this is the comp window, this is the raw footage and this is the comp that’s come form it. And thank you after effects, what its done is its made a comp the exact same size, the exact same frame rate to match my video so then I can go through, I'm going to click in here and I'm going to hit space bar and it should play my little animation, can you see the little dots moving around. Its just a little particles that were going to do later on, just as a background for our type. Hit space bar again to stop it. Now you might see, mines cropped round the edges, I'm going to go down here for 100% and go to fit. So that just fits in there so I can see everything.
So that’s the way to make a comp from a video, and I do this very often especially if I'm doing things like screen captures for this courses that I do for you. I cant get them at HD because of my laptop and the screen recording software, it comes through at about 720 standard definition so I just use those rather than trying to scale it up to HD for no reason.
Alright, that’s how to match a comp magically to your video.
How do I automatically match an After Effects composition to my video?
Import your video, then right-click it in the Project panel and choose New Comp from Selection. After Effects creates a composition with the same dimensions and frame rate as your footage, so you can start adding animation without manually matching settings or stretching the video to fit.
How to Match a Composition to Your Video Size in After Effects
Key Takeaways
Create a composition directly from footage to match its size and frame rate automatically.
Avoid enlarging lower-resolution video just to fit a Full HD composition.
Use the Project panel icons to distinguish source footage from its new composition.
Choose Fit in the Composition panel to see the whole image without changing its actual size.
Why Start with Your Video Rather Than a Blank Composition?
If you're making a type animation or a motion graphics project with no existing video, starting with a new, blank composition makes sense. You decide the settings, then build your animation inside it.
But you might be using After Effects to spruce up footage you already have. In that case, there's an easier approach: make the composition from the video itself.
Creating a composition first and dropping footage into it can leave you with settings that don't quite match. The composition might be a different size, or it might use a different frame rate. Then you're fiddling with scaling and positioning to make everything fit.
Let After Effects do that matching for you. You'll get a composition that suits the footage from the start.
Bigger Dimensions Don't Mean Better Footage
A common trap is choosing a Full HD composition, then importing a lower-resolution clip, such as a 720p recording, and scaling it up.
Enlarging that clip doesn't add detail that wasn't there in the first place. You can end up with a larger output file without gaining any extra image quality. For this workflow, it makes more sense to keep the footage at its existing resolution rather than enlarge it for no reason.
Create a Composition from Your Footage
1. Import Your Video
Go to File > Import > File and locate the video you want to use.
For this example, I'm using Particle Background.mp4, a green background animation with little moving particles. It's an existing video that can sit behind a type animation. We're using the finished background here, not building the particle effect.
If you're using the exercise files, download and unzip them first, then select that file. Your own video works just as well.
2. Choose New Comp from Selection
In the Project panel, right-click the imported video and select New Comp from Selection.
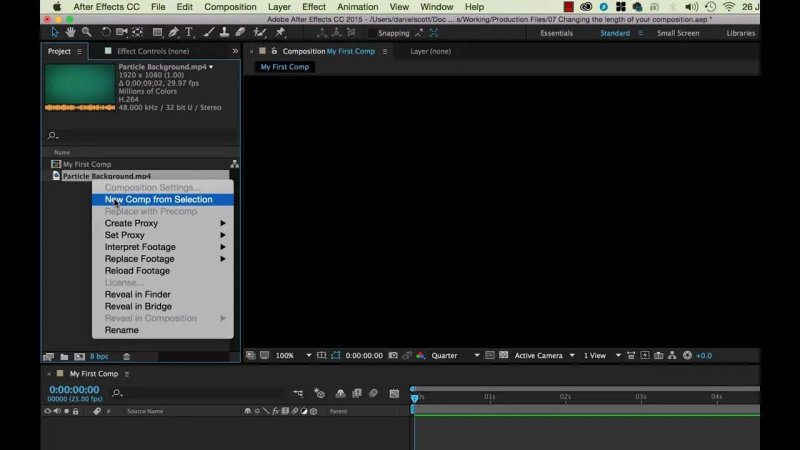
Create the composition from the footage rather than guessing its settings.
And thank you, After Effects. It creates a new composition with the same size and frame rate as the video, with the footage already in place.
If you previously created an empty composition, you don't need it for this approach. You can leave it alone or delete it if it's no longer useful.
3. Tell the Footage and Composition Apart
The new composition takes the same name as the source video, so you now have two similarly named items in the Project panel.
Check their icons rather than relying on the names. The imported video has a footage or film-reel icon; the composition has a different composition icon. One is your source material, and the other is where you'll work with that material and add animation.
Preview the Video and Fit It in the Panel
Click inside the Composition panel and press the spacebar to preview the animation. In the particle background example, you'll see the little dots moving around. Press the spacebar again to stop.
If the image looks cropped around the edges, check the panel's magnification setting. At 100%, the image may be too large to display fully within the available panel space.
Open the magnification menu at the bottom of the Composition panel and choose Fit.
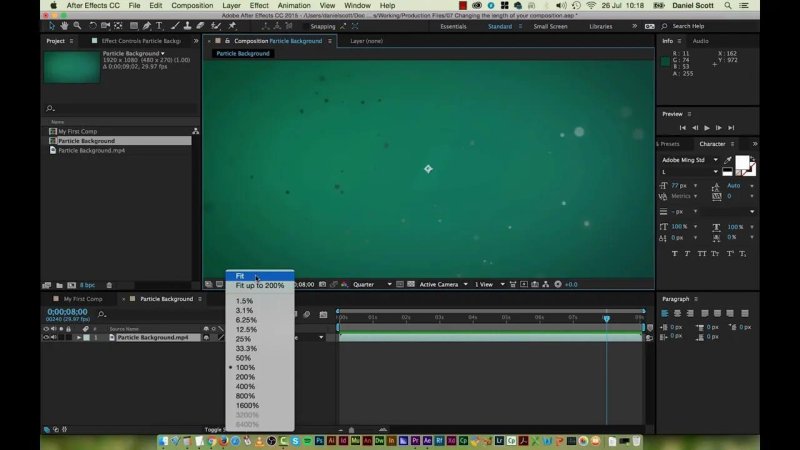
Fit makes the whole background visible within the panel.
Fit changes the preview magnification, not the composition dimensions or the footage scale. You can see the entire image without resizing anything in your project.
A Handy Workflow for Screen Recordings
I use this approach often for course screen captures. My laptop and recording software don't always give me Full HD footage; sometimes the recordings come through at around 720p.
Rather than force those recordings into a larger composition, I create the comp directly from the footage. The settings match, there's no unnecessary enlargement, and I can get on with adding the graphics.
That's the useful habit here: when an existing video is the starting point, let it set the composition size and frame rate.
Key Terms
Composition, or comp: The workspace in After Effects where you arrange footage and build animation. It has its own dimensions and frame rate.
Source footage: The original video imported into your project. It remains a separate Project panel item from the composition created from it.
Frame rate: The number of frames used per second of video. New Comp from Selection matches the composition's frame rate to the selected footage.
Fit: A preview magnification option that displays the entire composition within the available panel space. It doesn't resize the actual composition.
FAQs
Does New Comp from Selection match both video size and frame rate?
Yes. It creates a composition with the same dimensions and frame rate as the selected video, avoiding the need to match those settings manually.
Why does my video look cropped after creating the composition?
The Composition panel may be set to 100% magnification, so only part of the image fits in the panel. Choose Fit from the magnification menu to see the whole image.
Will scaling 720p footage up to Full HD improve its quality?
No. Scaling makes the image larger but doesn't add new detail. If there's no reason to enlarge it, create the composition at the footage's existing resolution.
Written by Daniel Walter Scott — Founder of Bring Your Own Laptop & Chief Instructor
