This course has been archived. See the updated course here.
How to render or export your After Effects animation
Questions



Student Gallery
Be the first to share something.
Course info
Overview

- This course is for absolute beginners
- You'll need a copy of Adobe After Effects CC 2015 or above. A free 30 day trial can be download from Adobe here.
- Create beautiful motion graphics
- Animate compelling infographics
- Choose the correct video settings.
- You’ll learn how to exporting your video easily.
- You’ll be able to create slick type animations.
- Rendering your video for Youtube & Vimeo.
- Create titles for interviews.
- Add music to your motion graphics.
- Trim & editing video.
- Add watermarking your video.
- Fixing shaky footage.
- Color correct & fix any bad footage.
- Add a vignette to your video.
- Learn how to use your skills from Illustrator & Photoshop
- How to use green screen footage
- How to mask like a pro.
- How to animate infographics like bar graphs, line graphs & pie charts.
- How to use camera to make 3D type.
- Animating static images using parallax
- Plus basic character animation.
- + More…
- This course is for people who want to start earning money as a motion graphics designer.
- This course is for beginners wanting to learn to use After Effects for motion graphics and infographics.
- No previous After Effects or animation skills are necessary.
- This course is NOT for people who have a good understanding of After Effects already. This is for new people only.
Course duration 5 hours+ your study.

Daniel Walter Scott
Founder of Bring Your Own Laptop & Chief Instructor
I discovered the world of design as an art student when I stumbled upon a lab full of green & blue iMac G3’s. My initial curiosity around using the computer to create ‘art’ developed into a full-blown passion, eventually leading me to become a digital designer and founder of Bring Your Own Laptop.
Sharing and teaching are a huge part of who I am. As a certified Adobe instructor, I've had the honor of winning multiple Adobe teaching awards at their annual MAX conference. I see Bring Your Own Laptop as the supportive community I wished for when I was first starting out and intimidated by design. Through teaching, I hope to bring others along for the ride and empower my students to bring their stories, labors of love, and art into the world.
True to my Kiwi roots, I've lived in many places, and currently, I reside in Ireland with my wife and kids.
Downloads & Exercise files
Transcript
Hi there, in this video were going to look at rendering or exporting your video from after effects. So rendering or exporting, it doesn’t really matter what you call it, it’s the same thing. So what were going to do is try and make a video at the end. And were going to try and make an mp4, an mp4 is the most common video format now, it plays online, its good for broadcast, there's all sorts of good uses for mp4’s. So, lets go and do it.
So lets go to composition and lets go to add to media encoder, so you can go, there's lots of different ways, you can go to export to media encoder, queue, you can go to this one in here, the shortcuts great, it doesn’t really matter which one you go to. Lets probably go this way, file, export, add to media encoder queue, now you can render this straight from after effects, now that’s totally fine and it works in a very similar sort of way. The reason we don’t do that is that after effects while its rendering cant do anything else, you're stuck waiting for it to finish. Where as if you send it off to this separate program called adobe media encoder its just a separate program and he's got one function in the world, its to render video, the cool thing about him is he can sneak in the background, be rendering your videos and you can continue on your merry way, making new after effects stuff. So that’s why we like it. So were going to go add to adobe media encoder queue.
Now, its going to be, it’s a separate program on your machine, it will start loading up in the background like my one will eventually, now one thing to note is that its going to be rendering the version that I have open, I had, can you see I had this first one we did and its got nothing in it, we can get rid of him, but I had this one open which if I double click him and if I send it to adobe media encoder its going to render this one, this blank video. So make sure you’ve got the comp you want to render open then go to add to media queue and then it opens up. Lovely.
Now, the awesome thing is, by default its already set. It’s going to be h264, its going to be match source, its going to be the same as we made it and its going to put it in the right folder. So at this stage, all were going to do is click play and were not going to worry about too much more of the details. Later on in the video towards the end were going to get into some fun stuff when we talk about codex and were going to talk about getting the file size really small and all sorts of other stuff but at the moment, this is all you really need to get started is this is going to make you a video at the right size that you made it at the right format that’s really good and shareable at a place where its easily found and its lovely. The cool thing about it is remember it’s in this other program called adobe media encoder, it gets installed without you asking. If I jump into after effects look I can still work in here.
So instead of getting After Effects all tied up doing stuff. It’s up to you. Aright, speed, speed, speed. It’s a pretty small one so you can see it rendering down here. Now, where it puts it is a little weird, so its put it into the, it’s a bit long that one here. But its on my computer here, what you're looking for is where you have saved your documents. That’s the file I was working on, my after effects ap. This is my after effects projects. And what happens is when you hit the play, it goes and makes a folder here with the same name and it adds this underscore ame for adobe media encoder and inside there, that one there is my particle background, it gets this name from, if I jump back into after effects, is from my comp, so when you're naming your comps, you can save some time by just giving it a name that you know you're going to use later on, so its called particle background and there he is there. This thing here don’t worry about, you may or may not have this one, its just a temporary file, its just disappears later on. Its only the mp4 we want, this is just a little file that I like to check out to see, for no special reason.
So you're looking for the mp4, you can see its 3.7 MB. I double click it, massive, I hit play, ooooh motion blur, easing, pauses, little particles fall and eventually it drops off. Great, so that’s my little mp4 and that is the basics for exporting. There's not much more to that, if you want to get more nerdy you can skip along to one of the later videos where we go through a bit more advanced exporting.
Aright, ill see you in the next video.
How do I export an MP4 from After Effects?
Open the composition you want to export, then choose File > Export > Add to Adobe Media Encoder Queue. In Media Encoder, check that the format is H.264 and the preset matches your source, confirm the output location, then click the green play button to create your MP4.
How to Render or Export Your After Effects Animation as an MP4
Key takeaways
Export through Adobe Media Encoder so you can keep working in After Effects.
Make sure the correct composition is active before sending it to the queue.
Use H.264 and Match Source for a straightforward first export.
Find your finished MP4 beside your project in the generated output folder.
Give your composition a useful name, then check the finished animation by playing it.
You’ve made your animation. Now you need an actual video file you can share. Rendering and exporting are two names for that final job: turning your After Effects composition into a finished video.
For this basic workflow, we’re making an MP4. It’s a common, shareable video format that’s useful for online playback. You don’t need to get tangled up in advanced compression settings just to get your first animation out. A few checks and a click of the play button will do nicely.
Why use Adobe Media Encoder?
You can render directly from After Effects, and that’s perfectly fine. The drawback is that rendering ties up After Effects, leaving you waiting rather than carrying on with your work.
Adobe Media Encoder is a separate application that handles the export. Send your composition over to it, and it can render in the background while you return to After Effects and work on something else.
That’s the main reason I like this route. You’re not stuck waiting for one animation to finish before getting on with the next.
1. Open the composition you actually want to export
This is the little check that saves a lot of frustration: make the intended composition active before adding it to the queue.
An After Effects project can contain several compositions. In this example, there’s a finished animation called Particle Background, but there’s also an earlier, empty composition. If the empty one is active when you send it to Media Encoder, that’s the one you’ll export. You’ll get a blank video rather than the animation you meant to make.
Double-click the composition you want, and check that its animation appears in the Composition panel. Lovely. Now you’re ready to send the right thing.
2. Add it to the Adobe Media Encoder queue
With your composition active, choose:
File > Export > Add to Adobe Media Encoder Queue
You can also find the Media Encoder queue command under the Composition menu. Either route does the same job, so use whichever feels easiest.
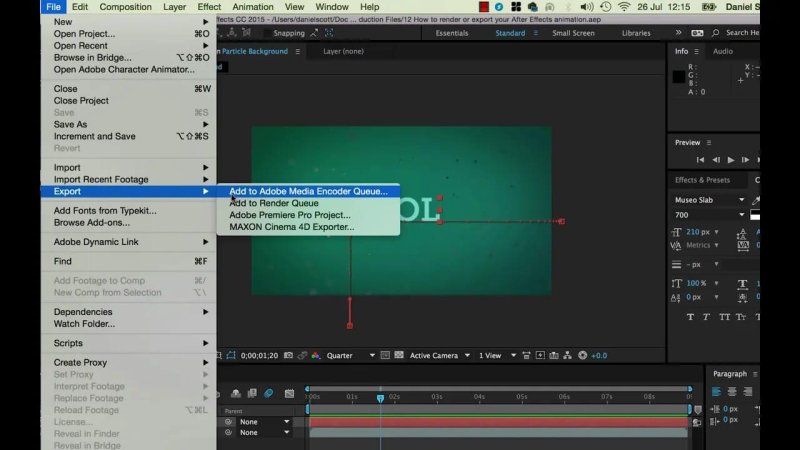
Send your active composition to Media Encoder through the Export menu.
Media Encoder will launch if it isn’t already open, and your composition will appear in its queue. Give it a moment to load. It’s opening a separate application, not simply another panel inside After Effects.
3. Check the basic export settings
In this example, Media Encoder has already filled in the settings we need. Before starting, check these three things:
Format: H.264. This is the setting used here to produce the MP4.
Preset: Match Source. This keeps the export aligned with the source composition, including the size you created it at.
Output File. This shows where the finished video will be saved.
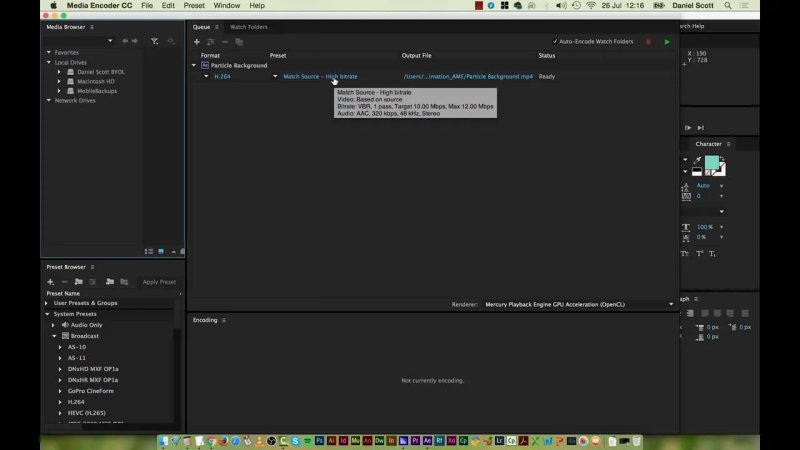
Check the format, source-matching preset and output location before starting the queue.
For a first export, that’s enough. You don’t need to start adjusting every option just because it’s there. These settings give us a video at the composition’s size, in a useful format, with a destination we can find afterwards.
Codecs, compression and getting the file size really small are more advanced topics. Keep those separate from the basic task of getting a finished MP4 out successfully.
4. Click play and let Media Encoder render
Click the green play button to start the queue. Media Encoder begins processing the composition, and you can see its progress in the encoding area.
Now you can switch back to After Effects and carry on working. That’s the handy part: the export is happening in the other application rather than keeping After Effects occupied.
The sample animation is small, so its export finishes fairly quickly. Let your own export complete before opening the resulting file.
5. Find your exported MP4
The default output location in this example is beside the saved After Effects project. Your project file ends in .aep. Media Encoder creates a folder with the project’s name followed by _AME, which stands for Adobe Media Encoder.
Inside that folder, look for the .mp4 file. Its name comes from the composition, so the animation here becomes Particle Background.mp4.
That’s a good reason to name compositions properly. A useful composition name gives your finished export a useful name too, saving a bit of tidying up later.
You may also notice a temporary file in the folder. It isn’t the finished video and may disappear later. The file you want to open and share is the MP4.
6. Play the finished animation
Double-click the MP4 and play it to check the result. The sample export is about 3.7 MB, and playing it lets us check the motion blur, easing, pauses, falling particles and the final movement off-screen.
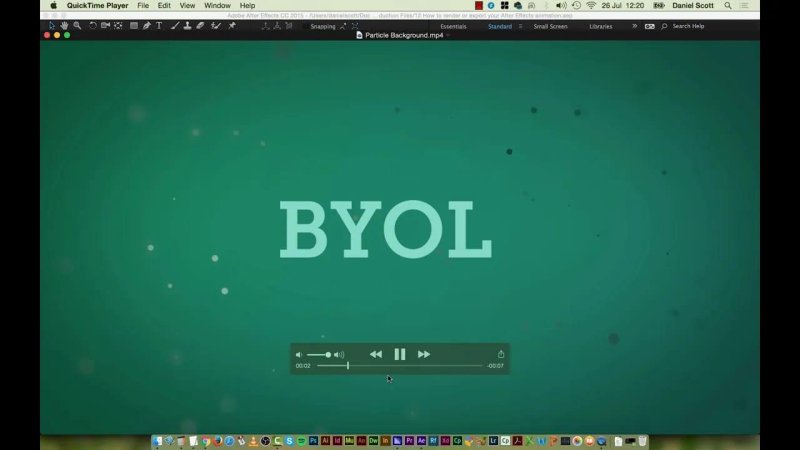
Play the finished MP4 to check that your animation has exported as intended.
Don’t stop at finding a file with the right name. Play it through and make sure it’s the composition you intended to export, with the movement and timing you expected.
That’s the basic workflow sorted: open the right composition, send it to Media Encoder, check the settings, start the queue and play the finished MP4. No need to make it more complicated than that.
Key terms
Rendering or exporting: Producing a finished video file from your After Effects animation. For this workflow, both terms refer to the same overall task.
Composition: The individual animation you open and send for export within an After Effects project.
H.264: The video encoding format selected in Media Encoder for this MP4 export.
Match Source: A preset that bases the export settings on the source composition, rather than choosing a different output size.
AEP: The file extension for an After Effects project. It’s your working project, not the finished MP4.
AME: Short for Adobe Media Encoder. In this example, _AME is added to the generated output folder’s name.
FAQs
Can I render directly from After Effects?
Yes. The advantage of using Adobe Media Encoder is that it handles the export separately, allowing you to continue working in After Effects while it renders.
Why did I export a blank video?
Check which composition was active when you added it to the queue. If an empty composition was open, it may have been sent instead of your finished animation. Open the intended composition and add that one to Media Encoder.
Where is my exported MP4 saved?
Check the Output File location in Media Encoder. In the workflow shown here, the MP4 is saved beside the AEP project inside a folder named after the project with _AME added.
Written by Daniel Walter Scott — Founder of Bring Your Own Laptop & Chief Instructor
