This course has been archived. See the updated course here.
After Effects Course Updates New Features 2021
Questions




Student Gallery
Course info
Overview

- This course is for absolute beginners
- You'll need a copy of Adobe After Effects CC 2015 or above. A free 30 day trial can be download from Adobe here.
- Create beautiful motion graphics
- Animate compelling infographics
- Choose the correct video settings.
- You’ll learn how to exporting your video easily.
- You’ll be able to create slick type animations.
- Rendering your video for Youtube & Vimeo.
- Create titles for interviews.
- Add music to your motion graphics.
- Trim & editing video.
- Add watermarking your video.
- Fixing shaky footage.
- Color correct & fix any bad footage.
- Add a vignette to your video.
- Learn how to use your skills from Illustrator & Photoshop
- How to use green screen footage
- How to mask like a pro.
- How to animate infographics like bar graphs, line graphs & pie charts.
- How to use camera to make 3D type.
- Animating static images using parallax
- Plus basic character animation.
- + More…
- This course is for people who want to start earning money as a motion graphics designer.
- This course is for beginners wanting to learn to use After Effects for motion graphics and infographics.
- No previous After Effects or animation skills are necessary.
- This course is NOT for people who have a good understanding of After Effects already. This is for new people only.
Course duration 5 hours+ your study.

Daniel Walter Scott
Founder of Bring Your Own Laptop & Chief Instructor
I discovered the world of design as an art student when I stumbled upon a lab full of green & blue iMac G3’s. My initial curiosity around using the computer to create ‘art’ developed into a full-blown passion, eventually leading me to become a digital designer and founder of Bring Your Own Laptop.
Sharing and teaching are a huge part of who I am. As a certified Adobe instructor, I've had the honor of winning multiple Adobe teaching awards at their annual MAX conference. I see Bring Your Own Laptop as the supportive community I wished for when I was first starting out and intimidated by design. Through teaching, I hope to bring others along for the ride and empower my students to bring their stories, labors of love, and art into the world.
True to my Kiwi roots, I've lived in many places, and currently, I reside in Ireland with my wife and kids.
Downloads & Exercise files
Transcript
No transcription available for this video.
Can Roto Brush 2 and the new After Effects 2021 tools really speed up motion graphics work?
Yes. Roto Brush 2 makes subject cut-outs far less painful, while taper and wave controls, Offset Paths copies, and improved 3D navigation make it much quicker to build lively social graphics, retro text, and dimensional animations without reaching straight for plugins.
After Effects 2021 New Features: Roto Brush 2, Tapered Strokes, 3D Tools and More
Key takeaways
Use Roto Brush 2 to isolate a person with a rough paint stroke, then refine only the bits that need help.
Add text and animated shapes both in front of and behind a cut-out subject for a much more layered result.
Use Taper, Wave and Trim Paths together to turn plain strokes into energetic animated blobs and lines.
Create concentric star and retro type effects with the new Copies control in Offset Paths.
Navigate 3D scenes more naturally with orbit, pan, dolly and the improved unified gizmo.
After Effects and Premiere Pro now support ProRes RAW.
Roto Brush 2 makes cut-outs much more fun
Roto Brush has been around for a while, and it was fine. Sometimes. Roto Brush 2 is the big improvement: it uses Adobe Sensei machine learning to isolate subjects much more reliably, saving a whole lot of frame-by-frame masking and general swearing at the old Roto Brush.
The useful application here is simple. Cut a person out of a clip, put bold text behind them, then add animated foreground shapes. It is a great way to make social media graphics feel more dimensional without filming against a green screen.
Create a composition from footage
Start with a new composition from your footage. To use Roto Brush, double-click the footage layer. This is important: Roto Brush works in the Layer panel, not the normal composition panel. It is very easy to get lost otherwise.
Paint a rough foreground selection
Select the Roto Brush tool and click-drag inside the subject. Do not carefully trace the outline. Just make a rough internal stroke over the person you want to keep. Roto Brush 2 will look at the clip and work out the edges.
It will not be flawless every time, especially with compressed footage, hair, glasses, ears, or similar details. But it gets surprisingly close with almost no manual work.
Add missing areas: paint normally over the part you want included, such as an ear or glasses.
Remove unwanted areas: hold Option on Mac or Alt on PC while painting.
Keep it sensible: decide how much perfection the shot actually needs before spending ages refining tiny details.
Freeze the result, then clean the matte
Put the playhead at the beginning and click Freeze. After Effects propagates the selection through the clip. This is where Roto Brush 2 shows off: rather than rapidly creeping into the background or losing half a head, it can hold the subject remarkably well.
Back in the composition, check the result against a black background. If the edge looks a bit rough, use the Roto Brush matte controls:
Reduce Chatter helps calm unstable edges.
Feather softens the transition slightly.
Shift Edge lets you pull the edge inward or outward. A small negative shift can make an edge feel cleaner.
Quality can be switched from Standard to High when you have the render time.
There is also a Roto Brush version setting, so it is possible to switch back to version 1 if you really want to. You probably will not.
Fix edge colour contamination when needed
Use Decontaminate Colours when background colour wraps around the subject edge. For example, a bright orange background behind a pale hoodie can tint the hoodie edges orange. This control helps counteract that colour spill by adjusting the edge colours.
Put text behind the subject
Once the cut-out is working, add a large text layer and place it below the isolated footage layer. The text now sits behind the person, which immediately makes a basic talking-head clip feel more designed.
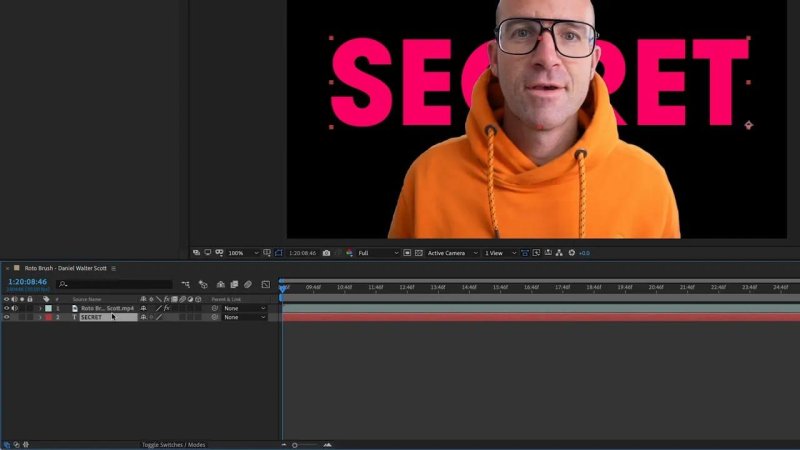
A cut-out subject in front of oversized text is a quick way to create depth.
For a fuller look, duplicate the footage layer. Keep one version as the Roto Brush cut-out above the text, and place an unmasked copy below the text as the background. The text then sits naturally between foreground subject and background footage.
Add a ridiculous wiggle because it works
To make the text lively, add a wiggle effect and increase its Position value. A fairly large value, around 500 in this example, plus some nervousness creates that intentionally chaotic, bouncing type effect. Wiggle is not new, but it remains hilarious and useful.
Practice brief: a positive word behind a cut-out
Grab a headshot clip of yourself or use stock footage, isolate the subject with Roto Brush 2, and put one positive word behind them. Try something like beautiful, happy, joy or wonder. Animate it by sliding it, wiggling it, or trying another effect. The practice is the bit that actually makes the tool stick.
Taper and Wave bring expressive strokes into After Effects
Before these additions, creating tapered, wavy strokes often meant plugins, expressions, or a more complicated setup. Now the controls are built into shape layer strokes.
Taper makes a stroke thick at one end and skinny at the other. Wave adds the wobbly, squiggly business. Add Trim Paths and suddenly a plain line can animate around a subject like an energetic little sticker.
Start with a shape, not a mask
Select the Pen tool with no layer selected. The icon should show the shape-layer indicator, not the mask indicator. This small visual clue is genuinely useful, because accidentally drawing a mask when you meant to draw a shape is one of those tiny After Effects things that gets old fast.
Set Fill to None, choose a Stroke colour, and choose a stroke width. The initial width matters because it becomes the maximum width available to the taper. Draw a path that moves through the composition, perhaps travelling in front of and behind a subject.
Use Taper controls in the Stroke settings
Open the shape layer, then go to Contents > Shape > Stroke > Taper. Increase Start Length to taper the beginning of the path. End Length does the same at the opposite end.
You can also adjust the starting and ending width to avoid an overly pointy result. The easing controls affect how the line moves between thin and thick. A little easing usually makes it feel more organic and less mechanically uniform.
Add Wave for a wobbly line
Open Wave, raise the Amount, then adjust Wavelength. The right values depend on the scale of your path and stroke. More amount gives a more obvious wave, while wavelength controls the spacing of the bends.
Both Taper and Wave are animatable, which means the wave can phase through the path over time. That is nice, but the really useful piece is still Trim Paths.
Animate it with Trim Paths
First, change the Stroke Line Cap from the unfortunately named Butt Cap to Round Cap. The rounder end makes the animated line look much nicer.
Then choose Add > Trim Paths on the shape layer. The basic animation is:
At the start of the timeline, set End to 0% and add a keyframe.
Move forward in time and animate End to 100% so the path draws on.
Decide how long the visible blob should be.
Animate Start upward just after End completes, so the line draws off again.
Apply Easy Ease to the keyframes for a less stiff animation.
To trim the layer so it vanishes after the animation, move to the final keyframe, hold Shift to snap the playhead to it, then trim the layer ending to that point. Turn on motion blur both for the composition and the shape layer if it suits the speed of the animation.
Need to retime the entire animation? Select all the keyframes, hold Option on Mac or Alt on PC, and drag one keyframe. The timing stretches proportionally, which is much better than shifting everything one keyframe at a time.
Make the line pass in front of and behind a person
Get the stroke animation working before duplicating anything. Then duplicate the animated shape layer:
Place one copy above the Roto Brush cut-out.
Place the second copy below the cut-out.
On the upper copy, draw a mask that reveals only the segment that should pass in front of the subject.
Let the lower copy handle the sections that should travel behind them.
The mask on the top shape layer works as a little window. Where the window hides the top stroke, the identical bottom stroke is visible instead. The transition makes it appear as though one continuous line wraps around the subject.
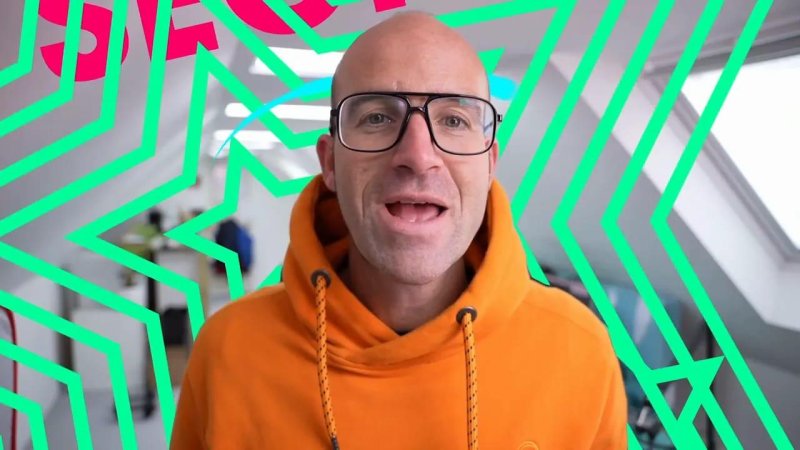
Tapered strokes, layered text and repeated stars can turn a simple clip into full sticker-mode social graphics.
Create concentric shape repeaters with Offset Paths copies
This feature is described as a concentric shape repeater, but do not go hunting for a button with that exact name. The useful change is that Offset Paths now has Copies. That is the upgrade.
Offset Paths itself is not new. Adding copies means a single shape can expand into multiple concentric outlines, whether that shape is a star, a rectangle, a custom path, imported SVG artwork, or converted text.
Build a pulsing concentric star
Create a shape layer with no Fill and a Stroke. A star makes a pretty excellent starting point. Under the shape layer Contents, choose Add > Offset Paths.
Animate the Amount and Copies controls from zero up to the values you want, then return them to zero. If the copies merge into a solid-looking shape rather than appearing as separated outlines, there is not enough space between them.
Fix that by doing one or more of the following:
Increase the Offset Paths Amount.
Reduce the stroke width.
Remove the fill.
Use the Offset value if you want the copies to explode outward or collapse inward. Apply Easy Ease and motion blur for smoother movement. Duplicate the layer, shift its timing, reposition it, and you have a stack of sparkly animated stars.
Use the same technique on retro text
This is where the feature gets especially fun. Pick a retro-style font from Adobe Fonts or another font library, type a short word or your first name, then convert it to shapes. In After Effects, use Layer > Create > Create Shapes from Text.
After Effects leaves the original text layer intact, so turn off its visibility for the moment and work with the generated shape layer. Remove the fill, set a coloured stroke, then add Offset Paths and animate Amount and Copies as with the star.
A thin cyan outline with an off-white text fill gives a very Tron-ish result. Add the original text layer back underneath if you want the centres of the letters filled.
Make a 1980s 3D anaglyph effect
Duplicate the converted text outlines. Keep one cyan and make the other a bright fluorescent red. Offset their animation timing slightly, or change their Offset Paths settings so they are not perfectly overlapping.
Try a blending mode, such as Overlay, on the upper layer to make the two colours interact. There is no single magic blending mode because it depends entirely on the look you are after. Work through the options and pick what looks good, not what sounds technically impressive.
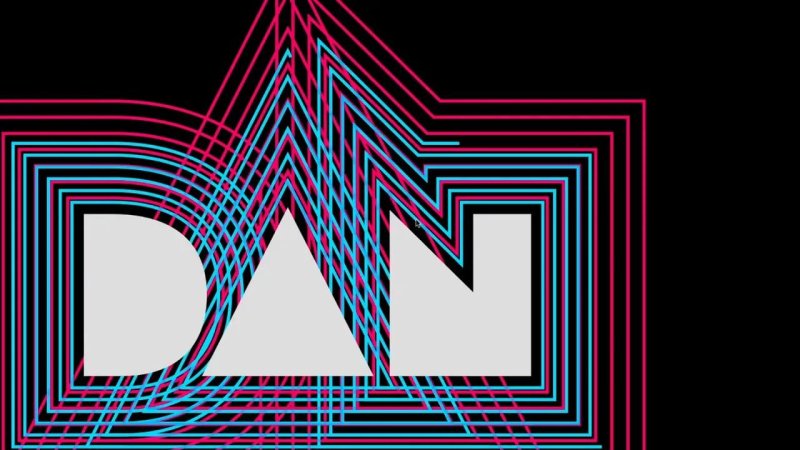
Offset Paths copies create a surprisingly good retro outline treatment from ordinary text shapes.
Time the text pulse to music
For a proper practice project, make a short retro text animation using your first name, a fresh font and music. The YouTube Audio Library provides music that can be used commercially on YouTube, with options to browse by genre, mood, or searches such as synth for a retro direction.
The important part is timing. A lovely animated pulse feels much more deliberate when its expansion and contraction land on the beat. A few seconds is plenty. Add bonus sound effects or a background image or video if you want to push it further.
After Effects 3D controls are finally more normal
3D itself is not new in After Effects. The old controls, though, felt ancient. The updated tools are much more intuitive and much closer to the navigation found in other 3D software.
The key improvements are a new unified gizmo, simpler camera navigation, standardised shortcuts, and the ability to navigate a 3D scene without first creating a camera.
Turn layers into 3D and navigate without a camera
Enable the 3D switch for the layers you want to work with. Previously, doing this sort of 2.5D movement required adding a camera and using the Unified Camera tool. Now you can start moving around the scene directly.
The old Unified Camera tool is gone. Instead, the camera navigation tools are:
1: Orbit
2: Pan
3: Dolly
If the shortcuts are not active, check the new 3D Preferences panel. On a PC, go through Edit and Preferences to find the 3D settings.
Orbit around the thing you care about
The new Orbit behaviour works around the cursor target. Click an object and a target appears, then drag to orbit around that location. This is much more useful than always orbiting around the centre of the entire scene.
If you need a proper animated camera, position the view where you want it, then choose View > Create Camera from View. Place the playhead at the beginning first if that is where the camera animation needs to begin. You can then animate the camera Position and adjust the view later in time for a smooth move.
Use the unified gizmo to transform 3D layers
Select one or more 3D layers with the Selection tool and the updated unified gizmo appears. It combines X, Y and Z movement, rotation and scale controls in one much more usable interface.
The shortcuts 4, 5 and 6 switch through gizmo modes. Press V to return to the universal version. Use R to reveal Rotation and animate a little spin, then Easy Ease those keyframes as usual.
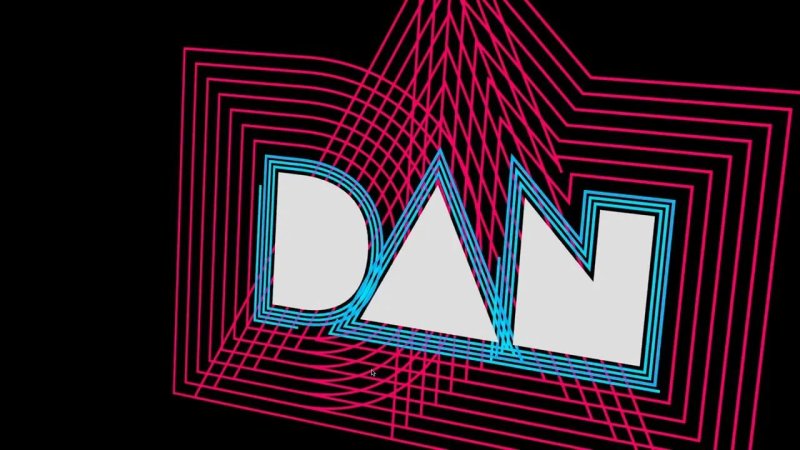
The updated 3D controls make it much easier to explore different dimensional text angles.
Use mouse navigation without changing tools
If you use a mouse with left, right and middle buttons, there is a very handy workflow. Hold Option on Mac or Alt on PC from almost any tool, then use:
Left mouse button: orbit the view.
Right mouse button: dolly in and out.
Middle mouse button: pan the view.
Let go of Option or Alt and you return straight to the tool you were using. That is a small thing, but it makes working in 3D feel considerably less clunky.
3D can be tough when you are new to After Effects. Do not let that put you off, but also do not be surprised if it feels harder than drawing lines and adding wiggles. It is worth practising, and these updated controls make the learning curve friendlier.
ProRes RAW support
After Effects and Premiere Pro now support ProRes RAW. It is a useful addition for workflows that use that format, although it requires a capable recent computer and strong graphics hardware. ProRes RAW files can be very large, so it is likely to matter more to editors and productions already shooting that format than to everyone else.
Make the tools work together
The good stuff happens when these features stop being isolated tricks. Use Roto Brush 2 to cut out a subject. Put animated text behind them. Wrap tapered, wavy strokes around them. Add concentric stars for pure visual chaos. Then turn the whole lot into 3D and make a slow, moody camera move through it.
Not every project needs all of that at once, obviously. But knowing these tools are built into After Effects means you can get much closer to an energetic, layered result without plugins and without spending half an hour moving mask points frame by frame.
Key Terms
Roto Brush 2
An After Effects tool that uses machine learning to isolate a foreground subject from its background across a video clip. It is used for creating masks and cut-outs without tracing every frame manually.
Trim Paths
A shape layer animator that reveals or hides sections of a path over time. It is commonly used to make strokes draw on, draw off, or travel around a composition.
Taper and Wave
Stroke controls within After Effects shape layers. Taper adjusts a line from thick to thin, while Wave introduces an animatable wavy distortion along the stroke.
Offset Paths Copies
A control that generates multiple offset versions of a shape path. It is particularly useful for concentric outlines, pulsing stars, and retro text treatments.
Unified Gizmo
The improved 3D transform control for moving, rotating and scaling 3D layers. It provides more direct and familiar manipulation of objects in an After Effects 3D scene.
FAQs
Is Roto Brush 2 better than the original Roto Brush?
Roto Brush 2 is designed to isolate subjects more accurately and more quickly using Adobe Sensei machine learning. It can still need refinement around hair, ears, glasses and difficult edges, but it reduces the amount of manual masking work significantly.
How do I create tapered strokes in After Effects?
Create a shape layer with a stroke, then open Contents, the Shape group, Stroke, and Taper. Animate Start Length or End Length, adjust widths and easing, then combine it with Trim Paths for an animated result.
Where is the concentric shape repeater in After Effects?
It is not a separate effect with that exact name. Add Offset Paths to a shape layer and use its Copies control alongside Amount and Offset to create concentric outlines.
Do I need a camera to use 3D in After Effects?
No. The updated 3D navigation tools let you orbit, pan and dolly around a 3D scene without creating a camera first. If you need to animate the view, you can create a camera from the current view later.
Does After Effects support ProRes RAW?
Yes. After Effects and Premiere Pro support ProRes RAW, although working with it benefits from a recent computer and capable graphics hardware due to the demands of the format.
Written by Daniel Walter Scott — Founder of Bring Your Own Laptop & Chief Instructor
