Don’t forget about clone Tool Stamp in Photoshop
Questions





Student Gallery
Course info
Overview
- 13+ Hours of content!
- 10+ Interactive exercises
- 68 downloadable resources
- You'll learn the best selection and masking techniques
- You'll know how to fix images that look 'hard to fix'
- You'll master advanced levels and curves tricks, specifically with skin, adjusting and enhancing colors
- You'll learn how to enlarge images without distortion and what to do when things go wrong
- You'll know how to convincingly remove all kinds of objects from images
- My favourite: You'll master the ability to distort, bend and reshape images
- Lets look at how current trending styles are super easy to duplicate
- You will become a type nerd. We'll use font pairing in Typekit. We'll also use Photoshop's ability to guess fonts
- Your Artboards skill will be mastered
- A master of retouching, you will become!
- You'll learn to edit videos in Photoshop, who'd have thought?
- We'll also create awesome cinemagraphs, AKA: Moving pictures!
- You'll learn to master 3D in Photoshop!
- You'll learn lots about professional, reusable mockups, techniques and shortcuts!
Course duration 13 hours 45 mins + your study.

Daniel Walter Scott
Founder of Bring Your Own Laptop & Chief Instructor
I discovered the world of design as an art student when I stumbled upon a lab full of green & blue iMac G3’s. My initial curiosity around using the computer to create ‘art’ developed into a full-blown passion, eventually leading me to become a digital designer and founder of Bring Your Own Laptop.
Sharing and teaching are a huge part of who I am. As a certified Adobe instructor, I've had the honor of winning multiple Adobe teaching awards at their annual MAX conference. I see Bring Your Own Laptop as the supportive community I wished for when I was first starting out and intimidated by design. Through teaching, I hope to bring others along for the ride and empower my students to bring their stories, labors of love, and art into the world.
True to my Kiwi roots, I've lived in many places, and currently, I reside in Ireland with my wife and kids.
Certificates
We’re awarding certificates for this course!
Check out the How to earn your certificate video for instructions on how to earn yours and click the available certificate levels below for more information.
Downloads & Exercise files
How do you remove an object near an edge in Photoshop without creating a blurry mess?
Use the Clone Stamp Tool when the Healing Brush starts making an edge look milky, soft, or just plain yuck. Clone Stamp copies exact pixels from a sampled area, and rotating that source lets you rebuild curved edges around details such as nostrils, ears, jewellery, and hands.
How to Use the Photoshop Clone Stamp Tool for Clean Retouching
Key takeaways
Use the Spot Healing Brush for simple marks in open, even areas.
Switch to the Clone Stamp Tool when an edit crosses a defined edge.
Always retouch on a separate layer so the work remains editable.
Rotate the clone source to follow curves and preserve natural contours.
Use keyboard shortcuts for fine rotation and larger source-position moves.
Check the result by toggling the retouch layer on and off.
Clone Stamp vs Healing Brush: When to Use Each
The Healing Brush is amazing for plenty of retouching jobs. Small blemishes, specks, and marks sitting in an area of similar texture are usually quick work for the Spot Healing Brush. Paint over them and Photoshop does a solid job of blending the surrounding texture and colour.
The trouble begins when there is a crisp or curved edge involved. A nose ring is a great example. If you try to heal straight across the ring where it overlaps the nose, Photoshop may blend pixels from both sides of the edge. Instead of a believable nose contour, you can end up with a soft, milky patch that does not match the shape underneath.
That is where the Clone Stamp Tool earns its keep. It does not try to blend the sampled pixels into the destination. It works more like a copy and paste inside a brush, giving you direct control over precisely what is painted.
Start With a Non-Destructive Retouch Layer
Before making any fixes, create a separate layer for the retouching work. Call it something obvious, such as Retouch. This is not glamorous, but it is one of those habits that saves you later.
Working on its own layer means you can:
Undo without damaging the original photograph.
Turn the retouching on and off to inspect the difference.
Adjust or remove parts of the work later.
Keep easy Healing Brush fixes and more careful Clone Stamp edits together in a controlled way.
Begin with the easy areas. Use the Spot Healing Brush for small spots away from important contours, then move to Clone Stamp where edges need to stay sharp and believable.
How the Clone Stamp Tool Actually Works
With the Clone Stamp Tool selected, choose a clean source area that resembles the pixels you need to rebuild. Set that target point, then paint over the unwanted detail. Rather than analysing and blending the new pixels like the Healing Brush, Clone Stamp lays down a direct copy from the sampled area.
That exact copying is the reason it is so useful for retouching around clear shapes. You can take a section of a nostril edge, for example, and use it to reconstruct another portion of the nose that has been interrupted by jewellery.
It is not a tool to use for every mark in an image. Use it when you need control. For ordinary spots, the Healing Brush is often faster. For edges, transitions, and shapes that must retain their form, Clone Stamp is the better choice.
Rotate the Clone Source to Match Curved Edges
The big trick with the Clone Stamp Tool is source rotation. A source area can have the right colour and texture but still look wrong if its angle does not line up with the curve you are trying to restore.
To access the controls, open Window > Clone Source. In the Clone Source panel, adjust the Angle control until the copied pixels follow the contour of the edge you are repairing.
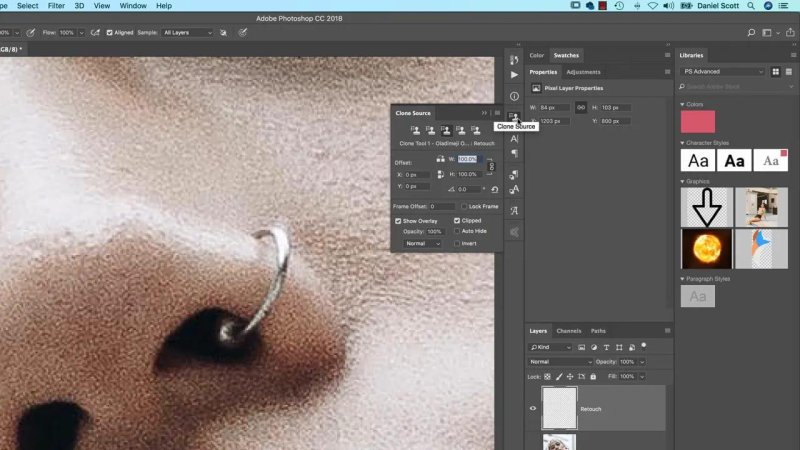
The Clone Source panel gives you the angle control needed to make sampled detail follow a curved edge.
For a nose, this is especially helpful. Sample an area around the nostril or nearby skin, rotate it to match the direction of the nose contour, then gently paint over part of the object. Because the sampled pixels are now aligned with the curve, the repaired edge has a much better chance of looking natural.
Do not try to cover everything in one massive stroke. Work in small sections. Sample, rotate, paint a little, then sample again if the shape or texture changes. A curved edge often needs several source points and slightly different angles as it turns.
Fine rotation shortcut
For small rotation adjustments, hold Option + Shift on a Mac or Alt + Shift on a PC, then press the less-than or greater-than key. This rotates the clone source in small increments.
That is ideal when the source is almost right and only needs a subtle nudge. For a much bigger change, dragging the Angle control in the Clone Source panel is generally easier.
A Practical Approach to Removing Jewellery From a Portrait
Removing a nose ring is not one single tool job. It is a mixture of techniques, used where each one makes sense.
Clean the simple surrounding marks first. Use Spot Healing Brush on small details in open skin areas.
Zoom into the difficult area. Look at where the object crosses highlights, nostril edges, shadows, and skin texture.
Sample a suitable nearby source. Choose pixels that belong to the same part of the form you need to recreate.
Rotate the source. Match the angle of the sampled edge to the curve at the destination.
Paint in short passes. Build the repair gradually rather than dragging across the whole object.
Use Healing Brush for the leftovers. Once the important contours are rebuilt, healing can tidy small remaining imperfections.
In practice, the inside edge of the nose, the outer nose contour, and the area around the nostril may all need separate samples. The clone source remembers its rotation, so do not forget to reset or alter the angle when moving to a different part of the image. A rotation that worked on one curve may be completely wrong on the next.
Move the Clone Source in Bigger Steps
Sometimes the sampled area is in roughly the right place but needs shifting across the image. You can reposition it more quickly by clicking once to place the source where it should begin, then holding Shift and using the arrow keys.
This moves the source in larger chunks. It is not always the fastest method, and it will not solve an incorrect angle or a poor sample choice, but it is useful when the source needs a substantial positional adjustment.
If the result looks odd, do not force it. Reset the source, sample a better area, rotate it if needed, and try again. The fastest retouch is usually the one that does not need repairing afterwards.
Retouch Around Ears, Hands, and Other Awkward Edges
The same thinking applies beyond a nose ring. In a portrait, an earring hoop might pass behind an ear, through loose hair, or alongside a hand. Those are all areas where a soft blended fix can easily damage the boundary between skin, hair, jewellery, and background.
Use a smaller brush as the repair gets tighter. Sample from the matching side of an edge, rotate the source to follow the direction of the contour, and paint just enough to rebuild that segment. Then move on to the next section.
For example, when restoring the edge where an ear meets a pale background, sample a clean portion of the ear contour and rotate it as necessary. When the repair moves away from the edge and into a broad, even background, the Spot Healing Brush may again be the faster tool.
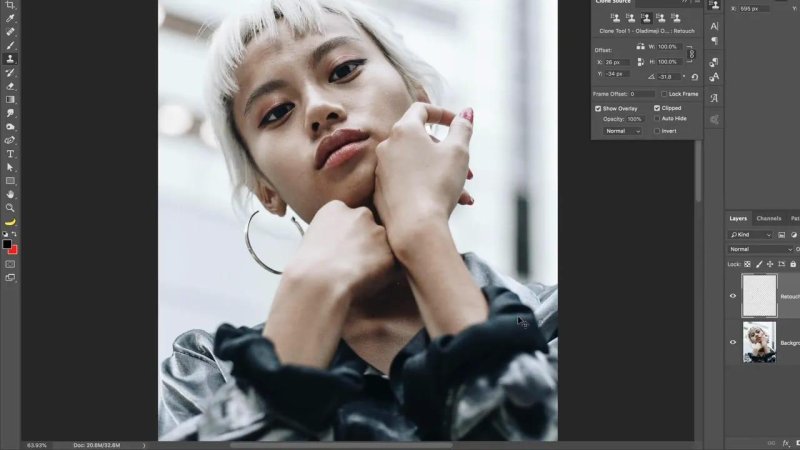
Zooming back out is essential because a repair can look perfect close up but still feel wrong in the full portrait.
Check Your Work at More Than One Zoom Level
It is easy to get lost at extreme zoom levels. Zoom in closely enough to preserve texture and edges, but zoom back out regularly to check whether the retouch actually works in the photograph as a whole.
Since the work is on a separate Retouch layer, toggle its visibility on and off. This gives you a quick before-and-after check and helps identify areas that still need attention, particularly around joins between the hand, face, ear, or jewellery.
The goal is not to use Clone Stamp everywhere. The goal is to combine the right tools: Healing Brush for straightforward clean-up, Clone Stamp for controlled pixel copying, and source rotation for contours that need to stay properly shaped.
Key Terms
Clone Stamp Tool
A Photoshop retouching tool that copies pixels from a sampled source area and paints those pixels elsewhere. Unlike the Healing Brush, it does not automatically blend the copied pixels into their new surroundings.
Clone Source
The sampled area used by the Clone Stamp Tool. The Clone Source panel lets you adjust settings such as the source angle, which is useful for matching curved details.
Spot Healing Brush
A retouching tool that automatically samples and blends surrounding pixels to remove small marks. It is best for uncomplicated areas where there are no important edges to preserve.
Non-destructive retouching
A workflow where edits are made on a separate layer rather than directly on the original image. This keeps changes editable and easy to compare against the untouched photo.
FAQs
Why does the Healing Brush make edges look blurry?
The Healing Brush blends sampled pixels with the surrounding destination area. That is useful for natural texture, but near sharp boundaries or curved contours it can mix pixels from both sides and create a soft, muddy result.
When should I use Clone Stamp instead of the Healing Brush?
Use Clone Stamp when you need to preserve a defined edge, shape, or direction of texture. It is particularly useful around nostrils, ears, jewellery, hands, hair edges, and other areas where automatic blending is not reliable.
How do I rotate the Clone Stamp source in Photoshop?
Open the Clone Source panel through Window > Clone Source and adjust the Angle control. For fine adjustments, use Option + Shift with the less-than or greater-than key on Mac, or Alt + Shift with those keys on PC.
Should I retouch directly on the photo layer?
No. Create a separate retouch layer first. It lets you toggle edits on and off, make corrections later, and protect the original image from permanent changes.
Written by Daniel Walter Scott — Founder of Bring Your Own Laptop & Chief Instructor
