How to package your Photoshop file to include linked images
Questions


Student Gallery
Be the first to share something.
Course info
Overview
- 13+ Hours of content!
- 10+ Interactive exercises
- 68 downloadable resources
- You'll learn the best selection and masking techniques
- You'll know how to fix images that look 'hard to fix'
- You'll master advanced levels and curves tricks, specifically with skin, adjusting and enhancing colors
- You'll learn how to enlarge images without distortion and what to do when things go wrong
- You'll know how to convincingly remove all kinds of objects from images
- My favourite: You'll master the ability to distort, bend and reshape images
- Lets look at how current trending styles are super easy to duplicate
- You will become a type nerd. We'll use font pairing in Typekit. We'll also use Photoshop's ability to guess fonts
- Your Artboards skill will be mastered
- A master of retouching, you will become!
- You'll learn to edit videos in Photoshop, who'd have thought?
- We'll also create awesome cinemagraphs, AKA: Moving pictures!
- You'll learn to master 3D in Photoshop!
- You'll learn lots about professional, reusable mockups, techniques and shortcuts!
Course duration 13 hours 45 mins + your study.

Daniel Walter Scott
Founder of Bring Your Own Laptop & Chief Instructor
I discovered the world of design as an art student when I stumbled upon a lab full of green & blue iMac G3’s. My initial curiosity around using the computer to create ‘art’ developed into a full-blown passion, eventually leading me to become a digital designer and founder of Bring Your Own Laptop.
Sharing and teaching are a huge part of who I am. As a certified Adobe instructor, I've had the honor of winning multiple Adobe teaching awards at their annual MAX conference. I see Bring Your Own Laptop as the supportive community I wished for when I was first starting out and intimidated by design. Through teaching, I hope to bring others along for the ride and empower my students to bring their stories, labors of love, and art into the world.
True to my Kiwi roots, I've lived in many places, and currently, I reside in Ireland with my wife and kids.
Certificates
We’re awarding certificates for this course!
Check out the How to earn your certificate video for instructions on how to earn yours and click the available certificate levels below for more information.
Downloads & Exercise files
Transcript
Hi there, this video is all about packaging files. What is packaging files? It means that I've got fonts that are included in this PSD that I've made, there's also images that are linked to it. If I send them just the PSD, they're going to open it, and it's going to say, "Hey, I'm missing some of the linked images, like this image here." It's also going to say, "I'm missing some of the fonts." We're going to fix that with Photoshop's package feature, which is perfect for exporting images. Not so good for fonts, but I'll show you a little hack using Illustrator to get the fonts as well. All right, let's get started.
To get started, in your '17 Exporting' folder, there is a PSD in there called 'Final Artwork', open that up. Now I've made this quite small just to keep the file sizes down in your exercise files. And I want to show you the different things that happen. So file packaging is pretty easy, we'll go to 'File', and we go to 'Package', let's get that out of the way. Where are we going to put it? I'm going to put mine in my desktop to make it nice and messy, I'm just going to click 'Choose'. And what it will to do is that it will use the name of your file, 'Final Artwork'. That's the kiss of death, calling anything final. But anyway, let's look on our desktop. You can see there, Final Artwork Folder gets generated for you. So it names the folder for you. Puts a copy of the PSD there, and any links that have been used.
So what are the links? Let's have a look. So in my files here, I've got a bunch of different things. I'm going to make this a bit bigger so we can see. So this Blueberries image here is not-- it doesn't have any little icon here. You'll notice that in my exports it didn't appear. So I've got that image and I've got the background. Why did I only get those two? It's because down here, the background is actually a Creative Cloud libraries image. That's why I did this, I went to my libraries, and went - here it is there - and I drag this out. And because it's connected to my library, and not actually embedded in this document, when I go to package, Photoshop includes it. Something similar happened to this option here, can you see this one here? When I brought this image in, I went 'File', and instead of using Place Embedded I use 'Place', 'Linked'. You can see the little linking icon there, so it's linking to my hard drive. It gets included in the package. But there's lots of other things that didn't, say this splash here, that was just embedded in the document. It's a Smart Object, which is cool, but it is not included in the package because it's actually embedded in here. It was either copied and pasted in here, or use the File, Embed.
So you've got three options, you can just leave it the way it is, and have some of them embedded, some of them not, so that your package document is a bit of both. You could go through and say, actually there's banana here, I want to link it. To do it you can right click it, and you can say 'Convert to Linked'. Basically it will just say, where do you want to put the banana? I'm going to stick mine on my desktop. Randomly messing up the desktop, and now it is linked to that file called Banana, now to be included in my package, so I've got some consistency. It also makes the PSD a bit smaller in terms of file size, because it's not included in here, it's just linked. Alternatively I could go through and say, actually I don't want all these linked. Just going to right click them and say, 'Embed this Link'. I'm going to embed this one, and then nothing will be included in that package. And you won't need to go 'File', 'Package' at all.
One of the things you didn't see up here, that was fonts. For some reason Photoshop does not package out the fonts, I can't make it happen. I've tried my damnedest. Adobe Illustrator and InDesign do, but Photoshop doesn't yet. But there is a trick to get the fonts out, but there's a few conditions that need to be met. And pretty much this file here breaks all of them. What you can do is just open up in Illustrator and then use its File Package. And it will pull the fonts out. Why won't it work with this document? It won't work with any layer that has a Layer Style, in our case it has a Drop Shadow. I'm going to click 'Clear Layer Style'.
The other thing that won't happen is that, see this R here, it has a Drop Shadow, if I delete the Drop Shadow, but it's still behind this splash, it's not going to work. So I'm going to save this file here, and let's go into Illustrator. Let's open up that file, 'Exercise File 17', "Final Artwork'. I just want to make sure Convert Layers to Objects is on. Click 'OK'. What you'll notice here is that this font here gets converted to actual editable text. Photoshop and Illustrator worked together and they say, "Well I'm just going to remake this in the font." Perfect. That will get included when I export.
What won't happen is, see this R back here? I'll zoom in on it. We see the text here is perfect vector. Zoom in. Lovely. But let's look at this R up here, because it's all behind this, it's being smushed and turned into pixels, so it just doesn't get exported. So if you're just looking to get the fonts out, you might have to do some, like hacking just to get this R up on the top, no Drop Shadow, just so that Illustrator can go through and pull the fonts out.
The other thing that won't happen is, if I pick another font, and it-- I pick a Typekit font, say let's use this one here. Adelle, because it's a Typekit font, Adelle, this TK font, it's not going to work. This font here though, it's Arial, it could be anything as long as it doesn't have TK next to it. O type fonts, Open type will work, TTs will work, but not the Typekit. You are only allowed to use Typekit because you pay for your Creative Cloud license. And if the other person on the other side has a Creative Cloud license, the fonts will go with it perfect. If they don't, then they're not allowed to have them.
So let's say we've got this far, let's go to 'File', it's in the same sort of place, it's called 'Package'. Where am I going to stick it? I'm going to save this document. Where am I going to save it? On to my desktop. I'm going to make a folder called 'Packaging Example'. Man, it's getting insane. Stick that in there. So I need to save it first, and then though, when I go to 'Package', I'm just going to make sure I include the fonts. You can see, it won't let me have Typekit fonts. It says, "Hey be careful about the restrictions of fonts", you say, "Don't worry, I will."
Now on my desktop, here's Packaging Example, there's my Final Artwork. And where did I say the package were going to? I did not check that 'File', 'Package'. I put mine in a weird folder, let's stick it on the desktop. Inside that lovely new folder we made. Make sure the fonts are included. Do it twice. There it is there. There's the ai file, which I don't really need, because I got all the images out of Photoshop, but there's the Arial that I used. Pulled out of your hard drive, ready to be sent on to the next person. Bit of a hack, might not be worth the time and effort, but you also might be desperate to get the fonts out. But remember, no Layer Styles, no Typekit fonts, make sure they're at the top of your layer group, and use 'File', 'Package'.
We use Illustrator to just get the fonts, and we use Photoshop to get all the linked images. Combine them together, we have a completed package file. You might be watching in the distant future, they might just have fonts in Photoshop, just check first, it hasn't been there forever so far, so you might get lucky, and they might update that. You might not have to do this kind of hacked version. That's it for this video, Packaging. I'll see you in the next video.
Can you package a Photoshop PSD with linked images and fonts so someone else can open it without missing files?
Yes, Photoshop’s File > Package command creates a folder containing a copy of the PSD and its linked image assets. Fonts are the awkward bit because Photoshop does not package them, but Illustrator can be used as a practical workaround for eligible fonts.
How to Package a Photoshop PSD with Linked Images and Fonts
Key takeaways
Package a PSD to collect linked images alongside a copy of the Photoshop document.
Embedded images are already inside the PSD, so Photoshop does not add them to the package.
Convert assets to linked files when you want a smaller PSD and a consistent handoff folder.
Use Illustrator’s Package command to collect compatible fonts when Photoshop will not do it.
Adobe Fonts, formerly Typekit fonts, cannot be packaged for sharing.
Why package a Photoshop file?
A Photoshop document can look perfect on your computer and fall apart the moment it is sent elsewhere. The usual problem is linked assets: images that sit outside the PSD on your hard drive or in a Creative Cloud Library. Send only the PSD and Photoshop may report missing linked files when it is opened.
Packaging creates a tidy handoff folder. Rather than sending a PSD and hoping you remembered every image that went into it, Photoshop gathers the document and the linked assets it relies on.
This is especially useful when a job is moving to another designer, a client needs an editable file, or you simply want a proper archive that can be reopened later without hunting through old folders.
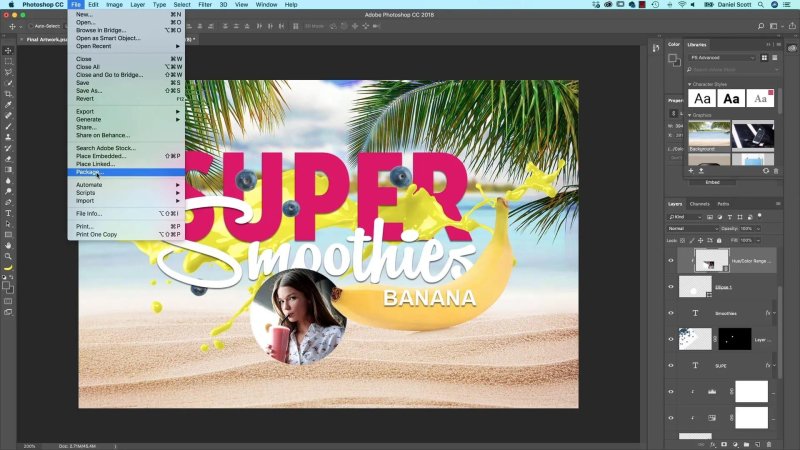
The packaging command lives under the File menu and starts the asset collection process.
Package linked assets in Photoshop
Open the PSD you want to hand over, then choose File > Package. Pick a location for the package and confirm it. Photoshop makes a folder, normally named after the document, and puts a copy of the PSD inside it along with the linked files it can find.
That is the straightforward part. The important bit is understanding which items Photoshop considers linked and which ones are already embedded.
What goes into the package?
Photoshop includes assets that are stored outside the PSD and connected back to it. In the example artwork, the package collects the linked portrait image and the linked background image.
An image pulled from a Creative Cloud Library is treated as a linked asset, so it is included. The same is true for an image brought in through File > Place Linked. Linked layers display a small link indicator, which is a useful clue that Photoshop will need the external file and can collect it during packaging.
What does not go into the package?
An embedded image does not need to be collected because its data is already inside the PSD. For example, an image copied and pasted into a document, or placed using Place Embedded, becomes part of the document itself. It can still be a Smart Object, but it is not a separate file that Photoshop needs to add to the package.
So if a package folder contains only some of the visual elements from a composition, that is not necessarily a problem. It usually means the missing items were embedded all along.
Choose between linked and embedded images
There is no single right answer here. It comes down to how you want the Photoshop file to behave and how you want to deliver it.
Keep a mix of linked and embedded assets
You can absolutely leave the document as it is. The resulting package will include only the linked files, while embedded files remain safely within the PSD. This is often perfectly fine.
Convert an embedded asset to a linked file
If you want more consistency, right-click an embedded Smart Object layer and choose Convert to Linked. Photoshop asks where to save the new linked file. Once the layer is linked, it will be included next time you package the document.
This approach also reduces the PSD file size because the image is no longer stored internally. Instead, the PSD points to the external asset.
Embed linked assets instead
You can go the other direction as well. Right-click a linked layer and choose Embed Linked. If every image is embedded, there are no linked files for Photoshop to collect, and you may not need to package the document at all.
That makes the PSD more self-contained, though potentially larger. Think about the handoff before committing: a single larger PSD may be simplest, while a package of linked assets can be easier to update and manage.
The Photoshop font limitation
Here is the frustrating bit: Photoshop’s Package feature does not collect fonts. It packages linked images, but not the fonts used in the PSD. Illustrator and InDesign provide font packaging, but Photoshop does not offer the same capability.
If fonts matter for the editable handoff, you have two choices. You can provide font information and have the recipient install licensed copies themselves, or use Illustrator as a workaround to package eligible fonts.
Use Illustrator to package fonts from a PSD
This is a bit of a hack, but it can be useful when you are desperate to collect the font files used in a Photoshop design.
Prepare a version of the PSD that meets Illustrator’s limitations.
Open that PSD in Illustrator.
In the import settings, make sure Convert Layers to Objects is enabled.
Save the Illustrator document.
Choose File > Package in Illustrator.
Enable the option to include fonts, then complete the package.
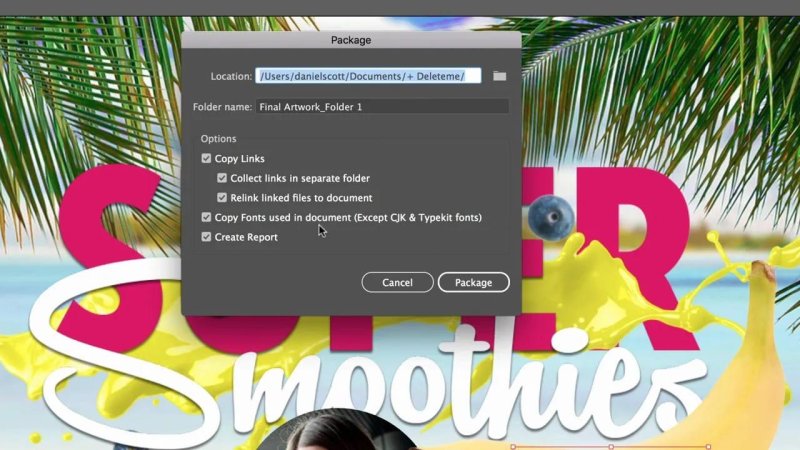
Illustrator provides the Include Fonts option that Photoshop packaging lacks.
Illustrator rebuilds compatible Photoshop text as editable text where it can. Once that text exists as proper editable type in Illustrator, Illustrator’s Package command can gather the associated font files.
You do not need Illustrator’s package for the linked images because Photoshop has already handled those. The goal here is to use Illustrator specifically for the fonts, then combine the useful contents of both package folders into one complete delivery folder.
Conditions for the Illustrator font workaround
This workaround is not magic. The PSD has to be prepared so Illustrator can recognise the text as text rather than flattening it into pixels.
Remove layer styles from type
Text with a layer style, such as a drop shadow, may not survive the trip as editable type. Remove the layer style before opening the PSD in Illustrator if collecting that font matters.
In practice, use Clear Layer Style on affected type layers. This is not about the visual appearance of the final artwork. It is about creating a temporary, font-collectable version of the file.
Keep text unobstructed
Text that sits behind another object can also become rasterised when Illustrator opens the PSD. It may look fine in the composition, but Illustrator can treat the hidden or overlapping area as pixels rather than editable vector text.
If a particular font needs collecting, move that text to the top of its layer group for the temporary export file. Make it visible, unobstructed, and free of effects. You can make a duplicate text layer just for this purpose if necessary.
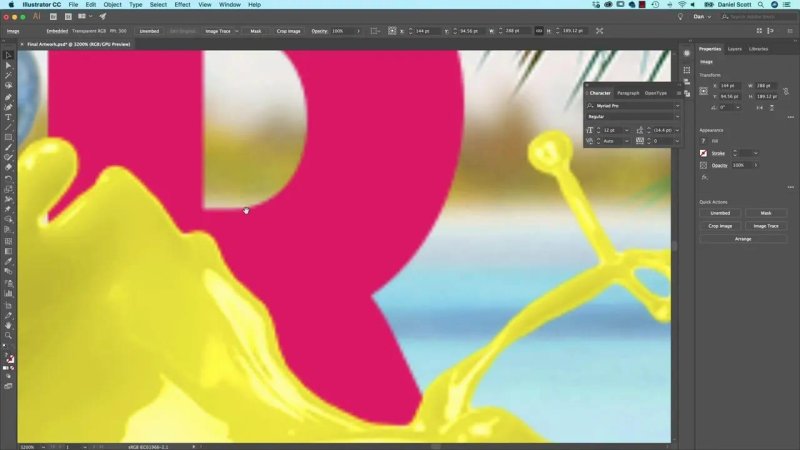
Text obscured by other artwork may be rasterised, preventing Illustrator from identifying its font.
Do not expect Adobe Fonts to package
Fonts marked as Adobe Fonts, formerly Typekit fonts, cannot be included in the package. These fonts are available through a Creative Cloud licence, not as shareable font files.
Standard installed fonts, including OpenType and TrueType fonts, can be packaged when licensing permits it. But Adobe Fonts are different. The recipient needs their own appropriate Creative Cloud access to activate them.
Create a complete handoff folder
The cleanest approach is to treat the two applications as having different jobs:
Photoshop Package: collects the PSD and its linked images.
Illustrator Package: collects compatible, locally installed fonts from a prepared version of the PSD.
Put the required PSD, linked-image folder, and permitted font files together in one clearly named delivery folder. Before sending it on, test it somewhere sensible if you can. Open the PSD from the packaged folder and make sure the links resolve correctly.
Also, try not to name the only copy of anything “Final”. That name has a remarkable ability to become untrue about five minutes later.
Key terms
Package
A packaging command creates a delivery folder containing a document and the external assets it needs. In Photoshop, this principally means linked images rather than fonts.
Linked asset
A linked asset remains a separate file outside the PSD. Photoshop records its location and displays it in the document, which keeps the PSD smaller but means the external file must travel with it.
Embedded asset
An embedded asset is stored within the PSD itself. It increases the file size but makes the document more self-contained because there is no separate image file to locate.
Creative Cloud Library asset
An asset placed from a Creative Cloud Library remains connected to that library rather than being fully embedded. Photoshop treats it as an external linked item when packaging.
Adobe Fonts
Adobe Fonts are activated through Creative Cloud and are not packaged as transferable font files. A recipient must have appropriate access to activate and use them.
FAQs
Does Photoshop Package include fonts?
No. Photoshop Package collects linked assets but does not package font files. Illustrator can sometimes collect compatible installed fonts after opening a suitably prepared PSD.
Why are some images missing from my Photoshop package?
They are probably embedded in the PSD. Photoshop packages external linked assets, while embedded images are already contained inside the document.
Can I package Adobe Fonts or Typekit fonts?
No. Adobe Fonts cannot be included as files in a package. The person opening the work needs their own suitable Creative Cloud licence and font activation.
Why does Illustrator turn some Photoshop text into pixels?
Layer styles, such as drop shadows, and text hidden behind other objects can prevent Illustrator from preserving the type as editable text. Remove effects and keep important text unobstructed in a temporary preparation file.
Written by Daniel Walter Scott — Founder of Bring Your Own Laptop & Chief Instructor
