Object Selection Tool in Photoshop
Questions


Student Gallery
Course info
Overview
- 13+ Hours of content!
- 10+ Interactive exercises
- 68 downloadable resources
- You'll learn the best selection and masking techniques
- You'll know how to fix images that look 'hard to fix'
- You'll master advanced levels and curves tricks, specifically with skin, adjusting and enhancing colors
- You'll learn how to enlarge images without distortion and what to do when things go wrong
- You'll know how to convincingly remove all kinds of objects from images
- My favourite: You'll master the ability to distort, bend and reshape images
- Lets look at how current trending styles are super easy to duplicate
- You will become a type nerd. We'll use font pairing in Typekit. We'll also use Photoshop's ability to guess fonts
- Your Artboards skill will be mastered
- A master of retouching, you will become!
- You'll learn to edit videos in Photoshop, who'd have thought?
- We'll also create awesome cinemagraphs, AKA: Moving pictures!
- You'll learn to master 3D in Photoshop!
- You'll learn lots about professional, reusable mockups, techniques and shortcuts!
Course duration 13 hours 45 mins + your study.

Daniel Walter Scott
Founder of Bring Your Own Laptop & Chief Instructor
I discovered the world of design as an art student when I stumbled upon a lab full of green & blue iMac G3’s. My initial curiosity around using the computer to create ‘art’ developed into a full-blown passion, eventually leading me to become a digital designer and founder of Bring Your Own Laptop.
Sharing and teaching are a huge part of who I am. As a certified Adobe instructor, I've had the honor of winning multiple Adobe teaching awards at their annual MAX conference. I see Bring Your Own Laptop as the supportive community I wished for when I was first starting out and intimidated by design. Through teaching, I hope to bring others along for the ride and empower my students to bring their stories, labors of love, and art into the world.
True to my Kiwi roots, I've lived in many places, and currently, I reside in Ireland with my wife and kids.
Certificates
We’re awarding certificates for this course!
Check out the How to earn your certificate video for instructions on how to earn yours and click the available certificate levels below for more information.
Downloads & Exercise files
Transcript
Hi everyone, this is a weird video, where we watch a video together. We're going to sit down side by side and watch YouTube. Why am I forcing you to do this? You don't have to, skip along, but what I wanted to show you is kind of the future of Photoshop. Just so that you're in the know, I love being in the know. And it's all about masking out things out of images. It's something called 'Deep Fill', which is something Photoshop is developing in the background. It's not in the product yet but will be in the future. Just gives you kind of a secret back stage pass of what they're doing. They announced that at last year's Adobe MAX conference, which is their big conference they have every year, at something called the Sneaks, which is in the last days. It's my most favorite part of the whole conference. They just kind of show you stuff that's going on in the background. Not available yet but will be, and it's pretty amazing. So let's watch it together now, you can skip ahead to the next video, or later on just go and check out Project 'Deep Fill', otherwise sit back, relax, I've skipped the intro. Let's just jump in.
Please welcome Jiahui Yu. Thank you. Hi, I'm Jiahui, and today I'll introduce some image hole filling technologies. As you all know that Photoshop already have, a very powerful image hole filling tool called Content Aware Fill, which can be used to remove distracting objects or undesired regions in an image to make it nicer. It works well in most cases but in my case here is quite complicated. Here, I have a saved file So I want to remove this thing here because it's annoying me. So I'm masking it in here. And let's see what Content Aware Fill can give us. Well! Now I have one, two, three, four, I've got four eyes now. I'm just going to talk over this, and annoying everyone.
The mere reason for this failure is because the Content Aware Fill does not try to understand the image. And it's only relying on copying the surrounding areas, the surrounding pixels into the hole. We believe a good image hole filling system should be able to understand the face, and fill the nose with the nose, not the eyes, or mouth, or something else. So to bridge this gap and solve this very challenging image hole filling problems we introduce Project 'Deep Fill'. We leverage the power of Adobe Sensei, deep learning and develop that 'Deep Fill' that can understand the image. Here, let's see how it performs.
I press that 'Deep Fill' button, and yes it can. Cool, huh? What if we master the entire eyebrow? Can 'Deep Fill' return us a new one? Well, let's try it. Here I masked the eyebrow, well, let's see Content Aware Fill first. Well, this time it copies the mouth into the location of the nose. And let's see the 'Deep Fill'. Well, it can successfully hallucinate a new eyebrow for you. We know that 'Deep Fill' works on faces, but in most cases, people travel around the world, and take photos, and find some people you want to remove. For that project, in my case-- here, I take a photo in Perth Canyon National Park. Well, it's wonderful, beautiful weather, but I find two people on the top. So what I'm going to do is, I take the photo-- what he's trying to explain in the background, is that Adobe Sensei is their kind of machine learning artificial intelligence. Watch what happens. Watch it disappear, was this the right one? This image is part of high resolution. It's a bad version.
What Adobe Sensei is doing is, it's looking at other people's images that they've found online. That's crazy, it goes out and says, you've taken this photo of a popular spot. I'm going to go off and see if I can find it-- Adobe Sensei is going to go off and see if they can find it online, and grab data from there and put it into your image without you asking. Crazy. Wait for it. This one looks visually realistic, but it's not semantically correct because it's not an arc anymore. So with our 'Deep Fill', by the way, we can mask multiple regions, and hallucinate it in one shot. Let's see it. And yes, this is the Deep Fill. Cool, huh! One more thing, given that Deep Fill users have no control over, what 'Deep Fill' will feel in this master region. Of course, we can provide multiple solutions for users to choose.
Another thing to mention is that, if you are like me, kind of cross over into the video world, they're looking to do this exact same thing but in live action. So, like people's videos that have gone online can be used, to mask out live actions of people walking in front of your video of the Eiffel Tower, can be masked down, because there are enough videos online. Enough data to kind of re-represent that. It's the best I can take into now. So, using 'Deep Fill', let's see how it forms. And yes. This is the AI-powered user guided image whole filling technology. Project 'Deep Fill'. Sense. That is awesome.
They just have a bit of a chat afterwards. So yes, it's just looking at data that exist online, and tries to use your image, Photoshop dives into the internet, and says, well here's some images that are the same, or we think are the same, and starts using that to put it together, rather than what's just in the image. They call it Adobe Sensei as their kind of like, background robot learning, machine learning Artificial Intelligence stuff. You'll see more and more of this into Adobe. Content Aware Fill is pretty amazing by itself, but when we get into this kind of, like reaching out, out of Photoshop and out of the image, things are going to get pretty cool.
Also know, this is Adobe MAX, this is in Vegas last year. It was my first time, it was so good. If you are going to this year's one in LA, drop me a line. What we'll do is, if any students are going, and we want to hang out, we'll just grab a beer one night and we'll see if we can get a few students together. And we'll just have a little chat, doesn't have to be anything too special, but if you are going to Adobe MAX, let me know. That is enough YouTube watching together. Let's jump into the next group of videos. haere rā.
How do I select a single object in a busy Photoshop image?
Choose the Object Selection Tool, hover over the object until Photoshop highlights it, then click to select it. Hold Shift and click to add other objects. If Photoshop misses a few details, refine the selection with Quick Selection or the Polygonal Lasso Tool before adding a layer mask.
How to Use the Object Selection Tool in Photoshop
Key takeaways
Select individual objects when Select Subject grabs too much.
Combine several objects into one selection with Shift-click.
Use Quick Selection to add missing details or remove unwanted areas.
Fill larger gaps with the Polygonal Lasso Tool instead of painting every little bit.
Finish with a layer mask and touch up any remaining edges.
When Object Selection is the better starting point
Select Subject is brilliant a lot of the time. Then you give it a busy photograph with a camera, lenses, a notebook, a pencil and all sorts of other bits, and it doesn’t quite know what you want.
Perhaps you only want one lens. Perhaps you want the camera and the lens, but not the notebook. Some objects might even be out of focus and completely irrelevant to your selection.
The Object Selection Tool lets you pick individual parts of a more complex image. Rather than asking Photoshop to decide what the main subject is, you point it towards the particular object you need. It’s a great starting point, even if it needs a little help around the edges.
1. Find the Object Selection Tool
Open your image in Photoshop. If you’ve already tried Select Subject and the result isn’t useful, clear that selection first:
Mac: Command + D.
PC: Control + D.
Look in the toolbar group containing the Object Selection Tool, Quick Selection Tool and Magic Wand Tool. Open that tool group and choose Object Selection.
If you learnt Photoshop with the Magic Wand, this is the same little neighbourhood of tools. Quick Selection is still really useful, too. You’re not replacing all those tools with one clever button. You’re choosing the best one to get started.
2. Hover to identify an object, then click
With Object Selection active, move your pointer over the image. Photoshop highlights the objects it thinks it can identify with a pink overlay or outline.
Those pink shapes can feel a bit jumpy at first. Move across the notebook and it highlights the notebook. Move over a lens and it highlights the lens. Photoshop is essentially asking, “Is this the object you mean?”
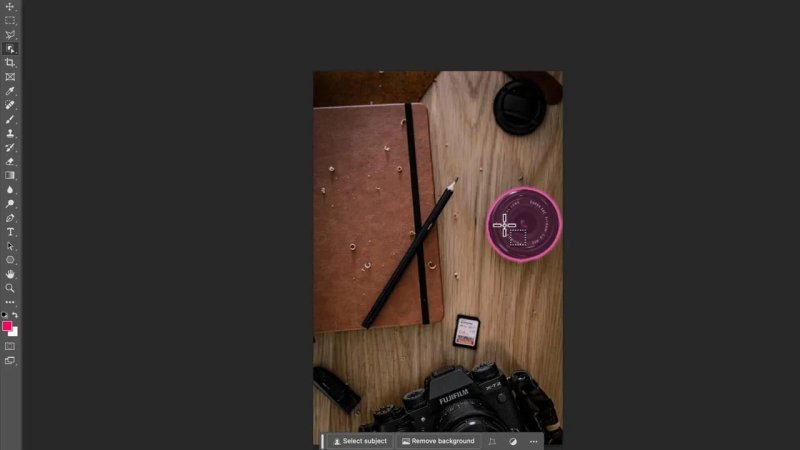
The pink highlight previews the object Photoshop has identified before you select it.
When the correct object is highlighted, click once to make the selection. In this example, a single click selects the separate camera lens on the desk.
Object detection can take a little while on a slower computer, so give Photoshop a moment if the highlights don’t appear immediately.
If that one object is all you need, you can add a layer mask straight away. But you can also keep building the selection.
3. Add more objects with Shift-click
To select the camera as well as the lens, hold Shift and click the camera. That adds it to the existing selection rather than replacing the lens selection.
This is where Object Selection becomes really handy. You can build a selection from the specific objects you want without including everything else on the desk.
Have a look around the result before masking it, though. The tool does a really good job, but it can get confused when part of an object looks very similar to the background.
4. Refine small details with Quick Selection
In the camera example, a small band wrapped around the gear is close in colour to the wooden background. Photoshop struggles to tell them apart, so part of that band gets left out.
You can recognise that it belongs to the camera. The automatic selection may need a little nudge.
Keep the selection active and switch to the Quick Selection Tool. This also gets those constantly changing pink previews out of the way while you work.
Add a missing area
Choose the plus option for Quick Selection.
Adjust the brush to suit the detail you’re working on.
Paint over the missing part to add it to the selection.
Reduce the brush size for smaller chunks near the edge.
The square bracket keys beside the P key are useful here: ] makes the brush bigger, and [ makes it smaller.
Remove an unwanted area
If you pick up something you don’t need, switch to the minus option in the options bar. Alternatively, hold Option on a Mac or Alt on a PC while painting to subtract from the selection.
Use a smaller brush when you’re getting into tight spaces around the camera or its attachments.
Don’t get carried away, though. It’s quite possible to make the automatic selection worse with an enthusiastic bit of manual painting. Let Object Selection do the bulk of the work, then adjust only what actually needs fixing.
5. Use the Polygonal Lasso for larger gaps
Quick Selection is my choice for small touch-ups. But sometimes there are lots of little missing areas, and painting them all would be a nuisance.
Take the notebook and pencil. Select the notebook with Object Selection, then hold Shift and click the pencil to include it. On closer inspection, you may find selection boundaries running through areas that should be fully selected.
Those dotted boundaries, often called marching ants, help you spot the gaps. If there are too many to brush over conveniently, use the Polygonal Lasso Tool instead.
Press L to access the Lasso tool group, then choose Polygonal Lasso Tool.
Choose Add to selection in the options bar, or hold Shift as you begin drawing.
Click around the area containing the missing pieces to create a straight-sided outline.
Return to the starting point and close the outline to add that area to your selection.
You don’t have to trace every tiny internal gap separately. Where an area is already selected, your new outline can overlap it. The important thing is to include the missing pieces without extending into background you want to leave out.
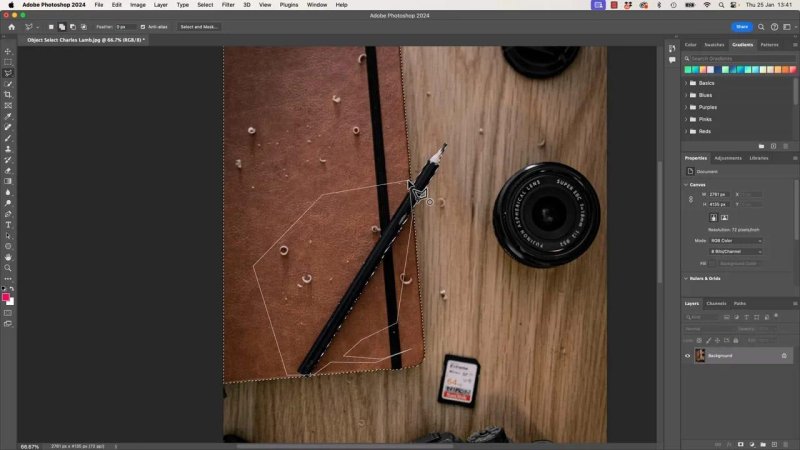
A single polygonal outline can include several missed areas without brushing over each one.
If you start drawing in the wrong mode, press Esc to cancel the unfinished outline, then begin again with Add to selection active. It’s an easy thing to miss.
6. Add a layer mask and finish the edges
Once the selection contains everything you want, click Add Layer Mask. This uses your selection to keep the chosen objects visible and hide the surrounding parts of that layer.
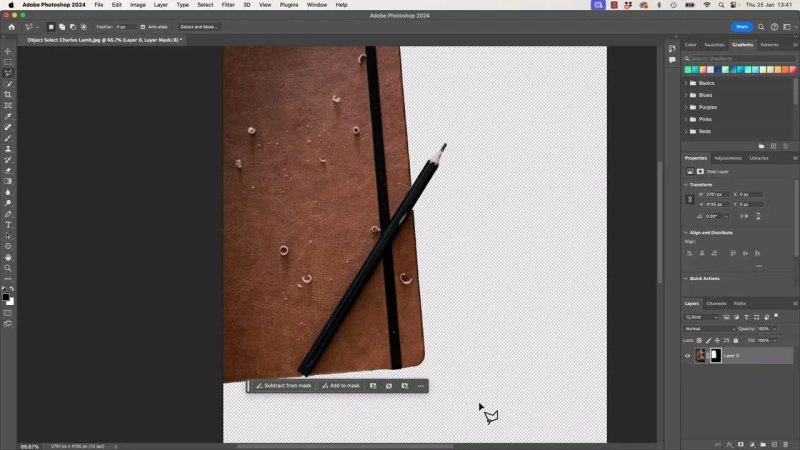
If a few unwanted bits remain, select the mask thumbnail and paint on the mask with a black brush to hide them. Make sure you’re working on the mask itself, rather than painting black onto the photograph.
The useful workflow is simple: Object Selection for the first pass, Quick Selection for small fixes, Polygonal Lasso for larger gaps, then a layer mask for the finish.
The automatic detection is clever, but it doesn’t have to get every pixel right to be useful. Let it handle the big job, then use the other selection tools to get exactly what you want.
Key terms
Object Selection Tool
A Photoshop selection tool that identifies individual objects within an image. Hovering previews a detected object, and clicking selects it.
Quick Selection Tool
A brush-based selection tool used here to refine the automatic result. You can paint to add missing areas or subtract unwanted ones.
Polygonal Lasso Tool
A tool for creating selections with connected straight-line segments. It’s useful for including several missed areas in one outline.
Marching ants
The moving dotted lines that show a selection’s boundaries. Boundaries inside an object can reveal areas that have been left out.
Layer mask
A mask controls which parts of a layer remain visible. In this workflow, the selection creates the initial mask, and black brushwork hides any remaining unwanted areas.
FAQs
When should I use Object Selection instead of Select Subject?
Use Object Selection when an image contains several objects and you only want particular ones. It’s especially useful when Select Subject selects too much or chooses something other than what you need.
How do I select multiple objects in Photoshop?
Click the first object with the Object Selection Tool, then hold Shift and click each additional object you want to include.
Why does Object Selection miss part of an object?
It can struggle when a detail looks similar to the background, as with the small band around the camera gear. Keep the selection active and use Quick Selection to add that missing detail.
Do I have to fix every gap with Quick Selection?
No. If there are lots of gaps within an area you want to keep, switch to the Polygonal Lasso Tool and use Add to selection to include them together.
Written by Daniel Walter Scott — Founder of Bring Your Own Laptop & Chief Instructor
