Advanced masking using a channels in Adobe Photoshop
Questions


Student Gallery
Course info
Overview
- 13+ Hours of content!
- 10+ Interactive exercises
- 68 downloadable resources
- You'll learn the best selection and masking techniques
- You'll know how to fix images that look 'hard to fix'
- You'll master advanced levels and curves tricks, specifically with skin, adjusting and enhancing colors
- You'll learn how to enlarge images without distortion and what to do when things go wrong
- You'll know how to convincingly remove all kinds of objects from images
- My favourite: You'll master the ability to distort, bend and reshape images
- Lets look at how current trending styles are super easy to duplicate
- You will become a type nerd. We'll use font pairing in Typekit. We'll also use Photoshop's ability to guess fonts
- Your Artboards skill will be mastered
- A master of retouching, you will become!
- You'll learn to edit videos in Photoshop, who'd have thought?
- We'll also create awesome cinemagraphs, AKA: Moving pictures!
- You'll learn to master 3D in Photoshop!
- You'll learn lots about professional, reusable mockups, techniques and shortcuts!
Course duration 13 hours 45 mins + your study.

Daniel Scott
Founder of Bring Your Own Laptop & Chief Instructor
instructorI discovered the world of design as an art student when I stumbled upon a lab full of green & blue iMac G3’s. My initial curiosity around using the computer to create ‘art’ developed into a full-blown passion, eventually leading me to become a digital designer and founder of Bring Your Own Laptop.
Sharing and teaching are a huge part of who I am. As a certified Adobe instructor, I've had the honor of winning multiple Adobe teaching awards at their annual MAX conference. I see Bring Your Own Laptop as the supportive community I wished for when I was first starting out and intimidated by design. Through teaching, I hope to bring others along for the ride and empower my students to bring their stories, labors of love, and art into the world.
True to my Kiwi roots, I've lived in many places, and currently, I reside in Ireland with my wife and kids.
Certificates
We’re awarding certificates for this course!
Check out the How to earn your certificate video for instructions on how to earn yours and click the available certificate levels below for more information.
Downloads & Exercise files
Transcript
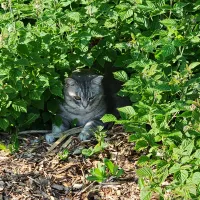
Hi there, it is time for another selection tool in your arsenal, and it is the mighty Channel Mask. It's been around a while, and it's perfect for when you need to select, say out of focus grass like this. There we go, easily done, but let's say you already know how to do a Channel Mask, don't worry, there's some stuff in here for you as well. Imagine if there was a brush we could just kind of, like paint across and remove all the ghosting. It is true, my friends, this brush exists, and I will show you in this next tutorial. Let's get in there.
It's getting better, we're going to love the brush. First up, let's open up our files, they're in our '02 Selections & Masking'. And it's all of these guys, it's Channel Mask 01, all the way through to 05. Quick little tip before we get going, if you hold down 'Ctrl', and hit 'Tab' on your keyboard, you can cycle through the open tabs along the top here. That works on both formats, Mac or PC. What we really came here for is Channel Mask. Just quickly before we get started, up until Photoshop released the Select Subject, and the Select & Mask function, all I did for kind of advance masking was Channel Mask, the thing we're going to do now. Because these two options that we learnt previously are so good, I don't use Channel Mask half as much anymore.
Basically I use them for the same sort of principle. I need kind of like, say this kind of out of focus, what would normally be here, but this, these two here in combination are so much better now, in my opinion. The reason I still use Channel Mask, and the reason I still include it in this Advanced course, is because if we click 'Select' 'Subject', It tries to find a person's face, and there is no face to be found. So couldn't find subject, click 'OK'. So there's times where I just need to--
I want to select all this grass, but it's super hard, right? Quick Selection Tool is not going to do it. Magic wand's got no hope. I might do okay with a Color Range, but there are some perks to a Channel Mask, and you need it in your arsenal to be an advanced Photoshop user. You don't want to turn up at the Advanced Photoshop party, and not know what a Channel Mask is. Even though it's getting useless it's kind of those badges of honor, like, I think the Lens Flare was when you're new.
So how does this work? I'm going to do it super quick, half to impress you, half to show you how quick it is once you know the-- once you get into the flow. Then I'll back it up and go a bit more step by step. So basically we go to the Channels Panel, we pick one of these three. The one that has the most contrast, blue does. So I'm going to right click it, duplicate it, click 'OK'. Turn this on, that off, then we use levels. And I'm just trying to accentuate the contrast, between the background and the foreground. I'm lifting this up, trying to find this kind of medium ground here. Let's click 'OK'.
I can blot in the stuff at the bottom here. I'm using my Paintbrush Tool, set to 'Normal'. I'm using black, making it nice and big. I'm just going to kind of paint it all out. Get a bit smaller and get some other stuff in there. Spend a little bit more time. I'm not, turn it into a selection. Go back into my Layers Panel and add a Layer Mask. First of all, reverse it out, invert the selection, add a Layer Mask. And you can see that will totally kind of freak you out, how fast it went there, but I guess I just want to show you the flow that I'm going through when I'm doing selections for something like this, and how easy it can be, because when I teach this live often people freak out, because there are quite a few steps. Don't worry, you won't probably remember them off by heart. I only remember them because I'm a trainer and I have to teach it all the time.
When I wasn't, when I was just freelancing, I would go "Okay, Channel Masks, they're good." Come back to this video, and just run through it every time you need to do it. And that's just the way it is, there's a few steps involved, but the results are pretty cool. Let me grab this, and add it to the background here. You can see, a pretty convincing mask, with very little effort put in to getting it perfect. So let's back it right up. I'll show you a cool little trick, it's File Revert. Because we only have so many undos, right? So if you go to 'File', 'Revert', it goes all the way back to when the document was last saved. And in this case it's way back before I did all my channel madness.
Let's look at it step by step and explain that a little bit. So it's channels that do the heavy lifting here. Basically a channel is just-- this document is RGB, you can see it up here in the tab. And that just means the computer makes all of these lovely colors out of a mixture of red, green, and blue. Now we're really not worried about channels at the moment, we're just going to use and abuse them to get our selection. What you're doing is you're looking through all three of these for the one that has the most contrast. In this case blue has a really clear contrast with the background. It's not always the case, sometimes it's red, sometimes green. So toggle through them all. Once you've found one you've got to duplicate it. Right-click it, 'Duplicate Channel'. I'm going to call it 'My Mask', for no reason. And I'm going to turn it on, and turn that one off. I don't want to destroy the red, green, and blue. I just want to work on this, my special little mask.
We're going to delete it in a second. So with it selected, we're going to go to 'Levels'. So 'Image', 'Adjustment', 'Levels'. We're not going to use the fancy adjustment levels. We're going to use old school destroy the layer levels, these ones here. And all we're looking to do is, you can see the sky here, it's quite gray still, so I want to kind of increase the whites. Basically you can adjust these guys any way you like. All you need to do is have a really strong white versus black. So that's all I'm doing, drag them left them right to see, like if I go too far this way, it starts kind of bleeding in. There's a little bit of like, I've done it so many times, that I kind of got a good feeling.
What you might have to do is get to this point, and say, "I'm going to try this, and then come back if it's not quite right." I'm going to crank the blacks up just a little bit as well. And I should point out-- I'm looking at the edge between this and this, I'm not worried about here, because, you saw it earlier on, it's blacked that in with a big paintbrush. It's this edge, this contrast between the background and the foreground here, that I want to, I guess get as sharp as I can. It feels okay. Click 'OK'. Now what I want to do is kind of fix this bottom stuff here, because I'm going to use my paintbrush. Set it to black. What kind of hardness? Somewhere in there, '80'. I'm just going to paint this in black. I'm going to do this to-- down the bottom here, quite rough, and then as I get closer I'm going to lower my brush, and get a little bit nicer about the whole experience, because I know that that is not a hole looking through. I know that's the sky, but I know this is just light that's reflecting on the grass.
So I'm going to go in here and just kind of fix this up a little bit. We'll go through in-- after we do this exercise, I'll show you a few extra little tricks to tidy this up a little nicer. You saw the end result here, I put in less effort. And it came in still with a really good result. Channel Masks are awesome. So I got the basics in there. Now what I want to do is load it as a selection. You can click on this little icon down the bottom here. And it loads that black versus white as a selection. Now this guy here is--- his job is done. I click on 'RGB' to turn all of these on. Just make sure the eyeball is off on the mask, or you can bin it. Like we just don't need that anymore. People get a little caught up on that channel being part of it. Really we just used it to get our little matching ends here.
Back to 'Layers', at the moment we have this sky selected. It really depends on your image. Sometimes you lever the right way around, sometimes you won't. If I click on 'Layer Mask' here, it's the opposite. So I'm going to go to select this. Now add my Layer Mask, and hey presto, you can see it was pretty bad along the top there, but it's still a pretty good mask. I'm going to grab my 'Move Tool'. I'm going to go 'Command C', 'Command V' on my Mac. Actually I probably do the other way around. I'm going to drag you, here. Use my little shortcut, 'Command-Shift-Square bracket'. 'Send to Back'. 'Ctrl-Shift-Square bracket' on a PC. You can see, a pretty convincing mask.
Let's look at a couple of other things you can do with Channel Masks to get the most from them. Let's go to 'Channel Mask 3'. And I'll lie, we're not going to do Channel Mask 3 together, because it's very similar to this first one here. I'm going to set that as your homework in the next video. You can do it now onboards if you want. What I want to do is, let's go to 'Mask', 'Channel Mask 4' and '5'. These are the ones I'm going to combine. You saw them at the beginning. We run into the same problems, we can't use Select, Subject, but we're probably going to use a little bit of Select & Mask, just to kind of push this a little bit further.
So same thing as before. Channels, I use these shortcuts here. If you're on a PC, is it Ctrl 3, 4, 5? Check whatever the shortcut is there. I'm holding down my 'Command' key and going 3, 4, 5. I'm not looking, just toggling through them all, just seeing. And don't worry about down here, you're looking at the transition between the sky and the background. And they're all really similar, actually because the background's pretty much white. I feel like, that's my one. You could argue on all the three of those ones. So I'm going to duplicate it. Duplicate, oh, don't delete it. Duplicate it. Can we give it a name? I'm not going to give it a name, because we're going to bin it in a second, so nobody's going to know we didn't name our layers.
So 'Blue copy' selected, all the rest of them off. Otherwise you get this kind of weird colors going on. Make sure it's selected, and remember, we're going to go to our Levels, and we're just looking to increase this contrast, so I'm going to zoom in a bit, and I'm just looking at-- if we go too far you'll end up with this. It bleeds over the edge, and looks not very good. So I'm going to increase the white a little bit to get the sky pure white. I feel like that's a pretty good one. Looks like it's pretty strong black versus white. Click 'OK', zoom out, and I'm going to blot in the bottom here, using my Brush Tool, nice big brush. I'm going to add a little bit extra to this one, I promise.
So we've got a selection, we're going to load it as a selection. We're going to click on 'RGB', you can leave that there. There's nothing wrong with leaving it there, click 'Channels'. 'Inverse' the selection, I'm using the shortcut 'Command-Shift-I' on a Mac, that's 'Ctrl-Shift-I' on a PC. And I've applied the Layer Mask. Now let's go and add it to our background. So actually going to bring this guy in, the other one, so 'Move Tool'. You come in here, friend. Want to know a cool extra little shortcut? You don't have a choice, I'm going to show you anyway. When you're dragging from one image to another, and you kind of like, ends up in a weird places, right? If you do that exact same technique.
So 'Move Tool', drag drag, hold, hold, I'm holding the 'Shift' key. Then let go, and it doesn't put it willy-nilly, it puts it exactly kind of top left. Really handy, okay, moderately handy. And move it underneath. And you can see, it did a pretty good job, but because I've gone for such an extreme background, it's gone from light to dark, you can see, they're kind of ghosting around the edges. So I'll show you two ways of fixing this type of thing. One you've learned before, one you haven't. So I'm going to click on my 'Layer Mask'. Even though we started with a Channel Mask, we delved into the channels, and messed around in there, we can still click on the 'Mask' and go to 'Select & Mask'. I'm making sure mine's against on black. And you can play around with the radius, and in this case here, Shift Edge is probably going to work. It doesn't work great though, works kind of too far down into the image here.
So I'm going to hit 'Cancel'. What I want to do is show you a cool little trick. And it's to use your paintbrush, the B key. And just switch it from Normal to 'Overlay'. I'm going to make it an appropriate brush size. I'm going to make it kind of fuzzy there. Make a little bit bigger, and try and impress you. Look how good that is. I loved it when I found this option. Instead of trying to control it all with Select & Mask, you can just use your Brush Tool with Overlay, and just kind of tidy up the edges. It doesn't have to be a Channel Mask you've started with, can be with any mask. All it really does is gets rid of the kind of in between zones, so let's undo that and kind of have a look. If you hold down the 'Alt' key on a PC, or 'Option' key on a Mac, and click on the 'Mask', it just shows you in black and white, which is handy, right?
I'm on 'Overlay', I'm on 'Brush Tool', black as my foreground color. And watch this, can you see, just like shrinks it in, or at least gets rid of the kind of gray areas. Can you see this white here in the middle, and there's black there, but there's this kind of like little bits of gray. And that's what the Overlay option is doing, as a brush. I'm going to zoom out. I'm going to turn. I'm going to hold down 'Option' key on a Mac, 'Alt' key on a PC. Go back in here, and just kind of fix that up.
One thing I might want to do as well, is you can use that same key. I'm going to go back into here, you can see there's some like, you see, all this kind of gray area down here, you can do the opposite. Just flick it over to white. Make an appropriate Brush size, you can do some pretty kind of easy fixes. You can see, you can get quite close to the edge without wrecking it. If you're just using a white paint brush it can be a little tricky. We're trying to go fast. This tool is perfect for it. Tidy it all up. Jump back out, back in, looking pretty cool.
So that's going to be it for Channel Mask, actually, one last bit. Let's use that same little tool, back here at the beginning, click on the 'Mask'. And we're going to use our 'Brush Tool', Overlay, I've set it to black now. And I'll lower the opacity just a little bit. If you've got the Brush Tool selected, the opacity, you can drag it down, that's fine. But cool little trick is just to tap '2' on your keyboard, '4', you can see it's changing up here, '6', '7'. I'm going to lower down to maybe 30%, and just kind of work these edges a little bit. There's a couple of fluffy bits that maybe aren't super realistic. And now we're actually finished.
So that is a Channel Mask. Maybe bookmark this video. I know, when I was learning Channel Mask-- they're super cool, but really hard to remember what to do. It's quite process driven, there you go. Let's get on to the next video.
- Powered by Marvin
- Terms of use
- Privacy policy
- Cookie policy
-
- © Bring your Own Laptop Ltd 2026