The Remove Tool in Photoshop
Questions

Student Gallery
Course info
Overview
- 13+ Hours of content!
- 10+ Interactive exercises
- 68 downloadable resources
- You'll learn the best selection and masking techniques
- You'll know how to fix images that look 'hard to fix'
- You'll master advanced levels and curves tricks, specifically with skin, adjusting and enhancing colors
- You'll learn how to enlarge images without distortion and what to do when things go wrong
- You'll know how to convincingly remove all kinds of objects from images
- My favourite: You'll master the ability to distort, bend and reshape images
- Lets look at how current trending styles are super easy to duplicate
- You will become a type nerd. We'll use font pairing in Typekit. We'll also use Photoshop's ability to guess fonts
- Your Artboards skill will be mastered
- A master of retouching, you will become!
- You'll learn to edit videos in Photoshop, who'd have thought?
- We'll also create awesome cinemagraphs, AKA: Moving pictures!
- You'll learn to master 3D in Photoshop!
- You'll learn lots about professional, reusable mockups, techniques and shortcuts!
Course duration 13 hours 45 mins + your study.

Daniel Walter Scott
Founder of Bring Your Own Laptop & Chief Instructor
I discovered the world of design as an art student when I stumbled upon a lab full of green & blue iMac G3’s. My initial curiosity around using the computer to create ‘art’ developed into a full-blown passion, eventually leading me to become a digital designer and founder of Bring Your Own Laptop.
Sharing and teaching are a huge part of who I am. As a certified Adobe instructor, I've had the honor of winning multiple Adobe teaching awards at their annual MAX conference. I see Bring Your Own Laptop as the supportive community I wished for when I was first starting out and intimidated by design. Through teaching, I hope to bring others along for the ride and empower my students to bring their stories, labors of love, and art into the world.
True to my Kiwi roots, I've lived in many places, and currently, I reside in Ireland with my wife and kids.
Certificates
We’re awarding certificates for this course!
Check out the How to earn your certificate video for instructions on how to earn yours and click the available certificate levels below for more information.
Downloads & Exercise files
Can the Photoshop Remove tool remove unwanted objects from a photo?
Yes. Photoshop’s Remove tool uses generative AI to paint away unwanted details such as small objects, dust, scratches, and background clutter. It is brilliantly quick for simple clean-up jobs, although larger or more intertwined subjects usually need Generative Fill for better control and alternative results.
How to Use the Remove Tool in Photoshop
Key takeaways
Find the Remove tool in the toolbar, usually beneath the Spot Healing Brush.
Use it like a brush to paint directly over small unwanted details.
Work on the correct layer because the edit is applied directly to that layer.
Choose Generative Fill when removing large, complicated objects or people.
Include every leftover fragment, shadow, hand, or edge in your selection to avoid strange AI results.
What the Photoshop Remove Tool Actually Does
The Remove tool removes things. Obvious name, spectacular little tool.
It uses the same kind of generative AI technology behind Generative Fill, but it is designed for quick, brush-based clean-up. Rather than carefully making a selection, generating options, and managing a new generated layer, you paint over the thing you want gone and Photoshop tries to rebuild the area around it.
That makes it ideal for tidying an image: a distracting object on the floor, a small decoration, a scratch, dust, or a bit of visual clutter that does not need a huge amount of thought. Paint it in, let go, and quite often it just disappears.
Where to Find the Remove Tool
The Remove tool may move around as Photoshop evolves, but it is commonly grouped beneath the Spot Healing Brush in the toolbar. Look for the Band-Aid icon, then choose Remove Tool from the fly-out menu.
Before painting, set a brush size that comfortably covers the unwanted item. A brush that is too small means loads of fiddly strokes. A brush that is appropriately sized lets you paint over the object in one clean pass.
How to Remove an Object with a Brush
Select the Remove Tool.
Make sure the correct image layer is selected in the Layers panel.
Adjust the brush size so it covers the object without taking in unnecessary areas.
Click and drag over the unwanted detail until it is fully painted over.
Release the mouse and let Photoshop generate the replacement pixels.
Repeat with another pass if a small remnant or shadow remains.
This is beautifully fast for lots of little fixes. In one image, objects on a bed, wall decorations, and items in a shelf can be painted away one at a time without creating a stack of generated variations for every single edit.
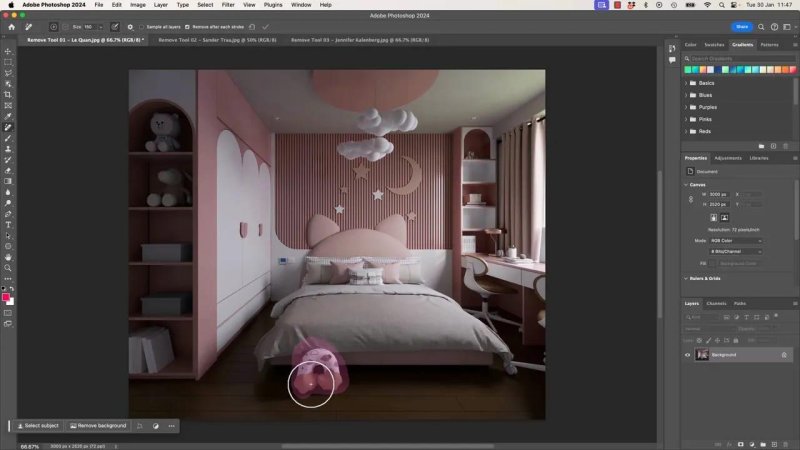
For small distractions, a quick painted pass can clean the image up remarkably well.
Remove Tool vs Generative Fill
Both tools use generative AI, and both can often produce a similar-looking result. The difference is really about speed versus control.
Use the Remove Tool for quick clean-up
The Remove tool is the practical choice when you just need something gone. It works directly on the selected layer, so no additional generated layer is created and no variation thumbnails appear in the Properties panel.
That is handy when removing plenty of tiny distractions, such as:
Dust and scratches
Small objects in the background
Decorative items that distract from the subject
Minor marks or clutter around the edge of a photo
It can also help keep the document simpler and save on file size because you are not building up multiple generated layers and variations.
Use Generative Fill for difficult removals
Generative Fill is better when the object is large, complicated, or tangled up with the rest of the image. It starts with a selection, then you leave the prompt empty and generate a replacement.
The major advantage is that Photoshop gives you multiple variations on a separate, masked layer. You can turn the layer on and off, test the options, and choose the version that makes the most visual sense.
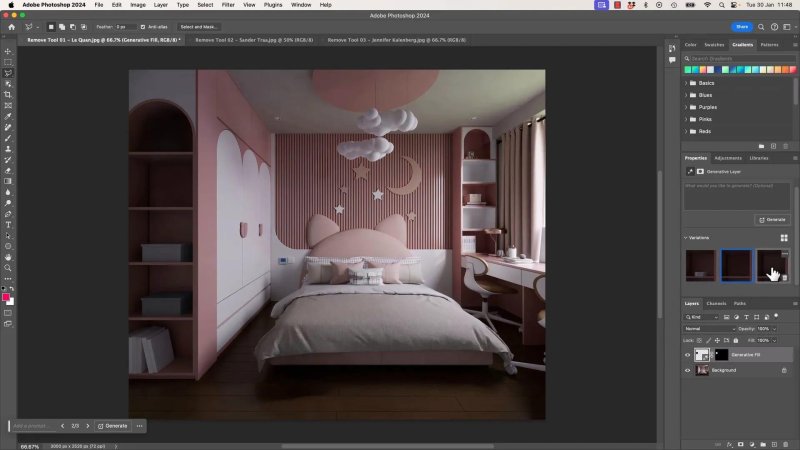
Generative Fill gives you multiple results to compare, which is useful when the removal needs more than a quick guess.
The Important Catch: The Remove Tool Is Destructive
The Remove tool works directly on the layer you have selected. That is why it is quick, but it also means you need to pay attention before painting.
If you select the wrong layer, the tool will not do what you expect. Always check the Layers panel first and make sure you are working on the layer that contains the pixels you actually want to change.
This is the trade-off. The Remove tool is a quick, direct edit. Generative Fill creates a separate generated layer with a mask, making it easier to toggle, compare, and revisit later.
Shadows Can Make a Simple Removal Harder
A small object can be easy to remove until it has a strong shadow. If you paint out the object but leave the shadow behind, Photoshop may try to blend that shadow into the generated result. It can get a bit confused.
You can paint again to remove the leftover shadow, and sometimes that works perfectly. But if the shadow is large, crosses other objects, or affects an area with lots of texture, switch to Generative Fill. The extra variations are often worth it.
The same idea applies to objects that are part of something bigger. A small plant may vanish nicely. A bowl sitting on a surface with a clear cast shadow can be more difficult because Photoshop has to reconstruct both the object and the lighting around it.
Removing a Person: Why It Gets Complicated
Removing a person from a photo is a very different job from removing a tiny object. People overlap each other, block backgrounds, cast shadows, and have hands, arms, hair, clothing, and feet going in all directions. That is a lot for AI to rebuild convincingly.
The Remove tool can still do an okay job, especially when the person is clearly separated from everything else. But when someone is intertwined with the group, Generative Fill is the better bet. Make a deliberate selection around the person, generate with no prompt, and inspect the available options.
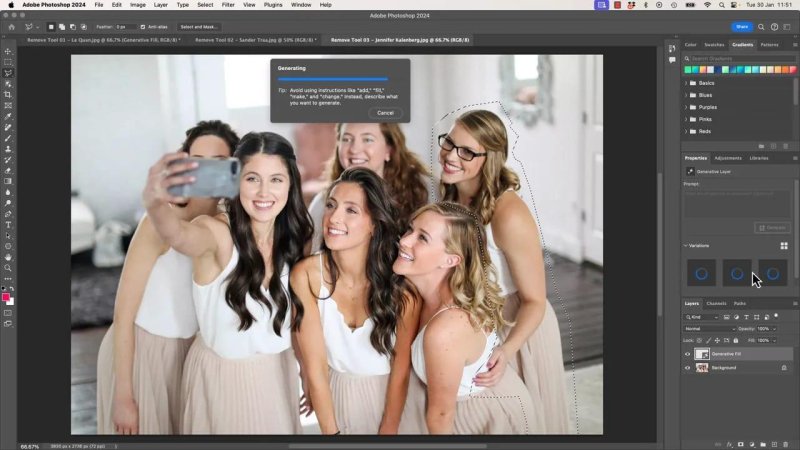
Removing an overlapping person is where Generative Fill earns its keep with several possible reconstructions.
Do Not Leave Body Parts Behind
This is the big one. If you remove most of a person but accidentally leave a hand, an arm, a shoulder, or some feet, Photoshop will try to make sense of what remains. Generative AI does not know that you meant to forget that bit. It assumes it is meant to be there and starts inventing a connection.
That is when things can become brilliant, weird, and occasionally creepy. You might end up with an unexpected extra person, an odd arm reaching around somebody, or body parts that do not seem to belong to anyone in the image.
If the result looks strange, do not just keep generating and hope for the best. Go back to the selection and inspect what was left outside it. The weirdness is often a clue that a fragment of the original subject was not included.
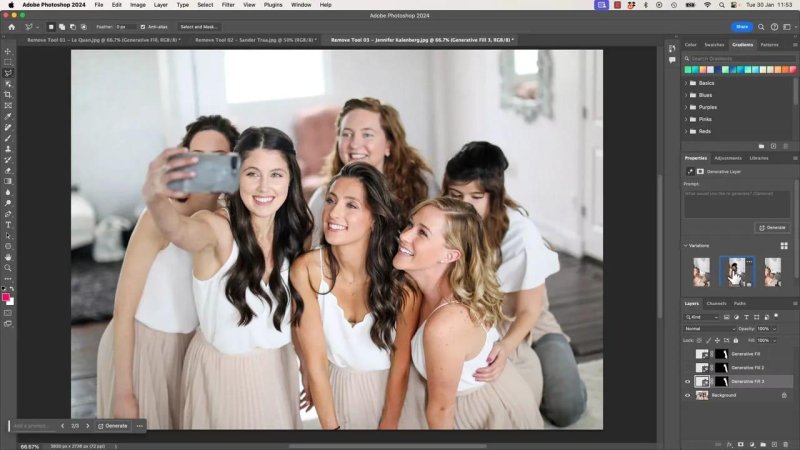
If a selection leaves meaningful fragments behind, AI may attempt to invent a person or connection that was never there.
A Better Selection Strategy for Complex Subjects
For larger removals, be purposeful. Include the complete subject plus any obvious fragments that would look strange on their own. If a hand belongs to the person being removed, include the hand. If their clothing overlaps another person, carefully select the relevant section rather than leaving a confusing sliver behind.
You may need to work in stages. Make one selection, generate a result, then make another selection to clean up remaining edges, shadows, or background inconsistencies. This is normal. Large removals are rarely a single-click job.
When the removal involves people, always check the whole image after generating. Look beyond the main area for unexpected hands, legs, faces, or strange background shapes. Photoshop can do an astonishing job, but it still needs a clear instruction about what should disappear.
Choosing the Right Tool for the Job
The Remove tool is fantastic when the brief is simple: there is a small thing in the image, it should not be there, make it gone.
Use it for quick, repeated clean-up. It is fast, simple, and avoids cluttering the document with generated layers and variation options.
When the job becomes bigger, more detailed, shadow-heavy, or person-shaped, use the same clever technology through Generative Fill instead. Start with a considered selection, leave the prompt blank for removal, and use the variations to find the result that works best.
That is the practical split: Remove Tool for lots of little things. Generative Fill for bigger, more complex things.
Key Terms
Remove Tool
A Photoshop brush-based tool that uses generative AI to replace unwanted image details directly on the selected layer. It is best suited to fast, small-scale clean-up.
Generative Fill
A Photoshop feature that generates content inside a selection. For object removal, create a selection, leave the prompt blank, and generate multiple possible replacements.
Destructive editing
An edit that changes the pixels on the current layer rather than creating a separate editable result. The Remove tool works this way on the selected layer.
Variation
An alternative AI-generated result. Generative Fill provides variations in the Properties panel so you can compare different reconstructions.
FAQs
Where is the Remove tool in Photoshop?
It is commonly grouped under the Spot Healing Brush in the toolbar. Look for the Band-Aid icon and choose Remove Tool from the hidden tool options.
Does the Remove tool create a new layer?
No. The Remove tool works directly on the selected layer, so make sure the correct layer is active before you start painting.
When should I use Generative Fill instead of the Remove tool?
Use Generative Fill for large or complex removals, especially people, overlapping subjects, difficult shadows, and detailed backgrounds. It gives you multiple variations and a separate masked layer.
Why did Photoshop create a strange extra person or body part?
This usually happens because part of the original person, such as a hand, shoulder, arm, or feet, was left outside the selection. Expand or refine the selection to include every relevant fragment, then generate again.
Written by Daniel Walter Scott — Founder of Bring Your Own Laptop & Chief Instructor
