How to retouch in Photoshop using face aware in Liquify
Questions


Student Gallery
Course info
Overview
- 13+ Hours of content!
- 10+ Interactive exercises
- 68 downloadable resources
- You'll learn the best selection and masking techniques
- You'll know how to fix images that look 'hard to fix'
- You'll master advanced levels and curves tricks, specifically with skin, adjusting and enhancing colors
- You'll learn how to enlarge images without distortion and what to do when things go wrong
- You'll know how to convincingly remove all kinds of objects from images
- My favourite: You'll master the ability to distort, bend and reshape images
- Lets look at how current trending styles are super easy to duplicate
- You will become a type nerd. We'll use font pairing in Typekit. We'll also use Photoshop's ability to guess fonts
- Your Artboards skill will be mastered
- A master of retouching, you will become!
- You'll learn to edit videos in Photoshop, who'd have thought?
- We'll also create awesome cinemagraphs, AKA: Moving pictures!
- You'll learn to master 3D in Photoshop!
- You'll learn lots about professional, reusable mockups, techniques and shortcuts!
Course duration 13 hours 45 mins + your study.

Daniel Walter Scott
Founder of Bring Your Own Laptop & Chief Instructor
I discovered the world of design as an art student when I stumbled upon a lab full of green & blue iMac G3’s. My initial curiosity around using the computer to create ‘art’ developed into a full-blown passion, eventually leading me to become a digital designer and founder of Bring Your Own Laptop.
Sharing and teaching are a huge part of who I am. As a certified Adobe instructor, I've had the honor of winning multiple Adobe teaching awards at their annual MAX conference. I see Bring Your Own Laptop as the supportive community I wished for when I was first starting out and intimidated by design. Through teaching, I hope to bring others along for the ride and empower my students to bring their stories, labors of love, and art into the world.
True to my Kiwi roots, I've lived in many places, and currently, I reside in Ireland with my wife and kids.
Certificates
We’re awarding certificates for this course!
Check out the How to earn your certificate video for instructions on how to earn yours and click the available certificate levels below for more information.
Downloads & Exercise files
Can you retouch a face naturally using Photoshop Liquify?
Yes. Photoshop’s Face-Aware Liquify tool detects facial features and gives you targeted controls for eyes, nose, mouth, jawline, and forehead. The real trick is not the tool itself, though. It is making tiny, believable adjustments so the person still looks like themselves.
How to Retouch Faces with Photoshop Face-Aware Liquify
Key Takeaways
Use a Smart Object before applying Liquify so every adjustment remains editable.
Face-Aware Liquify can alter facial features with sliders or direct on-image controls.
Link paired controls, such as eyes, for balanced edits, then unlink them when perspective needs correcting.
Use the Bloat tool when Face-Aware Liquify does not correctly detect or control part of a feature.
Photoshop can identify and retouch several faces in one group photo.
For professional portrait retouching, subtle changes beat dramatic transformations every time.
Start Non-Destructively with a Smart Object
Before stretching chins, making eyes massive, or attempting to turn a fivehead into a regular old forehead, make the image layer a Smart Object.
Right-click the background layer and convert it to a Smart Object. Then choose Filter > Liquify. Liquify will be applied as a Smart Filter, which means you can return to it later, switch it on and off, or ditch it entirely if things get a bit too exciting.
This is particularly useful when retouching portraits. It gives you an honest before-and-after comparison without permanently baking the changes into the image.
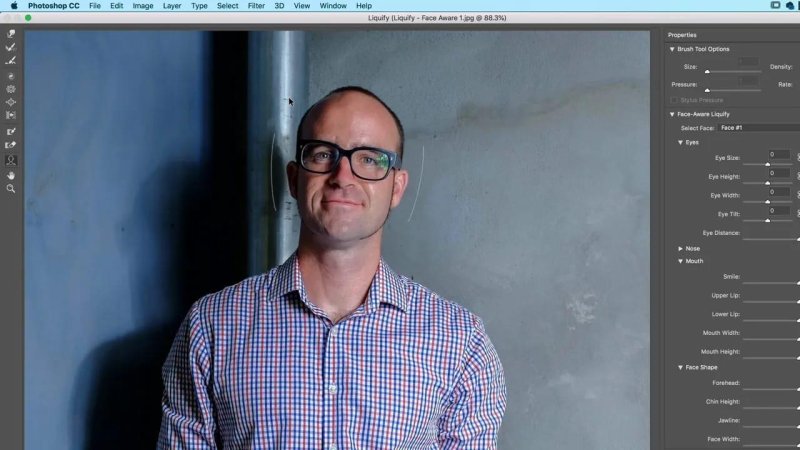
The Face-Aware Liquify panel puts feature-specific controls beside the portrait, making adjustments much more targeted than freehand warping.
Open the Face Tool in Liquify
Once the Liquify window opens, Photoshop will often detect the face automatically. If it does not, select the Face Tool from the Liquify toolbar. It is the little face icon below the Forward Warp tool.
Photoshop’s facial recognition identifies the major landmarks in the image, including the eyes, nose, mouth, jawline and forehead. It is surprisingly good at finding where the features are and understanding how they should move together.
There are two ways to make changes:
Face-Aware Liquify sliders: Use the controls in the panel to adjust facial features numerically.
On-image controls: Drag the visible white control points directly on the face for a more hands-on approach.
Both approaches do the same sort of work. Sliders are brilliant for controlled, repeatable changes. The on-image handles are great when you want to look at the face and simply nudge something into place.
Adjust the Eyes Without Making Them Weird
Eyes are usually the first place to start. In Face-Aware Liquify, you can control eye size, height, width, tilt and the distance between the eyes.
For most edits, link the two eyes together. When you alter one, the other follows, which keeps the adjustment symmetrical and sensible. But you do not have to keep them linked.
If the head is turned slightly, lens distortion or perspective can make one eye appear smaller than the other. In that case, unlink the controls and make a small correction to one side. You are not trying to redesign someone’s face. You are just compensating for what the camera has done.
You can also adjust:
Eye Size: Enlarges or reduces the overall eyes.
Eye Height and Width: Changes the shape independently of size.
Eye Tilt: Rotates the eyes slightly.
Eye Distance: Moves the eyes closer together or farther apart.
Everyone looks a bit cuter with bigger eyes, especially when the pupils are bigger. But this is where it is very easy to go too far. In serious portrait retouching, the best eye enlargement is often almost too small to notice.
Retouch the Nose, Mouth and Smile
Face-Aware Liquify also gives you controls for the nose and mouth. You can adjust the nose height and width, then tidy up the mouth shape, lip thickness and smile.
With the Face Tool active, Photoshop displays little white points over the features. Dragging these lets you manipulate parts of the face directly. It is a very visual way to work, especially for things like the mouth corners and smile.
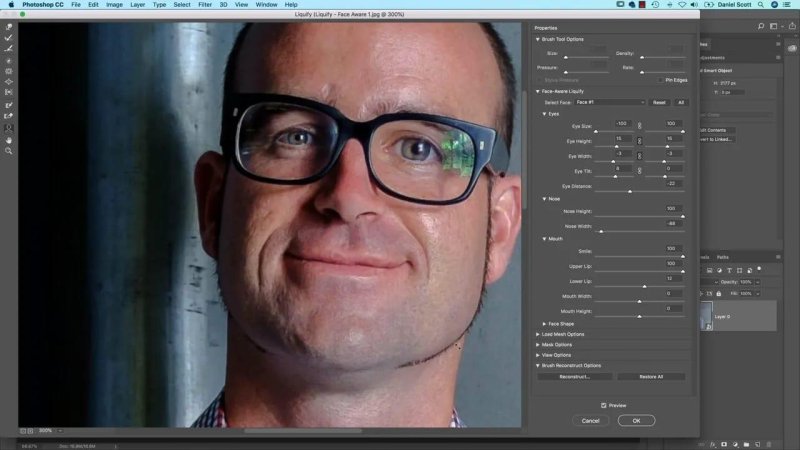
Direct facial controls make it easy to fine-tune a smile, mouth position and jaw shape while keeping an eye on the overall expression.
A smile adjustment is particularly impressive because Photoshop follows the facial structure rather than simply bending the lips in isolation. A cool, serious expression can become friendlier and more approachable with only a small movement.
Lips can be a little trickier. If only part of the lower lip is visible, Face-Aware Liquify may not grab it properly. If that happens, switch to the Bloat Tool, choose a suitable brush size and manually enlarge the area slightly. Once the feature is more clearly defined, returning to the Face Tool may give Photoshop a better read of the mouth.
Shape the Jawline and Forehead
For the jawline, Face-Aware Liquify lets you adjust the face shape in a more controlled way than dragging pixels around with traditional Liquify tools. Want a slightly stronger chin or jaw? There is a slider for that.
The forehead controls are there too. If someone has been lovingly informed by a sibling that they have a fivehead, Photoshop can bring that down a little. A fringe might still be required, depending on the situation.
Again, the point is control. Traditional Liquify could do these edits, but making them look natural was hard work. Face-aware controls make the process much easier because the adjustments are built around the structure of an actual face.
If your experiment becomes more cartoon character than portrait retouch, use Reset in Liquify and start again. Since the filter is on a Smart Object, you can also return to the document and toggle the Smart Filter visibility to compare the result with the original.
Use Face-Aware Liquify on Group Photos
Face-Aware Liquify is not limited to single portraits. It can detect multiple people in a group photo, which is pretty amazing.
When several faces are present, choose the person you want from the face selection menu in the Face-Aware Liquify panel. Photoshop lists the detected faces from left to right, so you can select one person at a time and make feature-specific adjustments.
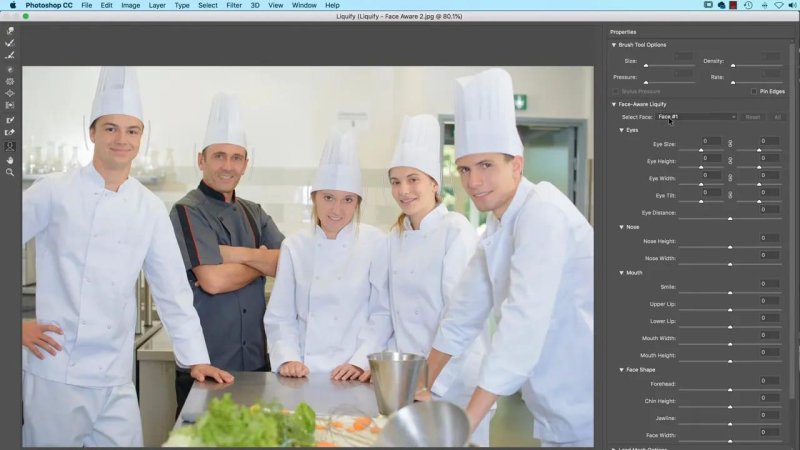
For a group portrait, select each detected face individually before making its specific adjustment.
This means you can make one person’s eyes slightly larger, nudge another person’s smile, or correct a small perspective issue without affecting everyone else in the image.
Work through the people one at a time. Select the face, make the adjustment, then select the next one. It is much tidier than trying to use broad manual warping tools across a crowded photograph.
The Retouching Rule That Matters Most: Be Subtle
The big changes are fun. Give yourself a huge jaw, pull the forehead down, crank up the eyes and enjoy the ridiculousness of it. But for real work, restraint is the entire game.
Portraits generally look healthier, happier and more polished with tiny refinements. A small increase in eye size can add a little life to a face. A gentle smile adjustment can make an expression more welcoming. A minute tweak to the cheeks or jaw can help a photograph match the intended visual direction.
For example, some commercial retouching asks for more traditionally feminine features in male swimwear imagery. That might involve subtly adjusting cheekbones and facial proportions. In another image, a stronger jawline may be the desired direction. The tool is flexible. The goal depends on the brief.
The danger is changing someone so much that they no longer look like the person in the photograph. This matters enormously for headshots, model images and professional portraits. You do not want someone walking into an interview only to be greeted with, “Hang on, this is not who was in the headshot.”
Be especially careful with:
Eye size and the distance between the eyes
Jaw width and chin shape
Cheekbone position
Smile intensity and lip shape
Forehead and overall face proportions
A good test is to turn the Smart Filter off and on. If the change feels obvious at first glance, pull it back. The strongest professional retouching often looks like nothing was done at all.
A Simple Face-Aware Liquify Workflow
Convert the portrait layer to a Smart Object.
Choose Filter > Liquify.
Select the Face Tool if Photoshop has not selected it automatically.
Begin with linked eye controls for balanced adjustments.
Unlink individual features only when perspective or the pose needs correction.
Adjust nose, mouth, smile, jawline and forehead with sliders or on-image points.
Use the Bloat Tool for manual lip or feature adjustments when detection is not cooperating.
For group images, choose each person from the detected faces menu.
Reset any adjustment that becomes too extreme.
Click OK, then compare the Smart Filter on and off before calling it finished.
Key Terms
Face-Aware Liquify
A Photoshop Liquify feature that detects facial landmarks and provides targeted controls for elements such as the eyes, nose, mouth, jaw and forehead.
Smart Object
A Photoshop layer type that preserves the original image data, allowing filters such as Liquify to remain editable as Smart Filters.
Smart Filter
An editable filter applied to a Smart Object. It can be reopened, hidden or removed without permanently changing the original pixels.
Bloat Tool
A Liquify tool that expands pixels beneath the brush. It is useful for manually enlarging an area when automatic facial controls do not catch it properly.
FAQs
Where is Face-Aware Liquify in Photoshop?
Open the image, then choose Filter > Liquify. In the Liquify workspace, select the Face Tool if it is not already active. The Face-Aware Liquify controls appear in the panel on the right.
Why should I convert my image to a Smart Object before using Liquify?
Converting to a Smart Object applies Liquify as an editable Smart Filter. You can reopen the settings, compare the original and retouched version, or disable the filter if the changes are too strong.
Can Photoshop Face-Aware Liquify edit more than one person?
Yes. In a group photograph, Photoshop can detect multiple faces. Select each detected person from the Face-Aware Liquify face menu and retouch them individually.
How much should I enlarge eyes in portrait retouching?
Keep it very subtle. A small adjustment can make eyes feel brighter and more appealing, while a large change can make the portrait look unnatural or unlike the person.
Written by Daniel Walter Scott — Founder of Bring Your Own Laptop & Chief Instructor
