How to change the perspective in Photoshop Perspective Warp
Questions





Student Gallery
Course info
Overview
- 13+ Hours of content!
- 10+ Interactive exercises
- 68 downloadable resources
- You'll learn the best selection and masking techniques
- You'll know how to fix images that look 'hard to fix'
- You'll master advanced levels and curves tricks, specifically with skin, adjusting and enhancing colors
- You'll learn how to enlarge images without distortion and what to do when things go wrong
- You'll know how to convincingly remove all kinds of objects from images
- My favourite: You'll master the ability to distort, bend and reshape images
- Lets look at how current trending styles are super easy to duplicate
- You will become a type nerd. We'll use font pairing in Typekit. We'll also use Photoshop's ability to guess fonts
- Your Artboards skill will be mastered
- A master of retouching, you will become!
- You'll learn to edit videos in Photoshop, who'd have thought?
- We'll also create awesome cinemagraphs, AKA: Moving pictures!
- You'll learn to master 3D in Photoshop!
- You'll learn lots about professional, reusable mockups, techniques and shortcuts!
Course duration 13 hours 45 mins + your study.

Daniel Walter Scott
Founder of Bring Your Own Laptop & Chief Instructor
I discovered the world of design as an art student when I stumbled upon a lab full of green & blue iMac G3’s. My initial curiosity around using the computer to create ‘art’ developed into a full-blown passion, eventually leading me to become a digital designer and founder of Bring Your Own Laptop.
Sharing and teaching are a huge part of who I am. As a certified Adobe instructor, I've had the honor of winning multiple Adobe teaching awards at their annual MAX conference. I see Bring Your Own Laptop as the supportive community I wished for when I was first starting out and intimidated by design. Through teaching, I hope to bring others along for the ride and empower my students to bring their stories, labors of love, and art into the world.
True to my Kiwi roots, I've lived in many places, and currently, I reside in Ireland with my wife and kids.
Certificates
We’re awarding certificates for this course!
Check out the How to earn your certificate video for instructions on how to earn yours and click the available certificate levels below for more information.
Downloads & Exercise files
Can Photoshop Perspective Warp straighten and change an object’s angle?
Yes. Perspective Warp lets you define the flat planes in an image, then reshape them to straighten converging lines or make an object appear to face a different direction. It is quick, surprisingly powerful, and best suited to clear, box-like surfaces without people crossing them.
How to Use Perspective Warp in Photoshop
Key takeaways
Correct distorted architectural lines by mapping the building’s visible planes.
Use a Smart Object first when you want the Perspective Warp adjustment to remain editable.
Build planes carefully in Layout mode before making any adjustments in Warp mode.
Hold Shift while working in Warp mode to constrain a line vertically or horizontally.
Expect empty edges after a major warp, then repair them with Content-Aware Fill if necessary.
Use the tool on simple geometric objects, not scenes where people or recognisable objects may become stretched.
What Perspective Warp is for
Perspective Warp is one of those Photoshop tools that feels a bit like travelling back in time and moving the camera, or even moving the object itself. It can solve two common problems.
Straightening perspective: Fix a building where verticals and roof lines are wandering off in all sorts of directions because of the lens or camera angle.
Changing an object’s direction: Make a box-like object, such as a shipping container, look as though it was photographed from another angle.
It is not a general-purpose distortion tool. The magic comes from telling Photoshop where the real-world planes are, then allowing it to reshape those planes in a believable way.
Start non-destructively with a Smart Object
Before applying Perspective Warp, convert the layer to a Smart Object. This is the fancy but sensible way to work because Perspective Warp becomes a Smart Filter that can be switched on and off later.
Once the layer is ready, choose Edit > Perspective Warp. Photoshop then gives you two stages: Layout and Warp.
Layout is where you map the geometry. Warp is where you get to bend reality a little.
Straighten a building with Perspective Warp
A church or similar building is a great example because the lens can make the background and architecture look skewed, even where lines should be straight. The aim is not to map every tiny detail. It is to map the main faces of the structure accurately enough that Photoshop understands the perspective.
1. Create the first plane
In Layout mode, click once on the image to create an initial plane. Drag its four corner handles until they cover one visible face of the building.
Use obvious visual references as you position the corners. A line along the ground can help with the base, while a roof line or vertical edge helps establish the rest of the plane. Take a moment here. The more convincingly the grid follows the real surfaces, the better the correction will be.
2. Add and connect the second plane
For the next visible face, click to create another plane and pull it towards the first. When the edges are close, the planes can snap together. That is handy because the connected planes now describe the corner where the two sides of the building meet.
Align this new plane with the building’s base and roof. You are essentially telling Photoshop, “These are the two flat surfaces I’m dealing with.”
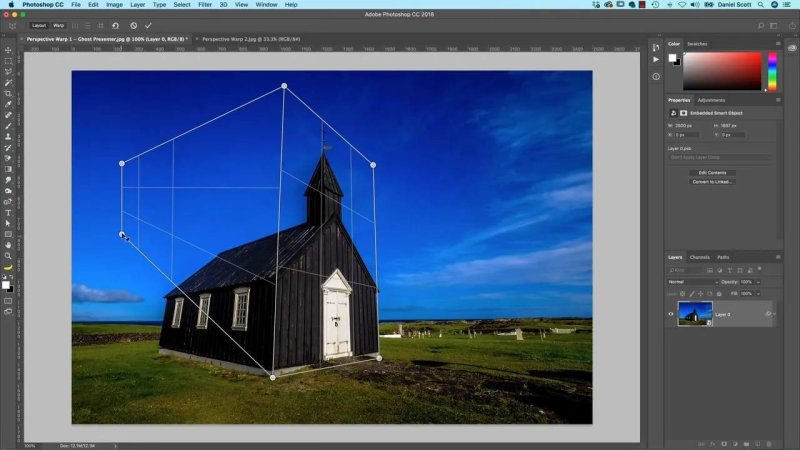
Connected planes map the building faces before any perspective correction is applied.
3. Switch from Layout to Warp
Once the planes are in place, switch to Warp. Now drag the handles to straighten the lines that should be vertical or horizontal. For a building, this usually means bringing the walls into a more upright position.
Perspective Warp works brilliantly on boxy forms, but a church has a pitched roof and other less predictable details. A small amount of visual judgement is perfectly normal. Nudge the handles until the structure feels straight rather than chasing mathematical perfection.
4. Apply the warp and check the Smart Filter
When the result looks right, click the tick or press Return. If you began with a Smart Object, toggle the Smart Filter on and off in the Layers panel to compare the correction with the original.
That before-and-after check is important. It is very easy to get carried away and overcorrect an image. The goal is a natural-looking building, not an image that has been forced into submission.
Change the apparent direction of a shipping container
Perspective Warp can do more than correct a skewed image. With a suitably simple object, it can make it look as though the object was facing another way when it was photographed.
A shipping container is about as perfect as it gets for this. It has flat faces, strong straight edges, and a recognisable rectangular form. Those are the conditions where Perspective Warp becomes properly impressive.
1. Map the container faces
Start in Layout mode and draw a plane over one face of the container. You can click and drag the plane roughly into place, then move its corner handles into position.
When creating an adjacent plane, bring its edge close to the first plane. Photoshop highlights compatible edges and snaps them together. That snapping makes it much easier to build a clean, connected model of the container.
2. Constrain an edge with Shift
Switch to Warp mode. A useful trick here is to hold Shift and click a line that should remain straight up and down. This locks that edge into a vertical plane.
Once it is constrained, dragging one related corner moves the connected edge with it. That lets you pull the container around while preserving the straight geometry that sells the illusion.
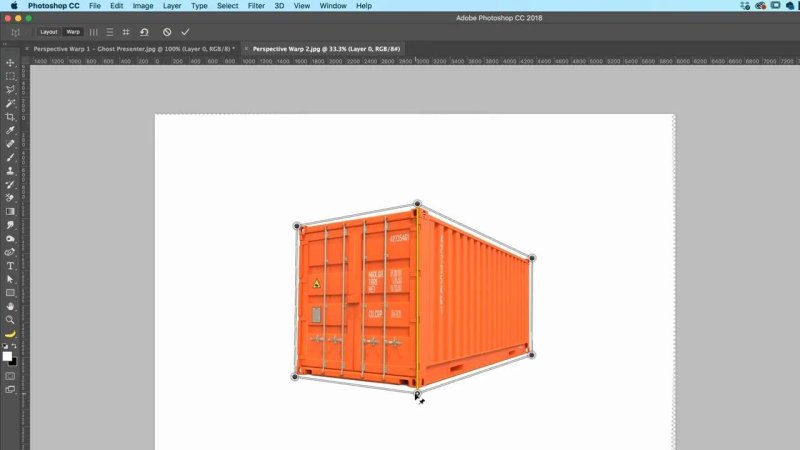
The warp mesh makes it possible to reshape a simple rectangular object while keeping its connected faces believable.
Work slowly, moving the handles a little at a time. You can make the container appear to turn, exposing more or less of a side. It takes a bit of tongue-out concentration, but the result can look remarkably like the container was photographed from another direction.
Press Return to commit the adjustment when the angle looks convincing.
Fix the blank edges created by a warp
Big perspective changes often leave blank or stretched areas around the edge of the canvas. If the layer is a Smart Object, you will need to rasterise it before using pixel-based filling methods.
Right-click the layer and choose Rasterize Layer. This removes the editable Smart Object setup, so only do it once you are happy to commit to the warp.
Then select the empty areas. A Rectangle Marquee selection is fine for quick rectangular gaps, and holding Shift lets you add multiple areas to the same selection. For less regular gaps, the Lasso Tool is the better choice.
Choose Edit > Fill and use Content-Aware Fill. It is particularly effective in natural areas such as sky, grass, dirt, and other organic texture, where Photoshop can blend in surrounding pixels without needing to recreate a precise geometric object.
When Perspective Warp works well, and when it does not
Perspective Warp is excellent when the image gives it something clear and structured to work with. It is at its best when there is a bit of a perfect storm: strong straight lines, flat connected surfaces, and minimal complex content crossing those surfaces.
Good candidates
Buildings with visible walls, roof lines, and strong architectural edges.
Shipping containers, boxes, signs, and other rectangular objects.
Interior shots where walls and windows need to be brought back into line.
Scenes with sky, grass, or other textures that can be repaired easily after the warp.
Use caution with these
People standing in front of the surface being warped.
Recognisable objects that should not become wider, narrower, or stretched.
Complex scenes with lots of overlapping forms at different depths.
Buildings with unusual shapes where the planes cannot be described cleanly.
Windows and generic textures can often tolerate an angle change because they simply smear or stretch a little. A person cannot. If someone becomes subtly too wide or distorted, the edit stops looking real very quickly.
Keep Perspective Warp in the toolkit for the right photo. It is quick and easy to use, and on the right image it is seriously good. Just do not expect it to be perfect every single time.
Key terms
Perspective Warp
A Photoshop command that lets you define flat planes in an image and then reshape them to correct perspective or alter an object’s apparent angle.
Layout mode
The first stage of Perspective Warp, used to draw and connect the grids that match the visible faces of an object or building.
Warp mode
The second stage, where the mapped planes are moved and constrained to straighten lines or change perspective.
Smart Object
A layer format that preserves the original layer content and lets Perspective Warp be applied as an editable Smart Filter.
Content-Aware Fill
A Photoshop filling method that uses surrounding pixels to replace selected blank areas, especially useful after a warp expands the edges of an image.
FAQs
Where is Perspective Warp in Photoshop?
Choose Edit > Perspective Warp. Converting the relevant layer to a Smart Object first keeps the result editable as a Smart Filter.
What is the difference between Layout and Warp in Perspective Warp?
Layout mode is for drawing the planes over the object’s real surfaces. Warp mode is for dragging those planes to straighten perspective or change the apparent direction of the object.
Why should I use a Smart Object before Perspective Warp?
A Smart Object lets you turn the Perspective Warp Smart Filter on and off later. This makes it easy to compare the original and corrected image or revise the adjustment.
Can Perspective Warp be used on interior photos?
Yes. It can be a useful way to straighten distorted walls and windows in a room. Be careful when large objects or people sit in the middle of the scene, as they can become visibly distorted.
How do I fill blank edges after a Perspective Warp?
Rasterize the layer if necessary, select the blank areas with a marquee or lasso selection, then use Edit > Fill with Content-Aware Fill. It works especially well on natural textures such as grass, dirt, and sky.
Written by Daniel Walter Scott — Founder of Bring Your Own Laptop & Chief Instructor
