How to crop an image in Adobe Photoshop CC
Questions


Student Gallery
Course info
Overview
By the end of this course you'll posess super skills!
- Learn the skills to mask anything… including the dreaded hair.
- Using your amazing new masking skills, you will be able to clearcut images.
- You will learn how to make type interactive.
- Together we will look at popular current visual styles and learn the tools and tricks necessary to recreate them.
- There is a fun section where you will learn how to distort, transform and manipulate images.
- We will create our own graphics using simple techniques from scratch.
- I will teach you to retouch photographs like a professional..
- Finally - any good Photoshop user should know how to put an island inside a bottle!
There are exercise files available to download so that you can follow along with me in the videos. There are lots of assignments I will set so that you can practice the skills you have learned.
Course duration 8 hours 35 mins + your study.
Get the completed files here.
Awarded the Best Photoshop Course by Learnopoly in 2023

Daniel Walter Scott
Founder of Bring Your Own Laptop & Chief Instructor
I discovered the world of design as an art student when I stumbled upon a lab full of green & blue iMac G3’s. My initial curiosity around using the computer to create ‘art’ developed into a full-blown passion, eventually leading me to become a digital designer and founder of Bring Your Own Laptop.
Sharing and teaching are a huge part of who I am. As a certified Adobe instructor, I've had the honor of winning multiple Adobe teaching awards at their annual MAX conference. I see Bring Your Own Laptop as the supportive community I wished for when I was first starting out and intimidated by design. Through teaching, I hope to bring others along for the ride and empower my students to bring their stories, labors of love, and art into the world.
True to my Kiwi roots, I've lived in many places, and currently, I reside in Ireland with my wife and kids.
Certificates
We’re awarding certificates for this course!
Check out the How to earn your certificate video for instructions on how to earn yours and click the available certificate levels below for more information.
Downloads & Exercise files
Transcript
Hi there, this video is all about cropping. You might think, "Hey, cropping is not that exciting, I'm going to skip along." You can, but there are some secret tricks in this video, I promise. Things like deleting crop pixels, and rotating it. Hang around, it's not a long video, let's get started.
First thing, 'File', 'Open'. In your 'Exercise Files', there is a folder called '04 Cropping', and let's open up 'Cropping 01', Now on your Tool panel over here, grab this fifth tool down, the 'Crop tool'. You notice, in Photoshop if you hover above these tools long enough-- watch this, if I hover above it you're not sure what the icon does, these little things pop out, kind of explaining what they are, this is the Crop Tool. Crop tool is easy to use, grab any of these corners that appear. So this right one here, I'm going to crop it in, so it's-- those shoes are a bit more central. When you've got it where you want it to be, hit 'Enter' on your keyboard and that's it, you've done some cropping.
Let me show you some other ways of doing it. Let's go to 'Edit', 'Step Backward'. Even though I'm on my Crop Tool, I can't see the edges, kind of just click on it again. Pops back into life. Now what I want to do is I want to proportionately crop it. I don't want to just kind of randomly pick a size. I want it to be the same height and width. And that's true-- who could guess what shortcut I hold down to kind of lock the height and the width? You guessed it, it's Shift, hold 'Shift' down. It means that when I'm holding down shift, the height and the width are the same. So I'm going to get it to be there, and then click 'Enter'.
More tricks with the Crop Tool. Let's go 'Edit', 'Step Backward', click on the tool again. What I'm going to do is crop it in, it doesn't really matter. Going to crop it kind of there. And what you can do now is, you can do two things. You can move it around by clicking and dragging anywhere in here and it does kind of weird, it drags the image, not the crop, I find that weird, but anyway. Say you want to kind of move it over here to about there, perfect. Let's say you want to rotate it a little bit as well. So all you need to do is just hover anywhere outside, anywhere. Can you see the little bent arrow? That guy there, click, hold, and drag. If you're like, I'm not sure if you are like me but I find this is a really weird thing that happens. Click, hold it, give it a wiggle around, see what you want. This can be really handy if there's like a horizon line. It maybe not straight, you can kind of drag it, and get these lines to line up. So get it, move it around, get it just practicing I guess with this Crop Tool. Then when you've got it where you want, hit 'Return'. Awesome!
Now there's one last thing for this particular Crop technique, is I'm going to go to 'undo' again, go back to my 'Crop Tool'. There's this option up here that says 'Delete Cropped Pixels' that's on by default, I'm pretty sure. Check yours, if you're working on an old version of Photoshop it's not going to be there, it's reasonably new. With it on, it means when I crop it down, and hit 'Return' and let's say I grab my 'Move Tool' now, unlock the layer by naming it. I can just move it around. You can see, it's kind of cropped it down, and deleted any excess, it's gone from the edge there. So what I'm going to do is, I'm going to 'Edit', 'Step Backward' quite a few times until I got my big image back. I'll show you the difference.
With the Crop Tool here let's turn that off and now I'm going to crop it down so I'm going to crop it to there, hit 'Enter' on my keyboard, it looks the same, right? But if I grab my 'Move Tool' now, watch what happens. Can you see, all that stuff that we cropped off is actually still up there. It's hidden and won't kind of say 'Print' but it is still there. Now I find I keep that on all the time, or uncheck it all the time. So 'Crop Tool', I make sure that's never on. It's useful, sometimes you want crop, it might be stuff you just don't need, you want to get rid of it. I find I'll leave it off because then it gives me the option to go back later on go to my 'Move Tool' and go, "Actually I want to kind of just adjust it a little bit." So that's the basic cropping in Photoshop. Let's get in and do some specific size cropping in the next video.
How do I crop an image in Photoshop without losing the original pixels?
Select the Crop tool, drag the crop handles to frame the image, and press Enter or Return to apply it. To keep the trimmed area available for later adjustments, turn off Delete Cropped Pixels before committing the crop.
How to Crop Images in Photoshop: Essential Tricks for Better Composition
Key takeaways
Use the Crop tool to remove distractions and bring the important part of an image into focus.
Hold Shift while resizing to keep the crop proportional.
Reposition the image inside the crop boundary before applying the crop.
Rotate directly with the Crop tool to straighten a wonky horizon.
Turn off Delete Cropped Pixels when you want the flexibility to recover cropped areas later.
Start with the Crop tool
Cropping might not sound wildly exciting, but it is one of those Photoshop skills that gets used all the time. A good crop can make a photo feel more intentional simply by removing the bits that do not help the composition.
Open the image, then choose the Crop tool from the Tools panel. If an icon is unfamiliar, hover over it for a moment and Photoshop will show a tooltip explaining what it does.
Once the Crop tool is active, a crop boundary appears around the image. Drag any corner or edge handle inward to remove unwanted space. For example, if the subject is sitting off to one side, crop from that side to bring it closer to the centre of the composition.
When the framing looks right, press Enter or Return to commit the crop.
Undo and reopen the crop boundary
If the crop is not quite right, choose Edit > Step Backward to undo it. Then click the Crop tool again to bring the crop boundary back to life.
This is useful because cropping is rarely a one-and-done decision. A tiny shift in framing can make the subject feel centred, balanced, or deliberately offset.
Keep your crop proportional with Shift
Sometimes you do not want to drag a crop into a random shape. You want to keep its height and width locked together while resizing.
Hold Shift as you drag a crop handle. Photoshop constrains the crop proportionally, so the shape stays consistent rather than stretching wider or taller as you resize it.
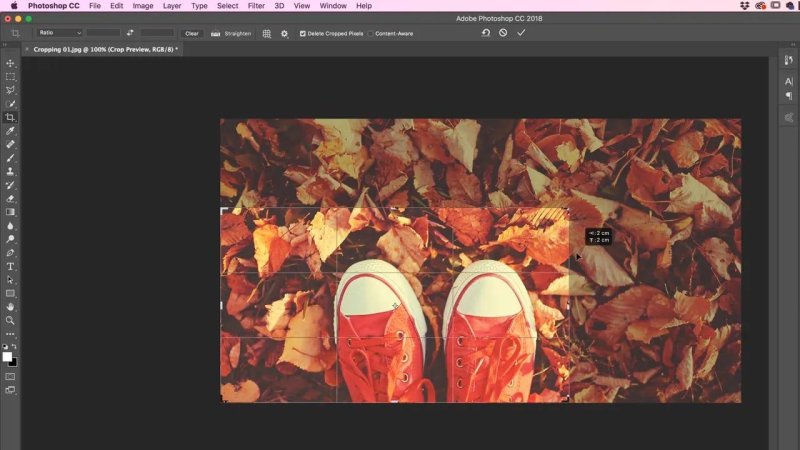
The dimmed outer area makes it easy to judge exactly what will remain in the final crop.
Once the proportions and framing are where you want them, press Enter or Return to apply the crop.
Move the image inside the crop
Here is a slightly odd but very useful part of the Photoshop Crop tool. After pulling the crop handles inward, click and drag inside the crop area to reposition the image.
It can feel a little backwards at first because Photoshop moves the image, rather than the crop boundary. But it gives you a quick way to test different compositions without changing the size of the crop.
Set your crop size first, then drag the image until the important details sit in the best position. That is often all it takes to turn a decent image into a stronger one.
Rotate and straighten while cropping
The Crop tool also lets you straighten an image at the same time. Move the cursor just outside the crop boundary until it changes to a curved double-arrow rotation icon. Click, hold, and drag to rotate.
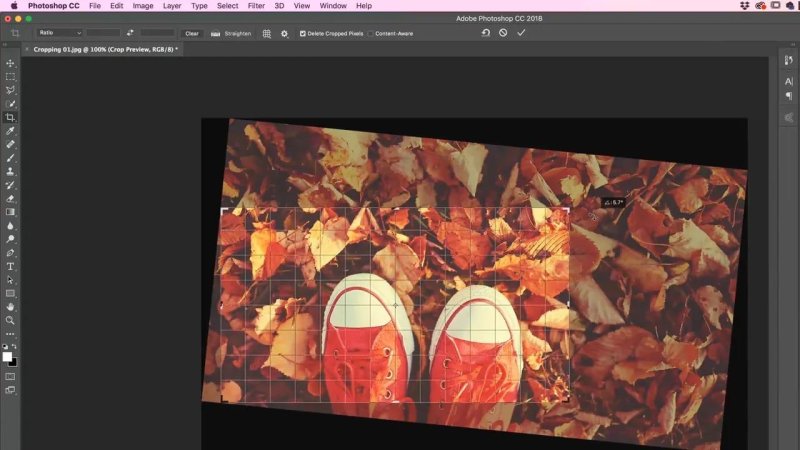
Rotating inside the crop is ideal for straightening an image before committing the final framing.
This is particularly handy for photographs with a horizon, building, or other line that should be level. Give it a little wiggle around, find the angle that looks right, then press Enter or Return when you are happy.
Should you delete cropped pixels?
The most important Crop tool setting is Delete Cropped Pixels, found in the options bar when the Crop tool is selected. It may be enabled by default, although older Photoshop versions may not include the option.
When Delete Cropped Pixels is turned on
With this option enabled, Photoshop permanently removes the pixels outside the crop boundary when you apply the crop. If you later unlock the layer and move it with the Move tool, there is no hidden image content around the edges because it has been deleted.
This is useful when you are certain the extra image area is no longer needed and you genuinely want it gone.
When Delete Cropped Pixels is turned off
With the option disabled, the image appears exactly the same after cropping, but the pixels outside the visible canvas are still there. They are hidden rather than deleted.
Choose the Move tool later and reposition the layer, and those supposedly cropped-off areas can come back into view. They will not appear in the final visible canvas unless you move them back, but they remain available for adjustment.
I tend to leave Delete Cropped Pixels turned off. It gives you room to change your mind later, adjust the composition, or recover a little more space around the edges without starting again from the original image.
A simple Photoshop cropping workflow
Select the Crop tool.
Drag corner or edge handles to set the new framing.
Hold Shift if you need to preserve the crop proportions.
Drag inside the crop area to reposition the image.
Drag outside the crop boundary to rotate and straighten it if needed.
Decide whether Delete Cropped Pixels should be on or off.
Press Enter or Return to apply the crop.
That is the basic Crop tool, along with the useful bits that are easy to miss. Cropping is not just about making an image smaller. It is about controlling attention, improving balance, straightening a scene, and keeping enough flexibility to fix things later.
Key terms
Crop tool
A Photoshop tool used to trim an image, improve its framing, and rotate or straighten it before applying the change.
Crop boundary
The adjustable outline that defines the part of the image that will remain visible after cropping.
Delete Cropped Pixels
A Crop tool option that permanently removes pixels outside the crop area when enabled. When disabled, those pixels remain hidden and can be recovered by moving the layer.
Proportional crop
A crop that retains a consistent relationship between height and width as it is resized. Holding Shift constrains the crop proportionally.
FAQs
What is the shortcut to apply a crop in Photoshop?
Press Enter or Return after positioning the crop boundary, adjusting the image, and rotating it if necessary.
How do I keep cropped parts of an image in Photoshop?
Turn off Delete Cropped Pixels in the Crop tool options before applying the crop. The trimmed pixels stay hidden outside the visible canvas rather than being permanently removed.
Can I straighten a photo with the Crop tool?
Yes. Hover just outside the crop boundary until the curved rotation cursor appears, then click and drag to rotate the image into a straighter position.
How do I crop proportionally in Photoshop?
Hold Shift while dragging a crop handle. This keeps the crop proportions consistent as you resize it.
Written by Daniel Walter Scott — Founder of Bring Your Own Laptop & Chief Instructor
