How to use the Distort Envelope Shape & Type
Questions
Student Gallery
Course info
Overview
- - How to use artificial intelligence to boost your creativity in ideation.
- - The quick way to take hand-drawn sketches and vectorize and color them.
- - The building blocks needed to set you loose on a huge variety of beautiful effects and techniques.
- - To make beautiful charts and graphs for your documents.
- - Color mastery to make quick color adjustments, Pantones, and blend it all together beautifully.
- - How to master images inside of your illustrator workflow.
- - To harness all the secret gems that'll help you level up your typography skills.
- - All the tricks of the trade for drawing complex shapes easily.
- - To double your creativity with the Transform and Distort section.
- - To speed up your personal workflow to get the most out of your creative day.
- The Curvature Tool
- How to master corners with corner widget effects
- How to work with Compound Paths
- The difference between Expand & Expand Appearance
- How to create Graphic Styles
- How to make Symbols
- How to use the Smooth Tool
- Advanced use of Simplify Path
- What Live Shape Effects are for
- How to make Repeating Grids & Concentric Circles
- How to make Random Objects
- Advanced Keyboard Shortcuts in Illustrator
- How to add a Gradient on a Stroke
- How to add a Gradient in Text
- How to use the Freeform Gradient tool
- How to use Advanced Color Swatches
- How to use Global Color Swatches
- What is the difference between RGB vs CMYK color modes?
- How to proof colors
- How to use Pantone Spot Colors
- Recolor Artwork & Changing all colors at once
- How to use Blending Modes
- How to work with Images & Blending Modes
- How to make Black & White Images
- Learn Advanced Workflow Tricks
- All the Super Selection Mastery
- How to use the History Panel
- Advanced Fonts Tricks & Tips
- Use Retype to know what Font is being used
- How to put Text Inside a Letter or Shape
- How to use the Touch Type Tool
- How to add a Connected Stroke Around Multiple Shapes
- How to Offset a Stroke with Text
- How to make a Bar Chart in Illustrator
- How to make a Pie Chart in Illustrator
- Layer Power Moves
- Advanced Artboard & Pages Tricks
- How to Unlink vs Embedded Images
- How to Crop Images Rather than Mask
- How to Mask Inside Text & Multiple Shapes
- How to you use the Puppet Warp Tool
- How to use the Distort Envelope Shape & Type
- How to use the Envelope Mesh
- How to blend lines together
- How to make a Linocut Effect
- How to make 3D Gradient Lettering Blends
- How to spin text into a ring
- How to turn text into a 3D donut shape
- How to make a Duotone image effect
- How to make a Roughen Stamp Vector Effect
- How to make a Neon Sign Glow Effect
- How to use a Halftone Effect using Plugins
- Advanced Exporting Assets Tricks in Illustrator
- How to use the Dimension Tool
So what're you waiting for? Let's start the course now!

Daniel Scott
Founder of Bring Your Own Laptop & Chief Instructor
instructorI discovered the world of design as an art student when I stumbled upon a lab full of green & blue iMac G3’s. My initial curiosity around using the computer to create ‘art’ developed into a full-blown passion, eventually leading me to become a digital designer and founder of Bring Your Own Laptop.
Sharing and teaching are a huge part of who I am. As a certified Adobe instructor, I've had the honor of winning multiple Adobe teaching awards at their annual MAX conference. I see Bring Your Own Laptop as the supportive community I wished for when I was first starting out and intimidated by design. Through teaching, I hope to bring others along for the ride and empower my students to bring their stories, labors of love, and art into the world.
True to my Kiwi roots, I've lived in many places, and currently, I reside in Ireland with my wife and kids.
Certificates
We’re awarding certificates for this course!
Check out the How to earn your certificate video for instructions on how to earn yours and click the available certificate levels below for more information.
Downloads & Exercise files
How do you warp shapes and text into custom forms in Illustrator?
Use Object > Envelope Distort. For quick bending, Make with Warp gives you ready-made styles like Arc, Flag, and Wave. For fitting text or artwork into a specific shape, Make with Top Object lets the shape on top drive the distortion.
How to Distort Envelope Shape and Type in Illustrator
If you have ever tried to make a bunch of shapes flow together with the Pen Tool and keep all the curves matching nicely, you already know it can become a bit of a nightmare. Envelope Distort is the shortcut to that lovely whippy, warpy look.
The really useful bit is that it works on both vector shapes and text. So you can bend a block of coloured rectangles into a flag, and you can also squish lettering neatly into a heart or another custom shape.
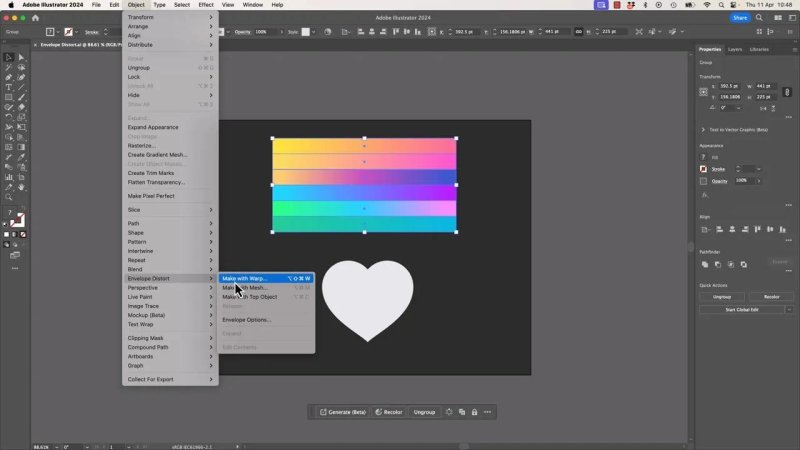
Start with a grouped vector shape
Envelope Distort works with vector artwork, so the first step is making sure the thing you want to bend is vector based. A simple example is a group of rectangles with gradients applied.
Group the artwork first, then select the whole group. From there, go to:
Object > Envelope Distort
You have a few options in that menu, but the two useful ones here are:
Make with Warp
Make with Top Object
The fastest way to get a curved result is Make with Warp and a live preview.
Use Make with Warp for quick shape distortion
Make with Warp is the easy win. Select the grouped artwork, choose the command, and Illustrator gives you a warp dialog with built-in styles.
Some of the common styles include:
Arc
Arch
Flag
Wave
Fish
Fisheye
Some are practical, some are a bit odd, and yes, Fish is in there waiting for its big moment. But the important point is this: these presets can save loads of time.
Instead of manually redrawing curves, you can drag a few sliders and get something that already looks polished.
Adjust the warp settings properly
Inside the warp dialog, the main controls are the bend and distortion sliders. The exact controls can change depending on the warp style you choose, so expect slightly different options for Arc compared with Flag or Wave.
A few practical tips:
Turn Preview on so you can see changes live.
Reset values to 0 when comparing styles, so you are seeing the true preset rather than a distorted version of the previous one.
Try similar styles side by side. Arc and Arch are close, but not identical.
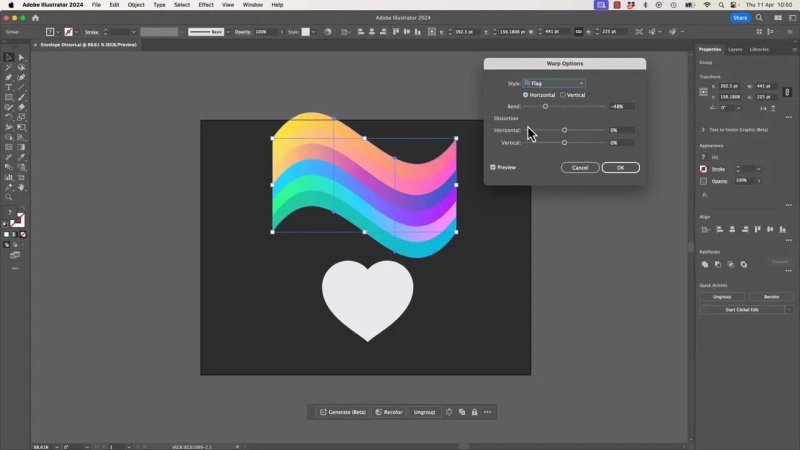
Flag and Wave styles are where Envelope Distort starts feeling like magic.
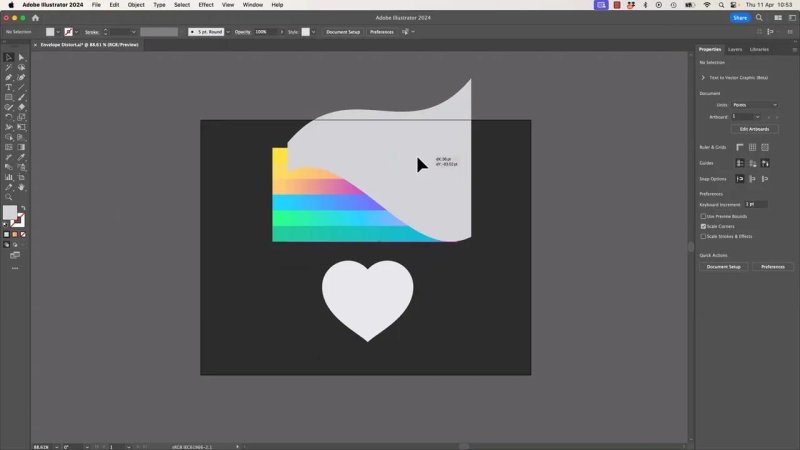
Your warp stays editable
One of the best parts is that a warp is not immediately permanent. After you click OK, the artwork is still living inside the envelope, which means you can go back and tweak it.
Select the warped object again and reopen the warp controls from the control bar or properties panel. You can switch styles, adjust bend, and keep refining without rebuilding the whole thing.
That makes Envelope Distort great for experimentation. You can try a rainbow arc, then a wave, then a flag, and settle on whatever feels right.
Understand what the envelope actually is
The idea is simple. Think of your artwork sitting inside an envelope. You are not directly bending every individual object inside it. You are bending the outer container, and the contents follow along.
That is why the effect stays so flexible at first. The original artwork is still there, but it is being controlled by the envelope around it.
Expand versus Release
At some point, you may want to stop editing the warp as a live effect and turn it into regular artwork. You have two different ways to break things apart, and they do different jobs.
Expand
If you go to Object > Expand, Illustrator converts the warped result into normal editable vector paths.
That means:
The live warp is gone
You can ungroup the result
Each part becomes regular vector artwork again
This is useful when you want full manual control and no longer need the warp settings.
Release
If you instead go to Object > Envelope Distort > Release, Illustrator separates the contents from the envelope shape that was causing the distortion.
This is especially handy because it lets you keep the actual shape that drove the bend.
Release gives you the controlling shape back, which is brilliant when you want to reuse the same distortion.
That released envelope can become a reusable template for other artwork later on.
Reuse a custom envelope shape again and again
This is where the workflow gets properly useful.
You can build an interesting warp once using Make with Warp, then Release it to get the custom envelope shape. After that, you can use that same shape to distort other objects with much more consistency.
So the flow looks like this:
Create a base shape or grouped artwork.
Use Make with Warp to get the exact flag, wave, or bend you want.
Use Release to separate the envelope from the contents.
Reuse the released envelope shape as the top object for other artwork.
If you have a specific distorted style you want to repeat across multiple pieces, this is the smart way to do it.
Use Make with Top Object to force text into a shape
Now for the fun bit. You can use a vector shape on top to distort text underneath it.
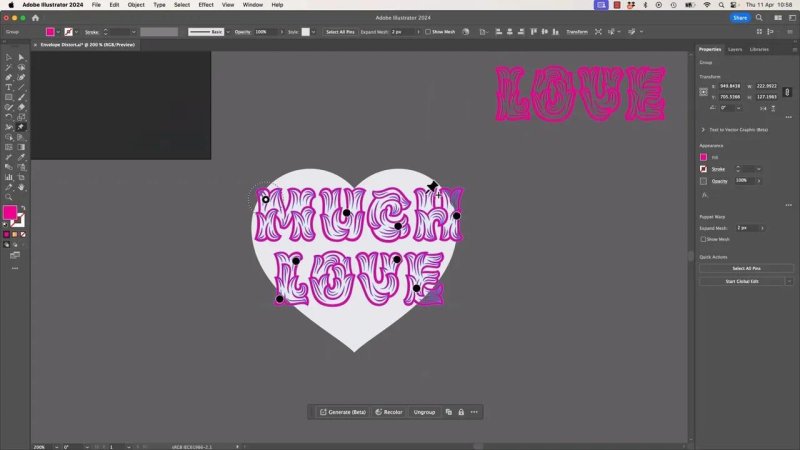
Say you have a heart shape and some text. The text could be something like two stacked words, and the heart sits above it in the layer order.
The order matters a lot here:
The shape must be on top
Select both the shape and the text
Choose Object > Envelope Distort > Make with Top Object
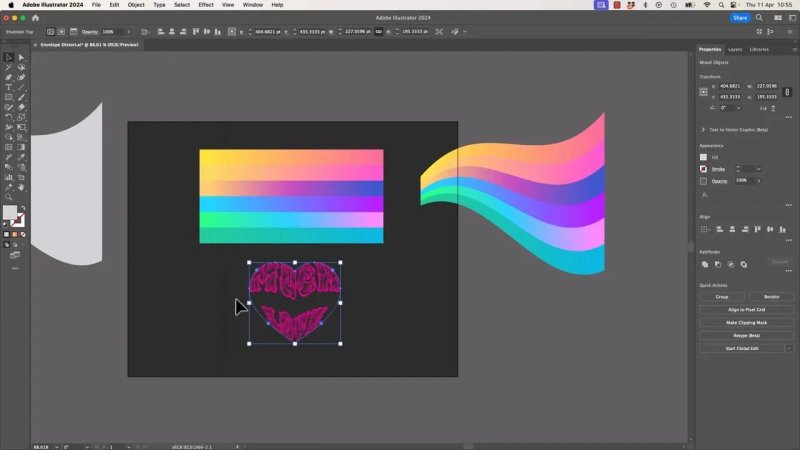
Make with Top Object lets the heart do the squeezing so the text conforms to the shape.
Illustrator uses the top shape as the envelope, and the text gets bent to fit inside it. Very cool, and much quicker than manually reshaping every letter.
Get your text close before distorting it
Technically, the text remains editable inside the envelope, but editing it once warped is a bit awkward. You can go in and adjust leading and text settings, but it is not the nicest environment to work in.
It is much easier to:
Choose a legible font first
Set your size before warping
Adjust line spacing before committing
Position the text roughly where you want it
If the font is already difficult to read, warping it into a shape will not suddenly make it clearer. Quite the opposite, really.
Keep a duplicate of the top shape if you want it visible
There is one little gotcha with Make with Top Object. The top shape becomes the envelope, so it effectively disappears into the distortion process.
If you want that original heart, flag, or other shape to remain visibly behind the text, duplicate it first.
A simple approach is:
Copy the top shape
Use one copy as the envelope
Keep the second copy underneath as the visible background shape
That way the text is forced into the shape, but the shape itself still appears as part of the finished design.
Keeping a visible heart underneath makes the final effect feel intentional instead of floating.
When Envelope Distort is not enough
Sometimes the top object method does strange things to certain letters. You might get one character that stretches awkwardly or bends in a way that feels wrong.
That is the tradeoff. The shape is in control, not you.
When you need more deliberate control over individual areas, there is another option.
Bonus method: use the Puppet Warp tool for text
This is a different technique, but it can produce a similar result. Instead of having a top shape dictate the distortion, you manually place pins and pull the artwork into position.
With the Puppet Warp tool, you can:
Add pins to key parts of the text
Anchor areas you want to keep stable
Pull specific corners or curves into place
Rotate or nudge parts more precisely
The important thing is to be deliberate. Random pins lead to random nonsense.
Place pins where structure matters, especially around corners and areas that should stay put. Then drag the parts you actually want to bend.
It takes longer than Envelope Distort, and in some cases it is probably more control than you really need, but when one letter is behaving badly, Puppet Warp can rescue the design.
When to use each method
Use Make with Warp when:
You want a quick preset distortion
You are shaping grouped vector artwork
You need styles like Arc, Flag, or Wave
You want to keep things editable for a while
Use Make with Top Object when:
You want text or artwork to fit a custom shape
You already have a vector shape to use as the envelope
You want to reuse a released envelope shape across multiple designs
Use Puppet Warp when:
You need more local control
A few letters or areas need manual adjustment
The automatic envelope result is close, but not quite right
FAQ
Can Envelope Distort be edited after I apply it?
Yes. As long as you have not expanded it, you can select the object again and reopen the warp settings to change the style or sliders.
What is the difference between Expand and Release in Envelope Distort?
Expand turns the warped result into standard vector shapes. Release separates the original contents from the envelope shape that created the distortion.
Why is Make with Top Object not working?
The most common issue is layer order. The shape controlling the distortion must be on top, and both the shape and the artwork need to be selected together.
Can I use Envelope Distort on text in Illustrator?
Yes. Text can be distorted with both Make with Warp and Make with Top Object. It can remain editable inside the envelope, although it is easier to set up the typography before distorting it.
Should I use Envelope Distort or Puppet Warp for text?
Use Envelope Distort for speed and broad shape changes. Use Puppet Warp when you want finer control over specific letterforms or problem areas.
- Powered by Marvin
- Terms of use
- Privacy policy
- Cookie policy
-
- © Bring your Own Laptop Ltd 2026