Advanced Shape Builder Uses
Questions


Student Gallery
Course info
Overview
- - How to use artificial intelligence to boost your creativity in ideation.
- - The quick way to take hand-drawn sketches and vectorize and color them.
- - The building blocks needed to set you loose on a huge variety of beautiful effects and techniques.
- - To make beautiful charts and graphs for your documents.
- - Color mastery to make quick color adjustments, Pantones, and blend it all together beautifully.
- - How to master images inside of your illustrator workflow.
- - To harness all the secret gems that'll help you level up your typography skills.
- - All the tricks of the trade for drawing complex shapes easily.
- - To double your creativity with the Transform and Distort section.
- - To speed up your personal workflow to get the most out of your creative day.
- The Curvature Tool
- How to master corners with corner widget effects
- How to work with Compound Paths
- The difference between Expand & Expand Appearance
- How to create Graphic Styles
- How to make Symbols
- How to use the Smooth Tool
- Advanced use of Simplify Path
- What Live Shape Effects are for
- How to make Repeating Grids & Concentric Circles
- How to make Random Objects
- Advanced Keyboard Shortcuts in Illustrator
- How to add a Gradient on a Stroke
- How to add a Gradient in Text
- How to use the Freeform Gradient tool
- How to use Advanced Color Swatches
- How to use Global Color Swatches
- What is the difference between RGB vs CMYK color modes?
- How to proof colors
- How to use Pantone Spot Colors
- Recolor Artwork & Changing all colors at once
- How to use Blending Modes
- How to work with Images & Blending Modes
- How to make Black & White Images
- Learn Advanced Workflow Tricks
- All the Super Selection Mastery
- How to use the History Panel
- Advanced Fonts Tricks & Tips
- Use Retype to know what Font is being used
- How to put Text Inside a Letter or Shape
- How to use the Touch Type Tool
- How to add a Connected Stroke Around Multiple Shapes
- How to Offset a Stroke with Text
- How to make a Bar Chart in Illustrator
- How to make a Pie Chart in Illustrator
- Layer Power Moves
- Advanced Artboard & Pages Tricks
- How to Unlink vs Embedded Images
- How to Crop Images Rather than Mask
- How to Mask Inside Text & Multiple Shapes
- How to you use the Puppet Warp Tool
- How to use the Distort Envelope Shape & Type
- How to use the Envelope Mesh
- How to blend lines together
- How to make a Linocut Effect
- How to make 3D Gradient Lettering Blends
- How to spin text into a ring
- How to turn text into a 3D donut shape
- How to make a Duotone image effect
- How to make a Roughen Stamp Vector Effect
- How to make a Neon Sign Glow Effect
- How to use a Halftone Effect using Plugins
- Advanced Exporting Assets Tricks in Illustrator
- How to use the Dimension Tool
So what're you waiting for? Let's start the course now!

Daniel Scott
Founder of Bring Your Own Laptop & Chief Instructor
instructorI discovered the world of design as an art student when I stumbled upon a lab full of green & blue iMac G3’s. My initial curiosity around using the computer to create ‘art’ developed into a full-blown passion, eventually leading me to become a digital designer and founder of Bring Your Own Laptop.
Sharing and teaching are a huge part of who I am. As a certified Adobe instructor, I've had the honor of winning multiple Adobe teaching awards at their annual MAX conference. I see Bring Your Own Laptop as the supportive community I wished for when I was first starting out and intimidated by design. Through teaching, I hope to bring others along for the ride and empower my students to bring their stories, labors of love, and art into the world.
True to my Kiwi roots, I've lived in many places, and currently, I reside in Ireland with my wife and kids.
Certificates
We’re awarding certificates for this course!
Check out the How to earn your certificate video for instructions on how to earn yours and click the available certificate levels below for more information.
Downloads & Exercise files
How do you use the Shape Builder tool in Illustrator properly?
Select overlapping shapes, press Shift + M, then drag to merge regions or hold Alt on Windows or Option on Mac to remove them. Once you know where it pulls colour from, how gap detection works, and a few hidden settings, it becomes one of the fastest illustration tools in Illustrator.
Illustrator Shape Builder Advanced: How to Master the Shape Builder Tool
The Shape Builder tool is one of those Illustrator features that looks simple at first, then quietly turns into the thing you use all the time.
If all you ever do is drag through overlapping shapes to join them, you are only using the obvious bit. The real power shows up when you start using it to remove complex areas, close imperfect gaps, colour illustrations quickly, and even split strokes when needed.
To make that practical, I am using a very questionable donut illustration. It does the job.
Start with one setting that saves a lot of frustration
Before doing any shape building, check one transform setting. Select any of the shapes, go to the Properties panel, open the extra transform options, and make sure:
Scale Strokes and Effects is turned off
Scale Corners is turned on
This matters because when you resize rounded objects such as icing drips or sprinkles, you usually want the stroke thickness to stay consistent instead of shrinking along with the shape.
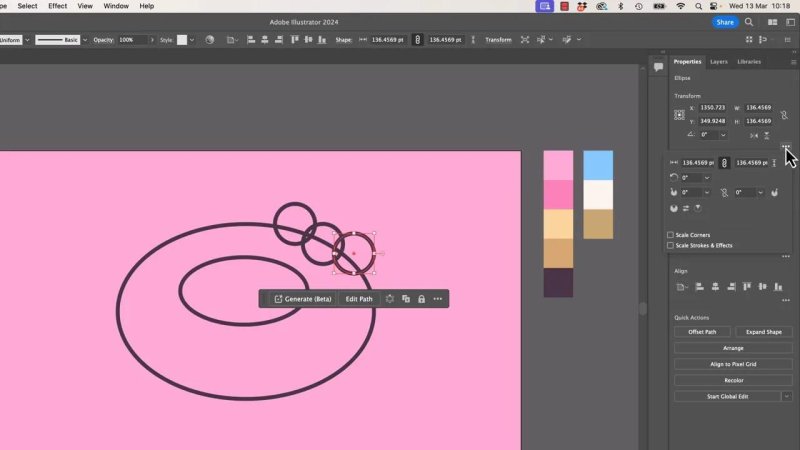
These transform options make the rest of the workflow behave properly when shapes are resized.
The basic Shape Builder move: merge and subtract
With everything selected, switch to the Shape Builder tool using Shift + M.
The basic behaviour is straightforward:
Drag across overlapping regions to merge them into one shape
Hold Alt or Option to switch into subtract mode and remove regions
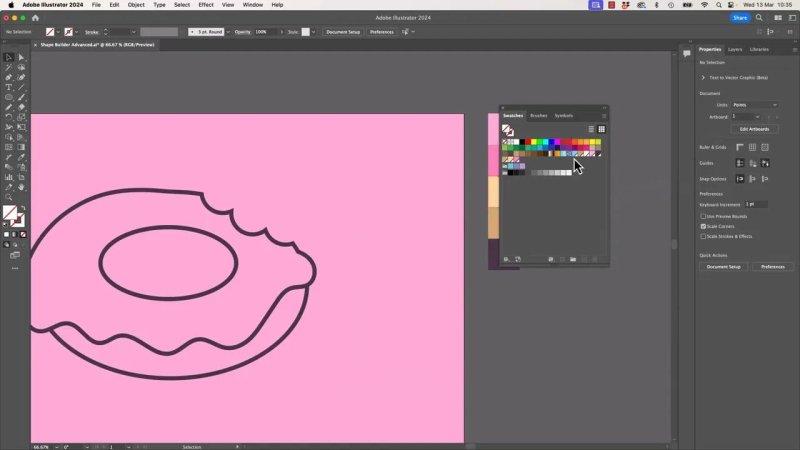
That is perfect for building something like a donut bite mark. Start with your donut ring and a few overlapping circles where the bite should be. With subtract mode active, drag through those little circular overlaps until the bite is carved out.
If it misses a segment, do another pass. That is normal when several small regions sit tightly together.
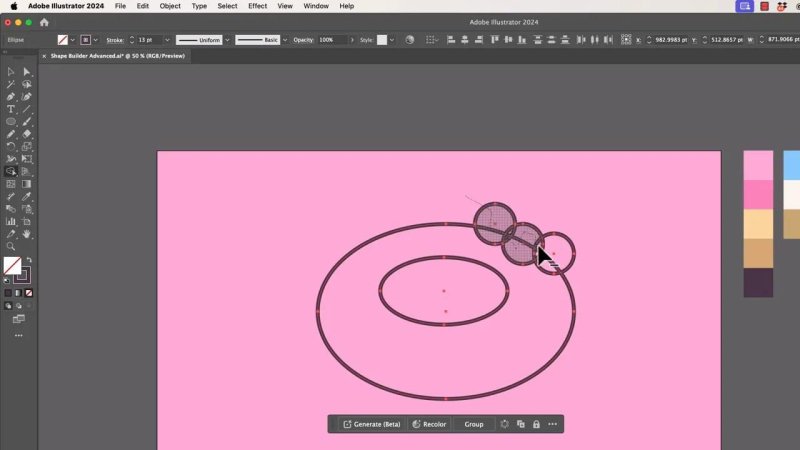
Subtract mode is where Shape Builder starts feeling properly useful.
Use Shape Builder with hand-drawn lines, even when they do not quite connect
This is where things get much more interesting.
Say you draw icing with the Pencil tool and the line does not perfectly overlap the donut edge. Normally, that tiny gap stops Shape Builder from recognising the region as fillable.
Instead of redrawing everything, you can make Shape Builder more forgiving.
Draw your icing shape first
Choose the Pencil tool with N, then double click it and push the smoothing up so your line comes out cleaner.
Draw the icing in one loose pass, but intentionally leave a small gap where it nearly meets the donut edge. If you are not sure whether there is really a gap, switch to Outline Mode with Cmd + Y on Mac or Ctrl + Y on Windows. That gives you a clean wireframe view so you can inspect the join properly.
If something is slightly off, use the Direct Selection tool to nudge anchor points until the gap is where you want it. The goal here is not overlap. The goal is a near miss.
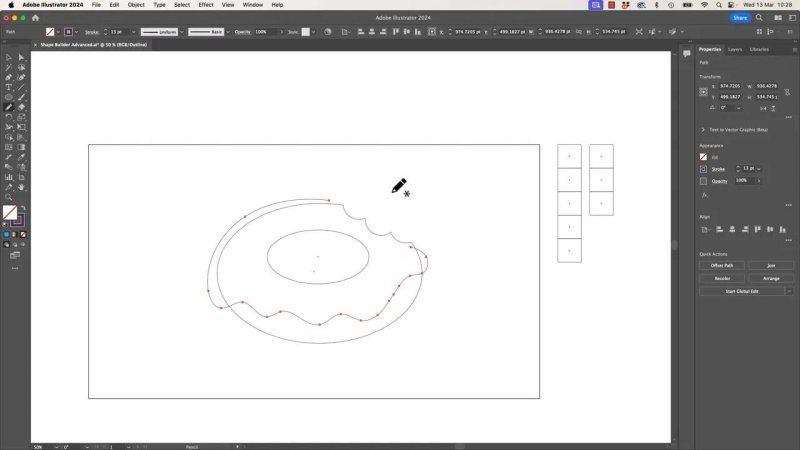
Outline Mode makes tiny path gaps obvious, which is exactly what you need before turning on gap detection.
Turn on gap detection
Double click the Shape Builder tool to open its options. This is a good habit in Illustrator generally, because a lot of the useful settings are hidden behind double clicking tools.
In the Shape Builder options, enable Gap Detection.
Then choose a size:
Small for very tiny gaps
Medium for slightly bigger ones
Large if your paths are close but still not closing
Custom if you need to force Illustrator to tolerate a much wider gap
If small and large do not work, jump straight to custom and increase the value until Shape Builder can see the region.
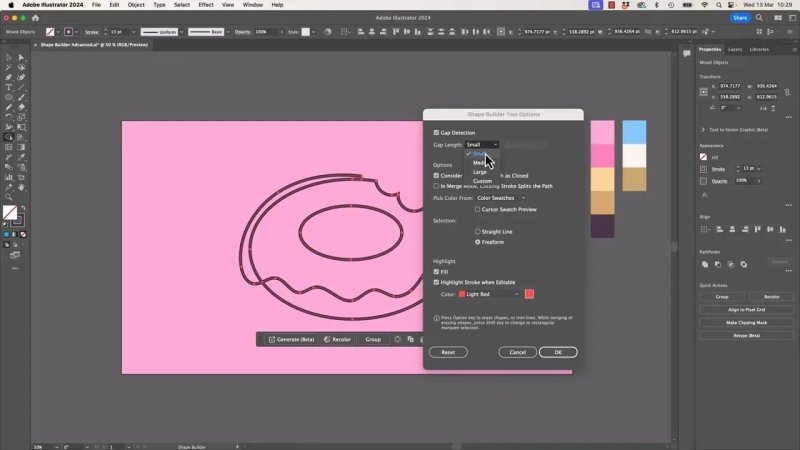
Gap detection is the feature that rescues loose drawing and imperfect overlaps.
Merge the icing anyway
Once gap detection is enabled, reselect the artwork, go back to Shape Builder, and drag across the icing areas you want combined.
Even though the paths are not perfectly joined, Illustrator can now treat them as a valid enclosed area and merge them for you.
This is especially useful for:
hand-drawn illustrations
live traced artwork
messy client files
any line art where everything is close, but not quite touching
Clean up the awkward bits afterwards
Gap detection helps you fill the region, but it will not magically make every edge beautiful. You may still get a slightly lumpy corner or a strange little tab where lines met badly.
When that happens:
use subtract mode to remove unwanted little pieces
switch to the Direct Selection tool
move anchor points around to smooth the result
This combination is excellent. Use Shape Builder to do the heavy lifting fast, then tidy the last five percent manually.
Understand where Shape Builder gets its colour from
One of the most confusing things about Shape Builder is that it seems to pick colours at random. It is not random. It is just using whatever your current fill and stroke settings are.
If your fill is set to none and your stroke is purple, the new shapes you create may inherit exactly that. If you were working on something else a minute ago, that can feel a bit chaotic.
The fix is simple: be intentional about colour before you start merging and filling.
Build a swatch set first, then colour with Shape Builder
If you are colouring an illustration, it is much easier to load the colours you want into the Swatches panel and use those as your palette.
Here is the workflow:
Deselect everything.
Open Window > Swatches.
Select the colours you want to use.
Choose Add All Selected Colours so they become swatches.
Now when you use Shape Builder, it can pull from that swatch set rather than whatever random fill and stroke were active last.
A proper swatch set turns Shape Builder into a much faster colouring tool.
Colour regions directly as you build
Once the swatches are ready, select your artwork, switch to Shape Builder, and choose the colour you want before clicking or dragging through regions.
That makes it easy to set the icing one colour and the donut base another without breaking your flow.
For a simple donut, that might mean:
pink icing on top
a biscuit or dough colour underneath
lighter or darker accent colours for sprinkles
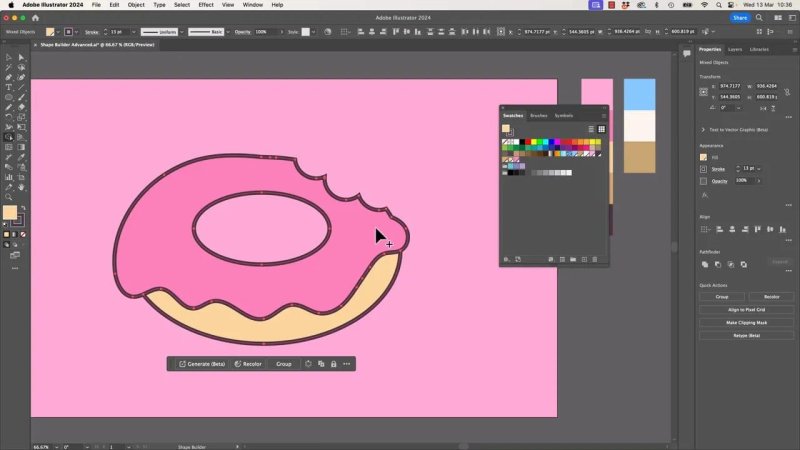
Once the swatches are set up, filling major illustration regions becomes very quick.
Turn on swatch preview and cycle colours from the keyboard
This is one of the handiest advanced Shape Builder tricks for illustration work.
Double click the Shape Builder tool and enable:
Pick Color From Color Swatches
Swatch Preview
With that turned on, Illustrator shows the current colour choice near your cursor, along with adjacent swatches. Then you can use the left and right arrow keys to cycle through your swatches without constantly mousing back to the panel.
It takes a minute to get used to, but once it clicks, it is brilliant for colouring larger illustrations quickly.
You can move through the palette, hover over a region, and click to apply the active swatch. Then tap an arrow key, move to the next region, and keep going.
That rhythm is much faster than selecting a fill colour from the panel every single time.
You can also use custom colours instead of swatches
If you do not want to work from a saved swatch, you can still set the current fill colour manually.
Select the artwork, go to Shape Builder, double click the fill swatch, choose the exact colour you want, then click into the region you want to fill.
The only real difference is that you lose the convenience of cycling neatly through a prepared palette.
Make rounded sprinkles the easy way
For the donut sprinkles, you do not need to draw each one from scratch.
A quick approach is:
Select the Rounded Rectangle tool.
Draw a narrow rounded shape.
If the corners are not rounded enough, use the corner widgets or properties controls to pull them in fully.
Rotate the shape.
Duplicate it several times.
Scatter the copies around the icing.
Because Scale Corners was enabled earlier, resizing those shapes keeps the ends nicely rounded rather than flattening them awkwardly.
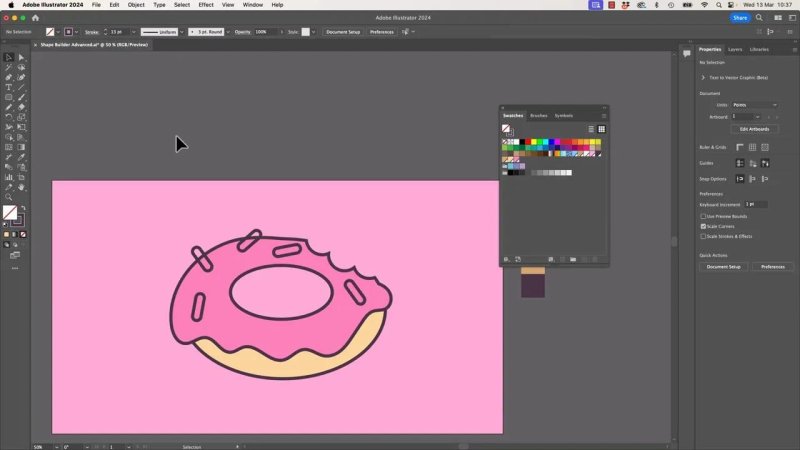
Rounded rectangles make tidy sprinkles fast, and Shape Builder can colour them just as easily as the larger regions.
A faster way to merge everything at once
Sometimes you do not want to carefully drag through individual regions. You just want to squash the whole lot into one flat icon.
Shape Builder can do that too.
With all relevant objects selected, hold Shift while dragging with the Shape Builder tool. Instead of tracing through small regions one by one, Illustrator merges the lot in one pass.
Think of it as a quick, Shape Builder flavoured version of Pathfinder Unite.
This is useful when:
you want a single silhouette
you are building a flat icon
you want to simplify artwork before recolouring or exporting
The obscure option that splits strokes
There is one setting tucked inside the Shape Builder options that is not especially obvious: In Merge Mode, Clicking Strokes Splits the Path.
The name is not exactly friendly, but the behaviour is useful in the right situation.
When this is enabled, clicking on a stroke where paths overlap can slice the path at that point. It is a bit like using the Scissors tool, but often quicker for simple overlaps.
Imagine two circles overlapping. With that option on:
select both circles
use Shape Builder
click the stroke where the overlap occurs
At first glance it may look like nothing happened. But if you then deselect and inspect the shapes, you will find the paths have been cut where they crossed.
I do not use this all the time, but if you do a lot of line based illustration, it may be exactly the niche shortcut you needed.
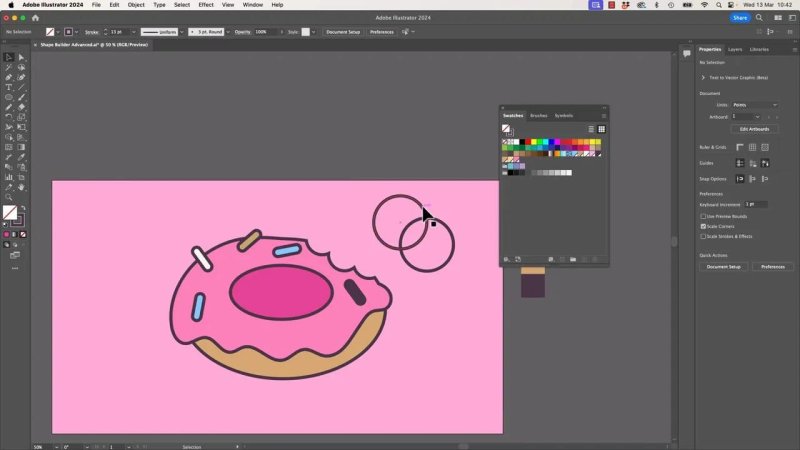
This stroke-splitting option is easy to miss, but handy when overlapping paths need a quick cut.
When Shape Builder does not work, check these things first
If the tool is being stubborn, run through this checklist:
Are all relevant shapes selected? Shape Builder only works on selected artwork.
Are the paths actually overlapping or close enough? If not, gap detection may need adjusting.
Is gap detection turned on? It is off by default in many setups.
Is the gap too large for the current setting? Try custom and increase the value.
Are your fill and stroke settings weird? The resulting colour may be inherited from your current active settings.
Did a tiny unwanted region get left behind? Use subtract mode and remove it.
Does the result look lumpy? Clean it up with Direct Selection rather than redrawing the whole thing.
Reset the tool before you move on
If you have been experimenting with custom settings, it is worth opening the Shape Builder options and resetting things before you finish.
A sensible setup is:
reset the tool to default behaviour if needed
turn gap detection back on if you want it available next time
leave the settings in a state that suits the kind of work you do most often
Illustrator tends to remember those settings, so a quick reset now can save confusion later.
Why this tool is so useful
The Shape Builder tool is not just for combining circles into logos. It is one of the fastest ways to clean line art, build illustrated forms, patch imperfect drawings, and colour artwork without getting lost in more complicated commands.
The big upgrades are these:
use Alt or Option to subtract regions fast
turn on Gap Detection to rescue nearly closed paths
prepare a Swatches palette to colour intentionally
enable Swatch Preview to cycle colours with arrow keys
hold Shift to merge everything in one go
use the stroke splitting option when overlapping paths need cutting
Once those become part of your workflow, Shape Builder stops being a basic merge tool and starts feeling like one of Illustrator's most flexible illustration shortcuts.
FAQ
What is the shortcut for the Shape Builder tool in Illustrator?
The shortcut is Shift + M. That switches directly to the Shape Builder tool from the keyboard.
How do you subtract shapes with Shape Builder?
Hold Alt on Windows or Option on Mac while using the Shape Builder tool. Then click or drag across the regions you want to remove.
Why is Shape Builder not filling a gap?
The most common reason is that Gap Detection is turned off, or the gap is bigger than the current tolerance setting. Double click the tool, enable gap detection, and try a larger or custom gap size.
How do you colour with the Shape Builder tool?
Set up your fill colour or prepare a swatch palette first, then use Shape Builder to click into regions as you merge or fill them. Turning on Swatch Preview makes it easier to cycle through colours with the keyboard.
Can Shape Builder split paths as well as merge them?
Yes. In the Shape Builder tool options, enable In Merge Mode, Clicking Strokes Splits the Path. That lets you cut overlapping paths in a quicker, more visual way.
- Powered by Marvin
- Terms of use
- Privacy policy
- Cookie policy
-
- © Bring your Own Laptop Ltd 2026