How to master corners with corner widget effects
Questions

Student Gallery
Course info
Overview
- - How to use artificial intelligence to boost your creativity in ideation.
- - The quick way to take hand-drawn sketches and vectorize and color them.
- - The building blocks needed to set you loose on a huge variety of beautiful effects and techniques.
- - To make beautiful charts and graphs for your documents.
- - Color mastery to make quick color adjustments, Pantones, and blend it all together beautifully.
- - How to master images inside of your illustrator workflow.
- - To harness all the secret gems that'll help you level up your typography skills.
- - All the tricks of the trade for drawing complex shapes easily.
- - To double your creativity with the Transform and Distort section.
- - To speed up your personal workflow to get the most out of your creative day.
- The Curvature Tool
- How to master corners with corner widget effects
- How to work with Compound Paths
- The difference between Expand & Expand Appearance
- How to create Graphic Styles
- How to make Symbols
- How to use the Smooth Tool
- Advanced use of Simplify Path
- What Live Shape Effects are for
- How to make Repeating Grids & Concentric Circles
- How to make Random Objects
- Advanced Keyboard Shortcuts in Illustrator
- How to add a Gradient on a Stroke
- How to add a Gradient in Text
- How to use the Freeform Gradient tool
- How to use Advanced Color Swatches
- How to use Global Color Swatches
- What is the difference between RGB vs CMYK color modes?
- How to proof colors
- How to use Pantone Spot Colors
- Recolor Artwork & Changing all colors at once
- How to use Blending Modes
- How to work with Images & Blending Modes
- How to make Black & White Images
- Learn Advanced Workflow Tricks
- All the Super Selection Mastery
- How to use the History Panel
- Advanced Fonts Tricks & Tips
- Use Retype to know what Font is being used
- How to put Text Inside a Letter or Shape
- How to use the Touch Type Tool
- How to add a Connected Stroke Around Multiple Shapes
- How to Offset a Stroke with Text
- How to make a Bar Chart in Illustrator
- How to make a Pie Chart in Illustrator
- Layer Power Moves
- Advanced Artboard & Pages Tricks
- How to Unlink vs Embedded Images
- How to Crop Images Rather than Mask
- How to Mask Inside Text & Multiple Shapes
- How to you use the Puppet Warp Tool
- How to use the Distort Envelope Shape & Type
- How to use the Envelope Mesh
- How to blend lines together
- How to make a Linocut Effect
- How to make 3D Gradient Lettering Blends
- How to spin text into a ring
- How to turn text into a 3D donut shape
- How to make a Duotone image effect
- How to make a Roughen Stamp Vector Effect
- How to make a Neon Sign Glow Effect
- How to use a Halftone Effect using Plugins
- Advanced Exporting Assets Tricks in Illustrator
- How to use the Dimension Tool
So what're you waiting for? Let's start the course now!

Daniel Walter Scott
Founder of Bring Your Own Laptop & Chief Instructor
I discovered the world of design as an art student when I stumbled upon a lab full of green & blue iMac G3’s. My initial curiosity around using the computer to create ‘art’ developed into a full-blown passion, eventually leading me to become a digital designer and founder of Bring Your Own Laptop.
Sharing and teaching are a huge part of who I am. As a certified Adobe instructor, I've had the honor of winning multiple Adobe teaching awards at their annual MAX conference. I see Bring Your Own Laptop as the supportive community I wished for when I was first starting out and intimidated by design. Through teaching, I hope to bring others along for the ride and empower my students to bring their stories, labors of love, and art into the world.
True to my Kiwi roots, I've lived in many places, and currently, I reside in Ireland with my wife and kids.
Certificates
We’re awarding certificates for this course!
Check out the How to earn your certificate video for instructions on how to earn yours and click the available certificate levels below for more information.
Downloads & Exercise files
How do you use Corner Widgets in Adobe Illustrator?
Select a shape, look for the small circular targets near each corner, and drag them to round or reshape the corners. If the targets are missing, turn them on from View > Show Corner Widgets, or switch to the Direct Selection tool to access corners on more complex paths.
Adobe Illustrator Corner Widgets: How to Master Rounded, Inverted, and Live Shape Corners
Corner Widgets are one of those Illustrator features that look tiny and innocent, then quietly turn into one of the fastest ways to shape artwork like you actually know what you are doing.
They are the little targets that appear near the corners of selected shapes. Drag them, click them with modifier keys, or edit them through the Transform panel, and suddenly rectangles, custom paths, and stars become a lot more flexible.
This is the good stuff: how to find Corner Widgets, why they behave differently on Live Shapes, how to round one corner instead of all four, and how to get those weird little fancy corner effects when plain rounding is too polite.
What Corner Widgets are
Corner Widgets are the small circular controls that appear near a shape's corners in Illustrator. They let you reshape corners without manually adjusting anchor points and handles.
On a basic rectangle, they usually show up automatically when the shape is selected. Drag one inward and all four corners round together. That happens because Illustrator knows it is dealing with a true rectangle, not just four points that happen to form one.
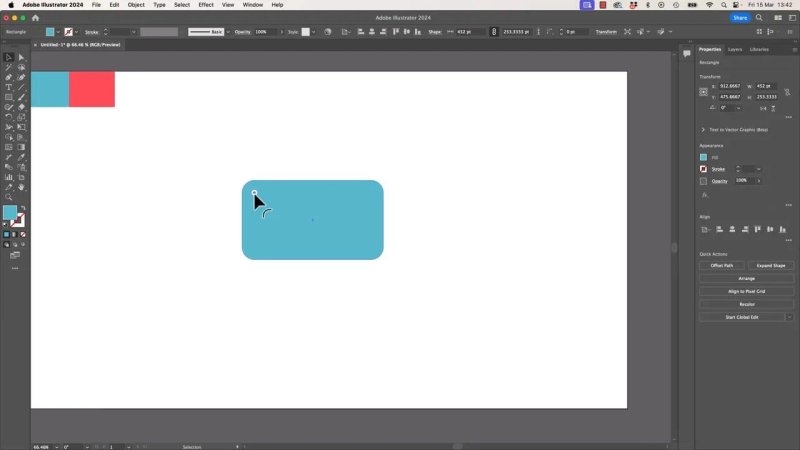
A plain rectangle turns into a rounded card shape in one drag.
If you cannot see Corner Widgets
If the little corner targets are missing, start with the obvious fix:
Go to View
Choose Show Corner Widgets
If that still does not sort it out, switch tools.
For standard shapes, the Selection tool, also called the black arrow, often shows them just fine. But for less regular shapes, you may need the Direct Selection tool, which is the white arrow or the A key.
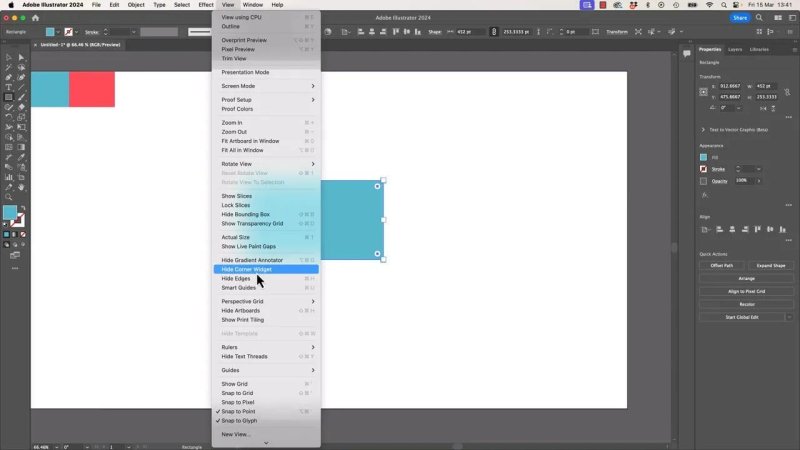
If the targets vanish, this menu option is the first place to check.
Why rectangles behave differently from custom shapes
This is where Illustrator gets a bit picky.
A real rectangle made with the Rectangle tool is a Live Shape. Illustrator recognises it as a rectangle and gives it extra editable properties. A custom shape drawn with the Pen tool might look rectangular, but Illustrator no longer treats it as an actual rectangle.
That difference matters because:
Live Shapes show their corner controls more readily
Custom paths often need the Direct Selection tool to reveal editable corners
Live Shapes can expose extra options in the Transform panel
Custom paths lose some of that built in structure
So if something worked a minute ago and suddenly does not, that is usually the reason. You may have stopped working with a Live Shape.
How to round all corners at once
On a selected rectangle or other supported shape, grab one of the corner widgets and drag inward.
If the shape has matching corners, Illustrator often rounds them all together. That is the quickest way to make:
buttons
cards
panels
soft label shapes
those friendly UI blocks everyone seems to love
It is fast, clean, and far better than fiddling around with anchor points for something this simple.
How to edit only one corner
If you want one corner to behave differently, you need to be more deliberate with your selection.
Using the Direct Selection tool:
Select the shape.
Drag a small selection around the specific corner area.
Once only that corner is active, drag its widget.
That gives you control over a single corner instead of forcing all corners to come along for the ride.
This is the trick behind asymmetrical shapes and those little callout style boxes with only one altered edge.
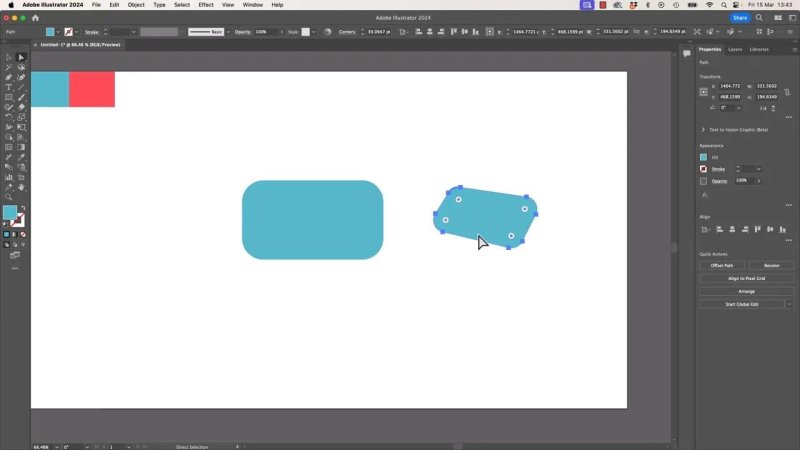
Selective corner editing is what gets you beyond generic rounded rectangles.
More than rounded: inverted and chamfered corners
Corner Widgets are not limited to regular rounded corners.
Hold Option on Mac or Alt on Windows and click a corner widget to cycle through different corner types. Illustrator lets you move between:
Round corners
Inverted round corners, the little inward scoops
Chamfered or flat cut corners
That is where things get more interesting. You can turn a basic box into something that feels like a label, a ticket, a teardrop callout, or one of those brochure feature panels that somehow never completely go out of style.
Even if you mostly use regular rounding, it is worth remembering those other corner types exist. They are excellent for adding shape language without needing a custom path from scratch.
Live Shape perks inside the Transform panel
Live Shapes get special treatment in the Transform panel.
If you open Window > Transform, a true rectangle shows extra rectangle properties that a custom drawn shape does not. That is your clue that Illustrator still recognises the object as editable geometry rather than just a general path.
Inside those properties, you can:
change the corner type
set exact corner values
unlink corners so each one can be edited independently
nudge values precisely with the keyboard
So instead of eyeballing everything with a drag, you can be exact.
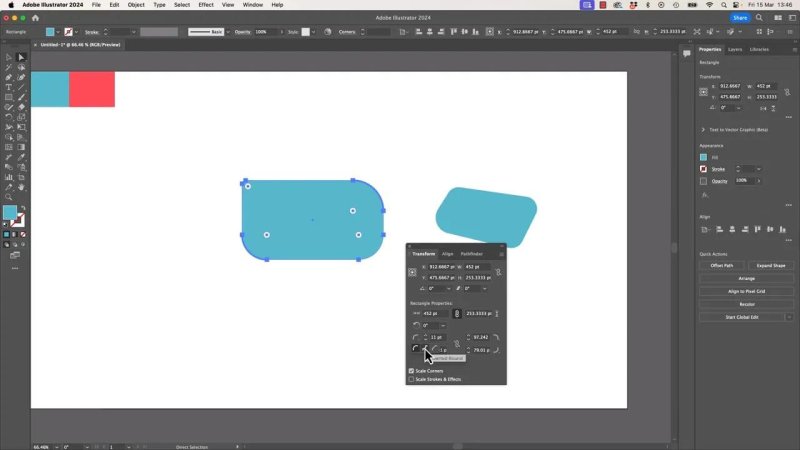
Live Shape properties give you precise corner control when dragging is not enough.
Once the corners are unlinked, you can give each one its own size and style. One corner can be an inward notch, another can stay rounded, another can be flat. That is the difference between a generic shape and one that looks intentional.
Why some shapes have corner controls and others do not
This is the short version:
If Illustrator sees a shape as a Live Shape, you get richer corner and shape controls.
If it is just a regular path, you still might get corner widgets, but not the full set of editable properties.
If you are using the wrong selection tool, it can look like the controls disappeared when they have not.
That is why a rectangle and a hand drawn four sided shape can look nearly identical but behave very differently.
Star tool corner controls are even better than they look
The Star tool is another Live Shape, and it comes with its own very fun set of controls.
When a star is selected, Illustrator gives you star properties in the Transform panel. You can adjust:
the inner radius
the outer radius
the number of points
the corner style and radius
There are also on canvas controls for dragging the star's proportions directly. Instead of a million separate corner widgets, the star uses a couple of core controls that affect the whole structure.
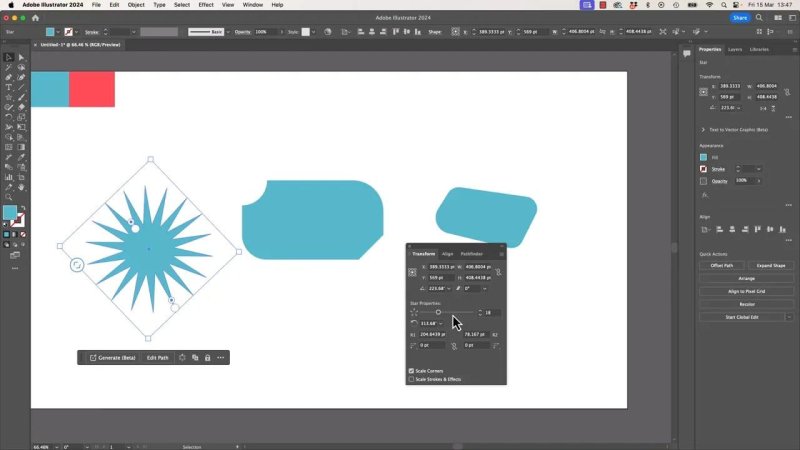
Stars are Live Shapes too, so you can reshape the whole thing without rebuilding it.
That means you can quickly morph a star from chunky and simple to spiky and wild, then soften it again just by adjusting the corners.
Round the corners and suddenly the star starts feeling less like a star and more like a biscuit, seal, badge, or decorative burst. Which is honestly a pretty great range for one tool.
How to round star points properly
If you want rounded star points, change the corner type to rounded and then increase the corner radius from zero.
The zero part matters. A rounded corner with a value of zero is still effectively pointy. Once you give it an actual value, the star softens up and becomes much more usable for logos, badges, stickers, and graphic labels.
You can push the number of points on screen only so far, but the Transform panel lets you type in higher values if you want to get excessive. And sometimes excessive is correct.
Absolute vs relative rounding
This is the subtle one, but it is useful.
When you double click a corner widget, Illustrator opens additional corner options. One of the settings lets you switch between Absolute and Relative rounding.
Absolute rounding is the default. It creates a standard, even corner radius.
Relative rounding follows the angle and direction of the surrounding lines more closely. Instead of looking like a perfect quarter circle dropped into the corner, it can feel more integrated with the shape's geometry.
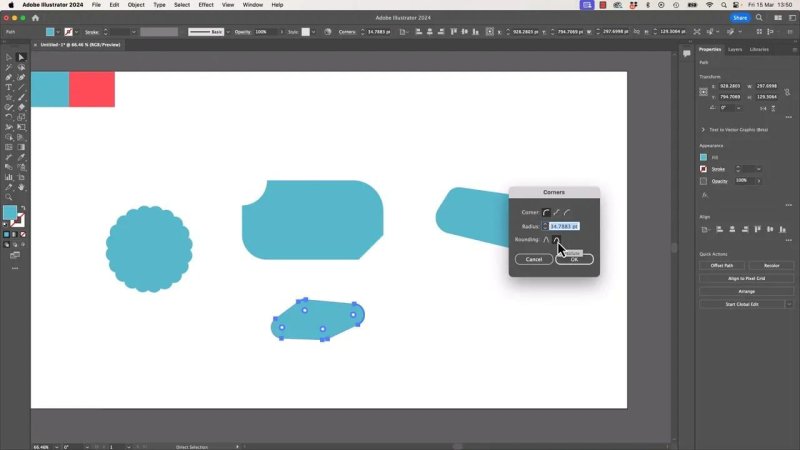
Relative rounding can produce a shape that feels more faithful to the original angles.
You will notice the difference most clearly on irregular or angled shapes. On some corners, especially where the lines are almost symmetrical, the change can be subtle. On others, the result is much more dramatic.
If a rounded corner looks too generic or too mathematically perfect, try relative rounding. It often gives the shape a better flow.
How to apply corner options to multiple corners
If you want to change the corner settings for more than one corner at the same time, make sure those corners are actually selected first.
That means:
Use the Direct Selection tool.
Shift select the corners you want to edit.
Double click one of the selected corner widgets.
If only one corner is selected, Illustrator only edits that one. This catches a lot of people out because it looks like the command should affect the whole shape, but it only works on the active corners.
When Corner Widgets are most useful
Once you get the hang of them, Corner Widgets are ideal for:
UI elements and cards
infographic panels
labels and tickets
callout boxes
stylised icons
logos built from simple geometry
softening harsh vector shapes quickly
The real win is speed. You can experiment quickly, keep shapes editable longer, and avoid overcommitting to custom anchor point editing too early.
Live Shape pros and cons
Pros
Fast corner editing
Precise values in the Transform panel
Easier experimentation
Shape specific controls for rectangles and stars
Independent corners when unlinked
Cons
Not every path remains a Live Shape
Custom drawn shapes lose some advanced properties
Controls can seem inconsistent if you switch between black and white arrow tools
Some options are tucked away and easy to miss
So yes, Live Shapes are brilliant, but only while Illustrator still recognises them as Live Shapes.
FAQ
Why are Corner Widgets not showing in Illustrator?
Turn them on from View > Show Corner Widgets. If they still do not appear, select the object and try the Direct Selection tool instead of the standard Selection tool.
How do I round only one corner in Illustrator?
Use the Direct Selection tool, select only the corner you want, and drag its widget. If the full shape is selected, Illustrator may adjust multiple corners together.
What is a Live Shape in Illustrator?
A Live Shape is an object Illustrator still recognises as a specific editable shape, such as a rectangle or star. That gives you extra controls in the Transform panel, including corner types, radii, and shape specific properties.
How do I change a corner from rounded to inverted or chamfered?
Hold Option on Mac or Alt on Windows and click the corner widget to cycle through the available corner styles. This lets you switch between rounded, inverted, and flat cut corners.
What is the difference between absolute and relative rounding?
Absolute rounding creates a standard corner radius. Relative rounding shapes the corner in a way that follows the direction and angle of the surrounding lines more closely, which can look better on irregular forms.
Can I edit star corners with Corner Widgets?
Yes. Stars are Live Shapes, so you can adjust their points, inner and outer radius, and corner style through both on canvas controls and the Transform panel.
You do not need a huge feature set to get better in Illustrator. Sometimes it is just learning what the little targets in the corners can really do.
Master those, and suddenly your shapes stop looking default.
Written by Daniel Walter Scott — Founder of Bring Your Own Laptop & Chief Instructor
