What are Live Shape Effects in Illustrator?
Questions


Student Gallery
Course info
Overview
- - How to use artificial intelligence to boost your creativity in ideation.
- - The quick way to take hand-drawn sketches and vectorize and color them.
- - The building blocks needed to set you loose on a huge variety of beautiful effects and techniques.
- - To make beautiful charts and graphs for your documents.
- - Color mastery to make quick color adjustments, Pantones, and blend it all together beautifully.
- - How to master images inside of your illustrator workflow.
- - To harness all the secret gems that'll help you level up your typography skills.
- - All the tricks of the trade for drawing complex shapes easily.
- - To double your creativity with the Transform and Distort section.
- - To speed up your personal workflow to get the most out of your creative day.
- The Curvature Tool
- How to master corners with corner widget effects
- How to work with Compound Paths
- The difference between Expand & Expand Appearance
- How to create Graphic Styles
- How to make Symbols
- How to use the Smooth Tool
- Advanced use of Simplify Path
- What Live Shape Effects are for
- How to make Repeating Grids & Concentric Circles
- How to make Random Objects
- Advanced Keyboard Shortcuts in Illustrator
- How to add a Gradient on a Stroke
- How to add a Gradient in Text
- How to use the Freeform Gradient tool
- How to use Advanced Color Swatches
- How to use Global Color Swatches
- What is the difference between RGB vs CMYK color modes?
- How to proof colors
- How to use Pantone Spot Colors
- Recolor Artwork & Changing all colors at once
- How to use Blending Modes
- How to work with Images & Blending Modes
- How to make Black & White Images
- Learn Advanced Workflow Tricks
- All the Super Selection Mastery
- How to use the History Panel
- Advanced Fonts Tricks & Tips
- Use Retype to know what Font is being used
- How to put Text Inside a Letter or Shape
- How to use the Touch Type Tool
- How to add a Connected Stroke Around Multiple Shapes
- How to Offset a Stroke with Text
- How to make a Bar Chart in Illustrator
- How to make a Pie Chart in Illustrator
- Layer Power Moves
- Advanced Artboard & Pages Tricks
- How to Unlink vs Embedded Images
- How to Crop Images Rather than Mask
- How to Mask Inside Text & Multiple Shapes
- How to you use the Puppet Warp Tool
- How to use the Distort Envelope Shape & Type
- How to use the Envelope Mesh
- How to blend lines together
- How to make a Linocut Effect
- How to make 3D Gradient Lettering Blends
- How to spin text into a ring
- How to turn text into a 3D donut shape
- How to make a Duotone image effect
- How to make a Roughen Stamp Vector Effect
- How to make a Neon Sign Glow Effect
- How to use a Halftone Effect using Plugins
- Advanced Exporting Assets Tricks in Illustrator
- How to use the Dimension Tool
So what're you waiting for? Let's start the course now!

Daniel Scott
Founder of Bring Your Own Laptop & Chief Instructor
instructorI discovered the world of design as an art student when I stumbled upon a lab full of green & blue iMac G3’s. My initial curiosity around using the computer to create ‘art’ developed into a full-blown passion, eventually leading me to become a digital designer and founder of Bring Your Own Laptop.
Sharing and teaching are a huge part of who I am. As a certified Adobe instructor, I've had the honor of winning multiple Adobe teaching awards at their annual MAX conference. I see Bring Your Own Laptop as the supportive community I wished for when I was first starting out and intimidated by design. Through teaching, I hope to bring others along for the ride and empower my students to bring their stories, labors of love, and art into the world.
True to my Kiwi roots, I've lived in many places, and currently, I reside in Ireland with my wife and kids.
Certificates
We’re awarding certificates for this course!
Check out the How to earn your certificate video for instructions on how to earn yours and click the available certificate levels below for more information.
Downloads & Exercise files
How do Live Shape Effects work in Adobe Illustrator?
Live Shape Effects let you edit shapes like ellipses, polygons, and stars after you draw them by using on-canvas widgets or the Transform panel. They are brilliant for making things like pie charts, triangles, badges, and starbursts quickly, but they stop being live once you expand or manually alter the shape in the wrong way.
How to Use Live Shape Effects in Adobe Illustrator
Live Shape Effects are one of those Illustrator features that feel a bit sneaky. They sit there quietly on shapes you probably use all the time, and then suddenly you realise you can turn a circle into a Pac-Man, a polygon into a perfect triangle, or a star into a proper badge without redrawing anything.
They are genuinely useful, and not just for making weird little novelty shapes. They are especially handy when you need clean, editable geometry fast.
What Live Shape Effects apply to
Live Shape Effects work on specific shape tools in Illustrator. The main ones here are:
Rectangle Tool
Ellipse Tool
Polygon Tool
Star Tool
Not every tool in that group behaves the same way. For example, the Flare Tool is not joining the party here.
The important thing is this: these effects only stay live when the shape is still treated as a live shape. Once you break that state, the extra controls disappear.
The basic idea behind live shapes
When a live shape is selected, Illustrator shows small on-canvas widgets. These little handles let you change the shape visually without rebuilding it from scratch.
Sometimes that means opening or closing an ellipse. Sometimes it means increasing the number of sides on a polygon. Sometimes it means turning a starburst into a softer badge.
It is quick, visual, and a lot more flexible than the old approach of drawing a shape, realising it is wrong, deleting it, and starting again.
This is the kind of payoff Live Shapes give you: one set of simple tools, lots of editable outcomes.
Using Live Shape Effects on an ellipse
Start with the Ellipse Tool and draw a circle or ellipse. Once it is selected, you will see the live shape widget.
Drag that widget and the ellipse opens up into a wedge shape. That is the classic Pac-Man look, though it is probably more useful as a pie slice than as retro arcade fan art.
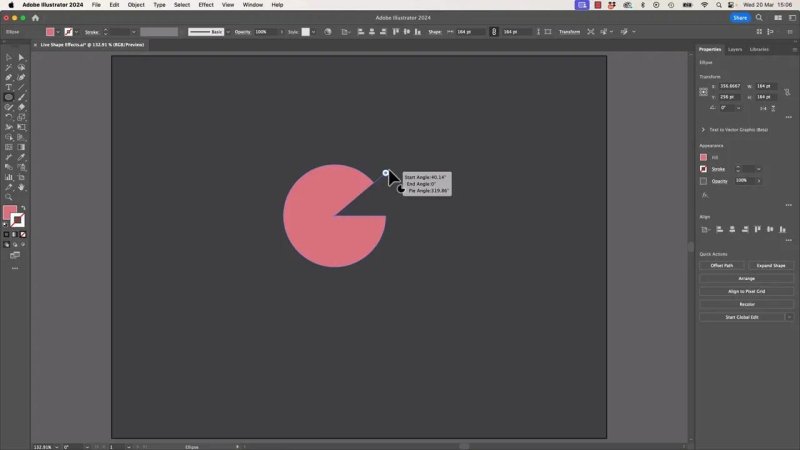
A plain ellipse can become a pie slice just by dragging the live widget.
That single feature is great for:
Pie charts
Circular progress graphics
Cutaway diagrams
Simple icon work
Use the Transform panel for precise control
You can drag the widget by eye, but for anything that needs accuracy, open the Transform panel.
That panel gives you ellipse-specific controls, including:
Width and height
Start angle
End angle
Direction options for flipping the arc
This is where things become much more practical. Instead of guessing, you can type the angles in directly.
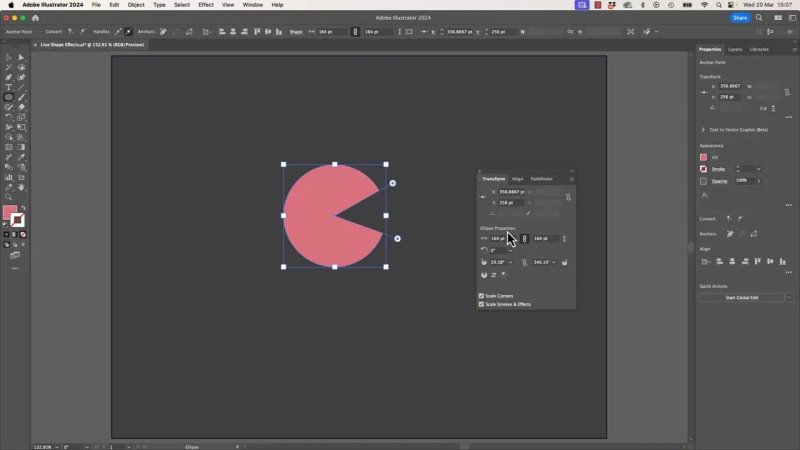
The Transform panel is where live ellipses stop being guesswork and start being precise.
If you ever want to reset the ellipse back to a full circle, double-click the live shape widget and Illustrator clears the effect.
How live shapes get broken
This is the bit that catches a lot of people.
If you switch to the Direct Selection Tool and start moving anchor points around, Illustrator can convert the object from a live shape into an expanded one. Once that happens, those lovely editable controls vanish.
So yes, Live Shape Effects are very handy, but they are also easy to lose.
If you break one by accident and catch it quickly, just undo.
Using the Polygon Tool for perfect triangles and more
The Polygon Tool is probably one of the most useful live shape tools in the whole set.
Draw a polygon, select it, and look for its live shape widget. It is not always in the same place as the ellipse widget, which is mildly annoying, but once you find it you can drag to change the number of sides.
That means you can go from:
Triangle
Square-ish polygon forms
Pentagon
Hexagon
All the other gons that everyone pretends to remember
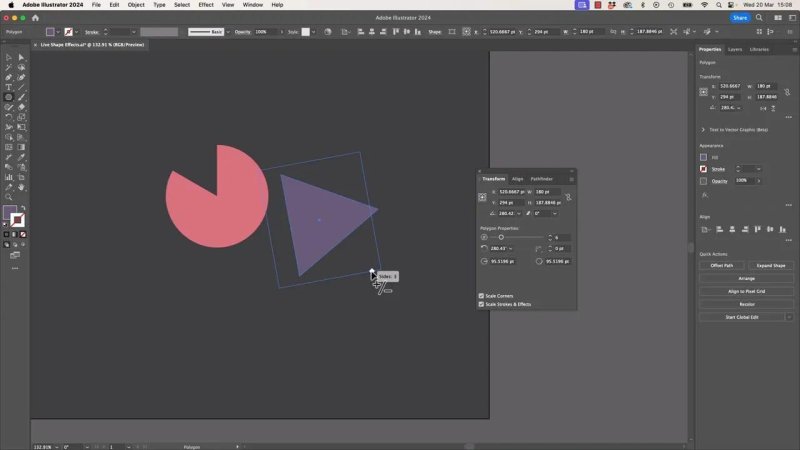
One of the easiest wins here is making a perfect triangle without wrestling with the Pen tool.
One especially useful trick is dragging the polygon down to three sides. That gives you a perfect triangle instantly.
If you have ever tried to draw a mathematically tidy triangle with the Pen tool, you already know why this matters.
Using the Star Tool to control points, sharpness, and rounded corners
The Star Tool has some of the most flexible Live Shape controls in Illustrator.
Draw a star and you can then adjust it after the fact, which is a major improvement over the older way of doing things.
Previously, if you wanted a star with a certain number of points, you often clicked once with the Star Tool, entered values, and hoped you got it right. If you changed your mind later, that usually meant starting again.
With live stars, you can keep editing.
What you can change on a live star
A live star gives you control over:
Number of points
Inner radius
Outer radius
Rounded corners
This means you can create very different looks from the same base shape:
A traditional star
A spiky starburst
A sun shape
A sticker or badge shape
A softer rounded burst
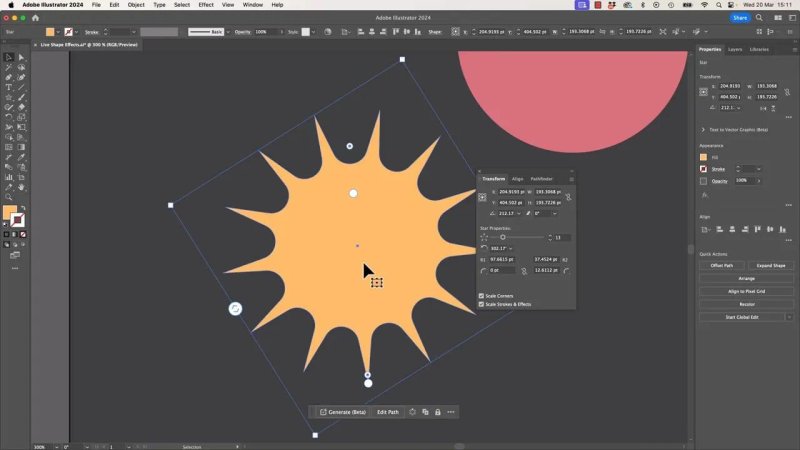
Stars are where Live Shapes get properly fun because the same object can become a burst, a sun, or a badge.
If you drag the inner radius outward, the centre opens up and the star begins to look more like a sunburst or promotional sticker. Pull it inward and it becomes more like a classic star.
There is also a separate live widget for corner rounding, so you can make the points feel softer without changing the overall structure.
A handy star trick with the keyboard
Here is a nice little bonus move.
While dragging out a star, before releasing the mouse, tap the Up Arrow or Down Arrow on the keyboard. That adds or removes points as you draw.
It is one of those tiny Illustrator tricks that makes you look far more organised than you might actually be.
When to expand a live shape
Most of the time, you are better off keeping the shape live for as long as possible.
That said, there are situations where you may need to expand the shape. For example:
Sending artwork to older production workflows
Preparing files for certain cutting or plotting systems
Needing a plain path instead of a live object
Once expanded, the shape still looks the same, but all the special live controls are gone.
So only do it when you actually need to.
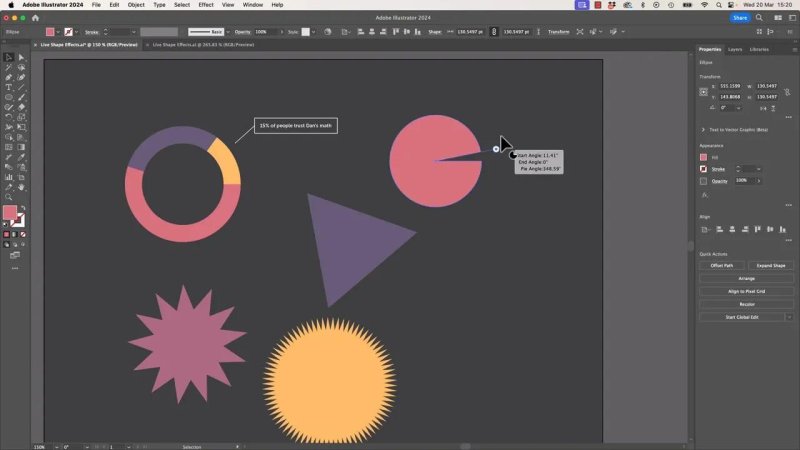
How to make a pie chart with Live Shape Effects
This is where the ellipse tool becomes properly practical.
If you need a pie chart segment that represents an exact percentage, dragging the wedge by eye is not enough. Instead, use the full circle value of 360 degrees and calculate the angle for each segment.
The formula
Use this:
360 x percentage as a decimal
Examples:
15% = 360 × 0.15 = 54 degrees
30% = 360 × 0.30 = 108 degrees
Type that result into the ellipse angle controls in the Transform panel and Illustrator creates the exact wedge size you need.
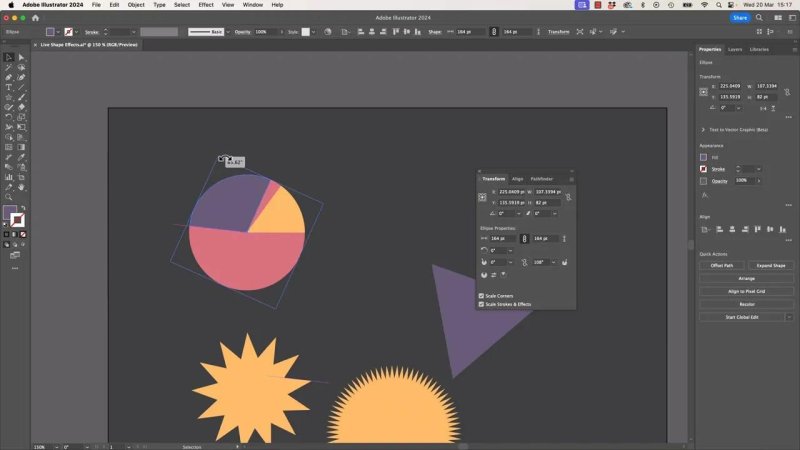
This is the fast, tidy way to build a pie chart when each segment needs an exact value.
A simple workflow for building the chart
Draw a full circle with the Ellipse Tool.
Duplicate it so you keep a base version handy.
Turn one copy into a wedge using Live Shape controls.
Use the Transform panel to enter the exact angle based on the percentage.
Bring the segment to the front if needed.
Duplicate for the next segment.
Change the colour and rotate it into place.
Use Smart Guides so the pieces snap neatly together.
That is a much cleaner method than trying to fake it with manually cut shapes.
Turning the pie chart into a donut chart
If a pie chart is nice, a donut chart is just a pie chart trying harder.
To create one, draw a smaller circle from the centre of the larger chart.
Use these shortcuts while drawing:
Alt on Windows or Option on Mac to draw from the centre
Add Shift to keep it a perfect circle
Then remove that centre area using the Shape Builder Tool. Make sure you are using Shift + M, not the Width Tool, which is the sort of tiny mistake that is very easy to make.
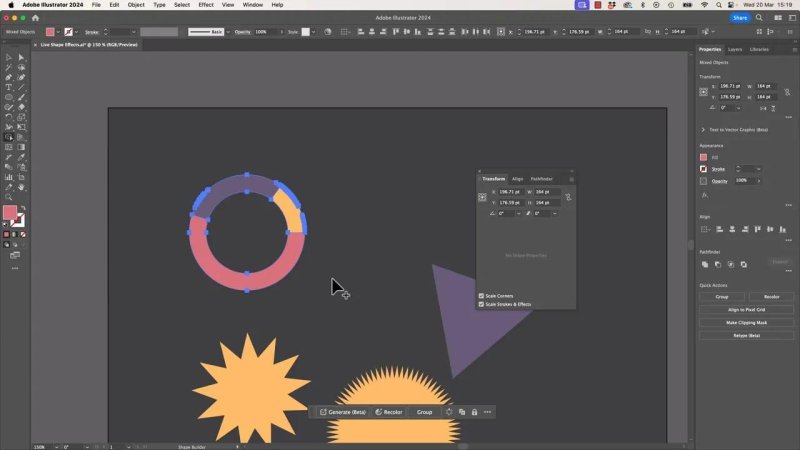
Once the centre is knocked out, the same pie chart becomes a cleaner donut-style graphic.
The result is a donut chart built from live shape wedges, which gives you a quick, editable graphic for presentations, infographics, or interface mockups.
Why some shapes show extra controls and others do not
If you have ever clicked a shape in Illustrator and wondered why it has odd little handles or widgets on it, this is usually the answer.
Those extra controls are Illustrator telling you the object is still a live shape.
If you do not see them, one of these is probably true:
The object was not created with a live shape tool
The shape has already been expanded
The anchor points were edited in a way that broke the live state
Once they are gone, you generally cannot just switch them back on for that exact object. That is why it is worth preserving the live version until you are sure you are finished.
Best ways to get more from Live Shape Effects
Use the Transform panel whenever precision matters.
Keep Smart Guides turned on for alignment and rotation.
Duplicate live shapes before making destructive changes.
Only expand when a workflow absolutely requires it.
Use polygons for perfect triangles instead of drawing them manually.
Use live stars for badges, bursts, and sticker shapes instead of building them point by point.
FAQ
Which Illustrator tools support Live Shape Effects?
The Rectangle, Ellipse, Polygon, and Star tools all support live shape editing. The Flare Tool does not behave the same way here.
Why did my Live Shape controls disappear?
The most common reason is that the shape was expanded or manually altered with the Direct Selection Tool. Once Illustrator converts it from a live shape to a regular path, the special controls are gone.
Can I make a perfect triangle in Illustrator without the Pen tool?
Yes. Draw a polygon and drag its live widget until it reaches three sides. That gives you a clean, perfect triangle instantly.
How do I create an exact pie chart segment in Illustrator?
Use an ellipse as a live shape and enter the wedge angle in the Transform panel. Calculate the angle with 360 multiplied by the percentage as a decimal.
How do I turn a pie chart into a donut chart?
Draw a smaller centred circle inside the pie chart and remove the middle using the Shape Builder Tool. Hold Alt or Option to draw from the centre, and Shift to keep the circle perfectly round.
Should I expand live shapes?
Only if you need to for compatibility with older production workflows or specific output requirements. In most cases, keeping the shape live gives you more flexibility.
- Powered by Marvin
- Terms of use
- Privacy policy
- Cookie policy
-
- © Bring your Own Laptop Ltd 2026