Learn Advanced Pen Tool Tricks
Questions


Student Gallery
Course info
Overview
- - How to use artificial intelligence to boost your creativity in ideation.
- - The quick way to take hand-drawn sketches and vectorize and color them.
- - The building blocks needed to set you loose on a huge variety of beautiful effects and techniques.
- - To make beautiful charts and graphs for your documents.
- - Color mastery to make quick color adjustments, Pantones, and blend it all together beautifully.
- - How to master images inside of your illustrator workflow.
- - To harness all the secret gems that'll help you level up your typography skills.
- - All the tricks of the trade for drawing complex shapes easily.
- - To double your creativity with the Transform and Distort section.
- - To speed up your personal workflow to get the most out of your creative day.
- The Curvature Tool
- How to master corners with corner widget effects
- How to work with Compound Paths
- The difference between Expand & Expand Appearance
- How to create Graphic Styles
- How to make Symbols
- How to use the Smooth Tool
- Advanced use of Simplify Path
- What Live Shape Effects are for
- How to make Repeating Grids & Concentric Circles
- How to make Random Objects
- Advanced Keyboard Shortcuts in Illustrator
- How to add a Gradient on a Stroke
- How to add a Gradient in Text
- How to use the Freeform Gradient tool
- How to use Advanced Color Swatches
- How to use Global Color Swatches
- What is the difference between RGB vs CMYK color modes?
- How to proof colors
- How to use Pantone Spot Colors
- Recolor Artwork & Changing all colors at once
- How to use Blending Modes
- How to work with Images & Blending Modes
- How to make Black & White Images
- Learn Advanced Workflow Tricks
- All the Super Selection Mastery
- How to use the History Panel
- Advanced Fonts Tricks & Tips
- Use Retype to know what Font is being used
- How to put Text Inside a Letter or Shape
- How to use the Touch Type Tool
- How to add a Connected Stroke Around Multiple Shapes
- How to Offset a Stroke with Text
- How to make a Bar Chart in Illustrator
- How to make a Pie Chart in Illustrator
- Layer Power Moves
- Advanced Artboard & Pages Tricks
- How to Unlink vs Embedded Images
- How to Crop Images Rather than Mask
- How to Mask Inside Text & Multiple Shapes
- How to you use the Puppet Warp Tool
- How to use the Distort Envelope Shape & Type
- How to use the Envelope Mesh
- How to blend lines together
- How to make a Linocut Effect
- How to make 3D Gradient Lettering Blends
- How to spin text into a ring
- How to turn text into a 3D donut shape
- How to make a Duotone image effect
- How to make a Roughen Stamp Vector Effect
- How to make a Neon Sign Glow Effect
- How to use a Halftone Effect using Plugins
- Advanced Exporting Assets Tricks in Illustrator
- How to use the Dimension Tool
So what're you waiting for? Let's start the course now!

Daniel Scott
Founder of Bring Your Own Laptop & Chief Instructor
instructorI discovered the world of design as an art student when I stumbled upon a lab full of green & blue iMac G3’s. My initial curiosity around using the computer to create ‘art’ developed into a full-blown passion, eventually leading me to become a digital designer and founder of Bring Your Own Laptop.
Sharing and teaching are a huge part of who I am. As a certified Adobe instructor, I've had the honor of winning multiple Adobe teaching awards at their annual MAX conference. I see Bring Your Own Laptop as the supportive community I wished for when I was first starting out and intimidated by design. Through teaching, I hope to bring others along for the ride and empower my students to bring their stories, labors of love, and art into the world.
True to my Kiwi roots, I've lived in many places, and currently, I reside in Ireland with my wife and kids.
Certificates
We’re awarding certificates for this course!
Check out the How to earn your certificate video for instructions on how to earn yours and click the available certificate levels below for more information.
Downloads & Exercise files
Transcript
Basically we just use the pen tool for everything. Hold a few shortcuts down and we can get very far in our design. Alright, let's get in there. Let's do some advanced pen tool tips and tricks. Alright, first up, I've created a document. Uh, I've just made mine a thousand by a thousand pixels.
It doesn't matter what size. Uh, I want you to bring in an image. Let's go to file. Let's go to place and in your exercise files, okay, there should be one called pen tool there. Is there pen tool oh one. What we're gonna do is we are going to set it as a template.
Okay? All that does is bring in the image but puts it on a background layer that is locked. Okay, see, check out my layers panel. See it's on this template layer. It's locked. You can unlock it to mess around with it, but it's kind of faded it out as well.
So this is something I drew in my notebook. Let have a little look and let's get advanced to pen tooling. The first tip is often when you are starting with the pen tool, you can go to view and turn smart guides off. I often turn that off when I'm working with the pen tool. The shortcut on a Mac is Command U on a pc, it's CTRL U. So I'm gonna turn that off.
The next tip is to change the anchor points, make 'em a bit bigger. They can be quite small on some displays. So on my Mac I go up to the word illustrator at the top, go to settings and down to this one selection and anchor display. If you're on a pc, go to edit general or edit settings. Um, and go to the same thing section and anchor display. And let's crank this one up.
Okay, anchor points are massive. Let's see what we've got. So when I grab my pen tool, which is the P key on my keyboard, watch this. Boom. Look how big these guys are. Giant handles.
You might find something in between. I'm gonna see if we can work with the giant handles just to make it easier for the video. You find the size that works for you. All right, so I've got the pen tool and just note if you are, haven't got much experience with the pen tool, none at all. You might wanna check out the essentials course version of the pen tool. Um, but if you've got some basic skills, you should be all right.
We're gonna kind of supercharge pen tool here. Just so you know, it does take a lot of practice. Okay, so if you did watch the essentials version, the way I teach it to kind of get used to it and a lot of self-taught people, they'll click once for a corner, they'll get to this curve here and they'll go, okay, drag out, click and drag for a curve. Click once for a corner click and drag and that is fine. It kind of works. What you'll find is you've got extra anchor points that you don't need.
I've got one, two, and three defining this curve down the bottom here and that works fine. But you'll find the more anchor points you have, the less smooth things are. Especially for something like this where it's really small. We've got one, two, and three defining this curve. So the trick is I'm gonna undo, undo, undo, undo. Uh, I'm gonna start down the bottom here.
And the weird thing is, is instead of putting the curve in the middle, I'm gonna put it at this corn point here. I'm gonna show you what I mean. This first one's a bit of a hail Mary and you don't really know what it does without a bit of practice. Watch this, I'm gonna click hold and drag and you're like, I've got a my anchor point with some handles coming out. I've dragged it this way 'cause it's the way the line's going. Can you see?
You can see what it's doing to the line here. So over here As well, I'm gonna click hold and drag it out. Okay? And you can see I can do the exact same thing, the same curve but only two anchor points and the handles on both ends are doing all the work. The trigger is this bit down the bottom here, okay, what is happening to this? So what I can do is I can hold down my option key down here and I can break this watch, crawl down my option and it jumps to you see my cursor changes from the pen tool to the convert anchor point tool.
And I can click hold and drag this and kind of just break it over here. Okay? Get at the top head. I wanna drag it out again even though it's not perfect. I do need both the top and the bottom handles. Just doing the bottom one will kind of work.
I like to have them out at both the top and the bottom or at least the first and second anchor point. Okay, roughly we can fix this up afterwards. So again, I need to break this one. So hold down my option, key on my Mac alt key on a PC and I can kind of break it to get it to go where I want. Same over here. I'm gonna click hold and drag to get the curve.
Gonna hold down my option key to break it, to get it to go where I want. And it takes a little bit of time but forget about the apex. Go to the top here, drag it out, hold down my option or al key. Okay and break it off. And you gotta kind of know that the anger point will drag the line this way and that's the bit of experience that it takes a little while. Now that might be advanced enough but if you wanna go super advanced, what happens is watch this, I'm going to drag this line outta here instead of letting go.
Then holding the option key and breaking it. What you can do is you can say drag and before you even let go of the mouse, hold the option key in a Mac alt can a pc and it breaks it in one go. Okay? So just removes one little step. It's how I've got fast uh, drawing things with a pen tool. But yes, it is quite complicated.
This one here, this line, there's too many curves going on. I've got two handles so I can bend the line two different ways, like up and down or in this case both the same sort of way. This one is one curve, another curve, another curve, another curve. There's too many going on. So I've got this first one going but I'm gonna need one here. Okay?
Sometimes you just can't control it all with just two anchor points. You need one two and I'm gonna need this third one down here. Again, hold the option key or the alt key before I let go. I'm just getting it roughly in. I can get it pretty close. But even if you're a pro, it does take a bit of time afterwards to tidy everything up and you see where you've dragged the handle in too far.
I find it's actually easier being quite zoomed in. Okay, when you are doing these and you see that one's too far out, this is gonna lead me into my next little super duper shortcut. Okay? Is I can do this and keep going and come back and fix it, but I can fix it while I'm working. Yes you can. Okay, so it is the command key on a Mac, the control key on a pc.
So we've done two, we've done the option alt, okay, which allows us to break the line and now we're doing the command or control key depending if your Mac or pc. And what it is is we can drag this anchor point, look at that whilst we're working. So I just held down that key command on a Mac control on pc, just drag it back home a bit so it's not wrecking my drawing so much. So I can actually do pretty close to finished using those tricks again. Drag this one out. You holding the option, an old can drag it to bed there.
Drag this last One out. The last one's always a pain in the butt. It's like, hey, do you want this to be a curve? Like no, no we don't. So before I let go, I'm gonna hold down the option key. Break that one, grab this one, hold down my option.
Counter mac alt. Can a PC get you back to where you started? The first and last join is always a bit tricky, kind of doesn't know what you means. So it jumps around a bit. So now I can stay on my pen tool here, okay? And hold down those keys.
Remember, command basically just switches it to the direct selection tool and the option key drags it to or changes it to to the convert to anchor point tool. So I never go back to the direct selection tool. I can, but that's gonna go around and go you, I want this to do a lot of the work there. This is a hand drawing so it's never gonna line up perfectly. See this one here, I want to be mostly straight and let this curve do the work. I could put another anchor point in here, but you end up with this like little kind of like kink in your pen line, which is also called the stroke pen line.
Okay? And the same here. Okay, I can work my way around. I've still got the pen tool selected. Okay, I'm just clicking on anchor points. Finishing these up.
Click on this anchor point, move the handles a little moons. Okay? And this one here, what I wanna do, yeah, we go, this one here is trickier. If I use those same techniques, you know where you got to the end here and it went, oh, you're gonna be a curve. And it kind of, I had to fix it afterwards when we went all the way around. This one here, if I click and drag for the first one, okay, click and drag for this one.
Haven't quite got it, that's right. Whole option to break it. Go down this way. Okay, come this one you can see what it's done. It is done. What we did when we got to this edge of the flipper here and it's kind of turned into a curve, but that's okay.
We can hold down our option key on a Mac or key in a PC just to kind of force it to go around sometimes here, can you see it's got this uh, handle selected but not this bottom one. It didn't disappear, but it doesn't know you've meant to select these ones. So sometimes you gotta hold your command or control key. Click on that once to highlight the anchor point to get all these things to spill back out. Sometimes happens, sometimes doesn't. All right?
Hmm. All right, what do you think? Do you like the tricks? I got a couple of other ones. Let's have a look at this one here. Okay, another little tip is we've looked at the optional rock key.
Okay? The commander control key, depending if you make a pc and the last one is spacebar, which is the same for all of them. So let's say I start down the bottom here, start getting my curve, go up the top here and I just kind of miss it. It's just way off. Okay? And I start dragging.
You're like, ugh, okay. If you hold spacebar before you let go easy, you can move the anchor point, let go of spacebar and then keep dragging. It has to be all in one motion. So your mouse has to be down the whole time. So click hold and drag click hole and you get it wrong. Click hold and drag.
But before I let go of my mouse hold spacebar and you're like, yeah, you go, you go look at us. Pin tool masters. Another trick is we go back to the command key on a Mac control key, a PC we use a second ago for selecting back to the direct selection tool. Remember we could use it to kind of like adjust this and we can use it while we're drawing. So earlier in the video I showed you how to like start doing it and then let go and then hold The command or control key and adjust it. You can do it while you're drawing.
Watch this. I can say, say I wanna point, actually I'm gonna break this one holding my alter option. Okay? Then I'm gonna start dragging here. Okay? And sometimes you need the moon on the other side, the little handle to be shorter on one side than the other.
And you're like, why are they the same length? Okay, before you stop dragging. Okay? So we get here, you hold the command key down, they're still connected, but you can see one can get shorter, one can get longer. Ooh, I don't do that very often, but you can. This is the advanced shortcut stuff.
Okay, there we go. Now we've got smart guides off. Sometimes smart guys need to be on okay, command you. Okay? And sometimes it just snaps way too big. And again, the tip for this, we kinda looked at it earlier, is if you're like, don't just get close, just zoom in, okay?
And you'll get lots more screen real estate and you can get a lot closer to a line without actually joining it up. Okay? You want it to start close without it actually connecting. Just zoom in a bit. Last but not least say that you do want these things to line up. Okay?
So um, it might be that you've already got some existing, actually I'm gonna draw something real quick. Alright? I'm gonna turn off all my layers panel. This one here, I want these to line up down the bottom here. And I don't wanna just kind of like snap them. I want these paths to line up.
'cause I could turn all my smart guides and I could just line these things up and try and snap them, okay? And that kind of works what I wanna do. Okay? But what I wanna do is actually leave the top part of this alone and I just want these anchor points to line up. So I'm gonna go into out outline modes, command Y on a Mac, control Y, and a pc. I'm gonna give my direct selection tool, which is the achy, okay?
And I'm gonna go to both of you guys. I don't wanna move 'em around. I just want you two to go to object. Let's go to path. Let's go to this one called average. And let's average them both and watch what happens.
Bam, it kinda lines them up. Cool, huh? So sometimes you kinda lines things up and you're like, oh, it's close enough, nobody can see. But you can actually technically get them bang in the same place by selecting just the anchor points you want and then going up to object path and average. But you gotta have something selected first. Otherwise if it's grayed out, there you go.
It's a good uh, tip. Make sure if it's grayed out, you gotta have them selected first with the direct selection tool. Alright, my friends, that is all the tips and tricks that I have got for the pen tool to make you just better with the pen tool faster with it. Loads of shortcuts. I know it does require lots of practice, but while there are lots of cool tools and illustrator, often the pen tool is the kind of core one that a lot of designers and illustrators use. So here you go.
Bit of practice, give it a try. Try some of the shortcuts. Maybe only a couple will sink in the beginning. You can come back to this video. Once you've got the hang of it, just pick one, pick them all. It's totally up to you.
Alright, that is it. I will see you in the next video.
How do you get smoother Pen Tool lines in Illustrator without adding loads of anchor points?
Use fewer points and let the handles do more of the work. The real speed boost comes from combining the Pen Tool with a handful of keyboard shortcuts so you can break handles, reposition points, and refine curves without constantly changing tools.
Illustrator Advanced Pen Tool Tips and Tricks for Smoother Curves and Faster Drawing
The Pen Tool is one of those Illustrator tools that feels awkward right up until the moment it clicks. Once it does, it becomes the tool you keep coming back to for almost everything.
If you already know the basics, the next step is not learning ten new tools. It is learning how to stay on the Pen Tool longer, use fewer anchor points, and rely on a few smart shortcuts to shape cleaner paths faster.
That is where these advanced Pen Tool tips come in.
Set up Illustrator so the Pen Tool is easier to use
Before drawing anything, it helps to make Illustrator a little less fussy.
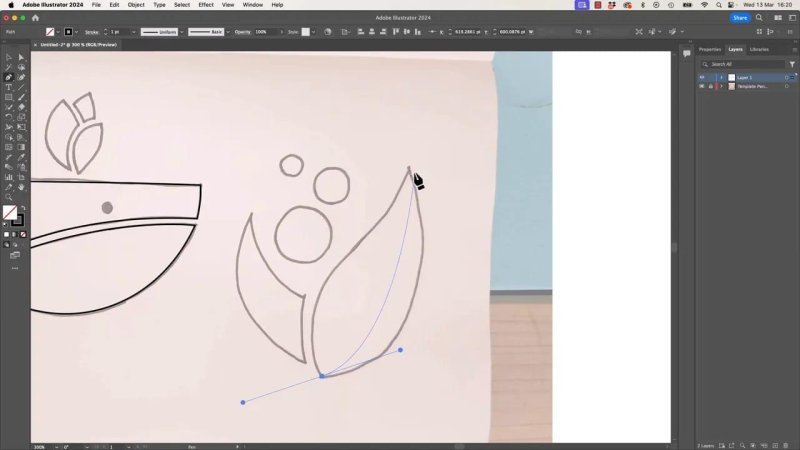
A simple practice setup is to create a document at any size you like, then place in a sketch or reference image and set it as a template. That puts the image on a locked background layer and fades it back a bit, which makes tracing much easier.
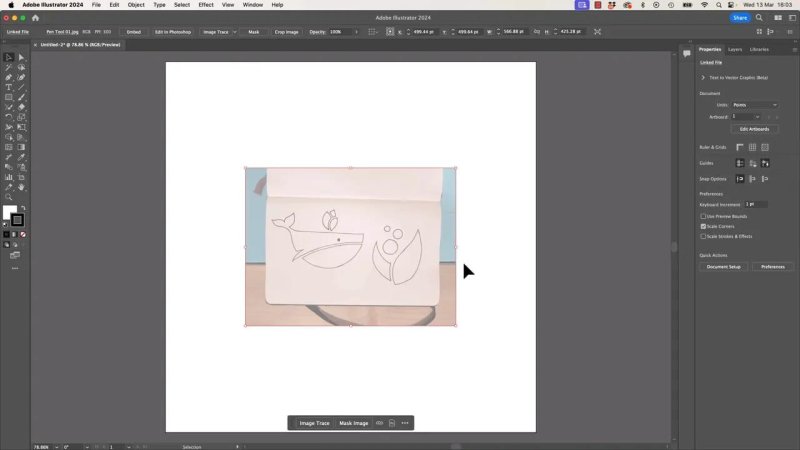
Using a locked template sketch gives you something to trace without getting in your way.
There are also two small changes that make a big difference:
Turn Smart Guides off when they start snapping to things you do not want. On Mac, that is Command U. On PC, Control U.
Increase anchor point and handle display size in Illustrator settings so the points are easier to grab, especially on higher resolution screens.
If anchor points feel tiny and fiddly, do not fight that. Make them bigger. It is a practical fix, not cheating.
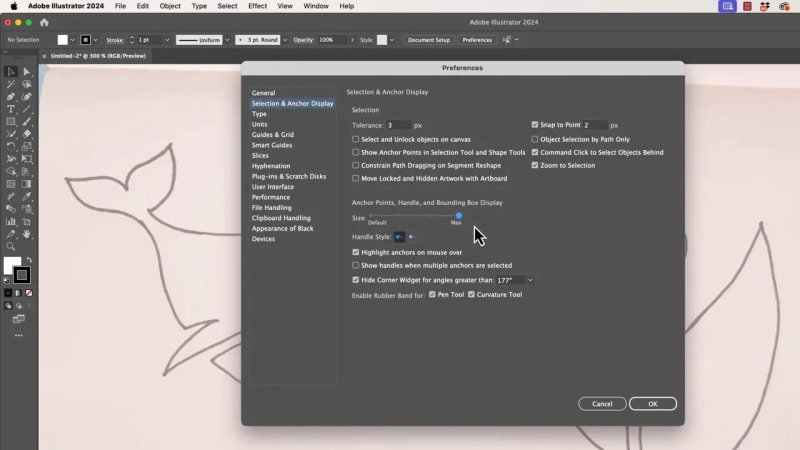
Bigger anchor points and handles can make precise Pen Tool work far less annoying.
The secret to smoother curves is fewer anchor points
A very common beginner habit is to build every curve with extra points.
You click once for a corner, drag for a curve, click again, drag again, and before long one smooth edge is being controlled by three or four anchors. It works, but the line tends to get lumpy. The more points you add, the more chances you have to introduce little kinks.
The cleaner approach is to use fewer anchor points and longer handles.
Instead of placing an anchor in the middle of a curve, place one at each end of that curve whenever possible. Then drag out the direction handles so they shape the line between those two points.
That is the big mindset shift. Do not ask, “Where does the line bend?” Ask, “Where can I place the fewest anchors and let the handles do the work?”
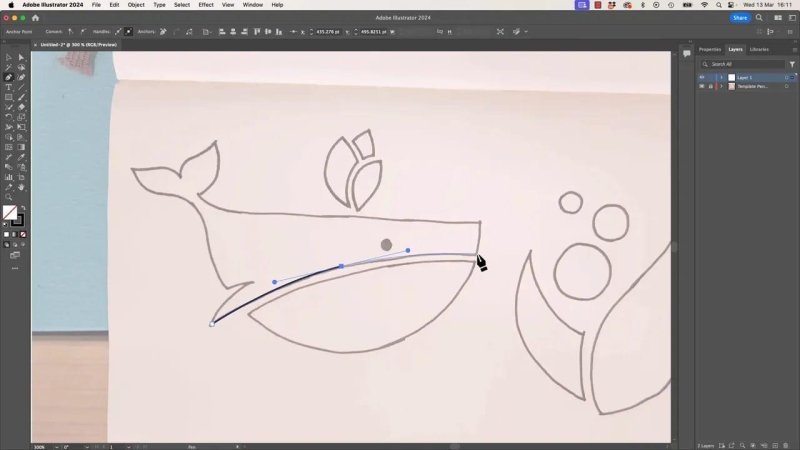
A smooth belly curve is much easier to control when two endpoints do most of the heavy lifting.
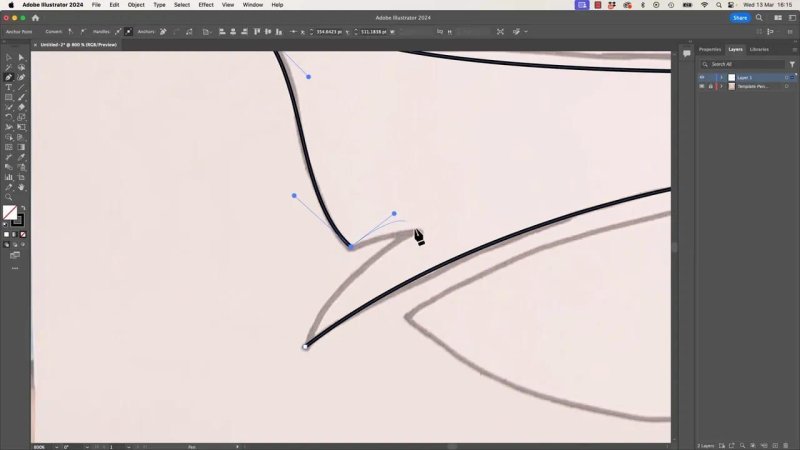
Use Option or Alt to break handles and change direction
The shortcut that really starts to unlock the Pen Tool is Option on Mac or Alt on PC.
When you hold that key while working with the Pen Tool, Illustrator temporarily switches to the Convert Anchor Point tool. That lets you break one handle away from the other so the path can change direction cleanly.
This is essential whenever you go from one curve into another curve that should not flow as a perfect mirror image.
For example:
Click and drag to create a curved anchor point.
Hold Option or Alt.
Drag one handle independently so the next segment heads off in a different direction.
This is how you get elegant corners and controlled transitions without abandoning the Pen Tool.
At first it feels like guesswork because you are learning how each handle pulls the path. That part really does come with repetition. But once you start reading the direction of a line, the shortcut becomes second nature.

Breaking a handle lets one anchor point steer two neighbouring curves in different ways.
The faster version: break the handle before you release the mouse
There is an even quicker variation.
Normally, you might drag out a handle, release the mouse, then hold Option or Alt and adjust the handle to break it.
You can skip that extra step.
While you are still dragging the handle out, hold Option or Alt before you release the mouse. Illustrator breaks the handle in the same move.
It sounds like a tiny difference, but this is exactly the sort of thing that speeds you up over time. Small efficiencies are what make the Pen Tool feel fluid instead of clunky.
Sometimes two points are not enough, and that is fine
Using fewer anchor points is the goal, but it is not a rule you have to force onto every shape.
Some sections simply contain too many direction changes. If a line bends one way, then another, then another again, trying to control all of that with just two points becomes more trouble than it is worth.
In those cases, add the extra point.
The aim is not to use the absolute fewest anchors in every situation. The aim is to avoid unnecessary ones. If a third point helps you describe the shape cleanly, use it.
Then tidy it up afterwards.
Use Command or Control to adjust points while you are still drawing
This is one of the most useful shortcuts in the whole workflow.
Hold Command on Mac or Control on PC while the Pen Tool is active, and Illustrator temporarily gives you the Direct Selection tool. That means you can grab anchor points or handles and reposition them without switching tools.
That is huge.
Instead of drawing a rough path, leaving the Pen Tool, fixing things, then coming back, you can refine the shape in the middle of the process.
Typical use cases:
Pull a handle back because it is overshooting the curve
Nudge an anchor point into better position
Rebalance a segment before placing the next point
This is one of the main reasons experienced Illustrator users seem so fast. They are not bouncing around the toolbar all the time.
Refining a point as you go is much quicker than finishing the whole path and repairing it later.
Stay on the Pen Tool as much as possible
Once you combine the Pen Tool with those temporary shortcut swaps, you can do most of your work without officially changing tools.
That usually means:
Pen Tool for placing points and dragging curves
Option or Alt for converting and breaking handles
Command or Control for direct selection and adjustment
That combination carries you a long way.
It also helps you avoid over-editing. When you are constantly switching tools, it is easy to get distracted and start patching shapes with extra points. Staying in one flow keeps the path cleaner.
If an anchor point lands in the wrong spot, use the Spacebar trick
Another excellent shortcut is the Spacebar.
Say you click and drag a point, but you realise the anchor itself is in the wrong place. Before releasing the mouse, hold the Spacebar. That lets you reposition the anchor point itself. Then release the Spacebar and continue dragging the handles.
The important part is that it all happens in one continuous motion. Your mouse button needs to stay down while you do it.
It is perfect for those moments when you know the curve shape is fine, but the actual point landed slightly off target.
The Spacebar move saves you from cancelling and starting a point again when the placement is slightly off.
You can also change handle lengths while the point is being created
Here is a more advanced variation of the Command or Control trick.
While dragging out a curve handle, hold Command or Control before letting go. That allows you to adjust the handle relationship while the point is still active.
This can be useful when one side of the anchor needs a shorter handle than the other. It is not something you will use constantly, but for awkward curves it gives you more control.
Think of it as a bonus move for those times when the default symmetrical drag is not doing what you need.
Zoom in instead of fighting Smart Guides
Smart Guides are useful, but they can also be over-helpful.
Sometimes you want to start close to another path without accidentally snapping to it. If Smart Guides keep grabbing things too early, the fix is often not a different setting. It is simply to zoom in more.
When you zoom in, you get more room on screen to place points precisely. That makes it much easier to get near a line without joining it or snapping to it by mistake.
So if Illustrator feels twitchy, zoom closer before assuming the Pen Tool is the problem.
How to line up anchor points perfectly with Average
Sometimes you do not just want two paths to look aligned. You want their anchor points to be mathematically in the same place.
That is where Object > Path > Average comes in.
This is especially handy when you have two path ends that should meet neatly, but you do not want to move the rest of either shape.
Here is the process:
Switch to Outline mode with Command Y on Mac or Control Y on PC.
Choose the Direct Selection tool with the A key.
Select only the anchor points you want to line up.
Go to Object > Path > Average.
Illustrator will move those selected points into alignment while leaving the rest of the paths alone.
If the Average command is greyed out, the usual reason is simple: you have not selected the actual anchor points first.
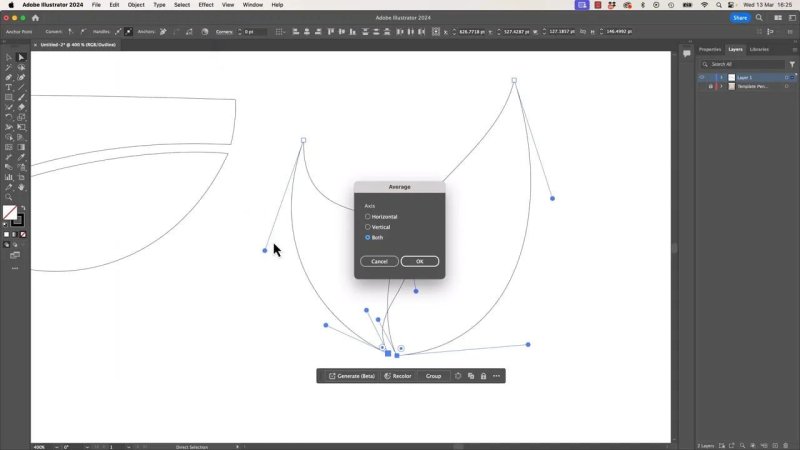
Average is the neat fix when two path ends need to meet exactly without shifting the whole shape.
A practical way to master these Pen Tool shortcuts
The easiest way to build confidence is to trace simple hand-drawn shapes.
A sketch with basic organic curves, like a whale or a leaf, is ideal because it forces you to make decisions about:
where to place anchor points
when to use long handles
when to break a handle
when an extra point is actually justified
how to refine paths without changing tools
Do not worry about perfection on the first pass. Even experienced users draw the shape roughly, then tidy anchor points and handles afterwards. That is a normal part of the process, not a sign that you are doing it wrong.
The core shortcut set worth memorising
If you only keep a few things from all of this, make it these:
P for the Pen Tool
Option or Alt to convert or break handles
Command or Control to temporarily access Direct Selection
Spacebar to reposition an anchor while placing it
Command U or Control U to toggle Smart Guides
Command Y or Control Y to switch to Outline mode
A for the Direct Selection tool
Those shortcuts cover a surprising amount of real-world Pen Tool work.
Why the Pen Tool is still worth mastering
Illustrator has plenty of clever tools, but the Pen Tool is still at the centre of a lot of design and illustration work. It gives you direct control, it rewards practice, and once the shortcuts become muscle memory, it is often faster than hunting for a more specialised tool.
The main thing is not to try to master everything at once.
Pick one or two shortcuts first. Get comfortable with those. Then layer in the next one. Over time, the whole workflow starts to feel much more natural.
And once that happens, you stop fighting the Pen Tool and start using it properly.
FAQ
Why do my Pen Tool curves look bumpy?
The usual cause is too many anchor points. Smoother paths typically come from using fewer points and shaping the line with handles instead of placing a new anchor at every little bend.
What does Option or Alt do with the Pen Tool in Illustrator?
It temporarily switches to the Convert Anchor Point function. That lets you break handles, change a smooth point into a directional one, and control how the next curve leaves that anchor.
How do I move an anchor point while I am still drawing it?
Keep the mouse button held down and press the Spacebar. You can reposition the anchor point, then release the Spacebar and continue dragging the handles.
How do I edit points without leaving the Pen Tool?
Hold Command on Mac or Control on PC while the Pen Tool is active. That temporarily gives you Direct Selection so you can adjust points and handles mid-drawing.
When should I turn Smart Guides off?
Turn them off when snapping keeps interfering with precise point placement. If you still need precision near existing paths, zoom in closer rather than fighting the snapping behaviour.
What does Average do in Illustrator?
Average aligns selected anchor points to the same position based on the chosen axis or both axes. It is useful when you want specific path ends to line up exactly without moving the rest of the artwork.
- Powered by Marvin
- Terms of use
- Privacy policy
- Cookie policy
-
- © Bring your Own Laptop Ltd 2026