AI Generative Recolor
Questions



Student Gallery
Course info
Overview
Get ready to dive into the mesmerizing world of Adobe Illustrator, where we'll craft stunning looking graphics. But we won't stop at just learning the tools; we're about to unleash our creative powers by creating real-world, practical, and portfolio-ready projects. Together we will learn to:
• Master the art of drawing with simple shapes and lines.- • Unleash your creativity by combining and subtracting shapes using the Shape Builder.
- • Create advanced custom logos and graphics.
- • Explore the world of creative brushes, lines, and strokes to elevate your designs to the next level.
- • Use the Width tool to enhance your lines and strokes adding a style.
- • Conquer the pen, pencil, and curvature tools like a pro.
- • Dive into the wonderful world of fonts and the art of mastering type.
- • Use the intertwine feature to create interesting overlapping illustrations.
- • Learn the art of masking images and graphics.
- • Discover the magic of distorting, bending, warping, and liquefying illustrations.
- • Select and use color combinations like a true master of design.
- • Craft your own unique repeating patterns.
- • Transform real drawings into captivating stencil-style images.
- • Export your creations for print, web, social media, and more.
- • Acquire the techniques used by professional graphic designers.
- • Work with your own mini-brief - creating a unique Farmer's Market brand and bringing it to life.
- • Harness the power of Adobe's Generative AI features to push your creative boundaries.
- • Working with mood boards to gather inspiration.
- • Create realistic mockups to enhance your designs even further.
- • Engage in a wealth of class projects to put your skills to the test.
- • Stay ahead with a handy printable PDF cheat sheet.
- • Access downloadable exercise files to help you practice and refine your skills.
- • Benefit from forum support provided by the BYOL Teaching Assistant Team.
- • Discover professional workflows and shortcuts to work more efficiently.
- • Gain access to a treasure trove of additional resources and websites to supercharge your career.
But that's not all! I'll unveil Illustrator's hidden gems that will transform you into a pro at discovering and utilizing breathtaking vector based graphics. We'll dive into the latest Illustrator tools, including the mind-blowing Generative AI features that allow us to craft illustrations that were once thought impossible.
Whether you've never even opened Illustrator or have struggled with it in the past, I'm here to show you the easy way to create breathtaking artwork and portfolio projects to be proud of. Join me as we go from Illustrator zeros, to Illustrator superheroes!
Who this course is for
• Absolutely no previous Adobe Illustrator experience is required.- • This course is designed for newcomers to Illustrator and design in general, so no prior design, drawing, or illustration experience is necessary.
- • This is a relaxed, well-paced introduction, perfect for producing a wide range of drawings, illustrations, logos, and portfolio projects. Only basic computer skills are necessary - if you can send emails and surf the internet, you're more than capable of mastering this course.
What you'll learn
- • Drawing with Shapes & Lines
- • Drawing with the Shape Builder
- • Creating a custom logo
- • Working with Brushes
- • Drawing with the pen, pencil & curvature tool
- • Learn how to work with type & fonts.
- • How to vectorise an image in Illustrator
- • How to curve text in illustrator
- • How to trace an image in illustrator
• How to warp text in illustrator
• How to embed images in illustrator
• How to mask images & graphics.
• How to distort, bend, warp & liquefy illustrations.
• How to make 3D illustrations.
• How to make your own repeating patterns.
• How to create stencil style images from real drawings.
• How to save, print & export for Print, web & social media.
• Lots of real world exercises for you to practice.
• Loads or class projects for you to complete.
• Printable Cheat sheet.
• You will get the finished files so you never fall behind.
• Downloadable exercise files.
• Techniques used by professional graphic designers.
• Professional workflows and shortcuts.
• A wealth of other resources and websites to help accelerate your career.

Daniel Walter Scott
Founder of Bring Your Own Laptop & Chief Instructor
I discovered the world of design as an art student when I stumbled upon a lab full of green & blue iMac G3’s. My initial curiosity around using the computer to create ‘art’ developed into a full-blown passion, eventually leading me to become a digital designer and founder of Bring Your Own Laptop.
Sharing and teaching are a huge part of who I am. As a certified Adobe instructor, I've had the honor of winning multiple Adobe teaching awards at their annual MAX conference. I see Bring Your Own Laptop as the supportive community I wished for when I was first starting out and intimidated by design. Through teaching, I hope to bring others along for the ride and empower my students to bring their stories, labors of love, and art into the world.
True to my Kiwi roots, I've lived in many places, and currently, I reside in Ireland with my wife and kids.
Certificates
We’re awarding certificates for this course!
Check out the How to earn your certificate video for instructions on how to earn yours and click the available certificate levels below for more information.
Downloads & Exercise files
Transcript
Hi everyone.
In this video we're going to go from this plain old fox to techno,
disco, all sorts of cool colors for the fox.
And we're going to let a AI artificial intelligence, not Adobe Illustrator.
That's confusing now, but I do the recoloring by using prompts.
It's a great way to bust out of our regular
old color schemes and explore new and pukey colors.
Some good, some bad.
All done with artificial intelligence using something called generative recolor.
All right, let's jump in and make some cool and not so cool colors.
Not cool, not cool.
Okay, cool cool.
the ratio is not great, but hey, it's really quick and easy to do.
Let me show you how quick and easy it is. Let's jump in.
All right. First up, open something that needs to be recolored.
I'm going to use the, fox that we're drawing, the awake fox.
I've also got Sleeping Fox ready to go.
and the other thing is, before you get started,
it needs to have some kind of color. You can't have it.
with no color or just one standard color.
Can all be black or be white.
Some variation of color, even if you just go through and kind of
fill it with any old swatch, you feel like, okay, just need something
to kind of grab on to.
The one thing, though, is
that it will kind of keep or try and honor the dark colors.
Replace the dark colors light with light.
So put some a little effort into maybe not the color hue, but maybe the lightness.
You can adjust them afterwards.
And so what I want to do is I want to select everything, okay?
I want the background to change color as well.
And there's a couple of ways of getting to the generative recolor.
There's this little thing that pops up okay there's recolor over there.
You can go to edit edit colors recolor.
There's a thousand ways of getting to the exact same tool in illustrator.
So if you do find, way that you like, why don't you use that way?
Just because I kind of have to cut it down somewhere.
Nobody wants to see the ten ways of getting to generative color.
You start off and let go to this one here
and have you play around with clicking the sample prompts.
Okay, that's easy to do. Let's click on one.
Give it a stick. I'll speed this up.
And what you'll find is nothing changes over here until you click one.
And then it kind of applies it okay.
You can see all the different color variations.
So I'm going to get rid of salmon sushi and give you a few
for instances of things that I like to type into.
It's kind of one of the new skills
I'm trying to develop, like how to talk to the robots.
Okay, so we're going to go something easy.
Seaside.
And the nice thing is it's generating four new variations.
But then the bottom is still those ones, that sushi mushroom thing
that was there before.
So you can go back okay.
And you can go seaside.
Oh my goodness.
so bad you go you.
Oh I bet you if you type in seaside yours also be different from mine.
It's amazing how like, I guess it's not like this doesn't affect the seaside.
It's about getting you out of your own kind of way for choosing colors
so that you don't end up
doing the exact same thing every time you design a logo or a brand or an icon.
And if you're new to design in general on color,
it's tricky to kind of flying colors.
It all work together, and generative color does a really good job of it.
What else we're going to tell it? Let's type.
I like typing in cyberpunk.
It's one of my favorite things to type in for making cool colors
that look all cool.
And you can see even the background color, which is gray.
Can you see it changes like that's a really warm one,
and that one's quite a cool gray, the background.
So it's retained some of the lights and darks, which is really cool.
Okay.
For cyberpunk I think I like that one the best.
What other things can you type in.
So think kind of art movements
okay that have distinctive colors pop up and see what we got here.
Oh some cool stuff. Oh I hate it.
What else.
Artists you know. Okay.
now everyone's thinking Andy Warhol.
Maybe that Marilyn Monroe kind of, lithograph kind of print thing.
And it's kind of got lots of yellows in it.
For some reason.
I haven't got it.
So it doesn't know exactly
what artwork you're talking about, and I don't remember the name of it,
but think others think movie think, like I'm thinking, movies
that have a really distinct kind of like color casts or color grading.
Something like Bladerunner, that's oh, is it that green?
I feel like this needs to be more purples in it.
But anyway, AI is getting better
and we're getting better at communicating with it as a designer.
like, the other thing is, I typed in this
the other day, I was like the old I wonder will happen.
Does it know the New Zealand flag?
It kinda does.
It's red and red, white and blue, like the American flag.
There's no real color differences.
So none of these are really close.
Close ish.
You can generate again. Say you did bed.
Keep going.
Getting worse.
Zealand flag very similar. All lots of flags.
And I'm going to type in and we'll have the same colors.
The pro New Zealand Orozco Irish like New Zealand flag not very unique.
Looks like the Australian flag.
Almost exactly the same British flag same colors.
The American flag and the other flag.
Though I think we nailed it.
Yeah, that could work. Artificial intelligence.
Anyway, so you might be way better at prompts than me.
Think of cool stuff to type in. Have a play around with this one.
Have a play around with the Fox as well, right?
A little update to the video
if you were having problems with coloring it sometimes.
So I just wanted to throw this in.
I've got this.
There is no fill. Okay. On these strokes.
So if I use generative fill, okay, I will work.
It will color the strokes, but because there's no fill, it won't color them in.
And because they're all the same stroke color, we end up with the same stroke.
So, same with this.
If I've got a fill and they're all the same color, it doesn't work.
You you see the variations, okay?
It's using the same colors and trying to recolor them, but they're all the same.
So all you need is you don't need a lot.
Okay?
But you do need some variation in brightness.
Doesn't have to be color.
Okay. So we've all got grays here. But look at this.
I do not know what they're all do.
Hopefully it's good looking colors.
Wonder where it got it from me anyway.
This I don't know from my file that it's keeping on me I love you
I and but as long as you've got tone in there
okay, it will apply color on top of it to an appropriate level.
Dark light
that's more me.
okay. It's not more me.
But anyway, you get the idea.
Just a reminder that you need to have
some, variation in tone to start with, and then recolor will work.
Great. All right, that is it.
I will see you in the next video.
You can experiment around, but, join me in the next video.
That's why I've come back and we do this in the next video as a class project.
So join me there.
We learned some shortcuts and do some cool coloring and some bad coloring.
See over there?
How do you use AI to recolour artwork in Adobe Illustrator?
Select artwork with some variation in light and dark tones, open Recolor, and switch to Generative Recolor. Enter a descriptive prompt or choose a sample prompt, then click a generated variation to apply it. Include your background in the selection if you want its colour to change too.
AI Generative Recolor in Illustrator: Explore New Colour Palettes with Prompts
Key takeaways
Generate alternative colour palettes from simple text prompts.
Prepare your artwork with tonal variation, even if it is only greyscale.
Explore prompts based on places, art movements, artists, films and flags.
Compare four generated variations and revisit earlier results.
Fix common problems with unfilled shapes and single-colour artwork.
A perfectly ordinary fox illustration can become a techno-disco fox in a few clicks. Some colour combinations will be lovely. Others will be a bit dreadful. The useful thing is how quickly you can try them.
Generative Recolor uses AI, meaning artificial intelligence rather than the slightly confusing abbreviation for Adobe Illustrator, to suggest colours from text prompts. It is a great way to escape the same palettes you reach for every time you design a logo, brand or icon.
You are not handing over your taste to a robot. You are getting it to suggest options you might never have chosen yourself, then deciding which ones deserve to stay.
Prepare your artwork: tone matters more than hue
Start by opening something you want to recolour. I am using a stylised fox with separate areas of dark red, orange, pink and white, against a grey background. A sleeping fox illustration works as another example, but the important part is not the subject. It is the existing colour variation.
Generative Recolor needs different tones to work with. If everything is one identical black, white or other colour, do not expect it to invent a separate palette for every shape.
You can give the shapes some initial fills using ordinary swatches. These do not need to be your final colours. However, put a little thought into which areas should be dark and which should be light.
The tool tries to preserve those relationships, replacing darker colours with darker colours and lighter colours with lighter ones. It is not a rigid guarantee, but the starting lightness gives it something useful to work with.
Hue is flexible: your starting reds, blues or greens can change completely.
Lightness is useful structure: contrasting tones help the different parts remain distinct.
Greyscale is fine: several shades of grey can provide enough variation to generate a colour palette.
You can adjust the colours afterwards, so there is no need to perfect the starting palette. Just avoid giving the tool one flat colour and hoping it will do all the separating for you.
Open Generative Recolor and apply your first variation
Select everything you want to recolour. Include the background shape if you want to explore background colours as part of the palette.
Open Recolor. You can use the Recolor option in the contextual controls or go through Edit > Edit Colors to the recolouring tool.
Switch to Generative Recolor. This gives you the prompt field and sample prompts.
Choose a sample prompt. It is an easy way to understand the process before writing your own.
Wait for the variations to generate. The tool produces four options.
Click a variation to apply it. Generating the options does not, by itself, change the artwork on the canvas.
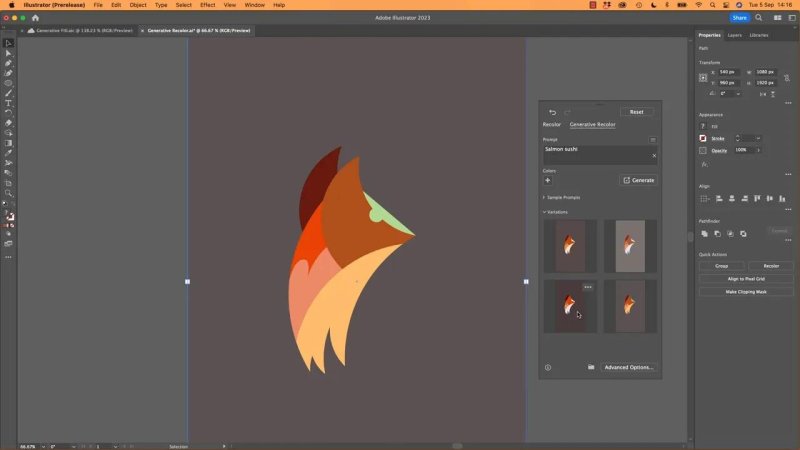
Click a generated thumbnail to try its palette on the selected artwork
That last step is easy to miss. If the results appear but the fox still looks unchanged, click one of the thumbnails. Then click the others to compare them on the actual illustration.
When you generate another set, earlier results remain below the newer ones in the panel. That means you can go back to an earlier idea rather than committing to whatever the robot has just decided is excellent.
Write prompts that push you beyond your usual colours
Learning how to describe colour ideas to AI is a skill in itself. You do not need an elaborate prompt to begin. A short phrase can give you plenty to explore.
Places and moods: try seaside
Start with something simple, such as seaside. In my experiment, it produced combinations involving blues, greens and pale tones, with some much louder choices mixed in.
Did I love all of them? Absolutely not. But they were different from the original fox, and that is part of the point.
Your seaside results may differ from mine. Treat the prompt as a creative direction, not an instruction that produces one predictable palette every time. Even an option you dislike can help you recognise what you do want.
This is especially useful when you are new to design and finding colours that work together feels tricky. Generative Recolor gives you combinations to assess instead of leaving you staring at a swatch panel.
Distinctive styles: try cyberpunk
Cyberpunk is one of my favourite prompts for getting interesting colours. On the fox, it produced options with purples, pinks, blues and turquoise, alongside a warmer alternative.
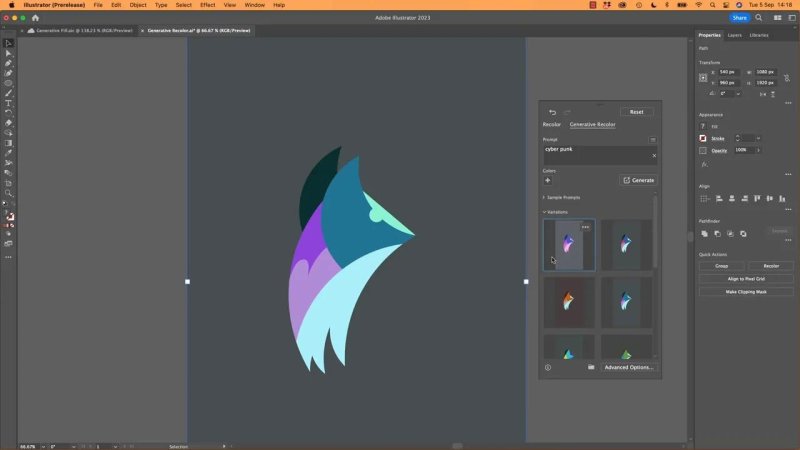
Cyberpunk gives the fox a very different personality without changing its shapes
Pay attention to the background as well as the fox. Because I selected both, the original grey changed too. One variation made it warmer, while another pushed it towards a cooler grey.
That is a useful reminder: a palette is not just the colours inside your illustration. The surrounding colour affects how the whole thing feels.
Art movements and artists: try pop art or Andy Warhol
Art movements with distinctive colour associations make good starting points. Pop art, for example, produced several quite different options. Some were fun; some were definitely not for me.
You can also try an artist’s name, such as Andy Warhol. I had his colourful Marilyn Monroe prints in mind, especially their yellows, but the results did not neatly match the particular artwork I was imagining.
The limitation is straightforward: an artist’s name does not tell the tool exactly which piece you mean. If you have a specific image in your head but only give it a broad reference, there is plenty of room for a different interpretation.
Films: try Blade Runner
Films with distinctive colour grading are another source of prompts. I tried Blade Runner, expecting something with more purple in it, and got a noticeably green set of options instead.
It was not the direction I had pictured. Still, it gave me another palette to consider. We are learning how to communicate these references to AI, and the tool will not always interpret them the way we do.
Flags: compare New Zealand and Ireland
Flags give you a more concrete colour reference, although that does not make the results exact.
I tried New Zealand flag. The tool picked up something of the red, white and blue idea, but the options were only loosely related to what I wanted. Those colours also appear in several other flags, including Australia, Britain and the United States, so the reference is not particularly distinctive as a palette.
Generating again gave me more options, but not necessarily better ones. More attempts do not guarantee a more accurate interpretation.
Irish flag felt more successful, with results closer to its green, white and orange colour direction. It is worth experimenting with both broad moods and recognisable colour references to see which gives you useful results.
Troubleshooting: why is Generative Recolor not colouring everything?
If the results seem flat or your shapes are not filling with colour, check the artwork before blaming the prompt. Two common setups cause problems.
Your shapes have strokes but no fills
Recolouring is not the same as filling empty shapes. If your artwork consists of outlines with no fill, Generative Recolor can change the stroke colours, but it will not add colour inside the shapes.
If those strokes all share the same colour, they also give the tool very little variation to work with. Add fills where you want filled areas, then give those fills some tonal differences.
Every filled shape uses the same colour
Adding a fill is not enough if every shape has the identical fill colour. The tool can replace that shared colour, but the shapes still remain one shared colour rather than becoming a varied palette.
A quick test makes this clear: take several overlapping circles. Give one group a single dark-grey fill, and give another group different shades of grey, from dark to light.
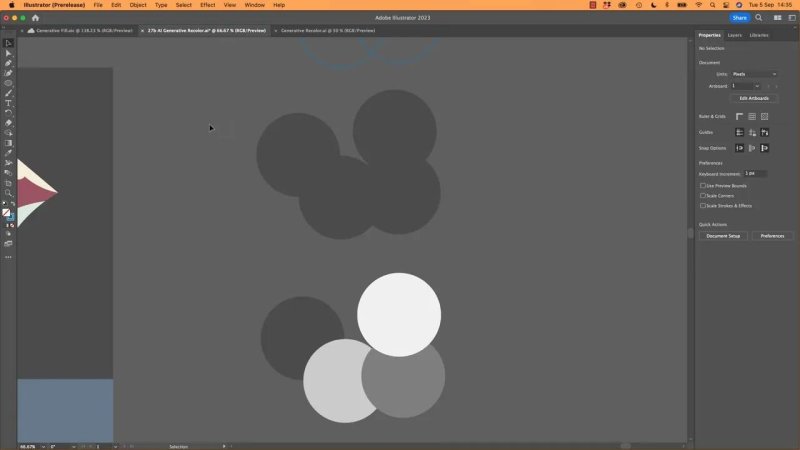
Different grey tones give the recolouring tool more to work with than one identical fill.
The single-colour group recolours as a single colour. The group with different grey tones can become a set of distinct colours, with the tool attempting to retain the light and dark relationships.
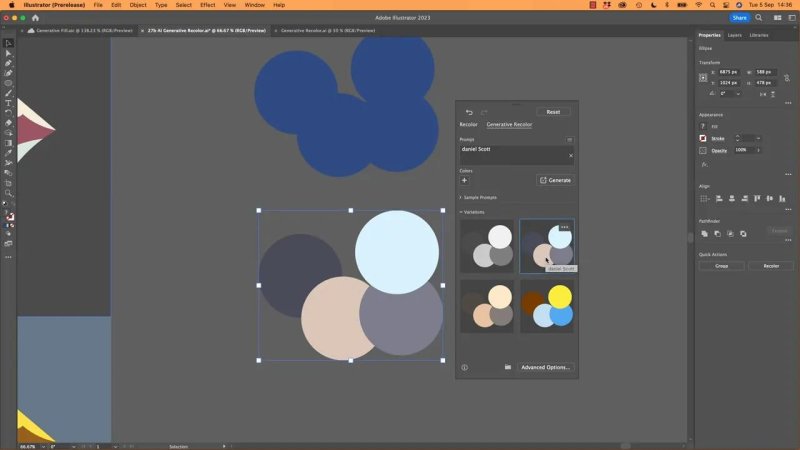
A greyscale starting palette can turn into several colours while keeping tonal separation.
You do not need lots of starting colours. You do need variation in tone. That is the most useful check when Generative Recolor seems not to be doing what you expected.
Experiment quickly, then use your judgement
Try the same illustration with a place, a visual style, an artist, a film and a flag. Compare all four options each time, including what happens to the background.
Some results will be cool. Some will be questionable. A few may be impressively unpleasant. The advantage is that you can explore them quickly, revisit earlier options and adjust a promising palette afterwards.
The goal is not to accept every suggestion. It is to get out of your own colour habits and find a direction worth developing.
Key terms
Generative Recolor
An Illustrator tool that uses artificial intelligence and text prompts to generate alternative colours for selected artwork.
Prompt
The text you enter to describe a colour direction. It can be a mood, place, style or reference, such as seaside, cyberpunk or an Irish flag.
Hue
The colour family, such as red, blue or green. Your starting hues can change substantially during recolouring.
Tone or lightness
How light or dark a colour is. Variation in lightness gives Generative Recolor a useful structure for assigning different colours.
Fill and stroke
A fill colours the interior of a shape; a stroke colours its outline. Recolouring an outline does not automatically add a fill.
FAQs
Can Generative Recolor work with greyscale artwork?
Yes. Different shades of grey provide tonal variation that the tool can turn into different colours. You do not need a colourful starting palette.
Why does my artwork stay unchanged after I generate colours?
You need to click one of the generated variations to apply it. Producing the thumbnails alone does not change the artwork on the canvas.
How do I recolour the background too?
Include the background shape in your selection before opening Recolor. It can then change alongside the illustration.
Will the same prompt always produce the same palette?
No. Results can differ, and generating again can offer another set of interpretations. Use prompts to explore directions rather than expecting an exact, repeatable palette.
Why does my artwork still have only one colour?
If all selected shapes use one identical colour, the tool may simply replace that colour with another shared colour. Give the shapes different light and dark tones before generating again.
Written by Daniel Walter Scott — Founder of Bring Your Own Laptop & Chief Instructor
