How to use Text to Vector in Illustrator
Questions













Student Gallery
Course info
Overview
Get ready to dive into the mesmerizing world of Adobe Illustrator, where we'll craft stunning looking graphics. But we won't stop at just learning the tools; we're about to unleash our creative powers by creating real-world, practical, and portfolio-ready projects. Together we will learn to:
• Master the art of drawing with simple shapes and lines.- • Unleash your creativity by combining and subtracting shapes using the Shape Builder.
- • Create advanced custom logos and graphics.
- • Explore the world of creative brushes, lines, and strokes to elevate your designs to the next level.
- • Use the Width tool to enhance your lines and strokes adding a style.
- • Conquer the pen, pencil, and curvature tools like a pro.
- • Dive into the wonderful world of fonts and the art of mastering type.
- • Use the intertwine feature to create interesting overlapping illustrations.
- • Learn the art of masking images and graphics.
- • Discover the magic of distorting, bending, warping, and liquefying illustrations.
- • Select and use color combinations like a true master of design.
- • Craft your own unique repeating patterns.
- • Transform real drawings into captivating stencil-style images.
- • Export your creations for print, web, social media, and more.
- • Acquire the techniques used by professional graphic designers.
- • Work with your own mini-brief - creating a unique Farmer's Market brand and bringing it to life.
- • Harness the power of Adobe's Generative AI features to push your creative boundaries.
- • Working with mood boards to gather inspiration.
- • Create realistic mockups to enhance your designs even further.
- • Engage in a wealth of class projects to put your skills to the test.
- • Stay ahead with a handy printable PDF cheat sheet.
- • Access downloadable exercise files to help you practice and refine your skills.
- • Benefit from forum support provided by the BYOL Teaching Assistant Team.
- • Discover professional workflows and shortcuts to work more efficiently.
- • Gain access to a treasure trove of additional resources and websites to supercharge your career.
But that's not all! I'll unveil Illustrator's hidden gems that will transform you into a pro at discovering and utilizing breathtaking vector based graphics. We'll dive into the latest Illustrator tools, including the mind-blowing Generative AI features that allow us to craft illustrations that were once thought impossible.
Whether you've never even opened Illustrator or have struggled with it in the past, I'm here to show you the easy way to create breathtaking artwork and portfolio projects to be proud of. Join me as we go from Illustrator zeros, to Illustrator superheroes!
Who this course is for
• Absolutely no previous Adobe Illustrator experience is required.- • This course is designed for newcomers to Illustrator and design in general, so no prior design, drawing, or illustration experience is necessary.
- • This is a relaxed, well-paced introduction, perfect for producing a wide range of drawings, illustrations, logos, and portfolio projects. Only basic computer skills are necessary - if you can send emails and surf the internet, you're more than capable of mastering this course.
What you'll learn
- • Drawing with Shapes & Lines
- • Drawing with the Shape Builder
- • Creating a custom logo
- • Working with Brushes
- • Drawing with the pen, pencil & curvature tool
- • Learn how to work with type & fonts.
- • How to vectorise an image in Illustrator
- • How to curve text in illustrator
- • How to trace an image in illustrator
• How to warp text in illustrator
• How to embed images in illustrator
• How to mask images & graphics.
• How to distort, bend, warp & liquefy illustrations.
• How to make 3D illustrations.
• How to make your own repeating patterns.
• How to create stencil style images from real drawings.
• How to save, print & export for Print, web & social media.
• Lots of real world exercises for you to practice.
• Loads or class projects for you to complete.
• Printable Cheat sheet.
• You will get the finished files so you never fall behind.
• Downloadable exercise files.
• Techniques used by professional graphic designers.
• Professional workflows and shortcuts.
• A wealth of other resources and websites to help accelerate your career.

Daniel Walter Scott
Founder of Bring Your Own Laptop & Chief Instructor
I discovered the world of design as an art student when I stumbled upon a lab full of green & blue iMac G3’s. My initial curiosity around using the computer to create ‘art’ developed into a full-blown passion, eventually leading me to become a digital designer and founder of Bring Your Own Laptop.
Sharing and teaching are a huge part of who I am. As a certified Adobe instructor, I've had the honor of winning multiple Adobe teaching awards at their annual MAX conference. I see Bring Your Own Laptop as the supportive community I wished for when I was first starting out and intimidated by design. Through teaching, I hope to bring others along for the ride and empower my students to bring their stories, labors of love, and art into the world.
True to my Kiwi roots, I've lived in many places, and currently, I reside in Ireland with my wife and kids.
Certificates
We’re awarding certificates for this course!
Check out the How to earn your certificate video for instructions on how to earn yours and click the available certificate levels below for more information.
Downloads & Exercise files
Can Adobe Illustrator turn text prompts into editable vector graphics?
Yes. Illustrator’s Text to Vector Graphic feature uses generative AI to create editable vector artwork from a written prompt. It is brilliant for generating creative starting points, icons, and illustrations, but you still need Illustrator skills to refine colours, shapes, anchor points, and occasional wonderfully weird AI mistakes.
How to Use Illustrator Text to Vector Graphics Using AI
Illustrator can now make vector artwork from a few words. Type a prompt, hit Generate, and it creates artwork that you can select, recolour, reshape, and pull apart just like any other vector graphic.
That is the exciting bit. The important bit is that it is not a replacement for design skills. Sometimes it gives you a fantastic chilli pepper. Sometimes it gives you a chilli pepper with mysterious pearls, or a fox with five legs. Either way, it gives you editable vector material to work with.
Create a blank Illustrator document
Start with a new document. The exact size is not especially important for experimenting, but an artboard around 1920 pixels x1080 pixels is a nice roomy place to play with generated artwork.
For this exercise, begin with an empty artboard. This makes it easier to see precisely what is being generated and prevents existing artwork from influencing the result while you are learning.
Open the Text to Vector Graphic panel
You may find Text to Vector Graphic inside the Properties panel, but it can feel a little cramped in there. A cleaner approach is to open it as its own panel:
Go to Window.
Choose Text to Vector Graphic.
Move or dock the panel somewhere comfortable.
This gives you a dedicated space for entering prompts, choosing a generation type, reviewing variations, and adjusting style settings without the rest of the Properties panel getting in the way.
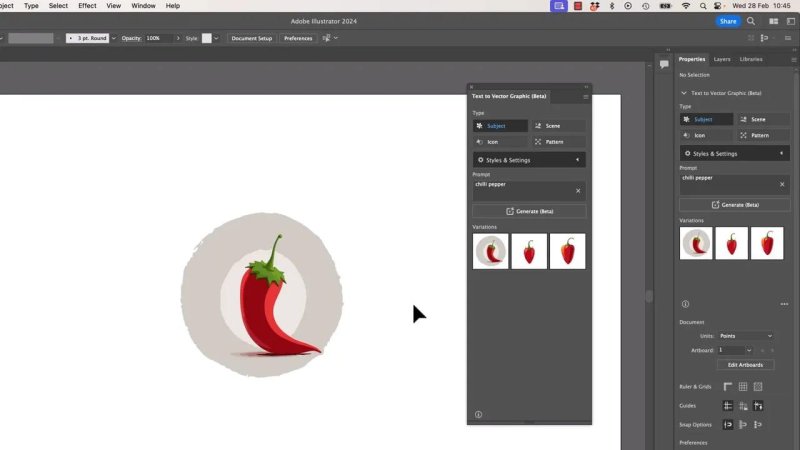
Each generation provides three variations, so you can quickly compare different takes on the same idea.
Generate your first AI vector graphic
With nothing selected, choose Subject in the Text to Vector Graphic panel. Then enter a simple prompt such as chilli pepper and select Generate.
Illustrator produces three variations by default. Select a variation from the thumbnails in the panel, or use the arrows in the contextual taskbar to cycle through them. You can also enter or revise your prompt in either location, so use whichever interface feels more natural.
The results are generated as vector artwork, not a flat raster image. That is a big deal because the artwork is immediately available for proper Illustrator editing.
Prompting is a design skill now
The difficult part is often not pressing Generate. It is working out how to describe what you actually want.
A vague prompt can produce something visually impressive that is completely wrong for the job. For example, asking for a less colourful chilli pepper with “line art” may still create something that is not remotely the restrained black-and-white sketch you had in mind.
When that happens, be more specific. Instead of relying on “line art,” try language such as:
Black and white sketch
Monochrome ink illustration
Simple outlined icon
Minimal vector logo graphic
This is part of the creative process with generative AI: turn the picture in your head into useful descriptive language, assess what comes back, and refine the prompt.
It can be frustrating, but it is worth remembering that this technology is at its earliest and roughest stage. It will improve. More importantly, you will improve at directing it.
Be specific, then generate again
Do not be afraid to hit Generate repeatedly. A new generation will not necessarily be wildly different, but it may give you the one useful option you were looking for.
Think of it less like placing a single order and more like asking a very fast, slightly chaotic illustrator for a fresh batch of thumbnail ideas.
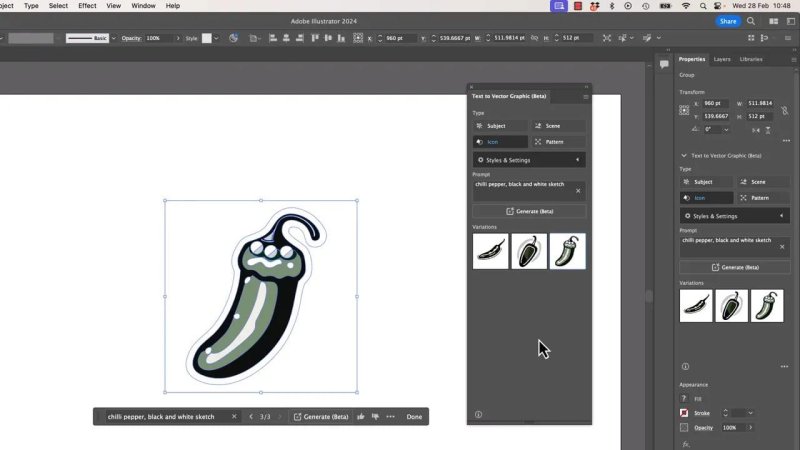
A more prescriptive prompt can push the output much closer to a simple black-and-white sketch direction.
Understand Match Active Artboard
When your document already contains artwork, look under Style and Settings for Match Active Artboard. This option is enabled by default.
With it switched on, Illustrator tries to match the style and colours of artwork already on the artboard. That can be useful when you are building a consistent set of illustrations or icons.
But when you want a completely fresh visual direction, turn it off. Otherwise, the generated artwork may keep trying to mimic what is already there instead of following your new prompt cleanly.
Subject versus Icon
The generation type makes a difference to the kind of result Illustrator aims for.
Subject generally produces more illustrative artwork.
Icon is intended to produce a more compact, icon-like or logo-like graphic.
In practice, the distinction is not always dramatic. Selecting Icon does not guarantee a perfect website logo, and it may still return an illustration-style result. It is still worth testing both options, especially if you are trying to move from a detailed scene towards a simpler graphic.
The output is also surprisingly variable. Give the same prompt to two people and there is a good chance they will receive noticeably different results.
Use descriptive prompts to create scenes
Text to Vector Graphic is especially fun when you start describing a scene rather than naming a single object. A prompt such as a chilli pepper with fire coming out of the top can lead to vivid, polished illustrative artwork.
It tends to be particularly strong at stylised animals, objects, and flames. People can be less reliable. And animals can be very enthusiastic about extra limbs. That is not a reason to avoid it, just a reason to inspect the result before using it.
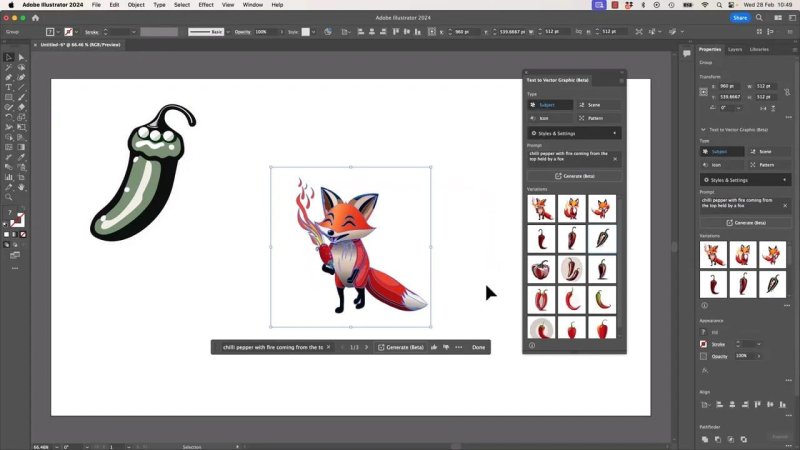
Scene-based prompts can produce charming illustration ideas, although a quick anatomy check is always sensible.
The crucial advantage: the result is editable vector artwork
This is where Illustrator’s AI generation becomes genuinely useful. You are not stuck with whatever it creates.
Use the Direct Selection tool, the white arrow, to select individual areas of the generated graphic. From there, you can make practical design decisions:
Select one or more coloured shapes and change their fill colour.
Choose parts of the artwork you like and preserve them.
Move individual anchor points.
Adjust paths and handles to change the shape.
Remove strange details that do not belong.
For example, if the generated pepper is nearly right but has a strange cluster of decorative shapes, do not throw the whole thing away. Select the unwanted pieces and edit or remove them. If a curve needs to extend a little further, grab the relevant anchor point and move it.
That is why learning Illustrator still matters. AI can help you create the first draft, but design work is often in the last 20 percent: refining form, simplifying shapes, correcting colours, and making the artwork actually fit the project.
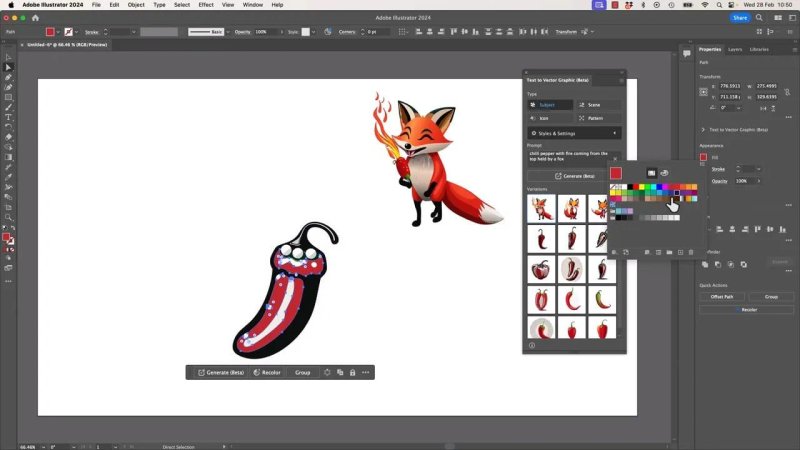
Because the generated artwork is vector-based, individual regions can be selected and recoloured directly in Illustrator.
Use generative AI as a supportive creative tool
Text to Vector Graphic is best treated as a creative support tool. It can get you past the blank page, create interesting directions quickly, and generate source artwork that you can transform using your own judgement.
It is especially useful when you need:
A quick illustration concept to develop further.
A set of visual directions to compare.
A starting point for a custom icon or decorative graphic.
Editable vector elements that can be recoloured or reshaped for a brand.
It does not remove the need to understand colour, composition, vector editing, anchor points, or the visual requirements of the job. In fact, the more Illustrator skills you have, the more useful the generated results become.
Commercial use of generated artwork
The vector content created through Illustrator Text to Vector Graphic is commercially usable. That means the generated assets can be used in paid products and company work, which makes the feature far more practical than a novelty experiment.
Still, treat every generation as working artwork. Review it carefully, refine it, and make it yours. The best result is rarely the first thing that appears on the artboard. It is the version you shape after the generation has given you a useful starting point.
FAQ's
Where is Text to Vector Graphic in Illustrator?
You can find it in the Properties panel, or open it as a separate panel by choosing Window and then Text to Vector Graphic.
Are Illustrator Text to Vector Graphics editable?
Yes. The generated results are vector artwork, so you can select individual shapes, change fills, edit anchor points, adjust paths, and remove unwanted elements.
What does Match Active Artboard do?
It makes Illustrator try to match the colours and visual style of artwork already on the active artboard. Turn it off when you want a fresh, independent generation.
Should I use Subject or Icon in Text to Vector Graphic?
Use Subject for more illustration-focused output and Icon when you want a more compact icon-style direction. Test both, because the result can vary and Icon may still generate something fairly illustrative.
Can generated Illustrator vectors be used commercially?
Yes. The generated content is commercially usable, including for paid products and company work.
Written by Daniel Walter Scott — Founder of Bring Your Own Laptop & Chief Instructor
