T-Shirt Making
Questions


Student Gallery
Course info
Overview
Join Adobe Certified Professional and Adobe MAX Master Award winner Dan Scott on an incredible journey into Adobe Illustrator! This course is tailor-made for anyone new to Illustrator and the world of design. Dan starts from scratch and unravels the secrets and techniques that let you create anything your creative heart desires, from icons, logos, and postcards to beautifully hand-drawn illustrations.
It's a relaxed, well-paced introduction, and Dan's approach is simple: start with shapes. A surprising amount of professional vector work begins as a few basic shapes combined and subtracted with the Shape Builder. Once that clicks, you'll be ready to conquer the Pen, Pencil, and Curvature tools like a pro and dive into the wonderful world of fonts.
Together with Dan, you'll learn how to:
- Master the art of drawing with simple shapes and lines
- Combine and subtract shapes to build custom logos and graphics
- Draw with confidence using the Pen, Pencil, and Curvature tools
- Pair fonts and style type that suits your design
- Choose color combinations with a designer's eye
- Export your creations for print, web, social media, and more
You'll practice on real-world projects from icons and logos to postcards and hand-drawn illustrations, then bring everything together in a complete Farmers' Market brand built from your own mini-brief. You'll gather inspiration with a mood board, design the logo and graphics, and present it all in realistic mockups. Dan also walks through Illustrator's hidden gems, including the mind-blowing Generative AI and AI Assist features. Turn rough sketches into polished vectors with Concept to Vector, generate artwork from a text prompt, get AI feedback before you share your designs, and keep your layers tidy. Dan shows you where these tools save you time, and where they're not worth the effort.
Plus, you'll get a handy printable PDF cheat sheet, forum support from the BYOL Teaching Assistant team, and a treasure trove of additional resources and websites to supercharge your career. Whether you've never even opened Illustrator or you've struggled with it in the past, Dan is here to show you the easy way to create breathtaking artwork and portfolio projects you'll be proud of. Let's go from Illustrator zero to Illustrator hero!
Requirements
- Adobe Illustrator installed (sign up for a free trial here)
- No prior Illustrator, design, or drawing experience required
- Basic computer skills (if you can send an email and browse the web, you're ready)
Who this course is for
- Absolutely no previous Adobe Illustrator experience is required
- This course is designed for newcomers to Illustrator and design in general, so no prior design, drawing, or illustration experience is necessary
- This is a relaxed, well-paced introduction, perfect for producing a wide range of drawings, illustrations, logos, and portfolio projects
- Only basic computer skills are necessary; if you can send emails and surf the internet, you're more than capable of mastering this course!
What you'll learn
- Drawing with shapes and lines
- Combining and subtracting shapes with the Shape Builder tool
- Designing custom logos and vector graphics
- Mastering the Pen, Pencil, and Curvature tools
- Working with brushes, strokes, and the Width tool
- Working confidently with type and fonts
- Curving and warping text
- Picking fonts faster with AI Assist
- Choosing effective color combinations
- Embedding and masking images and graphics
- Removing image backgrounds with one click
- Tracing images and converting hand-drawn artwork into vectors
- Creating stencil-style artwork from real drawings
- Creating overlapping artwork with Intertwine
- Distorting, bending, warping, and liquefying artwork
- Creating simple 3D illustrations
- Viewing 2D artwork from new angles with Turntable
- Designing seamless repeating patterns
- Turning rough sketches into polished vectors with Concept to Vector
- Generating vector artwork from a text prompt with Generate Vector
- Getting AI feedback on your designs before you share them
- Organizing layers automatically with AI Assist
- Gathering inspiration with mood boards
- Building a complete Farmers' Market brand from your own mini-brief
- Presenting your work with realistic mockups
- Exporting artwork for print, web, social media, and clients
- Multiple hands-on class projects you can add straight to your portfolio
- Practical workflows, shortcuts, and techniques used by professional graphic designers

Daniel Walter Scott
Founder of Bring Your Own Laptop & Chief Instructor
I discovered the world of design as an art student when I stumbled upon a lab full of green & blue iMac G3’s. My initial curiosity around using the computer to create ‘art’ developed into a full-blown passion, eventually leading me to become a digital designer and founder of Bring Your Own Laptop.
Sharing and teaching are a huge part of who I am. As a certified Adobe instructor, I've had the honor of winning multiple Adobe teaching awards at their annual MAX conference. I see Bring Your Own Laptop as the supportive community I wished for when I was first starting out and intimidated by design. Through teaching, I hope to bring others along for the ride and empower my students to bring their stories, labors of love, and art into the world.
True to my Kiwi roots, I've lived in many places, and currently, I reside in Ireland with my wife and kids.
Certificates
We’re awarding certificates for this course!
Check out the How to earn your certificate video for instructions on how to earn yours and click the available certificate levels below for more information.
Downloads & Exercise files
How do I turn an Illustrator design into a printed T-shirt?
Prepare a clean, correctly sized design in Illustrator, then export it in a format your printing service or cutting machine accepts. You can upload the artwork to a print-on-demand service, or export an SVG for a Cricut, cut the design from heat-transfer vinyl and press it onto a T-shirt yourself.
How to Make a T-Shirt Print with Adobe Illustrator
Key takeaways
Clean up your artwork before sending it to a printer or vinyl cutter.
Test the design’s size with a paper printout before committing.
Export several useful file formats from Illustrator in one go.
Choose between ordering a one-off T-shirt and making one at home.
Avoid two easy vinyl mistakes: forgetting to mirror and cutting the wrong side.
Illustrator is a lovely starting point for digital work, but it also opens the door to making actual, physical things. A design on your screen can become a shirt you can wear. That is pretty satisfying.
I’m using a fox illustration for this project, taking it through two routes: preparing files for a print-on-demand service, and making the shirt at home with a Cricut and heat-transfer vinyl. The initial Illustrator preparation is useful for both.
1. Start with a clean Illustrator document
Your working file might have spare shapes, background rectangles and other bits scattered around it. Rather than exporting the lot and hoping for the best, create a fresh document containing only the artwork you need.
Select the design in your existing file, leaving out any background you do not want printed.
Copy the artwork.
Choose File > New and create a new document.
Choose a Web preset as a convenient starting point for an RGB document.
Paste your artwork into the new document.
Do not worry too much about the initial page size. We will resize the artwork and fit the artboard around it shortly.
Use Outline mode to find unwanted paths
Press Command + Y on a Mac or Control + Y on a PC to switch to Outline mode. Think of it as X-ray vision for your illustration: the colours disappear, leaving the paths behind.
Inspect the shapes for stray objects, unnecessary lines or anything lurking underneath. You can temporarily move individual pieces around to investigate, then undo those moves to restore the design.
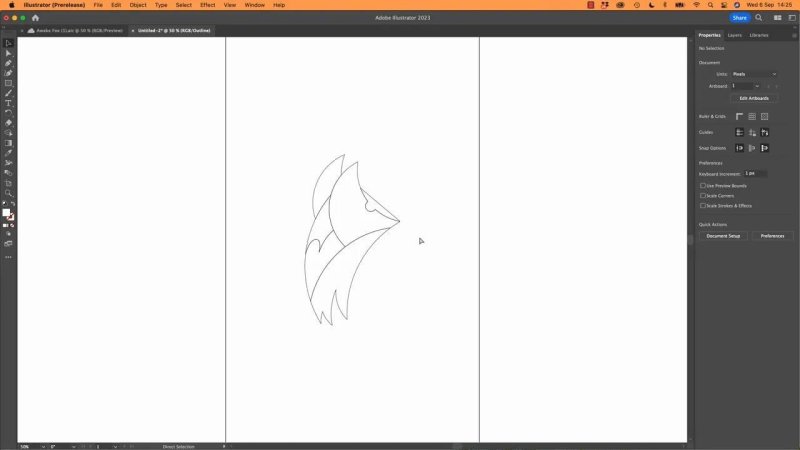
Outline mode makes it easier to inspect the paths behind the finished illustration.
Remove anything you do not need and join lines where necessary. A straightforward shirt print may tolerate some untidiness, but machines that follow paths, such as cutters or embroidery equipment, make clean artwork especially important.
Press the same shortcut again to return to the normal colour preview.
2. Test the print size in the real world
How big should the fox be? You can measure across your chest and make an educated guess, but my highly scientific method is to print it on paper and stick it to myself with Sellotape.
Seriously, it works.
I initially estimated about 180 mm, roughly 7 inches. Once I held that printout against my shirt, it was clearly too big. A smaller version at about 140 mm, roughly 5.5 inches, looked more sensible. I eventually aimed for about 130 mm, roughly 5 inches.
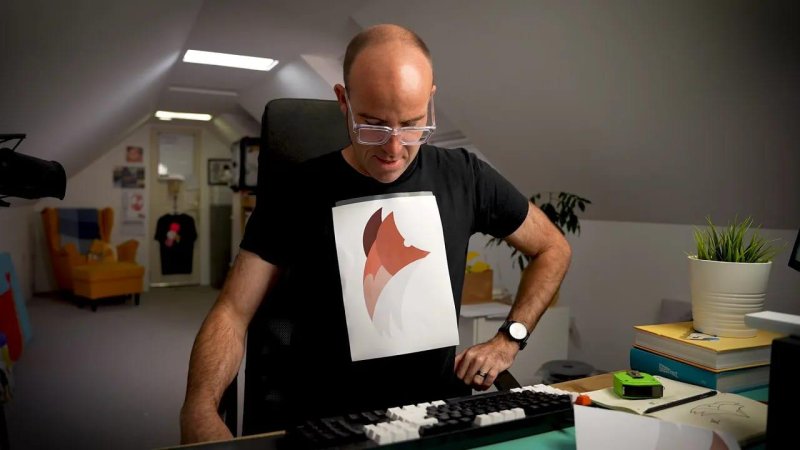
A paper mock-up is a wonderfully low-tech way to check the size before making the shirt.
Those are sizes for this particular design, not rules for every T-shirt. A small pocket-style graphic and a bold central illustration are different decisions. I wanted something fairly bold, so I kept the fox larger than I might for a subtle pocket placement.
Enter millimetres or inches, even in a pixel document
Back in Illustrator, select the complete design and find the width and height controls in the Properties panel.
Enable the link between width and height so the artwork scales proportionally.
Clear the existing value in the dimension field you want to set.
Type the measurement with its unit, such as 130 mm or 5 in.
Press Enter to apply it.
Illustrator can interpret those units even when the document is set to pixels. You do not need to change the whole document’s units or work out the conversion yourself. Just replace the existing field contents rather than accidentally leaving a mixture of units behind.
3. Fit the artboard and check the colour mode
The artwork is now the right size, but the page probably is not. I like to fit the artboard snugly around the design so there is no unnecessary space surrounding the export.
Select all the artwork you want to export.
Switch to the Artboard tool.
Open the presets menu in the Properties panel.
Choose Fit to Selected Art.
Return to the Selection tool.
The artboard now matches the outside bounds of the selected illustration. Nice little trick, that.
Next, check the document’s colour mode. For the print-on-demand workflow here, I’m using RGB. If the document is CMYK, choose File > Document Color Mode > RGB Color.
You may notice the colours shift slightly when switching modes. The important point is to prepare the file for its destination. The services discussed here commonly request RGB for this sort of one-off printing, but check your chosen provider’s specifications rather than assuming every printing process wants the same thing.
4. Export your T-shirt artwork in several formats
Different services accept different file types. Rather than returning to Illustrator every time an upload gets rejected, export a few useful versions together.
Choose File > Export > Export for Screens. Despite the name, this is handy for preparing several formats of the same artwork.
Select the artboard you want to export.
Choose a destination folder.
Turn off Create Subfolders if you want the files together in one folder.
Add the formats you need using the scale and format controls.
Use a single-size export rather than unnecessary multiple-size variants for this workflow.
Export the artboard.
Here are the versions I prepare:
PDF: My first option for a printing service that accepts it, retaining the vector artwork in this example.
SVG: Another useful vector format, and the one I use for the Cricut workflow.
PNG: A widely accepted image format and a useful alternative when the service does not accept the vector versions.
WebP: An optional extra, but not something I would rely on for these uploads.
For this design, my order of preference is PDF, then SVG, then PNG, subject to what the service accepts. PNG can still print well, but follow the provider’s size and quality requirements. Exporting several file types does not replace checking those specifications.
Also, give the artwork a sensible name. I left mine as “Artboard 1”, which is not exactly a triumph of file organisation.
5. Option one: order through a print-on-demand service
If you want a custom shirt without buying cutting equipment, a print-on-demand service is the straightforward route. You upload the artwork, position it on a product and order the finished item.
I’ve used Printful for work and personal projects, including shirts I have not made myself. I’ve also used Spreadshirt and Vistaprint, and Printify is another option to investigate.
Many of these platforms are geared towards setting up a shop and selling lots of products. That does not necessarily mean you need a whole business just to get one shirt. One-off ordering is commonly available, so check the options on the service you choose.
Upload, position and check the design
The exact buttons vary, but the basic process looks like this:
Choose a T-shirt style.
Select the garment colour. I used navy for the online example.
Find the design upload or file library option.
Check the upload specifications and select an accepted file.
Place the artwork on the shirt.
Adjust its position and size in the online editor.
Check any quality feedback before ordering.
I tried uploading the WebP version first, and the service rejected it. The PDF uploaded successfully, and the editor recognised the artwork as vector. That is exactly why having a few export options is useful.
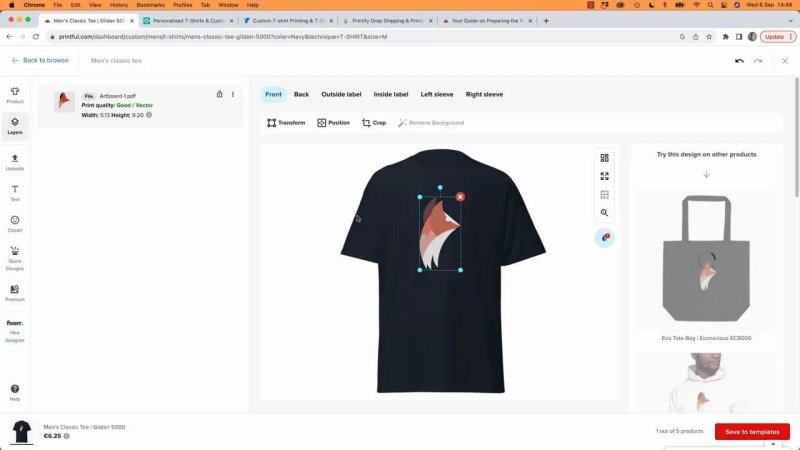
The online editor lets you check the design’s placement and scale before ordering.
At this point, the shirt is ready to order. The same platforms may also offer other products for your artwork, but I’m stopping short of checkout because I want to make this one myself.
6. Option two: send the SVG to a Cricut
A Cricut is a home cutting machine. It can cut materials for stickers, cards and other craft projects. For this shirt, it cuts the individual shapes from coloured heat-transfer vinyl, which are then applied to the fabric.
The machine is controlled through Cricut Design Space, the free software used here. It accepts several file types, but SVG is the best fit for this vector-cutting workflow.
Open Cricut Design Space and choose Upload Image.
Select the SVG exported from Illustrator.
Complete the upload and add the design to the canvas.
Choose Make to prepare the cuts.
Select the material-loading option appropriate to the vinyl you are using.
Review the separate colour cuts.
Because the fox contains several colours, the pieces are cut from separate colours of vinyl. In the preparation preview, Design Space arranges the shapes towards the top-left of the cutting area, rotating pieces where appropriate to reduce wasted material.
Do not be surprised if the cutting layout no longer looks like a complete fox. These are the individual pieces, organised for cutting rather than displayed in their final positions.
7. Cut the vinyl, then weed away the excess
For the sheet vinyl used here, place it on the cutting mat shiny side down, then load the mat into the machine.
And here is the step I always have to remind myself about: mirror the design before cutting. This is a T-shirt transfer, so the orientation needs to be reversed for the application process.
Before starting, check both things:
Is the design mirrored?
Is the vinyl facing the correct way?
Repeat the cutting process for the different colours. I also used white material supplied on a large roll, so its loading process differed from the smaller pieces on the mat.
What is weeding?
Weeding means removing the vinyl you do not want on the finished shirt. Once the machine has cut the shapes, peel away the surrounding material and pick out any unwanted small pieces, leaving the design on its carrier sheet.
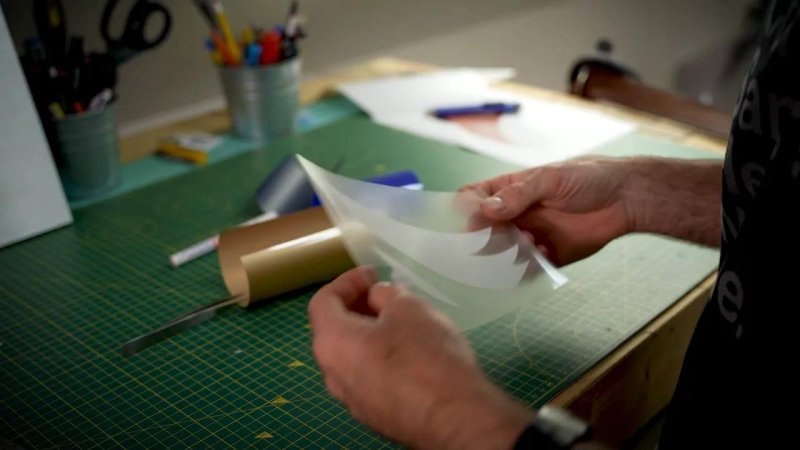
Weeding leaves only the shapes that belong on the shirt, supported by the carrier sheet.
A small picking tool helps lift the fiddly bits. Work through each colour until all the pieces are ready to apply.
It is quite therapeutic. Unless you have forgotten to mirror the design or cut the wrong side of the vinyl. Then, considerably less therapeutic.
8. Position and heat-press the design onto the shirt
The cut vinyl now needs heat to attach it to the fabric. An iron is one route; I used a rather large blue heat press. Subtle little machine. Takes up almost no room at all. Almost.
Lay the T-shirt flat on the press and decide where the design should sit. I used my paper printout as a reference to help line everything up in the middle.
Position the first vinyl piece on the shirt.
Apply heat with the press.
For the material used here, allow it to cool before peeling away the carrier.
Check that the vinyl has stayed attached to the fabric.
Align the next pieces and repeat until the design is complete.
The process here does not establish a universal temperature or pressing time. Use the application instructions for your particular vinyl and equipment, including its requirements for peeling the carrier.
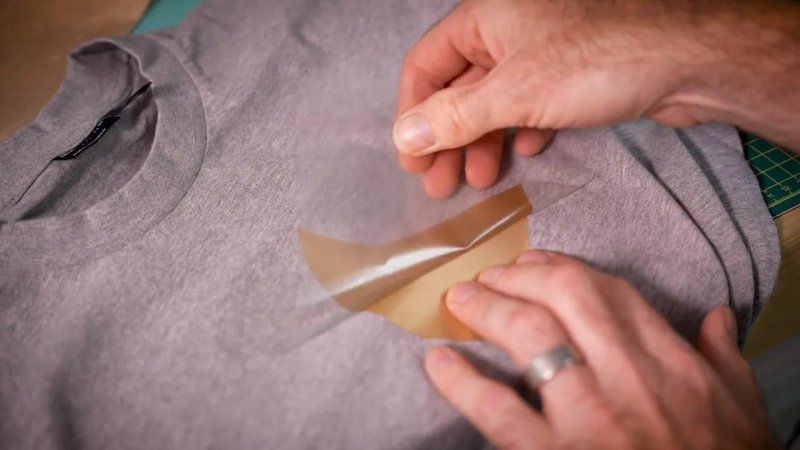
Peel away the carrier after cooling, checking that the vinyl remains attached to the shirt.
With a multicolour illustration, positioning the separate pieces is what brings the original design back together. Cut, weed, align, press, peel and repeat.
From Illustrator artwork to something you can wear
The finished fox shirt came out pretty well. The colours were not quite the original brand colours, mainly because I used the vinyl I already had in the drawer. Sometimes that is the creative brief: what have we actually got?
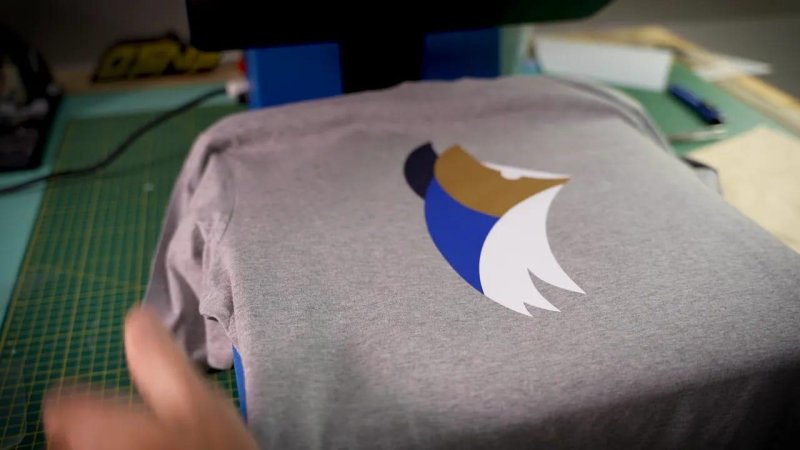
The separate vinyl pieces come together as a finished fox illustration on the shirt.
The useful part is the connection between the software and the finished object. Clean artwork, a real-world size test and the right export give you a solid starting point, whether someone else prints the shirt or you make it at home.
That is one of the joys of learning Illustrator. You are not limited to making things that stay on a screen. You can make some sweet stuff you can actually wear.
Key terms
Artboard
The page area you work on and export from Illustrator. Fitting it to selected artwork removes unnecessary space around the design.
Outline mode
An Illustrator view that displays paths instead of filled colours. It helps you inspect the structure of an illustration and find unwanted objects.
RGB and CMYK
Different colour modes used when preparing artwork. RGB is used for the print-on-demand files in this workflow, but the destination’s specifications should guide your choice.
Vector artwork
Artwork built from paths rather than a fixed grid of pixels. The fox’s vector shapes are useful both for scaling the design and for defining cutting paths.
SVG
A vector file format used to move the Illustrator design into Cricut Design Space.
Heat-transfer vinyl
Coloured material cut into shapes and attached to fabric using heat. In this project, separate colours form the finished fox illustration.
Weeding
Removing unwanted vinyl after cutting, leaving only the design pieces on their carrier sheet.
Mirroring
Reversing the design before cutting the transfer so it faces the correct way when applied to the shirt.
FAQs
Which Illustrator file format should I use for T-shirt printing?
Check your printing service’s accepted formats first. For the vector illustration here, PDF is the first choice where supported, followed by SVG, with PNG as a widely accepted alternative. The Cricut workflow uses SVG.
Should my T-shirt design be RGB or CMYK?
This print-on-demand workflow uses RGB. You can change it through File > Document Color Mode > RGB Color, but always follow the requirements of your chosen printing provider.
How can I check whether my design is too big?
Print a paper copy at the intended size and hold or tape it against the shirt. It is an easy way to judge the proportions before ordering a print or cutting vinyl.
Do I need a Cricut to make a custom T-shirt?
No. You can upload your prepared artwork to a print-on-demand service and order a finished shirt. A Cricut is an alternative for cutting vinyl and applying the design yourself.
Why do I need to mirror a heat-transfer vinyl design?
The transfer orientation reverses during application. Mirroring before cutting ensures the finished design faces the intended way on the shirt.
Written by Daniel Walter Scott — Founder of Bring Your Own Laptop & Chief Instructor
