How to make an arrow in Illustrator
Questions


Student Gallery
Course info
Overview
Join Adobe Certified Professional and Adobe MAX Master Award winner Dan Scott on an incredible journey into Adobe Illustrator! This course is tailor-made for anyone new to Illustrator and the world of design. Dan starts from scratch and unravels the secrets and techniques that let you create anything your creative heart desires, from icons, logos, and postcards to beautifully hand-drawn illustrations.
It's a relaxed, well-paced introduction, and Dan's approach is simple: start with shapes. A surprising amount of professional vector work begins as a few basic shapes combined and subtracted with the Shape Builder. Once that clicks, you'll be ready to conquer the Pen, Pencil, and Curvature tools like a pro and dive into the wonderful world of fonts.
Together with Dan, you'll learn how to:
- Master the art of drawing with simple shapes and lines
- Combine and subtract shapes to build custom logos and graphics
- Draw with confidence using the Pen, Pencil, and Curvature tools
- Pair fonts and style type that suits your design
- Choose color combinations with a designer's eye
- Export your creations for print, web, social media, and more
You'll practice on real-world projects from icons and logos to postcards and hand-drawn illustrations, then bring everything together in a complete Farmers' Market brand built from your own mini-brief. You'll gather inspiration with a mood board, design the logo and graphics, and present it all in realistic mockups. Dan also walks through Illustrator's hidden gems, including the mind-blowing Generative AI and AI Assist features. Turn rough sketches into polished vectors with Concept to Vector, generate artwork from a text prompt, get AI feedback before you share your designs, and keep your layers tidy. Dan shows you where these tools save you time, and where they're not worth the effort.
Plus, you'll get a handy printable PDF cheat sheet, forum support from the BYOL Teaching Assistant team, and a treasure trove of additional resources and websites to supercharge your career. Whether you've never even opened Illustrator or you've struggled with it in the past, Dan is here to show you the easy way to create breathtaking artwork and portfolio projects you'll be proud of. Let's go from Illustrator zero to Illustrator hero!
Requirements
- Adobe Illustrator installed (sign up for a free trial here)
- No prior Illustrator, design, or drawing experience required
- Basic computer skills (if you can send an email and browse the web, you're ready)
Who this course is for
- Absolutely no previous Adobe Illustrator experience is required
- This course is designed for newcomers to Illustrator and design in general, so no prior design, drawing, or illustration experience is necessary
- This is a relaxed, well-paced introduction, perfect for producing a wide range of drawings, illustrations, logos, and portfolio projects
- Only basic computer skills are necessary; if you can send emails and surf the internet, you're more than capable of mastering this course!
What you'll learn
- Drawing with shapes and lines
- Combining and subtracting shapes with the Shape Builder tool
- Designing custom logos and vector graphics
- Mastering the Pen, Pencil, and Curvature tools
- Working with brushes, strokes, and the Width tool
- Working confidently with type and fonts
- Curving and warping text
- Picking fonts faster with AI Assist
- Choosing effective color combinations
- Embedding and masking images and graphics
- Removing image backgrounds with one click
- Tracing images and converting hand-drawn artwork into vectors
- Creating stencil-style artwork from real drawings
- Creating overlapping artwork with Intertwine
- Distorting, bending, warping, and liquefying artwork
- Creating simple 3D illustrations
- Viewing 2D artwork from new angles with Turntable
- Designing seamless repeating patterns
- Turning rough sketches into polished vectors with Concept to Vector
- Generating vector artwork from a text prompt with Generate Vector
- Getting AI feedback on your designs before you share them
- Organizing layers automatically with AI Assist
- Gathering inspiration with mood boards
- Building a complete Farmers' Market brand from your own mini-brief
- Presenting your work with realistic mockups
- Exporting artwork for print, web, social media, and clients
- Multiple hands-on class projects you can add straight to your portfolio
- Practical workflows, shortcuts, and techniques used by professional graphic designers

Daniel Walter Scott
Founder of Bring Your Own Laptop & Chief Instructor
I discovered the world of design as an art student when I stumbled upon a lab full of green & blue iMac G3’s. My initial curiosity around using the computer to create ‘art’ developed into a full-blown passion, eventually leading me to become a digital designer and founder of Bring Your Own Laptop.
Sharing and teaching are a huge part of who I am. As a certified Adobe instructor, I've had the honor of winning multiple Adobe teaching awards at their annual MAX conference. I see Bring Your Own Laptop as the supportive community I wished for when I was first starting out and intimidated by design. Through teaching, I hope to bring others along for the ride and empower my students to bring their stories, labors of love, and art into the world.
True to my Kiwi roots, I've lived in many places, and currently, I reside in Ireland with my wife and kids.
Certificates
We’re awarding certificates for this course!
Check out the How to earn your certificate video for instructions on how to earn yours and click the available certificate levels below for more information.
Downloads & Exercise files
How do you add arrowheads to a line in Illustrator?
Select your line, open the Stroke panel, and choose an arrowhead from the start or end dropdown. Use the swap button if it appears at the wrong end, then adjust its Scale percentage to suit the stroke weight. The same controls work on straight, curved and hand-drawn paths.
How to Make Arrowheads in Adobe Illustrator
Key takeaways
Add arrowheads to paths drawn with the Line Segment, Pen, Curvature or Pencil tool.
Fix oversized arrowheads without making the whole line thinner.
Reshape straight arrows and draw smooth, looping arrows.
Combine arrowheads with rounded caps and variable-width profiles.
Choose whether strokes and arrowheads change size when you resize a path.
Arrowheads are easy to add in Illustrator. Adjusting them is where things get a little weird. An arrowhead can land at the wrong end, look enormous when you increase the stroke weight, or shrink when you wanted its thickness to stay the same.
Fortunately, those are all manageable. I’m using a map of Bunratty Castle, a castle I visited near me, to make one arrow pointing to the castle and another looping towards the car park. It’s a handy way to combine arrowheads with curves, caps and stroke profiles.
1. Draw a line and open the Stroke panel
If you have the exercise file, open Arrows. Otherwise, you can practise the same techniques on a path in your own document.
Draw a line using whichever tool suits the shape you need:
Line Segment tool: for a simple straight line.
Pen tool: for a path you build point by point.
Curvature tool: for a path you want to bend and reshape.
Pencil tool: for a freehand line or a loopy arrow.
For the castle arrow, start with a white stroke at about 3 pt. White makes the line easy to see against the map.
With the line selected, click the word Stroke to reveal its settings. You can also choose Window > Stroke to open the separate Stroke panel. If you’re going to experiment with several settings, keep that panel open. It saves a lot of opening and closing the little pop-up.
2. Add an arrowhead at the correct end
In the Stroke panel, find the two Arrowheads dropdowns. The left one controls the start of your path; the right one controls the end.
That means the first point you drew is the start, and the point where you finished is the end. It does not mean the left or right side of your artwork.
Select your path.
Choose an arrowhead style from either dropdown.
Check which end received the arrowhead.
If it’s the wrong end, click the swap arrowheads button.
I never seem to remember which way I drew the line. Rather than trying to work it out every time, I pick an end and swap it if necessary. There’s a button for it, so we might as well use it.
One small quirk: if the Stroke pop-up is open, Undo may close the pop-up first rather than remove the arrowhead. You may need to use Undo again. Swapping the ends is usually simpler.
3. Balance the arrowhead size and stroke weight
Here’s the bit that can catch you out. Increase the stroke weight to something like 20 pt, and the arrowhead can suddenly look massive. The line gets thicker, but the head may feel much too large for the design.
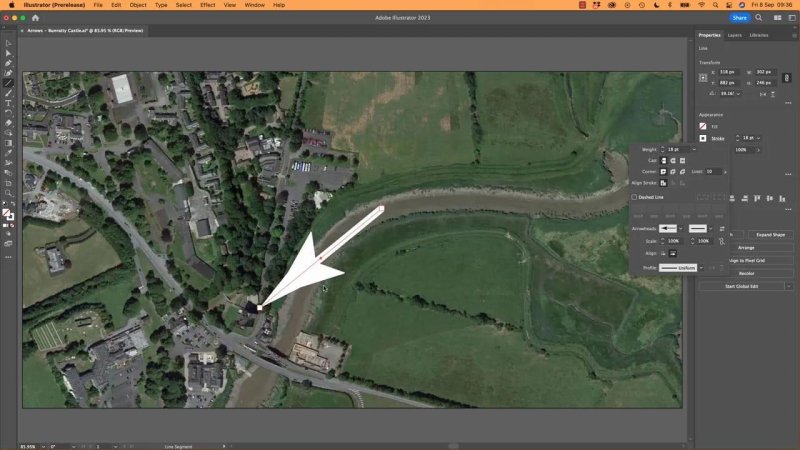
Increasing the stroke weight can leave you with a much larger arrowhead than you need.
Use the arrowhead Scale setting to correct the proportions. Each arrowhead dropdown has a corresponding scale field below it. Adjust the field for the end you’re using.
Try halving the current percentage, then refine it by eye. You can also change the arrowhead style if the shape itself isn’t working. A different head and a smaller scale can make the same line feel much more appropriate.
If you type a value and nothing seems to happen, press Tab. That applies the value and moves to the next field. Pressing Enter can close the pop-up, so Tab is useful when you want to keep experimenting. Clicking another field in the panel also lets you continue adjusting.
Choose where the arrow tip sits
The arrowhead Align controls determine how the head relates to the path endpoint:
Place the tip at the endpoint: the arrow points exactly where the path finishes.
Extend the tip beyond the endpoint: the arrowhead projects past the end of the path.
For this map, I keep the tip at the endpoint. That makes it straightforward to position the arrow precisely on the place I’m pointing to.
4. Change the direction or curve the arrow
To change where the arrow points, use the Direct Selection tool, the white arrow, and move just one endpoint.
The important part is selecting one anchor point, not both. If both endpoints are selected, dragging moves the whole line, even though you’re using Direct Selection.
Click an empty area to deselect the path.
Use Direct Selection to select only the endpoint you want to move.
Drag that point into position.
Now we can stack a few skills and turn the straight arrow into a curved one:
Choose the Curvature tool.
Click once around the middle of the existing path to add a point.
Drag that new point to bend the line.
Switch to Direct Selection if you want to refine the curve using its handles.
Adding the point may not appear to do much at first. The useful bit happens when you drag it. The arrowhead stays attached while you reshape the path.
5. Draw a smooth, looping arrow
For the car park, a little loop gives the arrow more personality. The Pencil tool is a good fit for that freehand shape.
Double-click the Pencil tool to open its options.
Move the fidelity setting towards Smooth.
Draw a flowing line with a loop in it.
Select the finished path with the Selection tool, the black arrow.
Add an arrowhead in the Stroke panel.
Again, the start dropdown corresponds to where you began drawing, and the end dropdown corresponds to where you stopped. If the arrowhead lands at the wrong end, swap it.
For this example, use an 8 pt stroke and an arrowhead scale of 60% as a starting point. Adjust those values to suit the size of your artwork.
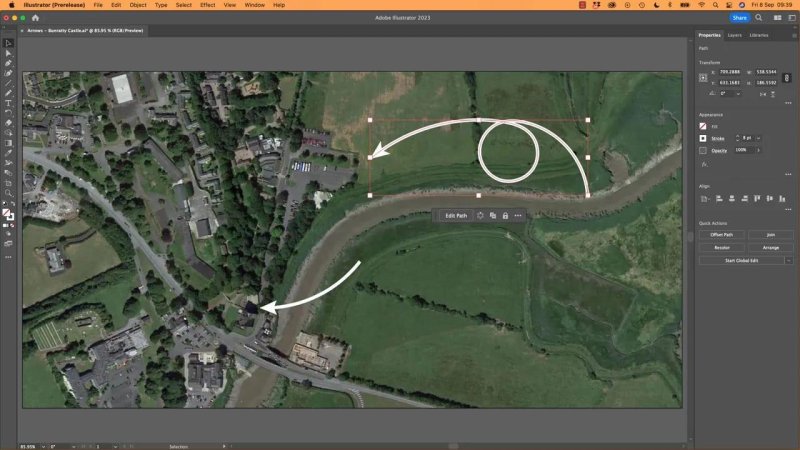
A smooth Pencil path gives the car park arrow a playful loop while keeping the arrowhead editable.
6. Finish the arrow with caps and profiles
An arrowhead is only part of the appearance. The other end of the stroke matters too.
In the Stroke panel, change the cap to Round Cap for a softer, rounded finish at the exposed tail. It’s a small change, but it gives the freehand arrow a nicer end.
Next, try a width profile. Instead of keeping the stroke the same thickness all the way along, a profile varies its width. That can give your looping arrow a tapered, more expressive shape.
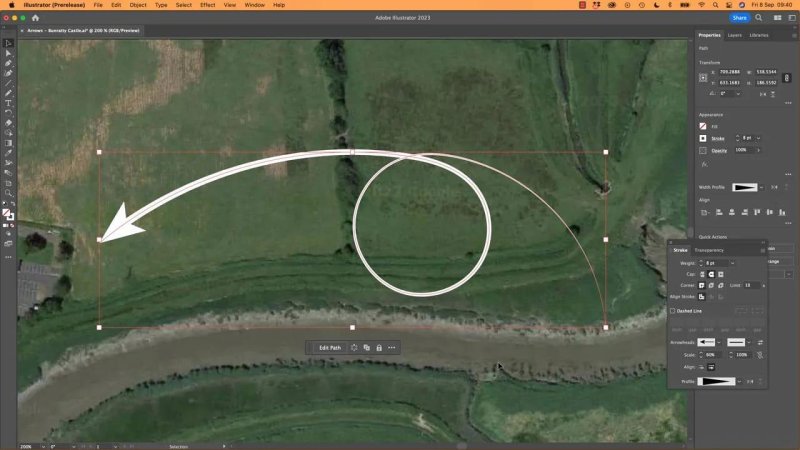
A width profile changes the feel of the loop without needing to redraw the path.
If the thick and thin sections run in the wrong direction, use the profile’s flip control. This is separate from swapping the arrowheads: one reverses the width treatment, while the other changes which endpoint carries the head.
7. Control what happens when you resize an arrow
There’s one more setting worth checking before you scale your arrows: Scale Strokes & Effects. You can find it in the Transform options.
It determines whether resizing changes only the path’s dimensions or also changes the thickness of its stroke and the size of its arrowhead.
Turn it off to make the path smaller while keeping the stroke weight and arrowhead size consistent.
Turn it on to scale the stroke and arrowhead along with the path.
For a map or technical drawing, turning it off can be useful. A short arrow and a long arrow can then have the same visual weight. Hold Shift while resizing to keep the path’s proportions.
When you want the whole arrow to become a proportionally smaller graphic, turn the setting on instead. There isn’t one correct choice for every job. It’s a setting you’ll toggle depending on what you need.
The combination is what makes Illustrator arrows useful: draw the path, add the head, balance its scale, and then refine the curve, tail and width. A plain line can become a clean map pointer or a cheerful little loop without rebuilding it from scratch.
Key terms
Stroke weight
The thickness of a path’s line, measured here in points. Changing it also affects the arrowhead’s size.
Arrowhead scale
A percentage that adjusts an arrowhead’s size relative to the stroke. Use it to balance the head without thinning the line.
Anchor point
A point that defines a path’s shape. Moving one endpoint changes the arrow’s position or direction without moving the entire path.
Cap
The treatment applied to an open stroke’s end. A round cap gives the arrow’s exposed tail a rounded finish.
Width profile
A setting that varies a stroke’s thickness along its length. Flipping the profile reverses that width treatment.
Scale Strokes & Effects
The option that controls whether stroke thickness and arrowhead size scale when the path is resized.
FAQs
Why is my Illustrator arrowhead at the wrong end?
The arrowhead dropdowns refer to the start and end of the path, not its position on the page. Use the swap arrowheads button in the Stroke panel to move the head to the other end.
How do I make an arrowhead smaller without changing the line thickness?
Reduce the corresponding arrowhead Scale percentage in the Stroke panel. Leave the stroke weight unchanged, and press Tab to apply the new percentage while continuing to edit.
How do I resize an arrow without making its stroke thinner?
Turn off Scale Strokes & Effects in the Transform options before resizing. The path changes size, but its stroke weight and arrowhead size remain consistent.
Written by Daniel Walter Scott — Founder of Bring Your Own Laptop & Chief Instructor
