How to draw rounded rectangles, triangles & tracing images in Illustrator
Questions


Student Gallery
Course info
Overview
Get ready to dive into the mesmerizing world of Adobe Illustrator, where we'll craft stunning looking graphics. But we won't stop at just learning the tools; we're about to unleash our creative powers by creating real-world, practical, and portfolio-ready projects. Together we will learn to:
• Master the art of drawing with simple shapes and lines.- • Unleash your creativity by combining and subtracting shapes using the Shape Builder.
- • Create advanced custom logos and graphics.
- • Explore the world of creative brushes, lines, and strokes to elevate your designs to the next level.
- • Use the Width tool to enhance your lines and strokes adding a style.
- • Conquer the pen, pencil, and curvature tools like a pro.
- • Dive into the wonderful world of fonts and the art of mastering type.
- • Use the intertwine feature to create interesting overlapping illustrations.
- • Learn the art of masking images and graphics.
- • Discover the magic of distorting, bending, warping, and liquefying illustrations.
- • Select and use color combinations like a true master of design.
- • Craft your own unique repeating patterns.
- • Transform real drawings into captivating stencil-style images.
- • Export your creations for print, web, social media, and more.
- • Acquire the techniques used by professional graphic designers.
- • Work with your own mini-brief - creating a unique Farmer's Market brand and bringing it to life.
- • Harness the power of Adobe's Generative AI features to push your creative boundaries.
- • Working with mood boards to gather inspiration.
- • Create realistic mockups to enhance your designs even further.
- • Engage in a wealth of class projects to put your skills to the test.
- • Stay ahead with a handy printable PDF cheat sheet.
- • Access downloadable exercise files to help you practice and refine your skills.
- • Benefit from forum support provided by the BYOL Teaching Assistant Team.
- • Discover professional workflows and shortcuts to work more efficiently.
- • Gain access to a treasure trove of additional resources and websites to supercharge your career.
But that's not all! I'll unveil Illustrator's hidden gems that will transform you into a pro at discovering and utilizing breathtaking vector based graphics. We'll dive into the latest Illustrator tools, including the mind-blowing Generative AI features that allow us to craft illustrations that were once thought impossible.
Whether you've never even opened Illustrator or have struggled with it in the past, I'm here to show you the easy way to create breathtaking artwork and portfolio projects to be proud of. Join me as we go from Illustrator zeros, to Illustrator superheroes!
Who this course is for
• Absolutely no previous Adobe Illustrator experience is required.- • This course is designed for newcomers to Illustrator and design in general, so no prior design, drawing, or illustration experience is necessary.
- • This is a relaxed, well-paced introduction, perfect for producing a wide range of drawings, illustrations, logos, and portfolio projects. Only basic computer skills are necessary - if you can send emails and surf the internet, you're more than capable of mastering this course.
What you'll learn
- • Drawing with Shapes & Lines
- • Drawing with the Shape Builder
- • Creating a custom logo
- • Working with Brushes
- • Drawing with the pen, pencil & curvature tool
- • Learn how to work with type & fonts.
- • How to vectorise an image in Illustrator
- • How to curve text in illustrator
- • How to trace an image in illustrator
• How to warp text in illustrator
• How to embed images in illustrator
• How to mask images & graphics.
• How to distort, bend, warp & liquefy illustrations.
• How to make 3D illustrations.
• How to make your own repeating patterns.
• How to create stencil style images from real drawings.
• How to save, print & export for Print, web & social media.
• Lots of real world exercises for you to practice.
• Loads or class projects for you to complete.
• Printable Cheat sheet.
• You will get the finished files so you never fall behind.
• Downloadable exercise files.
• Techniques used by professional graphic designers.
• Professional workflows and shortcuts.
• A wealth of other resources and websites to help accelerate your career.

Daniel Scott
Founder of Bring Your Own Laptop & Chief Instructor
instructorI discovered the world of design as an art student when I stumbled upon a lab full of green & blue iMac G3’s. My initial curiosity around using the computer to create ‘art’ developed into a full-blown passion, eventually leading me to become a digital designer and founder of Bring Your Own Laptop.
Sharing and teaching are a huge part of who I am. As a certified Adobe instructor, I've had the honor of winning multiple Adobe teaching awards at their annual MAX conference. I see Bring Your Own Laptop as the supportive community I wished for when I was first starting out and intimidated by design. Through teaching, I hope to bring others along for the ride and empower my students to bring their stories, labors of love, and art into the world.
True to my Kiwi roots, I've lived in many places, and currently, I reside in Ireland with my wife and kids.
Certificates
We’re awarding certificates for this course!
Check out the How to earn your certificate video for instructions on how to earn yours and click the available certificate levels below for more information.
Downloads & Exercise files
Transcript
Hi everyone.
In this video we are going to draw this sleeping fox.
Okay? We're going to draw it with simple shapes.
rectangles, triangles, stars, lines, curves
just basic stuff so that we can learn the fundamentals of illustrator.
We're actually only going to get this far two triangles and a curvy rectangle.
But there's lots of foundation.
All fundamental stuff in this video, so don't skip.
Plus, we'll learn how to bring in images
and lock them in the background so that we can trace over the top.
All right, let's get going.
All right.
Our first up we are going to create a file.
Either click this button here or file new.
Up to you.
There's a bunch of preset sizes along the top here okay.
We're going to go to an easy one that we probably all know and love.
We're going to use us later.
If you're a metric person just use later
okay.
So I'm going to use letter.
And over here I'm going to go portrait I'm going to go to landscape okay.
And get started.
The other thing we're going to change is under color mode down here okay.
We're going to change to RGB.
Okay.
we'll talk about color later on in the course.
RGB camera, computer screen color, Cmyk, Smallville commercial printing.
I was just going to stay on the computer.
You have more colors than RGB,
so we're going to keep that things a brighter and nicer.
We're not worried about rust effects at the moment.
Leave it. Whatever it is.
And then let's click create.
Next up, we're going to all draw from a pitch that have drawn okay.
Like a hand drawing.
We're going to bring it in and trace over the top of it.
And I'm just to keep everybody doing the same thing and not getting too lost.
So we're going to go to file and we're going to go to this one called place okay.
File place is the same as file import.
illustrator likes to be different like the only program ever okay.
So go file place.
And I want you to look in your exercise files. Okay.
And there's one in there that should be called sleeping Fox.
Okay.
And before you bring it in, what I want you to do is there
should be some stuff in the bottom here on a PC and a mac.
I'm not actually sure
if it's on a PC as well, but if you can't see the stuff in the bottom,
there's a little options.
Button shows the options because we want to do this template.
I'll show you what it does instead of just bringing in, in an image.
Okay. What it'll do is that'll do some fancy stuff for us.
Let's click place.
Okay.
What's fancy about it
in, it is kind of washed it out so we can draw over the top of it.
Normally this would be solid black.
If we go to our layers panel over here in the top right.
Okay. It's put it on its own layer.
Let's this one here.
It's locked it so we don't record okay.
And we can turn off visibility on and off so we can see it.
But let's see that little lock there.
It's locked it and it's made another little layer for us to draw on.
So it's just a tracing layer. That's why it's good.
They call it a template. Thank you illustrator okay.
Go back to properties and we'll start drawing.
First thing we're going to draw is we are going to draw a rectangle.
Very exciting. There it is there. Click on it okay.
If yours is somehow on something else okay.
Any of these tools that have see the little, chevron or
the little triangle in the bottom corner, that means there is
if I click hold, hold, hold my mouse down the stuff underneath it.
Some of them don't have it, but a lot of them do.
Okay.
So if you've got something other than the rectangle tool,
click it, hold it down, pick the rectangle tool. Okay.
So what we're going to do is draw the body here.
So I'm going to start at a point I can see click my mouse down hold it.
And just kind of covered.
We're going to be really rough here.
We're not going to be like surgical precision.
But you can kind of see that looks like it kind of covers the body.
Nice.
Once you have drawn it, if you've done it terribly,
what we can do is we can resize it okay.
And that is the black arrow.
So this one here okay.
Remember this was kind of like really big movements.
And the direct selection tool does little parts.
So let's click this top one okay.
And you can grab any of these squares and any of the corners to go up okay.
And move it around and kind of get it close and drag it along there.
You can grab the corner ones and resize it okay.
There you go.
So get it something like this.
It doesn't have to be perfect.
Now what we want to do is play around with the stroke in the fill.
So depending on what you last drew, you as might look different from mine.
Yours might look the same.
we've got over here a fill of white and a stroke,
which is the line around the outside of black.
I want to give it a fills click on the little,
this little square here next to the word fill. If it's not there.
Okay, grab the black arrow.
Okay. If it's gone, you got to click on the object. Okay.
And if you can't click on the objects, maybe click on the edge of the object
that doesn't have a fill means you can click the center.
Similar to click the edge.
So Black Arrow haven't selected.
You should see the fill over here.
And we're going to pick a Fox color ish.
Anything you like you can have a green fox blue fox okay.
Next thing I want to do is I just click off
and that little panel drops back in there.
I'm going to get rid of the stroke.
At the moment.
If I click from the background, can you see
there's a black stroke around the outside?
If I select on it and say you my friend, it's a click on that box there
that has the stroke color.
Okay, you might have this one here, you might not.
This is the none.
The little red line means I have no stroke.
You can do with the fill as well.
I can have no stroke and no fill.
It's not very useful.
It's a rectangle, okay.
And it's really hard to select afterwards.
So, don't do it.
You can't grade the edge though.
Okay.
But I'm going to have a fill and I'm going to have a stroke of none.
Here we go. We've done a rectangle.
Only took us a couple of minutes.
We'll get faster as we go.
That's the thing about fill and stroke. We're using this one over here.
You can totally use this one over here.
Same, same.
Okay, I can click the fill.
I actually got double click it.
And I can drag this slider up and down to pick different colors.
I can move this little circle around
to pick colors within shades within that color.
Okay. And same with the stroke.
I can click on this one here, the stroke of the background.
Double click it okay.
And in the same thing here I can drag this around and drag within the hues of here
to pick a stroke in a fill color I'm going to hit cancel and get rid of this.
I can go up to here and just pick orange.
That'll work, but I can use the undo.
So undo is undo it. It undo the shortcut.
It's one of those shortcuts you going to use a lot okay.
It's on the shortcuts sheet that you've printed off.
Or write it down.
Okay.
On a mac, it's command Z controls the on a PC.
Okay. You can go back loads.
I don't think there's a limit on it okay.
So just keep hitting undo
either coming up here or using the shortcut to edit undo
until it's back to where we didn't break it.
All right.
The next thing we're going to do is the radius of the corners.
This is something fancier.
Now with my black arrow okay I can click
any of these, see these like the little targets in the corners.
If I click hold and drag it.
Look at that. Look at rounded corners. Yes.
But you'll notice that if I move this out of the way, I only want two corners done.
So I'm going to undo. Undo.
Okay.
Remember mine's command Z on a mac, Ctrl Z on a PC.
And what I want to do is actually just do one corner okay.
So I can click on this once.
You can kind of tell, can you see the target looks a little different.
Yeah.
It just looks different.
click hold and drag that one.
Look at that same over here.
Click the moments. Drag that up.
Cool. Don't worry for this video.
We're just making it good enough.
But if you did want it to be perfect, I'm undoing again.
You can click one, hold shift and click the other.
Holding shift and clicking
multiple things will kind of select both of them at the same time.
Now with nothing held down, I can click and drag one of them.
Look, they're both perfectly the same
and my drawing is not perfect, so don't sweat it if yours isn't okay.
I'm sweating it because I want to move it up here. Go.
go. Rounded corners. Awesome.
Next up, let's draw the head.
We're going to use the polygon tool which is triangles of polygon.
There's no particular triangle tool okay.
We've got the polygon tool.
Remember to get to all these other tools.
Just click hold it down.
Hold hold hold and pick polygon.
Now by default it probably picks this I just clicked and dragged out
okay I don't know. Octagon.
No that is a pentagon hexagon Pentagon I think. So.
Anyway, what we can do if we want all the options
because we want triangle isn't three sides.
Okay.
What you do is with the tool selected, just click once
and you get given things like the radius which is the size of it
and how many sides I'm going to want three because I want triangle.
Whatever gets drawn will do okay.
Doesn't matter if yours is bigger or smaller or if it's crooked or not crooked.
Okay. We have got, triangle.
What I would like to do now is scale it and rotate it
to kind of sit over the top of this. Okay.
So what I'm going to do is, show you how to scale, rotate, grab the black arrow.
Now you can do it over here.
Like if we want it to go 90 degrees, you can just type it in 90 degrees.
And I didn't want it to go 90 degrees.
You can get it to go -90 or to 70, whichever you prefer.
Okay. So that's one way.
The most common way of doing things is actually just doing it
with the black arrow tool.
So look at this.
when I'm hovering above these corners, there's two options.
There's this one, the little double arrow and then the one just a bit further out.
This is like no man's land, right? Like this.
This one here is actually scale. We'll do him in a second.
But the rotation one is not there.
But just a little bit further out,
but not too far because it goes back to the arrow
somewhere in here, this magical land of rotation.
So what we're going to do is click hold once we see it.
Okay.
If you can't see it, remember have the selected find the Magic Zone.
Click and drag it.
You can drag it any which way you like okay.
What I want to do is get it to lock in
to kind of commonly use, angles, which is holding the shift key down.
So I'm still dragging hold shift and it goes in 45 degree angles.
Boop boop boop boop boop. There you go.
So I want to pointing that way okay.
The next thing I want to do is play around with size okay.
And we kind of saw it
before any of the corners you can rotate or do size doesn't matter.
up to you.
So I want this little stretchy arrow thing okay.
And I can drag it any size I want.
Okay.
If I want it to be like I don't want it to kind of distort, okay.
You can hold down the shift key like we did with the rotation.
That really common that shift key okay.
To get things to kind of go to normal sizes.
Or in this case it constrains the height to be the width as well.
So it kind of gives proportionately bigger.
So get it close.
Move it I'm going to grab the center of it.
Sometimes you need to grab the edge of it.
If you don't have a fill okay I'm going to get it close to it.
Hold the shift key down.
You can hold shift before you start dragging or afterwards
get it close enough.
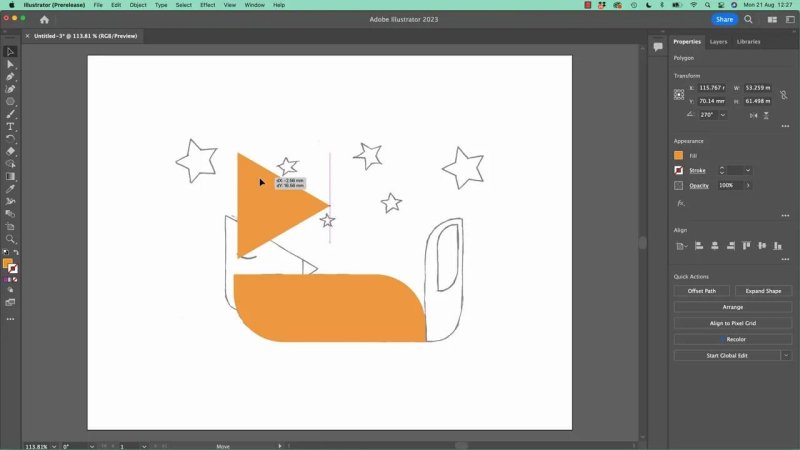
All right. So we're going to head to Big Triangle.
And I want to do a couple of things.
But I need to be able to see the thing in the background.
So we've added fill and remove this stroke and all of this
I want to select this hold shift to select the header as well okay.
So I've got them both selected.
And then I'm going to say that fill
that we just picked I'm going to switch you to none.
And the stroke
okay I have to kind of click off to get the little box in close up okay.
So I just kind of click off in the background.
If you do click off in the background like I accidentally did.
Now kind of on purpose.
Not really.
Okay.
Is even though I can't see it, it's got no stroke, no fill.
I can kind of hover around and eventually there's this thing, it says, hey,
there's something here, it's going to fill a stroke,
but I can click on it once, hold shift, try and find that one.
Now I've got them both selected.
They both have no fill, both have no stroke.
Let's give the stroke black okay.
So I can see the outside of it and clean off the background.
Because what I want to do is get this to be the right size, okay?
I pretty much got it before it's close enough.
Okay.
I want to play around with the corner options down here.
So I'm going to click off and click here.
Now in the corner options down here I want to run this one.
It only has one target at the moment okay.
So what I can do with a triangle is would be using the black arrow.
I told you that you use that mostly and you use the direct selection tool
which is the white arrow for little pieces.
Okay.
Because what I really want you to do is just do all the rounded corners.
Just kind of ignored these down here, okay.
Just didn't have them.
So if I go to the, like selection tool, which is like the details tool,
it gives me more details.
I'm going to click on just this target okay.
And drag this one up. Nice.
So you end up toggling between these two loads I'm back on my black arrow.
It's my like default tool is the one you end up falling back to.
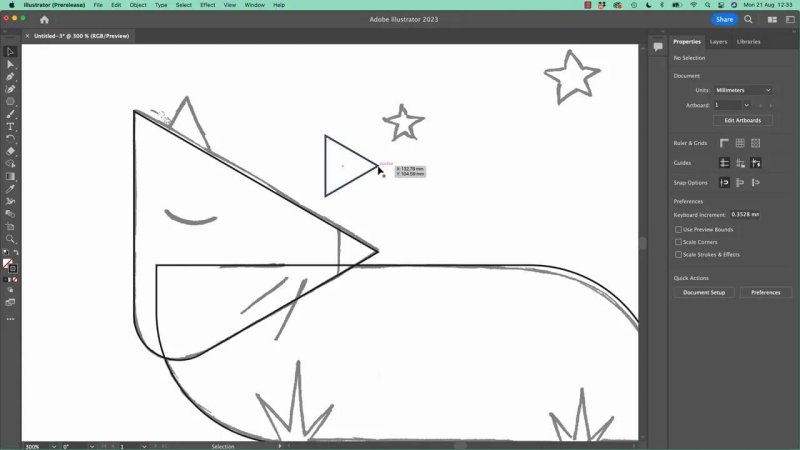
Now let's draw the nose.
We're going to do another triangle just to practice.
So we want the polygon tool okay I'm going to if I click out and drag
you notice it gone from a pinch again to a triangle automatically.
It just remembers the last thing you've done.
What I want to do is that I want it to come out at some random shape and angle
and size. I'm going to hold down.
Remember the key that kind of constrains things.
Do you remember it was. That's right. Hold down shift key.
You can see it kind of locks it into position and I can pick a rough size.
And for good measure we are going to look at the black arrow.
And we are going to get in that no man's land not size.
We're going to rotate it, hold down, shift.
So it kind of gets it into the right angle that we want.
Now it has no fill.
I can see no fill, no stroke.
Remembers the last thing we did. Okay.
And I'm going to drag it over.
You can either I end up dragging the the line.
You can drag the dot in the middle okay.
That if you find that more handy okay, I end up dragging the line for some reason.
So we're going to get it down to kind of where we need it.
And then we're going to zoom in.
Who remembers what zoom in is.
It's right plus that's right.
Command plus on a mac, control Plus on a PC.
Come in nice and close.
Remember, hold down the spacebar with the handle
just to kind of get it in position.
And what we want to do is we want this I got nothing selected.
So just click in the background.
I want this to line up perfectly with this.
Sometimes if you try and do it, which is if I grab the edge here.
So it's this is what happens.
It's easier to have it deselected because I want this point
to line up with this point.
If I grab it to start with.
And what you'll notice is there's all these words, right?
Okay. They're called smart guides and they're helpful.
Says do you want to grab the anchor. Yeah. Like yep.
Do you want to grab this path, which is the line
if I want to grab the anchor.
Okay.
If you can't see any of those words, go up to view
and make sure your Smart Guides has a little techniques to it.
Okay.
And what we're going to do is grab the anchor
and say, you go and match that anchor and it kind of gets close to it.
It should snap in if you're zoomed out, which is command or control minus,
it's a little hard to do it. Watch this.
If I try and do it out here, kind of
and that's what can frustrate people in illustrator.
But if I zoom in, it kind of says I really focus on this area, okay,
so I can drag you and it's just a little bit,
you know, nicer to work when you're zoomed in. Okay.
And you see, in this case what it said was intersect.
Would you like this anchor intersect with this one?
Yes, please. It's a bit big.
So I'm going to hold down my shift key and make it smaller.
Then grab it again.
So remember I deselect it off and then just grab the anchor.
Get it in there.
Look at that's what I like to do is give it a fill of black.
And does it need a black stroke?
It can, it can't.
I'm just going to turn it off okay.
So it has a fill but no stroke command or control minus to zoom out.
There we go. Got a hint with the nose.
All right.
It's a long video and we haven't done a whole a whole lot.
What we can do is we go to layers panel.
Let's turn the visibility of our template off.
And this is it.
We hit the big time.
but it's giving us a sense of the tools.
Let's get on to the next video.
We'll draw the eye and the whiskers and the stars and all the rest of it.
Is that coloring it into making it look awesome?
All right, I'll see in the next video.
How do you draw a fox in Illustrator using simple shapes?
You can build a sleeping fox in Adobe Illustrator with a rectangle, a couple of triangles, and a few basic adjustments. The real win is not just the fox itself, but learning how to place a reference image, lock it as a template, work with fill and stroke, round corners, rotate shapes, and line things up accurately with Smart Guides.
Drawing With Basic Shapes in Illustrator
This fox looks fancy enough to feel like proper illustration work, but the construction is wonderfully simple. That is exactly why it is such a good exercise.
The goal here is not perfection. The goal is to get comfortable with the foundations of Illustrator by drawing over a reference image and turning basic shapes into something recognisable. By the time the body and head are in place, you have already touched a bunch of the tools that matter most when you are starting out.

This simple fox sketch is enough to teach a lot of Illustrator basics without getting overwhelming.
Why this exercise is worth doing
At first glance, it might seem like not much happens. You make a rounded rectangle, add a triangle for the head, then another small triangle for the nose.
But packed into that process are some of the most useful beginner skills in Illustrator:
Creating a new document with sensible settings
Choosing RGB for screen based artwork
Placing an image as a template
Using layers and locks properly
Drawing with rectangles and polygons
Switching between fill and stroke
Removing strokes cleanly
Resizing and rotating objects
Rounding corners selectively
Using the Selection and Direct Selection tools
Snapping points together with Smart Guides
Zooming in for precise alignment
That is a solid chunk of Illustrator muscle memory right there.
Create the document first
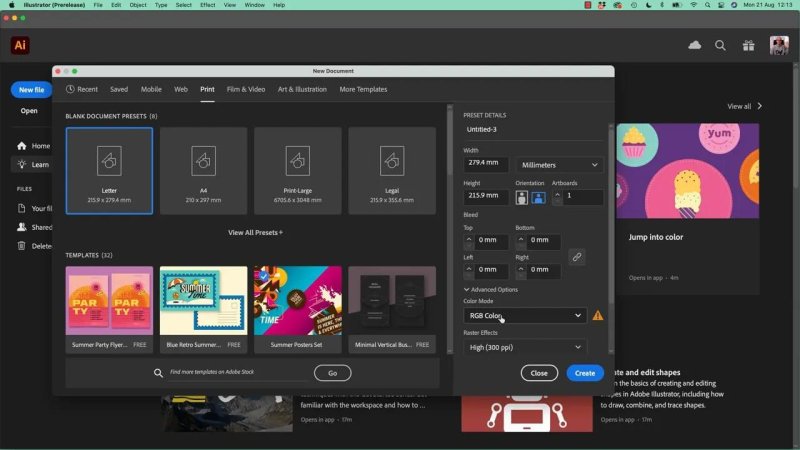
Start by creating a new file. You can use the new document button on the home screen or go through File > New.
For this exercise, use a US Letter preset and switch the orientation to Landscape. The exact page size is not the important part, so if you usually work in metric, do not overthink it. The main idea is just to get onto a simple artboard quickly.
The setting that does matter here is Color Mode. Change it to RGB.
Why RGB? Because this artwork is staying on screen. RGB gives you a brighter, wider range of colours than CMYK, which is aimed more at commercial printing. If the artwork is living digitally, RGB is the better fit.
Choosing RGB at the start saves hassle later when the artwork is meant for screens.
Place the fox sketch as a template
Rather than drawing the fox freehand, bring in a sketch and trace over it. This keeps the exercise focused on Illustrator tools instead of worrying about inventing the design from scratch.
Go to File > Place. Yes, Illustrator calls it Place instead of Import. That is just one of those Illustrator things.
Before placing the image, look for the options at the bottom of the file dialog and enable Template. If you do not see those options, expand the dialog first.
Using the Template option does a few helpful things automatically:
It places the image on its own layer
It fades the image back so it is easier to draw over
It locks that layer so you do not accidentally move or edit it
It creates a fresh layer above for your tracing work
That is much better than dropping an image onto the page and then wrestling with it every few seconds.
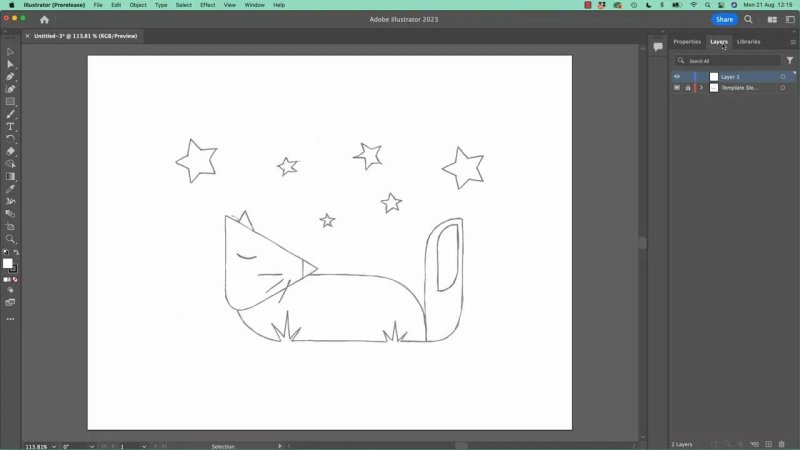
The template layer setup is one of those small Illustrator conveniences that makes tracing much less annoying.
Draw the fox body with a rectangle
Now for the exciting part: a rectangle. Genuinely.
Select the Rectangle Tool. If another shape tool is showing in the toolbar, click and hold to reveal the hidden options and choose Rectangle.
Draw a rough box over the fox body. This is not the time for surgical precision. Just cover the main body shape well enough to give yourself something to work with.
If the shape is too big or in the wrong place, switch to the Selection Tool, which is the black arrow, and adjust it by dragging the corners or sides. The black arrow is your broad movement tool. You will use it constantly.
Set the fill and remove the stroke
Once the rectangle is selected, give it a fill colour. Pick any fox-like colour if you want to stay on theme, or go rogue and make a blue or green fox if that makes you happy.
Then remove the stroke. The stroke is simply the outline around the shape. Set it to None, usually shown as a white box with a red slash.
A shape with both no fill and no stroke is technically still there, but it becomes annoying to select, so avoid that unless you mean it.
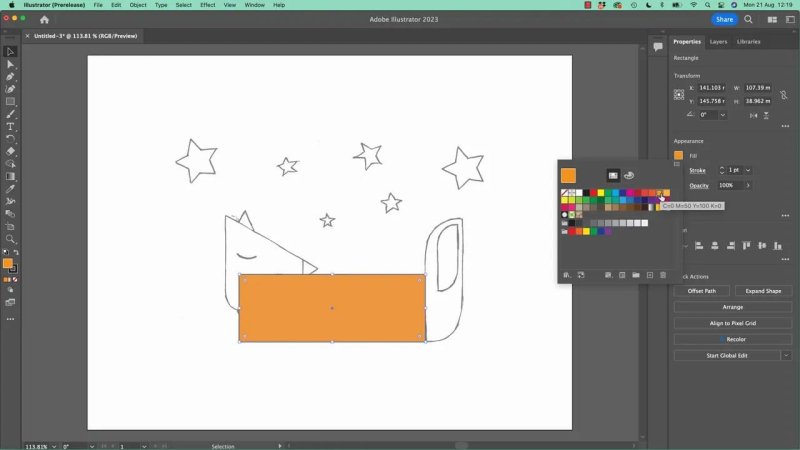
A flat fill instantly makes the main body shape easier to read and easier to edit.
Two ways to choose fill and stroke colours
You can adjust fill and stroke from the Properties panel, or use the colour swatches and colour picker directly in the toolbar. Both routes are valid.
If you double click the fill or stroke box, Illustrator opens a colour picker where you can:
Move up and down through hue ranges
Choose lighter or darker variations within that hue
Set fill and stroke independently
If you make a mess, use Undo. A lot. On Mac that is Command + Z. On PC it is Control + Z.
Undo is one of the most-used shortcuts in Illustrator, and for good reason.
Round only the corners you want
The body of the sleeping fox is not a perfect rectangle, so now you soften it.
With the shape selected using the black arrow, you will see little corner widgets. Dragging one rounds the corners. If you drag without thinking, Illustrator rounds all of them together.
That is fine if you want a pill shape. It is less fine when you only want certain corners rounded.
To round specific corners:
Click a single corner widget once to target just that corner
Drag it inward to round only that point
Repeat for the other corner you want softened
If you want two corners to match exactly, click one, then Shift click the other, and drag either of them. Illustrator will adjust both together.
That is a small trick, but a very useful one.
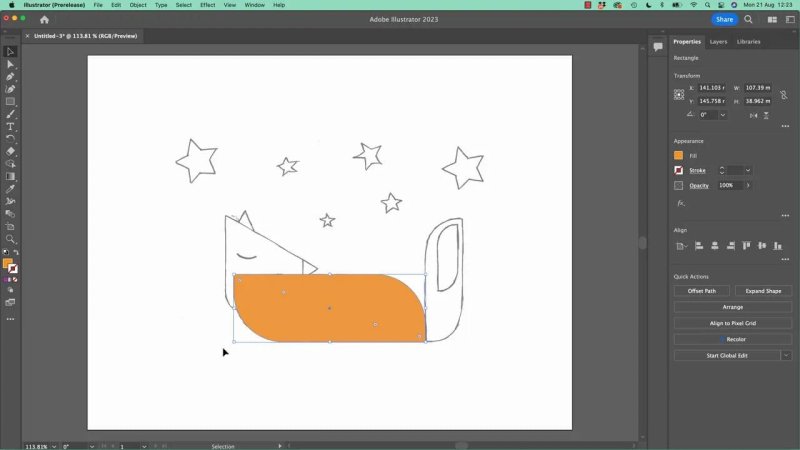
Rounding just a couple of corners is what turns a stiff box into something that starts to feel like a sleeping animal.
Build the head with a triangle
Illustrator does not give you a dedicated triangle tool. Instead, triangles come from the Polygon Tool.
Select the Polygon Tool, then click once on the artboard instead of dragging. Clicking opens the polygon options box, where you can set the number of sides directly.
Set it to 3 sides. That gives you a triangle.
Do not worry if the initial triangle is too large, too small, or facing the wrong direction. That is normal. It is just the starting point.
Rotate the triangle
With the triangle selected and the black arrow active, hover near a corner. You will notice two useful zones:
On the corner gives you scaling
Just outside the corner gives you rotation
There is a little sweet spot for rotation. Too close and you scale. Too far and you get the normal arrow again. Somewhere in that middle zone lives the rotation cursor.
Drag to rotate, and hold Shift if you want the angle to snap in cleaner increments. That makes it much easier to get the triangle pointing in the direction you want.
Scale proportionally
To resize without distorting the triangle, drag from a corner while holding Shift. That keeps the proportions locked, which is usually what you want for shapes like this.
Move it into place so it forms the fox head.
The head starts as a plain triangle, then gets nudged, rotated, and scaled until it sits naturally against the body.
Use stroke temporarily when you need to see through shapes
At this stage, a solid fill can actually get in the way because it hides the sketch beneath.
A handy move here is to select both the body and head shapes, set their fill to None, and give them a black stroke instead. That lets you see the tracing image clearly while you refine the fit.
This is also a good reminder that Illustrator remembers the last appearance you used. If a new shape suddenly appears with no fill and no stroke, it is not broken. It is just inheriting the styling from the previous shape.
Black arrow versus white arrow
This is one of the core Illustrator habits to learn early.
Black Arrow, or Selection Tool, is for whole objects
White Arrow, or Direct Selection Tool, is for parts of objects
Use the black arrow when you want to move, scale, or rotate a full shape.
Use the white arrow when you want to target a single anchor point, a corner widget, or one specific detail.
For the head, the white arrow is useful because you may want to round just one corner of the triangle instead of all of them together.
That back and forth between black arrow and white arrow happens all the time in Illustrator. Get used to it early and things feel a lot less mysterious.
Draw the nose with another triangle
The nose is just another polygon with three sides.
This time, because Illustrator remembers the previous polygon settings, you can often drag out a triangle straight away. Hold Shift while dragging if you want to constrain the angle so it comes out in a more controlled orientation.
Then use the black arrow to:
Rotate it into place
Scale it down
Move it to the tip of the head
At this point, zooming in becomes really important.
Why zooming in makes Illustrator less frustrating
When you are trying to line up one tiny point to another, being zoomed too far out makes snapping feel unpredictable. Illustrator starts trying to help, but it can feel jumpy and awkward.
Zoom in close using Command + Plus on Mac or Control + Plus on PC.
While zoomed in, hold the Spacebar to temporarily access the Hand tool and move around the artboard.
This combination makes detailed alignment much easier and a lot less irritating.
When you zoom in, snapping the nose into place stops feeling random and starts feeling helpful.
Use Smart Guides to snap the nose into place
Smart Guides are the little on-screen hints that tell you what Illustrator thinks you are trying to do. You will see labels like anchor, path, or intersect as you move objects around.
For the nose, the goal is to grab the correct point and match it to the point at the end of the head.
The easiest way is often to deselect first, then hover until Illustrator identifies the anchor point you want. Once it says you are grabbing the anchor, drag it toward the matching point on the head until it snaps.
If those labels are not appearing, check View > Smart Guides and make sure they are turned on.
In this case, Illustrator may report an intersect cue, which is its way of saying the points are lining up where they should.
Once the nose is aligned, give it a black fill and remove the stroke if you want a clean, solid nose shape.
Turn the template layer off to check your work
One of the nicest ways to see what you have actually made is to hide the reference sketch for a moment.
Open the Layers panel and switch off the visibility of the template layer.
What remains at this stage is simple, but that is the point:
A rounded body shape
A triangle head
A small triangular nose
It does not sound like much, but it is enough to prove that basic shapes can carry a character surprisingly far.
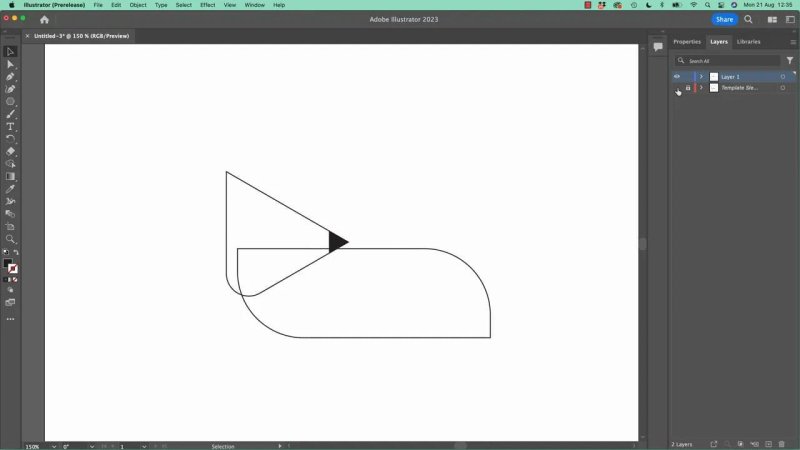
With the template hidden, you can see the whole fox beginning to emerge from just a few clean shapes.
What this teaches beyond the fox
This is really a lesson in how Illustrator works, disguised as a cute drawing.
By the end of this stage, you have already practised:
Starting documents correctly
Thinking in vectors instead of brush strokes
Building illustrations from geometric forms
Editing appearance through fill and stroke
Controlling shape corners
Switching between object level and point level editing
Using snapping intentionally instead of fighting it
That is the real foundation work. The fox just makes it more fun.
FAQ
Why use File Place with Template instead of just dragging in an image?
Because Template does the setup for you. It fades the image back, locks it on its own layer, and creates a separate layer to draw on. That makes tracing cleaner and stops you from accidentally nudging the reference around.
Should I use RGB or CMYK for this Illustrator drawing?
Use RGB if the artwork is staying on screen. It gives you brighter colours and is better suited to digital work. CMYK is more appropriate when you are preparing something for professional print.
What is the difference between the black arrow and the white arrow in Illustrator?
The black arrow selects and moves whole objects. The white arrow lets you edit specific parts of an object, such as individual points or corner widgets. You will switch between them constantly.
How do I make a triangle in Illustrator?
Use the Polygon Tool and set the number of sides to three. The quickest precise method is to select the tool and click once on the artboard, which opens the polygon options box.
Why are Smart Guides useful when lining up shapes?
They show helpful snap information such as anchor points, paths, and intersections. That makes it much easier to align one point to another accurately, especially when fitting the nose to the head.
What should I do if Illustrator snapping feels awkward?
Zoom in closer. A lot of snapping frustration comes from working too far out. When you zoom in, Illustrator can focus on a smaller area and the snapping becomes much more precise and predictable.
- Powered by Marvin
- Terms of use
- Privacy policy
- Cookie policy
-
- © Bring your Own Laptop Ltd 2026