Drawing with the Pencil Tool in Adobe Illustrator CC
Questions


Student Gallery
Course info
Overview
Get ready to dive into the mesmerizing world of Adobe Illustrator, where we'll craft stunning looking graphics. But we won't stop at just learning the tools; we're about to unleash our creative powers by creating real-world, practical, and portfolio-ready projects. Together we will learn to:
• Master the art of drawing with simple shapes and lines.- • Unleash your creativity by combining and subtracting shapes using the Shape Builder.
- • Create advanced custom logos and graphics.
- • Explore the world of creative brushes, lines, and strokes to elevate your designs to the next level.
- • Use the Width tool to enhance your lines and strokes adding a style.
- • Conquer the pen, pencil, and curvature tools like a pro.
- • Dive into the wonderful world of fonts and the art of mastering type.
- • Use the intertwine feature to create interesting overlapping illustrations.
- • Learn the art of masking images and graphics.
- • Discover the magic of distorting, bending, warping, and liquefying illustrations.
- • Select and use color combinations like a true master of design.
- • Craft your own unique repeating patterns.
- • Transform real drawings into captivating stencil-style images.
- • Export your creations for print, web, social media, and more.
- • Acquire the techniques used by professional graphic designers.
- • Work with your own mini-brief - creating a unique Farmer's Market brand and bringing it to life.
- • Harness the power of Adobe's Generative AI features to push your creative boundaries.
- • Working with mood boards to gather inspiration.
- • Create realistic mockups to enhance your designs even further.
- • Engage in a wealth of class projects to put your skills to the test.
- • Stay ahead with a handy printable PDF cheat sheet.
- • Access downloadable exercise files to help you practice and refine your skills.
- • Benefit from forum support provided by the BYOL Teaching Assistant Team.
- • Discover professional workflows and shortcuts to work more efficiently.
- • Gain access to a treasure trove of additional resources and websites to supercharge your career.
But that's not all! I'll unveil Illustrator's hidden gems that will transform you into a pro at discovering and utilizing breathtaking vector based graphics. We'll dive into the latest Illustrator tools, including the mind-blowing Generative AI features that allow us to craft illustrations that were once thought impossible.
Whether you've never even opened Illustrator or have struggled with it in the past, I'm here to show you the easy way to create breathtaking artwork and portfolio projects to be proud of. Join me as we go from Illustrator zeros, to Illustrator superheroes!
Who this course is for
• Absolutely no previous Adobe Illustrator experience is required.- • This course is designed for newcomers to Illustrator and design in general, so no prior design, drawing, or illustration experience is necessary.
- • This is a relaxed, well-paced introduction, perfect for producing a wide range of drawings, illustrations, logos, and portfolio projects. Only basic computer skills are necessary - if you can send emails and surf the internet, you're more than capable of mastering this course.
What you'll learn
- • Drawing with Shapes & Lines
- • Drawing with the Shape Builder
- • Creating a custom logo
- • Working with Brushes
- • Drawing with the pen, pencil & curvature tool
- • Learn how to work with type & fonts.
- • How to vectorise an image in Illustrator
- • How to curve text in illustrator
- • How to trace an image in illustrator
• How to warp text in illustrator
• How to embed images in illustrator
• How to mask images & graphics.
• How to distort, bend, warp & liquefy illustrations.
• How to make 3D illustrations.
• How to make your own repeating patterns.
• How to create stencil style images from real drawings.
• How to save, print & export for Print, web & social media.
• Lots of real world exercises for you to practice.
• Loads or class projects for you to complete.
• Printable Cheat sheet.
• You will get the finished files so you never fall behind.
• Downloadable exercise files.
• Techniques used by professional graphic designers.
• Professional workflows and shortcuts.
• A wealth of other resources and websites to help accelerate your career.

Daniel Scott
Founder of Bring Your Own Laptop & Chief Instructor
instructorI discovered the world of design as an art student when I stumbled upon a lab full of green & blue iMac G3’s. My initial curiosity around using the computer to create ‘art’ developed into a full-blown passion, eventually leading me to become a digital designer and founder of Bring Your Own Laptop.
Sharing and teaching are a huge part of who I am. As a certified Adobe instructor, I've had the honor of winning multiple Adobe teaching awards at their annual MAX conference. I see Bring Your Own Laptop as the supportive community I wished for when I was first starting out and intimidated by design. Through teaching, I hope to bring others along for the ride and empower my students to bring their stories, labors of love, and art into the world.
True to my Kiwi roots, I've lived in many places, and currently, I reside in Ireland with my wife and kids.
Certificates
We’re awarding certificates for this course!
Check out the How to earn your certificate video for instructions on how to earn yours and click the available certificate levels below for more information.
Downloads & Exercise files
Why does the Pencil tool in Illustrator make my drawings look rough or weird?
Because the default Pencil tool settings are far too fussy. Illustrator tries to follow every little wobble, and it also has a habit of editing or reconnecting paths in ways that feel unpredictable. A couple of quick option changes make it much smoother and much easier to control.
Illustrator Pencil Tool: How to Fix the Default Settings for Better Drawing
If you have ever grabbed the Pencil tool in Adobe Illustrator, drawn something with great optimism, and then immediately thought, well, that looks awful, the good news is that it is probably not you.
The default Pencil tool settings are not doing you any favours. They are overly accurate when what most people actually want is a cleaner, smoother, more flattering line. Once you tweak a few options, the tool becomes far more useful for sketchy illustration, tracing over references, and building hand-drawn vector artwork that still looks polished.
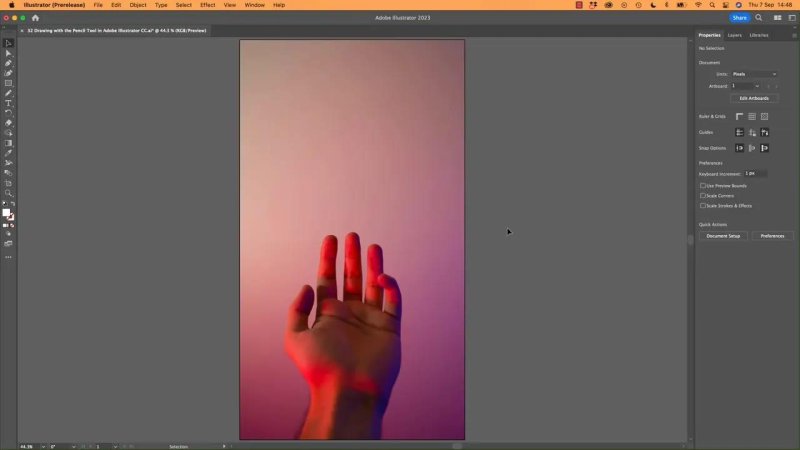
Start with a simple document and a reference image
A good way to practise is to create a tall portrait document, such as a web-sized artboard, and bring in a photo to draw over. In the example here, the reference image is placed directly into the document rather than added as a template.
That matters because a template usually fades the image back. If you actually want to use the photo at full strength while drawing, placing it normally makes more sense.
When you place an image in Illustrator, you have two practical options:
Click once to place it at its original size.
Click and drag to scale it as you place it, which is much better when the image is massive.
If Smart Guides are enabled, dragging the image into position is even easier because Illustrator helps you line things up as you go.
Placing a reference image at a workable size makes tracing and freehand drawing far less painful.
Lock the background and draw on a new layer
Before drawing, lock the image layer so you do not accidentally move it around. Then create a fresh layer for the vector lines.
This keeps everything tidy and saves a lot of frustration later. Even if you are just sketching something quickly, separating the reference from the artwork is worth doing.
A simple layer setup works well:
Background for the placed image
Pencil Drawing for the paths you create
Find the Pencil tool and check your stroke settings
The Pencil tool usually lives under the Paintbrush tool in the toolbar. If you do not see it straight away, click and hold that tool group and choose Pencil Tool.
Before you draw anything, make sure you are applying a stroke. If there is no visible stroke, you can end up drawing paths that technically exist but seem invisible.
If that happens, switch to Outline view with Command + Y on Mac or Control + Y on Windows. That lets you confirm whether the path is really there. If it is, the issue is usually appearance, not the tool itself.
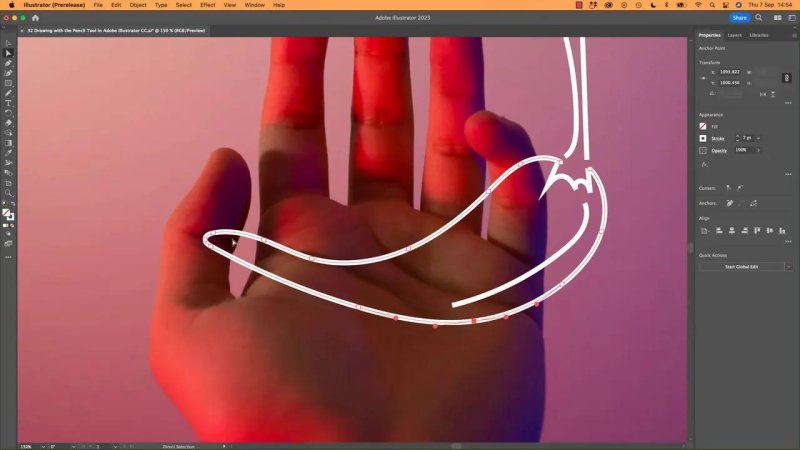
For tracing over a darker image, a white stroke is a handy choice because it stands out clearly.
Why the default Pencil tool feels bad
Out of the box, the Pencil tool tries to stick very closely to your hand movement. That sounds helpful, but in practice it means every small wobble and hesitation gets baked into the line.
The result is often:
wobbly curves
awkward corners
more anchor points than you want
drawings that look shakier than they need to
If you are freehand drawing something organic, like a pepper shape, the default line can feel clumsy very quickly.
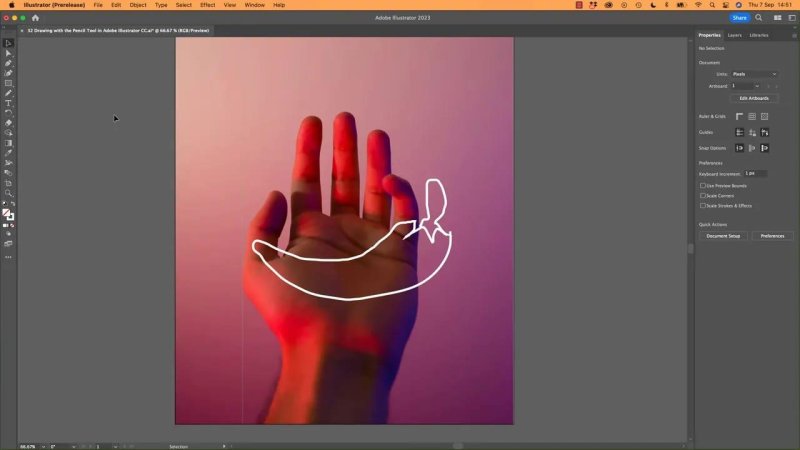
This is the kind of result that makes people blame themselves, when really the default tool settings are the problem.
Open the Pencil Tool Options
The fix lives inside the tool settings.
You can open them in one of two ways:
Double-click the Pencil tool in the toolbar
With the tool selected, use Tool Options in the Properties panel
Either route gets you to the same place. What matters is changing the behaviour of the tool so it helps you rather than exposing every tiny hand movement.
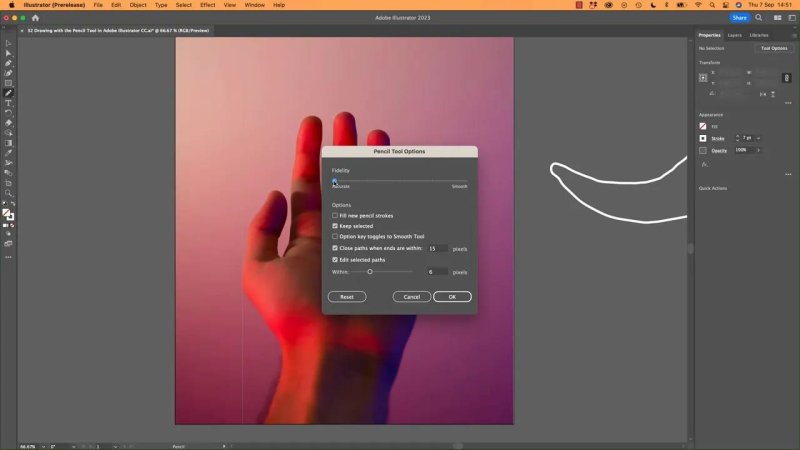
The Pencil Tool Options panel is where the real improvement happens.
The one setting that makes the biggest difference: Fidelity
Inside the Pencil Tool Options, the most important control is the one that adjusts how accurate or smooth the line should be.
If it is set toward accuracy, Illustrator follows your path very literally. If you push it toward smoothness, Illustrator simplifies the motion and gives you cleaner curves.
For most people, especially when sketching shapes by hand, moving that setting toward Smooth gives a much better result straight away.
You are essentially letting Illustrator tidy up your line as you draw. And honestly, that is exactly the kind of help most of us want.
Once smoothing is increased, the same rough sketch suddenly looks much more deliberate. It may still not be a masterpiece, but the line quality improves a lot.
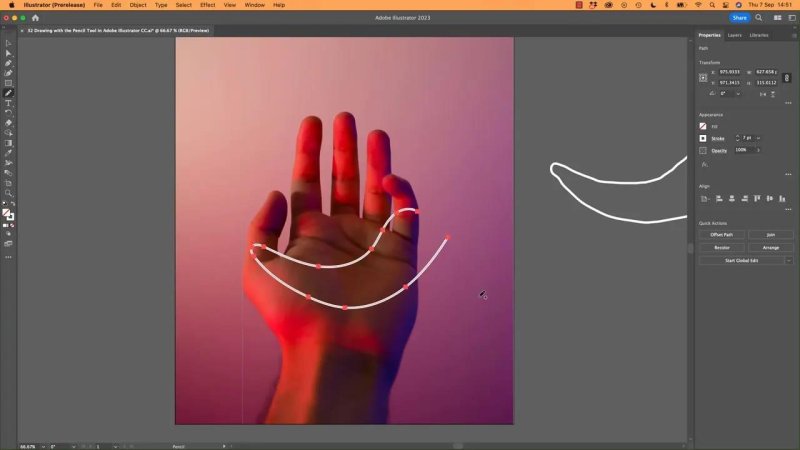
With smoothing turned up, the line stops fighting you and starts looking intentional.
Turn off the weird path behaviour
There is another reason the Pencil tool feels strange to many people. By default, it often keeps the last path active and tries to continue editing or reconnecting it when you draw again.
That can lead to confusing behaviour such as:
new strokes joining onto old ones
existing paths being reshaped instead of creating a fresh line
drawing that feels unpredictable from one stroke to the next
If that behaviour does not suit the way you work, go back into the Pencil Tool Options and disable the settings that keep the path selected or allow selected paths to be edited while drawing.
For a lot of people, turning both of those off makes the tool feel much more natural. You draw one line, then another, and Illustrator stops trying to be clever.
A practical setup that works well
If you want a simple setup that feels much nicer than the defaults, use this approach:
Set the Pencil tool toward Smooth.
Turn off Keep Selected if you do not want Illustrator to keep reusing the last path.
Turn off Edit Selected Paths if you want each new stroke to stay separate.
Use a visible stroke colour and increase stroke weight while practising.
That combination gives you smoother freehand lines and far fewer surprises.
Use the Pencil tool for the loose shape, then refine it
The Pencil tool is brilliant for getting down an organic first pass. You can draw the overall silhouette quickly, especially when you are aiming for a hand-drawn style.
But that does not mean the first line has to be perfect.
Once the shape exists, you can switch to other Illustrator tools to clean it up:
Direct Selection tool to move anchor points
Pen tool to remove unnecessary points
Anchor point editing to refine handles and corners
Curvature-style adjustments to improve the flow of the path
This is really the sweet spot. Draw freely first, then edit deliberately.
How to clean up a rough Pencil path
After drawing a line, click it with the Direct Selection tool and inspect the anchor points. You may notice that one area dips too low, bends too sharply, or contains more points than necessary.
At that stage you can:
drag a point into a better position
delete extra anchor points with the Pen tool
adjust the curve until it better matches the intended shape
You do not need to choose between freehand drawing and precision. Illustrator lets you combine both.
Freehand drawing gets you close, and anchor point editing gets you the finish.
The real lesson: bad defaults can make a good tool seem useless
This is one of those classic Illustrator moments where the software can feel harsher than it needs to. It is easy to assume the tool is bad, or that your drawing is bad, when really the defaults are just set in a way that does not flatter most users.
Once you increase smoothing, the Pencil tool becomes much more forgiving. It can help create clean sketch lines, quick traced shapes, and casual vector illustrations without needing perfect hand control.
So if your first attempt looks messy, do not take it personally. Nudge the settings, try again, and let Illustrator help a bit more.
FAQ
Where is the Pencil tool in Illustrator?
It is usually grouped under the Paintbrush tool in the toolbar. Click and hold that tool icon to reveal the Pencil tool.
How do I open Pencil Tool Options?
Double-click the Pencil tool in the toolbar, or select the tool and open its options from the Properties panel.
What Pencil tool setting should I change first?
Start by moving the fidelity setting toward smoothness. That single change usually makes the biggest improvement in line quality.
Why does the Pencil tool keep changing my previous path?
That usually happens because Illustrator is keeping the last path selected or allowing selected paths to be edited as you draw. Turn those options off if you want cleaner, separate strokes.
Can I edit Pencil tool lines after drawing them?
Yes. Use the Direct Selection tool to move points, and use the Pen tool or anchor point controls to remove or refine points and curves.
- Powered by Marvin
- Terms of use
- Privacy policy
- Cookie policy
-
- © Bring your Own Laptop Ltd 2026