Scaling Stroke & Effects & Corners
Questions


Student Gallery
Course info
Overview
Get ready to dive into the mesmerizing world of Adobe Illustrator, where we'll craft stunning looking graphics. But we won't stop at just learning the tools; we're about to unleash our creative powers by creating real-world, practical, and portfolio-ready projects. Together we will learn to:
• Master the art of drawing with simple shapes and lines.- • Unleash your creativity by combining and subtracting shapes using the Shape Builder.
- • Create advanced custom logos and graphics.
- • Explore the world of creative brushes, lines, and strokes to elevate your designs to the next level.
- • Use the Width tool to enhance your lines and strokes adding a style.
- • Conquer the pen, pencil, and curvature tools like a pro.
- • Dive into the wonderful world of fonts and the art of mastering type.
- • Use the intertwine feature to create interesting overlapping illustrations.
- • Learn the art of masking images and graphics.
- • Discover the magic of distorting, bending, warping, and liquefying illustrations.
- • Select and use color combinations like a true master of design.
- • Craft your own unique repeating patterns.
- • Transform real drawings into captivating stencil-style images.
- • Export your creations for print, web, social media, and more.
- • Acquire the techniques used by professional graphic designers.
- • Work with your own mini-brief - creating a unique Farmer's Market brand and bringing it to life.
- • Harness the power of Adobe's Generative AI features to push your creative boundaries.
- • Working with mood boards to gather inspiration.
- • Create realistic mockups to enhance your designs even further.
- • Engage in a wealth of class projects to put your skills to the test.
- • Stay ahead with a handy printable PDF cheat sheet.
- • Access downloadable exercise files to help you practice and refine your skills.
- • Benefit from forum support provided by the BYOL Teaching Assistant Team.
- • Discover professional workflows and shortcuts to work more efficiently.
- • Gain access to a treasure trove of additional resources and websites to supercharge your career.
But that's not all! I'll unveil Illustrator's hidden gems that will transform you into a pro at discovering and utilizing breathtaking vector based graphics. We'll dive into the latest Illustrator tools, including the mind-blowing Generative AI features that allow us to craft illustrations that were once thought impossible.
Whether you've never even opened Illustrator or have struggled with it in the past, I'm here to show you the easy way to create breathtaking artwork and portfolio projects to be proud of. Join me as we go from Illustrator zeros, to Illustrator superheroes!
Who this course is for
• Absolutely no previous Adobe Illustrator experience is required.- • This course is designed for newcomers to Illustrator and design in general, so no prior design, drawing, or illustration experience is necessary.
- • This is a relaxed, well-paced introduction, perfect for producing a wide range of drawings, illustrations, logos, and portfolio projects. Only basic computer skills are necessary - if you can send emails and surf the internet, you're more than capable of mastering this course.
What you'll learn
- • Drawing with Shapes & Lines
- • Drawing with the Shape Builder
- • Creating a custom logo
- • Working with Brushes
- • Drawing with the pen, pencil & curvature tool
- • Learn how to work with type & fonts.
- • How to vectorise an image in Illustrator
- • How to curve text in illustrator
- • How to trace an image in illustrator
• How to warp text in illustrator
• How to embed images in illustrator
• How to mask images & graphics.
• How to distort, bend, warp & liquefy illustrations.
• How to make 3D illustrations.
• How to make your own repeating patterns.
• How to create stencil style images from real drawings.
• How to save, print & export for Print, web & social media.
• Lots of real world exercises for you to practice.
• Loads or class projects for you to complete.
• Printable Cheat sheet.
• You will get the finished files so you never fall behind.
• Downloadable exercise files.
• Techniques used by professional graphic designers.
• Professional workflows and shortcuts.
• A wealth of other resources and websites to help accelerate your career.

Daniel Walter Scott
Founder of Bring Your Own Laptop & Chief Instructor
I discovered the world of design as an art student when I stumbled upon a lab full of green & blue iMac G3’s. My initial curiosity around using the computer to create ‘art’ developed into a full-blown passion, eventually leading me to become a digital designer and founder of Bring Your Own Laptop.
Sharing and teaching are a huge part of who I am. As a certified Adobe instructor, I've had the honor of winning multiple Adobe teaching awards at their annual MAX conference. I see Bring Your Own Laptop as the supportive community I wished for when I was first starting out and intimidated by design. Through teaching, I hope to bring others along for the ride and empower my students to bring their stories, labors of love, and art into the world.
True to my Kiwi roots, I've lived in many places, and currently, I reside in Ireland with my wife and kids.
Certificates
We’re awarding certificates for this course!
Check out the How to earn your certificate video for instructions on how to earn yours and click the available certificate levels below for more information.
Downloads & Exercise files
How do I stop stroke width changing when I resize in Illustrator?
In Illustrator, deselect the artwork and toggle Scale Strokes & Effects and Scale Corners in the Properties panel. Keep them on when an illustration needs to shrink or grow as one piece, and turn them off when resized icons need to retain matching stroke weights and corner radiuses.
How to Scale Strokes, Effects and Corners in Adobe Illustrator
You have drawn something lovely, perhaps a fox with fine whiskers and outlined stars, then you scale it down. Suddenly the object is tiny but its lines are still massive. The whiskers look completely wrong, the outlines become chunky, and rounded details no longer feel proportional.
The reverse can happen too. Scale an object up and its stroke may become far thicker than the rest of the artwork. Nothing is technically broken. Illustrator is simply following its current scaling settings.
The two settings responsible are:
Scale Strokes & Effects
Scale Corners
They control whether an object's stroke weight, effects and corner radiuses change along with its overall dimensions.
The best default: scale everything together
Most of the time, turn both settings on. When you scale an entire illustration, logo or grouped piece of artwork, you generally want every visual detail to come along for the ride.
With both options enabled, reducing the artwork also reduces its stroke widths and corner radiuses. The result stays visually balanced at its new size. A thick outline remains relatively thick, fine whiskers remain fine, and rounded elements retain the same proportions.
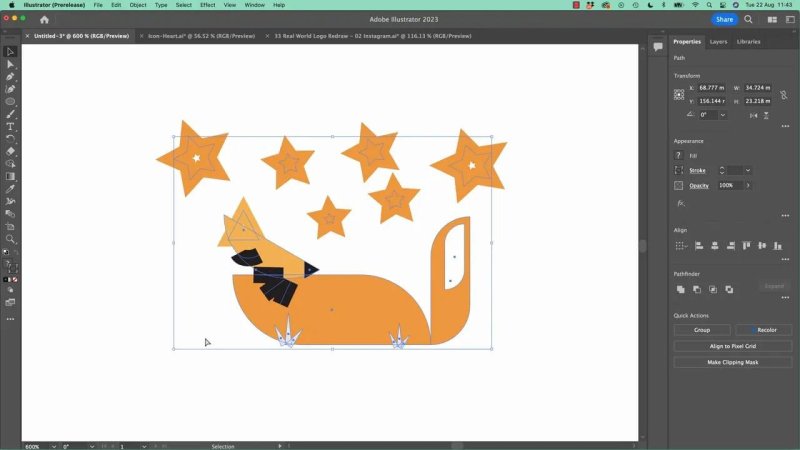
When strokes and corners do not scale appropriately, small details can quickly become visually heavy.
To resize proportionally, select the artwork with the Selection tool, the black arrow, then drag a corner handle while holding Shift. If Scale Strokes & Effects and Scale Corners are on, the whole illustration scales as a consistent unit.
This is especially important when shrinking detailed artwork. At a small size, unchanged strokes can dominate the whole design and make the underlying shapes almost disappear.
Where to find Scale Strokes & Effects and Scale Corners
The slightly odd part is that these options appear in different places depending on whether artwork is selected.
When nothing is selected
Click on an empty part of the artboard to deselect everything. In the Properties panel, look for the two checkboxes:
Scale Corners
Scale Strokes & Effects
You can also use Select and then Deselect, but clicking in an empty area is normally much quicker. If Deselect is greyed out, there was nothing selected already.
When objects are already selected
Sometimes deselecting is a nuisance. Maybe you have just made a careful ninja selection of several objects and do not fancy trying to select them all again.
In that case, open the Transform area of the Properties panel. The same Scale Corners and Scale Strokes & Effects controls are available there. It is the exact same setting, just more convenient when you already have objects selected.
There is no need to treat these as two unrelated switches. In normal work, turn both on together or both off together. There may be a very specific use for mixing them, but it is rarely the practical choice.
What happens when scaling is off
With both settings off, Illustrator changes the object's width and height but leaves its stroke width and corner radius alone.
This can create some strange results. Scale a fox illustration down and the body may become tiny while the face details, whiskers and outlined stars stay visually oversized. At a close zoom, the mismatch becomes very obvious.
Corner behaviour can also feel inconsistent. A shape with all four rounded corners will try to retain its original corner radius. Shapes with only some corners rounded can produce results that look even more peculiar. The important thing is that the corner radius is not being proportionally reduced with the rest of the object.
For general illustration work, this is why keeping both options on is such a good default.
When you should turn scaling off: matching icon strokes
There is one very useful exception: icon design.
Icons in the same set need consistent line weights. Imagine you have a heart icon with a 40 point stroke and you draw a search icon from a circle and a line. Both should use the same stroke width so they feel like part of the same family.
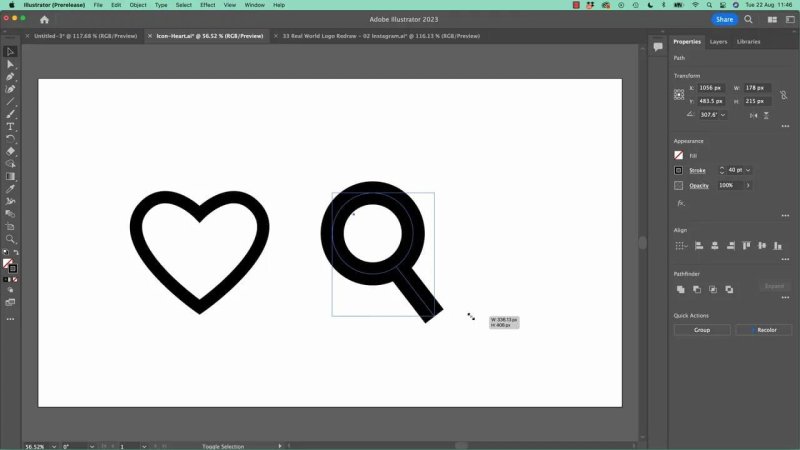
Scaling a search icon with stroke scaling enabled makes its outline much heavier than the matching heart icon.
If you select the search icon and enlarge it while Scale Strokes & Effects is enabled, the stroke expands too. A 40 point stroke can become a chunky 76 point stroke, while the heart remains at 40 points. The icon set immediately looks inconsistent.
That is the moment to turn both Scale Corners and Scale Strokes & Effects off. Now you can scale the search icon until it reaches the right physical size while keeping its stroke width unchanged.
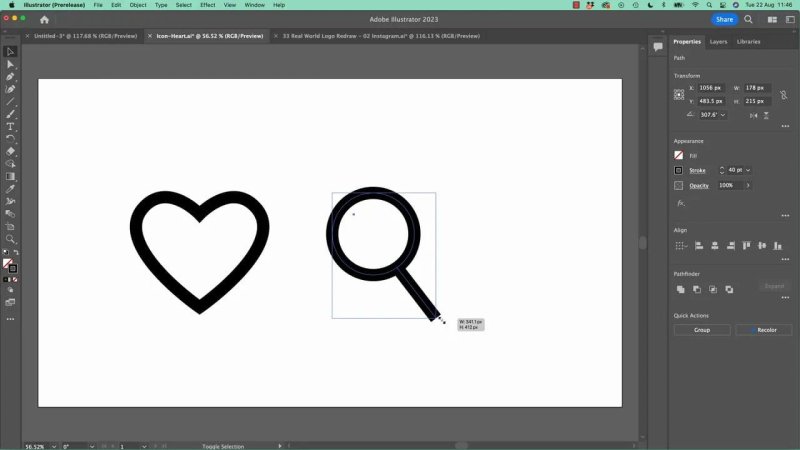
With stroke scaling turned off, the icons can differ in size while retaining a consistent visual line weight.
This is also useful when corner radiuses need to match. If several icons use the same rounded geometry, scaling one icon without scaling its corners helps preserve that shared style.
A simple decision rule
If you are unsure which setting to use, ask one question: Should this artwork remain proportional, or should it match an existing system?
Keep both settings on when scaling an illustration, logo, decorative graphic or any self contained piece of artwork.
Turn both settings off when resizing an icon or UI element that must preserve the same stroke width and corner radius as nearby elements.
That is the whole thing. One setting is useful in one document, then becomes deeply annoying in another. A pair of icons may need fixed strokes, while the same icons pasted into a larger illustration may need every detail to scale down together.
Scaling imported artwork without ruining it
Say you have created a heart and search icon at a sensible size in one document, then paste them into an illustration where they are absolutely ginormous. If scaling is still turned off, reducing them will preserve their original thick strokes. That may have been perfect for your icon set, but now it makes the imported artwork look far too heavy beside the illustration.
Before scaling the imported icons down, turn Scale Strokes & Effects and Scale Corners back on. Then select the required objects and resize them proportionally. Their outlines and rounded details reduce with the rest of the artwork, making them sit far more naturally in the composition.
Use the setting for logo redraws and detailed vector art
This issue appears constantly when recreating logos and working with detailed vector graphics. A design may look great at the size at which it was drawn, then fall apart when scaled because line weights, rounded corners and effects are not behaving as expected.
When the goal is simply to make the entire design larger or smaller, enable both options. The artwork will scale properly, with strokes, effects and corners all retaining their intended relationship to one another.
When the goal is consistency across a system of icons, disable both options before adjusting individual icon sizes. You will keep the same line weight and corner language across the set.
Quick Illustrator scaling checklist
Select your artwork with the Selection tool.
Hold Shift while dragging a corner handle to scale proportionally.
Use Command + 0 on Mac or Control + 0 on Windows to fit the artboard in the window.
Use Command + Plus on Mac or Control + Plus on Windows to zoom in and inspect small details.
Turn Scale Strokes & Effects and Scale Corners on for proportional artwork scaling.
Turn both options off for icon sets that need fixed stroke widths and consistent corner radiuses.
Once you know where these controls live, scaling stops being a mystery. You can make artwork tiny without giant whiskers, make artwork huge without unexpectedly chunky outlines, and keep icon sets looking properly consistent.
FAQ's
Should Scale Strokes & Effects usually be on in Illustrator?
Yes. For most illustrations, logos and grouped artwork, leave it on so stroke widths and effects scale proportionally with the object.
Why do my strokes look too thick after scaling artwork down?
Scale Strokes & Effects is likely turned off. Illustrator has reduced the object dimensions while keeping the original stroke widths, causing outlines and fine details to look oversized.
When should I turn off Scale Corners and Scale Strokes & Effects?
Turn them off when resizing icons or interface elements that need to preserve the same stroke width and rounded corner style as other icons in the set.
Where are the Illustrator scaling options?
With nothing selected, find them in the Properties panel. With objects selected, find the same controls in the Transform section of the Properties panel.
Written by Daniel Walter Scott — Founder of Bring Your Own Laptop & Chief Instructor
