Awake Fox Combining Tools & Skill Stacking
Questions





Student Gallery
Course info
Overview
Get ready to dive into the mesmerizing world of Adobe Illustrator, where we'll craft stunning looking graphics. But we won't stop at just learning the tools; we're about to unleash our creative powers by creating real-world, practical, and portfolio-ready projects. Together we will learn to:
• Master the art of drawing with simple shapes and lines.- • Unleash your creativity by combining and subtracting shapes using the Shape Builder.
- • Create advanced custom logos and graphics.
- • Explore the world of creative brushes, lines, and strokes to elevate your designs to the next level.
- • Use the Width tool to enhance your lines and strokes adding a style.
- • Conquer the pen, pencil, and curvature tools like a pro.
- • Dive into the wonderful world of fonts and the art of mastering type.
- • Use the intertwine feature to create interesting overlapping illustrations.
- • Learn the art of masking images and graphics.
- • Discover the magic of distorting, bending, warping, and liquefying illustrations.
- • Select and use color combinations like a true master of design.
- • Craft your own unique repeating patterns.
- • Transform real drawings into captivating stencil-style images.
- • Export your creations for print, web, social media, and more.
- • Acquire the techniques used by professional graphic designers.
- • Work with your own mini-brief - creating a unique Farmer's Market brand and bringing it to life.
- • Harness the power of Adobe's Generative AI features to push your creative boundaries.
- • Working with mood boards to gather inspiration.
- • Create realistic mockups to enhance your designs even further.
- • Engage in a wealth of class projects to put your skills to the test.
- • Stay ahead with a handy printable PDF cheat sheet.
- • Access downloadable exercise files to help you practice and refine your skills.
- • Benefit from forum support provided by the BYOL Teaching Assistant Team.
- • Discover professional workflows and shortcuts to work more efficiently.
- • Gain access to a treasure trove of additional resources and websites to supercharge your career.
But that's not all! I'll unveil Illustrator's hidden gems that will transform you into a pro at discovering and utilizing breathtaking vector based graphics. We'll dive into the latest Illustrator tools, including the mind-blowing Generative AI features that allow us to craft illustrations that were once thought impossible.
Whether you've never even opened Illustrator or have struggled with it in the past, I'm here to show you the easy way to create breathtaking artwork and portfolio projects to be proud of. Join me as we go from Illustrator zeros, to Illustrator superheroes!
Who this course is for
• Absolutely no previous Adobe Illustrator experience is required.- • This course is designed for newcomers to Illustrator and design in general, so no prior design, drawing, or illustration experience is necessary.
- • This is a relaxed, well-paced introduction, perfect for producing a wide range of drawings, illustrations, logos, and portfolio projects. Only basic computer skills are necessary - if you can send emails and surf the internet, you're more than capable of mastering this course.
What you'll learn
- • Drawing with Shapes & Lines
- • Drawing with the Shape Builder
- • Creating a custom logo
- • Working with Brushes
- • Drawing with the pen, pencil & curvature tool
- • Learn how to work with type & fonts.
- • How to vectorise an image in Illustrator
- • How to curve text in illustrator
- • How to trace an image in illustrator
• How to warp text in illustrator
• How to embed images in illustrator
• How to mask images & graphics.
• How to distort, bend, warp & liquefy illustrations.
• How to make 3D illustrations.
• How to make your own repeating patterns.
• How to create stencil style images from real drawings.
• How to save, print & export for Print, web & social media.
• Lots of real world exercises for you to practice.
• Loads or class projects for you to complete.
• Printable Cheat sheet.
• You will get the finished files so you never fall behind.
• Downloadable exercise files.
• Techniques used by professional graphic designers.
• Professional workflows and shortcuts.
• A wealth of other resources and websites to help accelerate your career.

Daniel Walter Scott
Founder of Bring Your Own Laptop & Chief Instructor
I discovered the world of design as an art student when I stumbled upon a lab full of green & blue iMac G3’s. My initial curiosity around using the computer to create ‘art’ developed into a full-blown passion, eventually leading me to become a digital designer and founder of Bring Your Own Laptop.
Sharing and teaching are a huge part of who I am. As a certified Adobe instructor, I've had the honor of winning multiple Adobe teaching awards at their annual MAX conference. I see Bring Your Own Laptop as the supportive community I wished for when I was first starting out and intimidated by design. Through teaching, I hope to bring others along for the ride and empower my students to bring their stories, labors of love, and art into the world.
True to my Kiwi roots, I've lived in many places, and currently, I reside in Ireland with my wife and kids.
Certificates
We’re awarding certificates for this course!
Check out the How to earn your certificate video for instructions on how to earn yours and click the available certificate levels below for more information.
Downloads & Exercise files
How do you turn a sketch into vector artwork in Illustrator?
Place the sketch as a template, build its main curves with overlapping circles, then use Shape Builder to remove and merge regions. Add the smaller details with the Pen and Curvature tools, check for stray paths in Outline mode, and colour the finished shapes before removing their strokes.
The Awake Fox: Draw and Colour a Fox in Adobe Illustrator
Key takeaways
Use simple circles to build the fox’s large, smooth curves.
Combine Shape Builder, Pen and Curvature tools rather than forcing one tool to do everything.
Find hidden paths and leftover fragments with Outline mode.
Speed up drawing with centre-based scaling, drag duplication and Smart Guides.
Finish with separate colour regions, no strokes and a dark background.
A fox drawing might look like a job for the Pen tool from start to finish. But there’s a much easier way to tackle large parts of it: circles. Lots of circles, a little trimming, a few custom curves, and suddenly that sketch starts becoming a proper illustration.
This is skill stacking. Instead of learning each Illustrator tool in isolation, we’re putting them together in one project. The important bit isn’t using every tool equally. It’s knowing which tool makes the next bit easier.
1. Create the document and place your sketch
Start with File > New. I generally choose the Web category and a Common preset because it gives me a useful rectangular document with RGB colour. Switch the orientation to portrait and click Create.
Now bring in the drawing:
Choose File > Place.
Select the fox sketch. The exercise file used here is Awake Fox V2.
Tick Template before placing it.
The Template option puts the image on its own layer and dims it, making your new vector paths easier to distinguish from the original drawing.
Don’t worry about reproducing every wobble in the pencil lines. It’s a hand-drawn sketch, so the goal is a clean interpretation, not a perfect mathematical match to every mark.
2. Build the big curves with circles
Look at the fox’s neck, head and ears. Many of those long curves can come from the edges of circles. That saves a lot of fiddling with individual anchor points.
Hold down the Rectangle tool in the toolbar and choose the Ellipse tool, or press L.
Hold Shift while dragging to create a perfect circle.
Set the Fill to None so you can still see the sketch underneath.
Choose a bright stroke colour. Pink works nicely here because it stands out against the pencil drawing.
Press V for the Selection tool, then move and resize the circle until an arc follows one of the fox’s major curves.
Use large circles for the sweeping neck curves, then smaller ones for the head and ears. Duplicate and resize them as you work. There will be a bit of nudging around, and that’s completely normal. The arrow keys are handy for small adjustments.
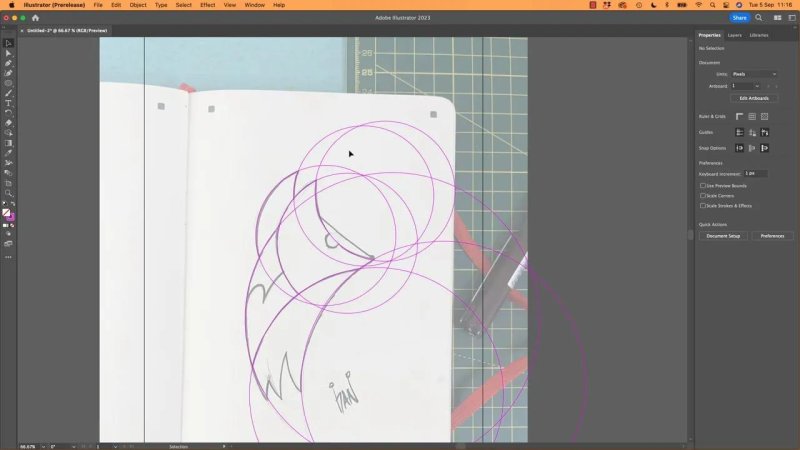
The main curves start as overlapping circles, not a complicated hand-drawn path.
Scale from the centre
Holding Shift keeps a circle round while you resize it. Add Option on a Mac or Alt on Windows, and it scales from its centre rather than from the opposite side.
Mac: Shift + Option while dragging a corner.
Windows: Shift + Alt while dragging a corner.
This is particularly useful when the circle is already roughly centred where you want it. You can make it bigger without shifting its centre away from the sketch.
The same combination works when drawing a new circle. Find the centre first, then hold Shift and Option or Alt as you drag outwards. Often that’s much easier than guessing where the top-left corner should be.
Duplicate while dragging
Copy and paste is fine, but a normal paste tends to drop the duplicate into the middle of the current view. That’s not always where you need it.
With the Selection tool, start dragging an existing circle, then hold Option or Alt. Illustrator leaves the original behind and creates a duplicate as you move.
Release the mouse first, then the keyboard key. If you let go of Option or Alt before releasing the mouse, you’ll simply move the original instead.
If that feels like too much finger gymnastics, just copy and paste. Totally fine. The shortcut is there to make life easier, not to turn drawing a fox into a keyboard exam.
3. Trim and merge the circles with Shape Builder
Once the circles are in place, the drawing looks fairly confusing. Good. We’ve got the geometry we need; now we can remove the bits we don’t.
Shape Builder only works on selected artwork. If you activate it and nothing happens, check your selection first.
Press V and select all the construction circles.
Press Shift + M to activate Shape Builder.
Hold Option on Mac or Alt on Windows to subtract unwanted regions.
Click a region to remove it, or drag across several regions to delete them together.
Start with the obvious outside pieces. Don’t try to solve all the overlapping shapes in one go. Remove the parts you definitely don’t need, then work inwards.
Deleted something useful? Undo it. That happens, especially around the ears where several circles overlap.
After trimming, use Shape Builder without a modifier key to merge adjoining regions. Drag through the areas that should become one shape, such as the main face or a larger neck section.
Keep the intended colour divisions separate. We want a collection of useful shapes, not necessarily one giant silhouette.
4. Use Outline mode to find the leftover junk
Shape Builder can leave behind little fragments, stray lines or objects with no fill and no stroke. I tend to call these bits junk. They might be invisible in the normal view, but they’re still in the document.
That matters when they keep getting selected, or when the artwork goes to a printer or vinyl cutter and those unwanted paths cause trouble.
Outline mode is Illustrator’s X-ray view. It shows the underlying paths without their normal fill and stroke appearance.
Menu: View > Outline.
Mac shortcut: Command + Y.
Windows shortcut: Control + Y.
Press the shortcut again to return to the normal preview.
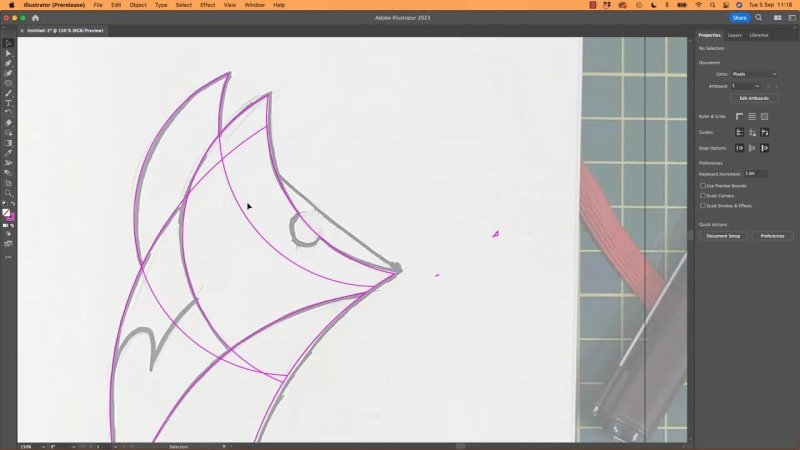
Outline mode strips away the stroke appearance so the underlying paths are easier to inspect
Zoom in and look around the edges. Use the Selection tool to select isolated fragments and delete them. You can also hide the template layer to make the remaining vector paths simpler to inspect.
Outline mode is useful even when nothing is invisible. A thick or dashed stroke can make a drawing look much more complicated than it really is. Switching to outlines lets you concentrate on the path itself.
If you experiment with a heavy or dashed stroke, turn the dash setting off and return to a thin stroke afterwards. Here, a one-pixel construction stroke is enough.
5. Add the muzzle line with Smart Guides
The circles have done most of the heavy lifting, but the face still needs a straight connection towards the nose.
You could use the Line Segment tool. I generally use the Pen tool instead because it draws straight lines and does much more besides.
Turn on Smart Guides to help line up the connection:
Mac: Command + U.
Windows: Control + U.
With the Pen tool active, hover over your starting point until Illustrator identifies an anchor. Click, then move to the destination path near the nose and click again.
Press Escape to stop drawing. Otherwise, the Pen tool keeps waiting for another point. It’s very easy to keep clicking in an attempt to detach it, create a collection of accidental lines, and then have to undo the lot. Escape is the answer.
This line gives Shape Builder a boundary to work with later. You don’t have to carve out and colour that region immediately.
Keep these two shortcuts distinct: Command or Control + U controls Smart Guides; Command or Control + Y controls Outline mode. They’re both useful, but they do very different jobs.
6. Make the eye from a small circle
The eye is another chance to use a simple shape rather than draw a custom curve.
Press L for the Ellipse tool.
Position the cursor at the centre of the eye in the sketch.
Hold Shift + Option on Mac or Shift + Alt on Windows and draw a small circle from its centre.
Press V and select the circle together with the relevant face paths.
Press Shift + M and merge the appropriate regions so the remaining eye has the small, sliced-circle shape.
The overlap with the muzzle line helps shape that little eye detail. Again, we’re using basic geometry and then keeping only the part we need.
Two useful shortcuts to remember are M for Rectangle and L for Ellipse. No, the letters aren’t particularly logical. They’re just useful enough that you’ll get used to them.
7. Draw the lower fur with the Curvature tool
The pointed fur at the bottom could be constructed from more circles, but it would take too long. This is where switching tools makes sense.
Choose the Curvature tool. It handles the curve shaping for you, which makes it a friendly option for these smaller details.
Start your new path slightly outside the existing boundary. Clicking directly on an existing path can cause you to edit that path rather than begin a separate one.
Single-click to create a curve point.
Double-click to create a corner point.
Place curve points around the apex of each curved section.
Use corner points where the fur changes sharply into a tip or notch.
If you accidentally make a smooth point where you need a corner, double-click that point to convert it.
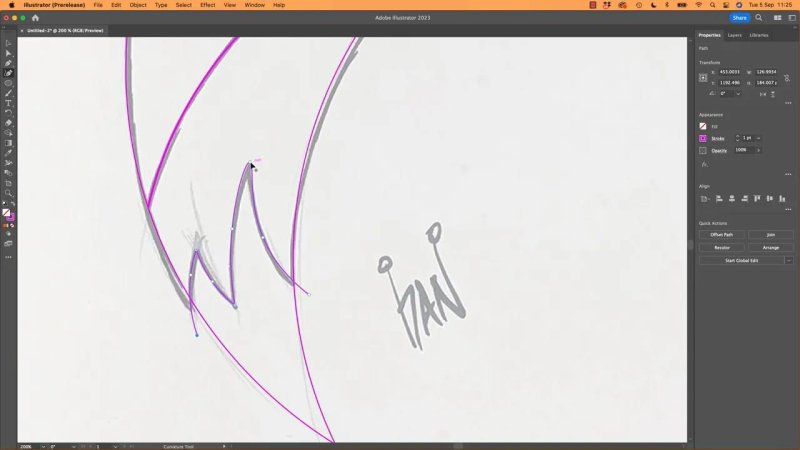
Smooth curves and sharp corners work together to build the lower fur detail
Let the new path cross through the existing boundary rather than trying to attach both ends perfectly. Press Escape when you’re finished, then select the new path and the relevant surrounding shapes.
Switch to Shape Builder and hold Option or Alt to remove the unwanted outside sections. The crossing paths give it the intersections it needs to trim the fur neatly.
Check the result in Outline mode. Tiny extensions can look perfectly harmless in the normal preview and become obvious once you see the underlying paths. Remove them with Shape Builder or use the Direct Selection tool to select and delete the unwanted points.
8. Use the Pen tool for the remaining fur detail
For the small fur division further up the back, use the Pen tool. This gives you more direct control over the curves.
Press P for the Pen tool.
Start outside the existing shape with a single click.
Click and drag at a curved section to create direction handles.
Single-click where you need a sharp corner.
Continue through the other boundary so the path can be trimmed.
The difference is control. The Curvature tool calculates the curve as you place points. With the Pen tool, you create and adjust the handles yourself.
I like having that control, but neither approach is the one correct way. Use whichever makes the particular curve easier.
Refine it rather than expecting a perfect first attempt
The curve probably won’t be perfect immediately. That’s okay. Press A for Direct Selection and adjust the anchor points and handles afterwards.
Keep the number of anchor points low. A few well-placed points can produce the smooth curve you want without making the path unnecessarily fiddly.
Select the relevant artwork, return to Shape Builder with Shift + M, and subtract the overhanging line sections with Option or Alt. You can do this while still in Outline mode.
9. Colour the fox with Shape Builder
Now we can colour it. Finally!
First, select all the fox paths with the Selection tool. A useful check is to move the selected artwork temporarily and see whether any vector pieces are left behind. Undo the move once you’ve checked.
Return to the normal preview if you’re still in Outline mode, then activate Shape Builder.
Choose a colour in Fill.
Click the region you want to colour.
Choose another fill colour and click the next region.
Continue until the fox’s separate areas are filled.
The existing swatches are good enough to get started. You can spend longer choosing colours in the colour controls, but there’s no need to let that stop you finishing the drawing.
For this fox, use a warm colour for the lower back, a darker orange for the next section, and a deeper red-orange for the face. The rear ear gets a dark red. Use an off-white or very light grey for the pale muzzle and chest, with a slightly darker grey beneath it.
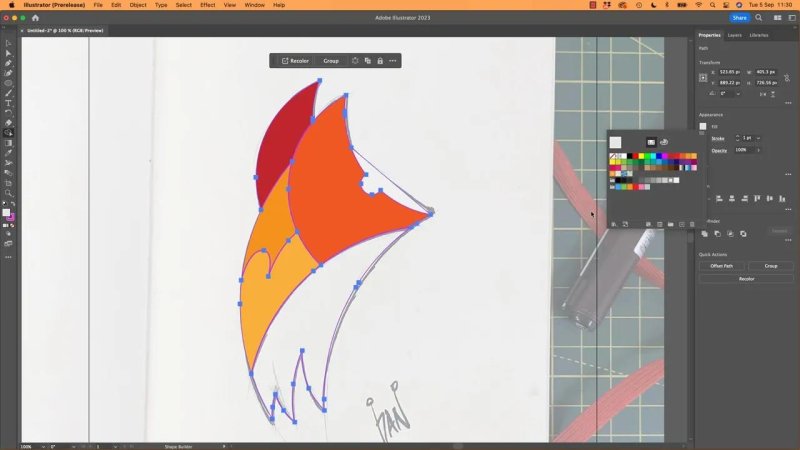
Separate regions make it easy to give the face, ear, back and chest their own colours
Once the fills are in place, select the entire fox and set Stroke to None. The bright construction lines have done their job. We don’t need them in the finished illustration.
If the Fill control displays a question mark while everything is selected, nothing is wrong. It simply means the selection contains several different fill colours, so Illustrator can’t show one colour for the whole selection.
10. Add a dark background and refine the colours
Hide the sketch’s template layer in the Layers panel. Now you can judge the illustration on its own.
I like this fox on a dark background. The pale chest becomes much clearer, and the warm colours stand out nicely.
Press M for the Rectangle tool.
Draw a rectangle covering the artboard. Smart Guides can help you snap to its edges.
Give it a dark grey fill and no stroke.
With the rectangle selected, choose Arrange > Send to Back.
If the rectangle covers the fox at first, don’t panic. Sending it to the back puts it behind the illustration.
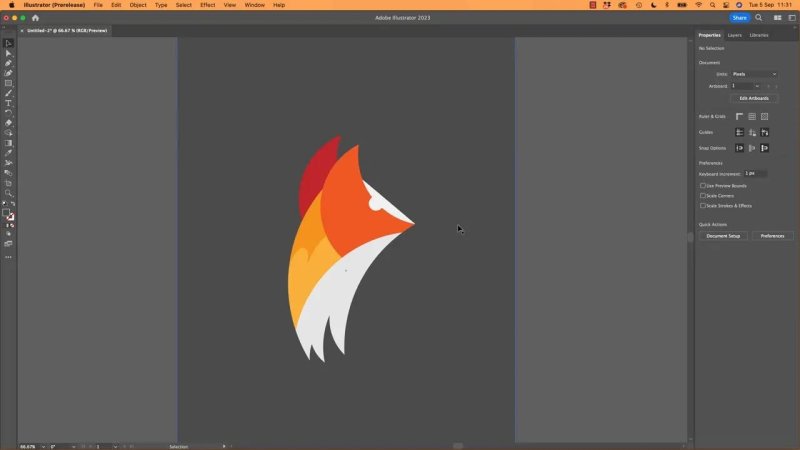
A dark grey background gives the pale chest a clear edge and sets off the warm colours.
The first colour choices don’t have to be the final ones. I’m not completely sold on the bright orange here, so I’d spend a bit more time refining it and pulling out some saturation.
In the colour mixer’s menu, switch from RGB or CMYK to HSB. That gives you Hue, Saturation and Brightness controls, making it easier to adjust those qualities directly.
The real lesson: choose the tool that suits the shape
The finished fox is the result of several small, manageable jobs:
Circles supply the broad curves.
Shape Builder trims, merges and colours the regions.
Smart Guides help position connections.
The Pen tool draws straight lines and controlled curves.
The Curvature tool handles custom curves with simpler point placement.
Direct Selection refines the details.
Outline mode reveals the junk that normal preview can hide.
You don’t need to be an Illustrator master to put these together. Build the big shapes, tidy them, add the details and then colour them. Each skill makes the next one more useful. That’s the whole point of skill stacking.
Key terms
Template layer
A separate, dimmed reference-image layer used to guide your redrawing. It keeps the sketch visually distinct from the new vector artwork.
Shape Builder
A tool that works with selected, intersecting artwork to merge or subtract regions. It can also apply fill colours to those regions.
Outline mode
A view that displays the underlying vector paths rather than their normal fills and strokes. It helps reveal stray objects and small fragments.
Smart Guides
On-screen alignment aids that help identify anchors, paths and other useful positioning references while you draw or move objects.
Anchor points and direction handles
Anchor points define a path’s structure. Direction handles let you control the shape of its curves.
HSB
Hue, Saturation and Brightness: colour controls that let you adjust the colour itself, its intensity and its brightness separately.
FAQs
Why isn’t Shape Builder working?
Select the artwork before activating Shape Builder. Press V, select the paths you want to work with, then press Shift + M.
How do I find invisible paths in Illustrator?
Use View > Outline, or press Command + Y on Mac or Control + Y on Windows. Objects with no fill or stroke become visible as paths, so you can select and delete them.
Should I use the Pen tool or the Curvature tool?
Use the Curvature tool when you want Illustrator to shape curves as you place points. Use the Pen tool when you want direct control over direction handles. Both work well for this fox’s smaller details.
How do I stop the Pen tool from adding more points?
Press Escape when you’ve finished the current path. That stops the drawing operation without adding accidental extra segments.
How do I draw a perfect circle from its centre?
Choose the Ellipse tool and hold Shift + Option on Mac or Shift + Alt on Windows while dragging. Shift keeps it circular, while Option or Alt makes it grow from the centre.
Written by Daniel Walter Scott — Founder of Bring Your Own Laptop & Chief Instructor
