How to make a Mood Board in Illustrator
Questions


Student Gallery
Course info
Overview
Get ready to dive into the mesmerizing world of Adobe Illustrator, where we'll craft stunning looking graphics. But we won't stop at just learning the tools; we're about to unleash our creative powers by creating real-world, practical, and portfolio-ready projects. Together we will learn to:
• Master the art of drawing with simple shapes and lines.- • Unleash your creativity by combining and subtracting shapes using the Shape Builder.
- • Create advanced custom logos and graphics.
- • Explore the world of creative brushes, lines, and strokes to elevate your designs to the next level.
- • Use the Width tool to enhance your lines and strokes adding a style.
- • Conquer the pen, pencil, and curvature tools like a pro.
- • Dive into the wonderful world of fonts and the art of mastering type.
- • Use the intertwine feature to create interesting overlapping illustrations.
- • Learn the art of masking images and graphics.
- • Discover the magic of distorting, bending, warping, and liquefying illustrations.
- • Select and use color combinations like a true master of design.
- • Craft your own unique repeating patterns.
- • Transform real drawings into captivating stencil-style images.
- • Export your creations for print, web, social media, and more.
- • Acquire the techniques used by professional graphic designers.
- • Work with your own mini-brief - creating a unique Farmer's Market brand and bringing it to life.
- • Harness the power of Adobe's Generative AI features to push your creative boundaries.
- • Working with mood boards to gather inspiration.
- • Create realistic mockups to enhance your designs even further.
- • Engage in a wealth of class projects to put your skills to the test.
- • Stay ahead with a handy printable PDF cheat sheet.
- • Access downloadable exercise files to help you practice and refine your skills.
- • Benefit from forum support provided by the BYOL Teaching Assistant Team.
- • Discover professional workflows and shortcuts to work more efficiently.
- • Gain access to a treasure trove of additional resources and websites to supercharge your career.
But that's not all! I'll unveil Illustrator's hidden gems that will transform you into a pro at discovering and utilizing breathtaking vector based graphics. We'll dive into the latest Illustrator tools, including the mind-blowing Generative AI features that allow us to craft illustrations that were once thought impossible.
Whether you've never even opened Illustrator or have struggled with it in the past, I'm here to show you the easy way to create breathtaking artwork and portfolio projects to be proud of. Join me as we go from Illustrator zeros, to Illustrator superheroes!
Who this course is for
• Absolutely no previous Adobe Illustrator experience is required.- • This course is designed for newcomers to Illustrator and design in general, so no prior design, drawing, or illustration experience is necessary.
- • This is a relaxed, well-paced introduction, perfect for producing a wide range of drawings, illustrations, logos, and portfolio projects. Only basic computer skills are necessary - if you can send emails and surf the internet, you're more than capable of mastering this course.
What you'll learn
- • Drawing with Shapes & Lines
- • Drawing with the Shape Builder
- • Creating a custom logo
- • Working with Brushes
- • Drawing with the pen, pencil & curvature tool
- • Learn how to work with type & fonts.
- • How to vectorise an image in Illustrator
- • How to curve text in illustrator
- • How to trace an image in illustrator
• How to warp text in illustrator
• How to embed images in illustrator
• How to mask images & graphics.
• How to distort, bend, warp & liquefy illustrations.
• How to make 3D illustrations.
• How to make your own repeating patterns.
• How to create stencil style images from real drawings.
• How to save, print & export for Print, web & social media.
• Lots of real world exercises for you to practice.
• Loads or class projects for you to complete.
• Printable Cheat sheet.
• You will get the finished files so you never fall behind.
• Downloadable exercise files.
• Techniques used by professional graphic designers.
• Professional workflows and shortcuts.
• A wealth of other resources and websites to help accelerate your career.

Daniel Walter Scott
Founder of Bring Your Own Laptop & Chief Instructor
I discovered the world of design as an art student when I stumbled upon a lab full of green & blue iMac G3’s. My initial curiosity around using the computer to create ‘art’ developed into a full-blown passion, eventually leading me to become a digital designer and founder of Bring Your Own Laptop.
Sharing and teaching are a huge part of who I am. As a certified Adobe instructor, I've had the honor of winning multiple Adobe teaching awards at their annual MAX conference. I see Bring Your Own Laptop as the supportive community I wished for when I was first starting out and intimidated by design. Through teaching, I hope to bring others along for the ride and empower my students to bring their stories, labors of love, and art into the world.
True to my Kiwi roots, I've lived in many places, and currently, I reside in Ireland with my wife and kids.
Certificates
We’re awarding certificates for this course!
Check out the How to earn your certificate video for instructions on how to earn yours and click the available certificate levels below for more information.
Downloads & Exercise files
How do you create a mood board in Illustrator?
Create a new RGB document, collect images that suit the direction of your project, and drag them into Illustrator. Arrange them into a loose collage, making your strongest references larger if you like. The aim is to gather useful ideas in one place, not to produce a perfectly polished design.
How to Make a Mood Board in Adobe Illustrator
Key Takeaways
Find inspiration across Dribbble, Behance and Google Images.
Use screenshots or saved images to build your collection quickly.
Drag a batch of images into Illustrator rather than adding them individually.
Use image size to highlight the strongest design direction.
Keep your first mood board loose, and leave detailed font and colour choices for later.
What a Mood Board Is Actually For
A mood board is simply a page full of things that help establish the feel of a project. There is no particularly tricky skill involved. Find things you like, put them together, and give yourself somewhere to return to when you start designing.
When I’m building a new product, I use it to collect ideas that would otherwise be scattered across different websites. For this example, the project is a hot sauce brand, so much of the inspiration comes from bottles, labels and packaging.
The point is to reference, not to copy. You might find an approach that feels close to the direction you want. Or you might decide your brand should look completely different from what is already out there. Either way, it helps to know what exists before you make that decision.
This first board is primarily for your own use. It can be a bit of a mess. You can make a mood board suitable for a client presentation, too, but that usually deserves a little more time spent on the arrangement.
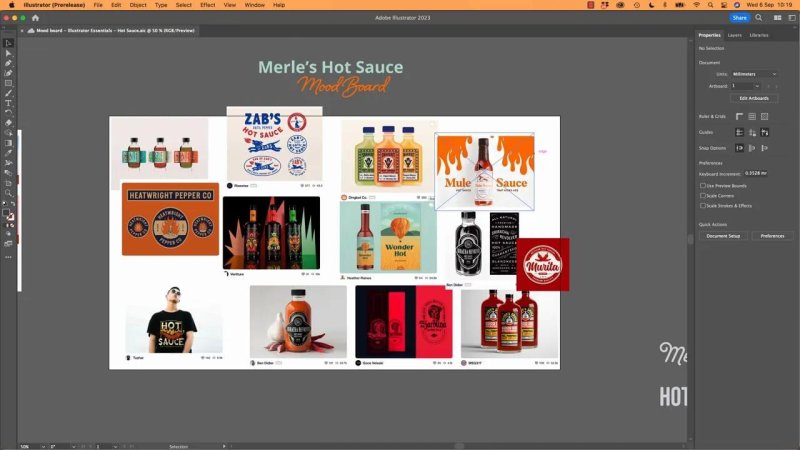
A collection of packaging references gets the project’s visual ideas into one place
1. Start With a Simple Illustrator Document
Create a new document and choose RGB colour mode. I use RGB at this stage for its broader colour range.
Don’t get stuck choosing the perfect artboard dimensions. Pick a size and get started. The collection will probably spread beyond it as you add and rearrange images, and you can resize the artboard later.
Illustrator works well for this because you can move references around freely. You don’t have to decide on a rigid layout before you know what you’ve collected.
2. Find Product and Brand Inspiration
I tend to use three places for inspiration. They each give you a slightly different mix, which is useful when you’re trying to understand a product category.
Dribbble
Search Dribbble, with three Bs, for your product type. In this case, that means searching for hot sauce and browsing for designs that catch your eye.
Collect the ones you like. You’re looking for useful visual references, not choosing a finished solution for your own brand.
Behance
Behance.net is another good place to find design inspiration. Like Dribbble, it often features beautifully presented, heavily designed work.
Keep in mind that some of these projects may be concepts rather than real products. They’re still useful for exploring a style, but they don’t necessarily show what is actually on sale.
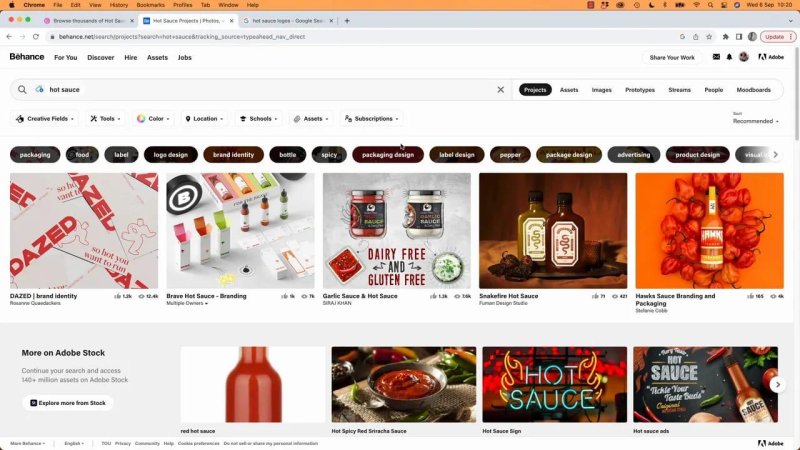
Behance offers polished packaging and branding references to explore
Google Images
I also use Google Images to see a broader mix. You’ll find some very slick designs alongside more ordinary, homemade-looking products and older branding.
That variety is helpful. A mood board doesn’t need to be made entirely from beautifully presented design projects.
And your references don’t all have to be hot sauce. If something from a similar product category catches your eye and feels right for the brand, include it. What matters is whether it offers an interesting direction for your project.
3. Capture the Images You Want to Use
My usual approach is to take screenshots. It’s quick, and you can capture just the part you’re interested in.
On a Mac: press Command + Shift + 4, then drag a box around the image. The screenshot is saved to the desktop.
On Windows: use the screenshot method available for your version. Print Screen is a common starting point, but the exact process varies.
Alternatively: right-click an image and use the option to save it, where available.
Once you’ve collected a batch, you’re ready to bring them into Illustrator. There’s no need to make every image the same size first.
4. Drag the Whole Batch Into Illustrator
Rather than adding references one at a time, I bring the whole collection in together:
Open the folder containing your screenshots or saved images.
Position the file browser over the Illustrator window.
Select the images you want to include.
Drag the selection into the Illustrator workspace.
Give Illustrator a moment to import them, then click back into the document.
On a Mac, that file browser is Finder. On a PC, use the equivalent file browser. Once the images are in the document, start moving them around.
5. Arrange a Loose Collage and Emphasise Your Favourites
You could line everything up neatly, but I quite like the collage look. The screenshots are different sizes anyway, so let them be different sizes. Move them into an arrangement where you can see and compare the references.
If one image feels particularly strong, make it larger. That gives you a visual reminder when you come back to the board: this was the direction that stood out.
The same idea can help when presenting to a client. A larger reference can signal the style you think should lead the brand, rather than giving every option equal emphasis.
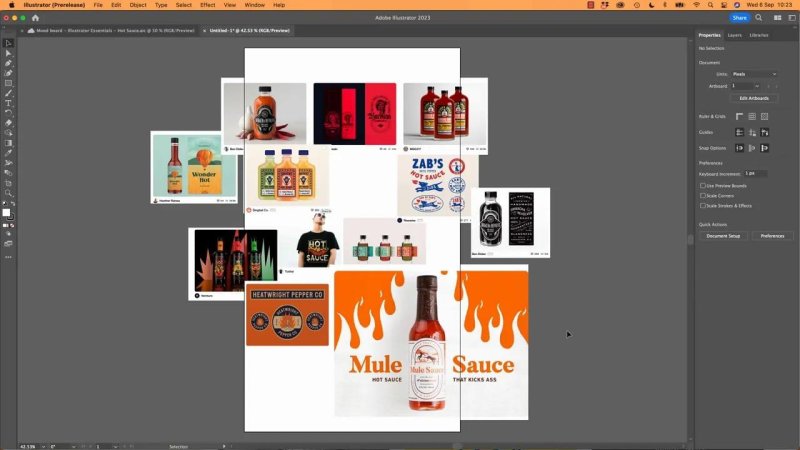
Making a favourite reference larger helps the strongest direction stand out
For your own working board, though, don’t spend ages making it official. Get the ideas onto the page first. A client-facing version can be tidied up afterwards.
6. Resize the Artboard If You Need More Room
If the collection has outgrown the page, use the Artboard Tool to adjust it.
You can also deselect everything and choose Edit Artboards. From there, change the width and height values or drag an artboard edge outwards to fit the collection.
Don’t worry too much about the dimensions. At this stage, the artboard just needs to accommodate your references.
Keep the First Pass Simple
You don’t need to settle on fonts or build a colour palette yet. Include those references if you want to, but they aren’t required for this first pass.
For now, collect products and visual ideas that align with what you want to make. They don’t have to match your product exactly. They just need to feel interesting and potentially useful for your brand.
That’s mood board basics: gather the references, put them together, and make the strongest ideas easy to spot. It doesn’t need to be more complicated than that.
Key Terms
Mood board
A collection of visual references that establishes the feel or possible design direction of a project. It is a starting point for ideas, not a finished brand design.
Artboard
The page area in an Illustrator document. You can resize it as your collection grows.
RGB
A colour mode based on red, green and blue. It is the mode used for this mood board workflow.
Visual hierarchy
The relative emphasis given to elements in a layout. On this board, making a reference larger helps mark it as a leading idea.
FAQs
Does a mood board need to look neat?
No. A personal working board can be a loose collage of differently sized images. Spend more time refining the layout if you plan to present it to a client.
Can I include inspiration from other product categories?
Yes. Include references that feel relevant to your brand’s direction, even if they aren’t the same type of product.
Do I need fonts and colour palettes on my first mood board?
No. Start with product and design references. You can explore specific fonts and colours later, or include them now if they are already useful to your thinking.
Written by Daniel Walter Scott — Founder of Bring Your Own Laptop & Chief Instructor
