How to draw lines, arcs & stars in Illustrator
Questions





Student Gallery
Course info
Overview
Get ready to dive into the mesmerizing world of Adobe Illustrator, where we'll craft stunning looking graphics. But we won't stop at just learning the tools; we're about to unleash our creative powers by creating real-world, practical, and portfolio-ready projects. Together we will learn to:
• Master the art of drawing with simple shapes and lines.- • Unleash your creativity by combining and subtracting shapes using the Shape Builder.
- • Create advanced custom logos and graphics.
- • Explore the world of creative brushes, lines, and strokes to elevate your designs to the next level.
- • Use the Width tool to enhance your lines and strokes adding a style.
- • Conquer the pen, pencil, and curvature tools like a pro.
- • Dive into the wonderful world of fonts and the art of mastering type.
- • Use the intertwine feature to create interesting overlapping illustrations.
- • Learn the art of masking images and graphics.
- • Discover the magic of distorting, bending, warping, and liquefying illustrations.
- • Select and use color combinations like a true master of design.
- • Craft your own unique repeating patterns.
- • Transform real drawings into captivating stencil-style images.
- • Export your creations for print, web, social media, and more.
- • Acquire the techniques used by professional graphic designers.
- • Work with your own mini-brief - creating a unique Farmer's Market brand and bringing it to life.
- • Harness the power of Adobe's Generative AI features to push your creative boundaries.
- • Working with mood boards to gather inspiration.
- • Create realistic mockups to enhance your designs even further.
- • Engage in a wealth of class projects to put your skills to the test.
- • Stay ahead with a handy printable PDF cheat sheet.
- • Access downloadable exercise files to help you practice and refine your skills.
- • Benefit from forum support provided by the BYOL Teaching Assistant Team.
- • Discover professional workflows and shortcuts to work more efficiently.
- • Gain access to a treasure trove of additional resources and websites to supercharge your career.
But that's not all! I'll unveil Illustrator's hidden gems that will transform you into a pro at discovering and utilizing breathtaking vector based graphics. We'll dive into the latest Illustrator tools, including the mind-blowing Generative AI features that allow us to craft illustrations that were once thought impossible.
Whether you've never even opened Illustrator or have struggled with it in the past, I'm here to show you the easy way to create breathtaking artwork and portfolio projects to be proud of. Join me as we go from Illustrator zeros, to Illustrator superheroes!
Who this course is for
• Absolutely no previous Adobe Illustrator experience is required.- • This course is designed for newcomers to Illustrator and design in general, so no prior design, drawing, or illustration experience is necessary.
- • This is a relaxed, well-paced introduction, perfect for producing a wide range of drawings, illustrations, logos, and portfolio projects. Only basic computer skills are necessary - if you can send emails and surf the internet, you're more than capable of mastering this course.
What you'll learn
- • Drawing with Shapes & Lines
- • Drawing with the Shape Builder
- • Creating a custom logo
- • Working with Brushes
- • Drawing with the pen, pencil & curvature tool
- • Learn how to work with type & fonts.
- • How to vectorise an image in Illustrator
- • How to curve text in illustrator
- • How to trace an image in illustrator
• How to warp text in illustrator
• How to embed images in illustrator
• How to mask images & graphics.
• How to distort, bend, warp & liquefy illustrations.
• How to make 3D illustrations.
• How to make your own repeating patterns.
• How to create stencil style images from real drawings.
• How to save, print & export for Print, web & social media.
• Lots of real world exercises for you to practice.
• Loads or class projects for you to complete.
• Printable Cheat sheet.
• You will get the finished files so you never fall behind.
• Downloadable exercise files.
• Techniques used by professional graphic designers.
• Professional workflows and shortcuts.
• A wealth of other resources and websites to help accelerate your career.

Daniel Walter Scott
Founder of Bring Your Own Laptop & Chief Instructor
I discovered the world of design as an art student when I stumbled upon a lab full of green & blue iMac G3’s. My initial curiosity around using the computer to create ‘art’ developed into a full-blown passion, eventually leading me to become a digital designer and founder of Bring Your Own Laptop.
Sharing and teaching are a huge part of who I am. As a certified Adobe instructor, I've had the honor of winning multiple Adobe teaching awards at their annual MAX conference. I see Bring Your Own Laptop as the supportive community I wished for when I was first starting out and intimidated by design. Through teaching, I hope to bring others along for the ride and empower my students to bring their stories, labors of love, and art into the world.
True to my Kiwi roots, I've lived in many places, and currently, I reside in Ireland with my wife and kids.
Certificates
We’re awarding certificates for this course!
Check out the How to earn your certificate video for instructions on how to earn yours and click the available certificate levels below for more information.
Downloads & Exercise files
How do you draw lines, arcs and stars in Adobe Illustrator?
Use Illustrator’s Line Segment tool for straight details, the Arc tool for simple curves, and the Star tool for decorative shapes. Set the stroke and fill before refining each object with the Selection tool, then use layering, copying and basic shapes to turn those small pieces into a complete illustration.
Adobe Illustrator Essentials: Draw Lines, Arcs, Stars and More
This is where a simple illustration starts to feel alive. We've started witha fox using basic shapes, now we are adding whiskers, a sleepy eye, stars, an ear, a tail, grass and a night sky, while picking up some very useful Illustrator foundations along the way.
The nice thing is that none of this requires wizard-level drawing skills. It is mostly simple shapes, lines, fills, strokes and a little bit of moving stuff about.
First, make sure the correct layer is active
If your pencil cursor has a line through it and Illustrator refuses to draw, check the Layers panel before panicking. The layer may be hidden, locked or simply not selected.
Make sure the layer visibility icon is turned on.
Click the layer name so it highlights blue, confirming it is the active layer.
Unlock the layer if it has been locked.
This matters even more as an illustration grows and you begin working with several layers. A tiny bit of layer housekeeping saves a lot of confused clicking later.
Draw fox whiskers with the Line Segment tool
The Line Segment tool lives in the shape-tool group, underneath the Rectangle tool. Click and hold the Rectangle tool to find it, then choose Line Segment.
Zoom in with Command or Control + when you need to get close. You can pan around by holding the Spacebar, or use the zoom controls if that feels more comfortable.
To create each whisker, click, hold and drag. If the line appears invisible, it probably has no stroke. Select it with the black Selection tool, give it a black stroke and set the fill to None. A line can technically have a fill, but because it is only a single path, there is nothing useful to see.
The default Illustrator stroke is one point, which is a bit skinny for bold fox whiskers. Increase the stroke weight to around five points for a much clearer result.
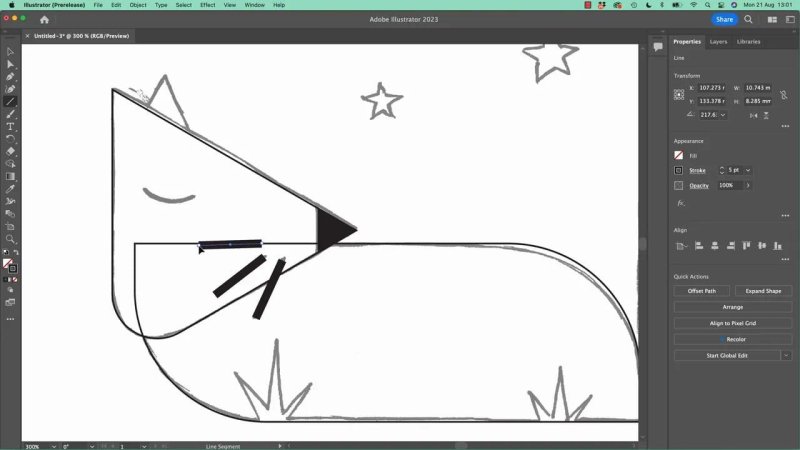
A heavier stroke gives small facial details enough visual weight to read clearly.
Make separate lines when starting out
It can be tempting to draw every whisker from exactly the same starting point. The catch is that Illustrator may select and move the existing line instead of creating a new one.
The simple beginner-friendly solution is to draw each whisker separately. If you do need several lines to begin at one exact point, deselect first by clicking the empty background with the black arrow, switch back to the Line Segment tool, and draw the next line.
Create a sleepy eye with the Arc tool
The Arc tool is a handy little shortcut for drawing simple curves before you are comfortable with the Pen tool. It may be hidden under the three dots at the bottom of the toolbar, rather than sitting in the main tool panel.
Choose the Arc tool, click and drag to make a curve that is roughly right, then use the black Selection tool to rotate it into place. Do not worry about drawing the arc perfectly on the first go. Get it close, rotate it, and carry on.
For an open eye instead, use the Ellipse tool. Hold Shift while dragging to constrain the shape to a perfect circle. When moving an object, grab the actual path rather than a bounding-box handle. The handles resize the object, while the path lets you move it.
Use the Star tool for a quick night sky
The Star tool is also grouped with the shape tools. Click and drag to create a star, then use the black Selection tool to resize and rotate it. Hold Shift while scaling so the star does not go all squidgy.
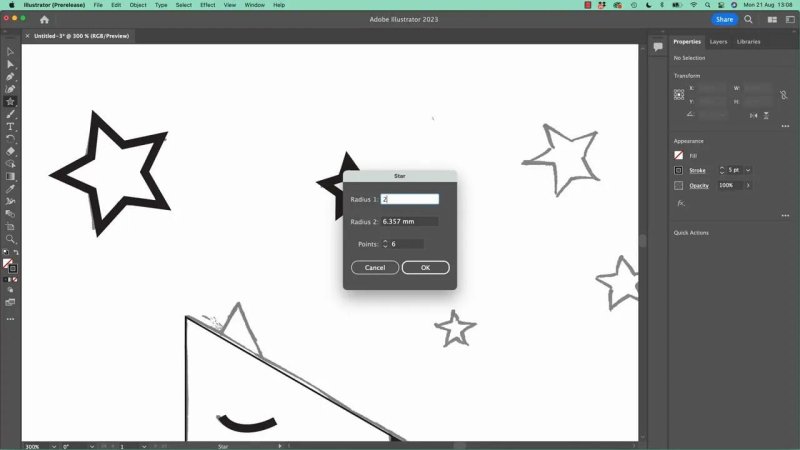
The Star tool can create more than the standard five-point shape.
Change the number of points and spike level
For more control, click once on the artboard with the Star tool instead of dragging. Illustrator opens a dialog where you can set:
Points: Choose the number of star points, such as five or six.
Radius 1 and Radius 2: Control the inner and outer radius.
The distance between the inner and outer radius determines how sharp the star looks. Increase the difference to make a more dramatic, spiky star. Bring the values closer together for a flatter, less exciting star.
Once you have made a star you like, do not keep redrawing it. Select it with the black arrow, then use normal copy and paste:
Command-C and Command-V on a Mac
Control-C and Control-V on Windows
Scale and rotate the copies to create a more natural scattered group. For a quick full-artboard view, use Command or Control + 0.
Colour shapes with fills and strokes
Once the line details and stars are in place, start applying colour. Select the fox body shapes and give them orange fills, perhaps using a lighter orange for the head and a darker orange for the body. Remove the stroke if you want cleaner, flatter colour shapes.
When multiple objects are selected and they have different fills, Illustrator may show a question mark in the Fill control. That is not an error. It simply means the selected objects do not all share the same fill colour.
You can select multiple objects by holding Shift and clicking them one at a time. If there is clear empty space around the objects, drag a selection box around them instead. Be careful, though. A large selection box can easily grab parts of the fox that you did not mean to change.
Create an ear with the Triangle tool and arrange it behind the head
The fox ear is another basic shape job. Find the Polygon tool, click once to open its settings, and set the number of sides to three. That gives you a triangle.
Draw the triangle near the top of the fox head, then give it a white fill and a light-orange stroke. Increase the stroke weight until it feels right, around four points works nicely here.
The ear needs to sit behind the head, which introduces one of Illustrator’s important ideas: stacking order. The last object you draw lands on top, but you can change that.
Select the ear.
Choose Arrange.
Select Send to Back.
You can also right-click an object and use the same Arrange options. There are several routes to this command, and eventually the keyboard shortcuts become second nature.
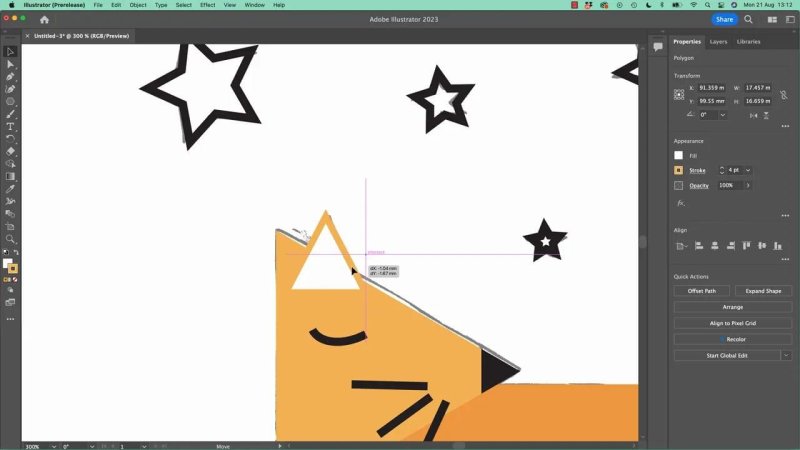
Sending the triangle behind the head turns a basic polygon into a properly layered ear.
For quick tool switching, get used to V for the Selection tool and A for the Direct Selection tool. They are small shortcuts, but they save a surprising amount of time.
Build the tail from rounded rectangles
The tail looks complicated at first, but it is really just a couple of rectangles with rounded corners.
Draw a tall rectangle aligned near the back of the fox.
Give it the same orange fill as the body and no stroke.
Use the corner widgets to round the corners that need rounding.
Copy and paste the shape to create the inner white tail detail.
Scale the copied shape down and set its fill to white.
A useful gotcha appears here: if a rectangle refuses to become any smaller, its corner radius may be too large. Reduce the radius first, then scale the rectangle down again. The large corner curve was effectively holding the shape open.
You can select both tail pieces with Shift-click and rotate them together if you want to test a different pose. Hold Shift while rotating to keep the movement constrained. Maybe the tail up looks like an alert sleeping fox. Maybe it does not. You decide.
Make grass from triangles and use Smart Guides
Little grass tufts are just triangles. Draw a triangle with the Polygon tool, hold Shift to keep it regular, then resize and rotate it with the Selection tool. Give it an off-grey fill to suit the nighttime scene.
Copy and paste the triangle to create a small cluster, overlap the pieces, then copy that cluster for another patch of grass. Scale the second patch down to make it feel less repeated.
If objects are not snapping into place as expected, check that Smart Guides are enabled under the View menu. Smart Guides make it easier to align grass, rectangles and other shapes to nearby edges without trying to place every pixel by hand.
Add ground and sky backgrounds with rectangles
To finish the scene, use the Rectangle tool for two large background shapes:
A lower rectangle for the ground, filled with a light colour.
A larger rectangle for the sky, filled with a dark grey.
The sky rectangle will cover everything when you first draw it. That is fine. Select it, choose Arrange > Send to Back, and your fox, stars and grass come back into view.
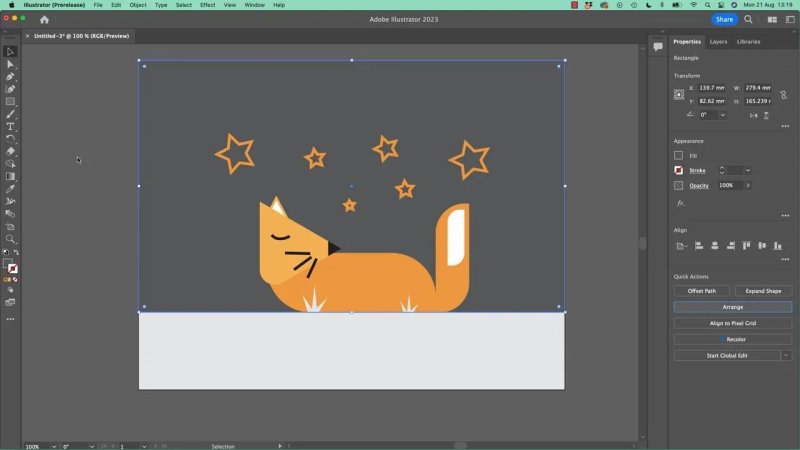
Simple shapes, bold line details and a dark background are enough to create a complete nighttime illustration.
That is the big takeaway here. A surprising amount can be made in Illustrator with basic shapes and lines alone.
When tracing a reference is the sensible option
If illustration is not your background, it can be much easier to draw something by hand first and trace over it in Illustrator. Use a reference image as a template, then build over it with the simple shapes and tools you have learned.
That is not cheating. It is a perfectly sensible workflow. A clear hand sketch can be scanned or photographed, brought into Illustrator as a template and redrawn cleanly. If the sketch is very rough, it may be more useful as a loose idea than a direct tracing source.
You do not need to be brilliant at drawing to work in Illustrator. Sometimes a rough paper sketch is enough to give you direction. Other times, you will go straight into Illustrator. Both approaches are completely valid.
Two easy fixes when Illustrator feels stuck
Escape isolation mode
Double-clicking an object can put you into Isolation Mode. Everything else becomes greyed out, and it can feel as if Illustrator has stopped letting you select things.
To get out, press Escape or double-click an empty part of the background. Easy peasy.
Hide the template layer when you are finished
Once you have traced your reference, turn off its visibility in the Layers panel using the eye icon. If parts of the template are still visible around the finished illustration, hiding it is the cleanest way to check your actual artwork.
Keep working with basic shapes for now. Later, you can combine them with the Pen tool, Shape Builder and the rest of Illustrator’s toolset to make much more complex artwork. But for a sleeping fox, a few lines, arcs, stars and rectangles get you a very long way.
FAQ's
Where is the Arc tool in Adobe Illustrator?
The Arc tool may be hidden under the three dots at the bottom of the toolbar. Select it from the expanded tool list, then click and drag to create a simple curve.
How do I make a perfect circle in Illustrator?
Select the Ellipse tool and hold Shift while dragging. This constrains the ellipse proportions so it becomes a perfect circle.
How do I make a star more pointy in Illustrator?
Click once with the Star tool and adjust the inner and outer radius values. A larger difference between those values produces a sharper, more spiky star.
Why can I not draw on my Illustrator layer?
Check whether the layer is visible, unlocked and selected in the Layers panel. Click the layer name so it highlights, then try drawing again.
How do I send an object behind another object in Illustrator?
Select the object, then choose Arrange and Send to Back. You can also right-click the object to find the Arrange menu.
Written by Daniel Walter Scott — Founder of Bring Your Own Laptop & Chief Instructor
