Dan tidying up students work
Questions




Student Gallery
Course info
Overview
Get ready to dive into the mesmerizing world of Adobe Illustrator, where we'll craft stunning looking graphics. But we won't stop at just learning the tools; we're about to unleash our creative powers by creating real-world, practical, and portfolio-ready projects. Together we will learn to:
• Master the art of drawing with simple shapes and lines.- • Unleash your creativity by combining and subtracting shapes using the Shape Builder.
- • Create advanced custom logos and graphics.
- • Explore the world of creative brushes, lines, and strokes to elevate your designs to the next level.
- • Use the Width tool to enhance your lines and strokes adding a style.
- • Conquer the pen, pencil, and curvature tools like a pro.
- • Dive into the wonderful world of fonts and the art of mastering type.
- • Use the intertwine feature to create interesting overlapping illustrations.
- • Learn the art of masking images and graphics.
- • Discover the magic of distorting, bending, warping, and liquefying illustrations.
- • Select and use color combinations like a true master of design.
- • Craft your own unique repeating patterns.
- • Transform real drawings into captivating stencil-style images.
- • Export your creations for print, web, social media, and more.
- • Acquire the techniques used by professional graphic designers.
- • Work with your own mini-brief - creating a unique Farmer's Market brand and bringing it to life.
- • Harness the power of Adobe's Generative AI features to push your creative boundaries.
- • Working with mood boards to gather inspiration.
- • Create realistic mockups to enhance your designs even further.
- • Engage in a wealth of class projects to put your skills to the test.
- • Stay ahead with a handy printable PDF cheat sheet.
- • Access downloadable exercise files to help you practice and refine your skills.
- • Benefit from forum support provided by the BYOL Teaching Assistant Team.
- • Discover professional workflows and shortcuts to work more efficiently.
- • Gain access to a treasure trove of additional resources and websites to supercharge your career.
But that's not all! I'll unveil Illustrator's hidden gems that will transform you into a pro at discovering and utilizing breathtaking vector based graphics. We'll dive into the latest Illustrator tools, including the mind-blowing Generative AI features that allow us to craft illustrations that were once thought impossible.
Whether you've never even opened Illustrator or have struggled with it in the past, I'm here to show you the easy way to create breathtaking artwork and portfolio projects to be proud of. Join me as we go from Illustrator zeros, to Illustrator superheroes!
Who this course is for
• Absolutely no previous Adobe Illustrator experience is required.- • This course is designed for newcomers to Illustrator and design in general, so no prior design, drawing, or illustration experience is necessary.
- • This is a relaxed, well-paced introduction, perfect for producing a wide range of drawings, illustrations, logos, and portfolio projects. Only basic computer skills are necessary - if you can send emails and surf the internet, you're more than capable of mastering this course.
What you'll learn
- • Drawing with Shapes & Lines
- • Drawing with the Shape Builder
- • Creating a custom logo
- • Working with Brushes
- • Drawing with the pen, pencil & curvature tool
- • Learn how to work with type & fonts.
- • How to vectorise an image in Illustrator
- • How to curve text in illustrator
- • How to trace an image in illustrator
• How to warp text in illustrator
• How to embed images in illustrator
• How to mask images & graphics.
• How to distort, bend, warp & liquefy illustrations.
• How to make 3D illustrations.
• How to make your own repeating patterns.
• How to create stencil style images from real drawings.
• How to save, print & export for Print, web & social media.
• Lots of real world exercises for you to practice.
• Loads or class projects for you to complete.
• Printable Cheat sheet.
• You will get the finished files so you never fall behind.
• Downloadable exercise files.
• Techniques used by professional graphic designers.
• Professional workflows and shortcuts.
• A wealth of other resources and websites to help accelerate your career.

Daniel Walter Scott
Founder of Bring Your Own Laptop & Chief Instructor
I discovered the world of design as an art student when I stumbled upon a lab full of green & blue iMac G3’s. My initial curiosity around using the computer to create ‘art’ developed into a full-blown passion, eventually leading me to become a digital designer and founder of Bring Your Own Laptop.
Sharing and teaching are a huge part of who I am. As a certified Adobe instructor, I've had the honor of winning multiple Adobe teaching awards at their annual MAX conference. I see Bring Your Own Laptop as the supportive community I wished for when I was first starting out and intimidated by design. Through teaching, I hope to bring others along for the ride and empower my students to bring their stories, labors of love, and art into the world.
True to my Kiwi roots, I've lived in many places, and currently, I reside in Ireland with my wife and kids.
Certificates
We’re awarding certificates for this course!
Check out the How to earn your certificate video for instructions on how to earn yours and click the available certificate levels below for more information.
Downloads & Exercise files
How do you smooth Pen Tool curves in Adobe Illustrator?
Start by removing unnecessary anchor points, then use the Direct Selection Tool to adjust the remaining handles. Check for handles that double back, unjoined endpoints and corner points where you need a smooth curve. Usually, a cleaner path comes from fewer points and letting their handles do more of the work.
How to Smooth Pen Tool Curves in Illustrator
Key takeaways
Spot the common causes of bumps, kinks and wobbly outlines.
Remove extra anchor points without rebuilding the whole drawing.
Close paths whose endpoints look joined but are not.
Adjust handle angles and lengths to make neighbouring curves flow together.
Preserve straight sections while smoothing the curves around them.
You have got all your anchor points in. It looks like an owl. The Pen Tool has done its job, mostly. There are just a few edges that need a little love.
That is a perfectly normal stage to reach. The Curvature Tool often feels amazingly easy at first, while the Pen Tool takes a bit more practice. It gives you more control, but it also gives you more opportunities to pull a handle somewhere unhelpful.
I am using owl drawings kindly shared by four past students: Rob Thompson, Tidral Eubanks, Teresa Digman and Valeria Bolislava. Each agreed to let their work help future students. These examples are useful because they show the little problems that crop up in real practice, not just a perfectly constructed demonstration.
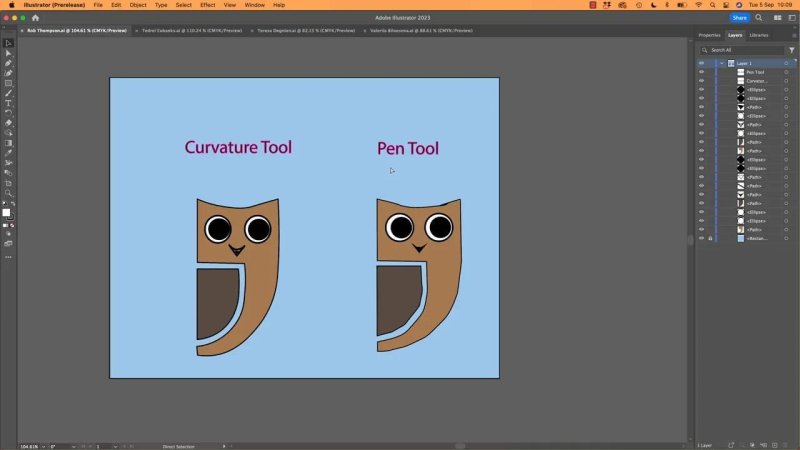
The same owl exercise makes differences in curve quality easy to compare.
Get the paths ready for editing
If you have the exercise files, the examples are in the Pen Tool Tidy Up folder. You can open them together rather than one at a time:
Open the folder and select the first file.
Hold Shift and select the last file to select the group.
Drag the selected files into the open Illustrator window.
Use the document tabs along the top to move between them.
Zoom into the edge you want to fix, then select the path. If your version of Illustrator offers an Edit Path button in the contextual controls, clicking it switches you from selecting the whole object to editing its points.
You can also use the tools directly. These three shortcuts will get plenty of use:
V: Selection Tool, the black arrow, for selecting the object.
A: Direct Selection Tool, the white arrow, for selecting and moving individual anchor points and handles.
P: Pen Tool, for working on the path, including adding or removing points and connecting endpoints.
Before dragging anything, identify the actual anchor points. The little controls sticking out from them are handles, not additional points. That distinction matters: sometimes the anchor is in the right place, and it is the handle causing all the trouble.
Fix handles that double back on themselves
In Rob’s owl, the top of the head has several points along what should be a fairly simple, shallow curve. One handle has doubled back on itself. The outline looks close to right, but the way it has been built is fighting the shape.
Think of the handles as little gravitational moons. They pull the curve towards them. One says, “Come over here,” while the next says, “No, back this way.” If those controls reach too far past one another, the path can develop a crooked patch or even fold back.
That is why a line can look almost fine until you start moving its handles. A tiny adjustment reveals that the curve was tangled underneath.
With the Direct Selection Tool, select the troublesome anchor and inspect its handles. Bring an overextended handle back towards its anchor, or change its direction so the path flows towards the next point rather than doubling back.
Do this with the existing points first. It helps you understand what is causing the bump. Then ask the more important question: do you need all those points at all?
Remove unnecessary anchor points
For a simple, smooth curve, fewer anchor points are usually better. Extra points give you more local control, but they also give you more little joins to get right. You can spend ages lining everything up and still leave a subtle wobble.
Rob’s shallow head curve is a good example. Rather than keeping several intermediate anchors, I remove a few and let a single central curve point do more of the work between the corners.
Select the path.
Press P for the Pen Tool.
Hover directly over an existing anchor point.
When the cursor shows a minus, click to remove that point.
Press A and adjust the remaining points and handles to recover the curve you want.
Boop. One point gone. Supply your own sound effect.
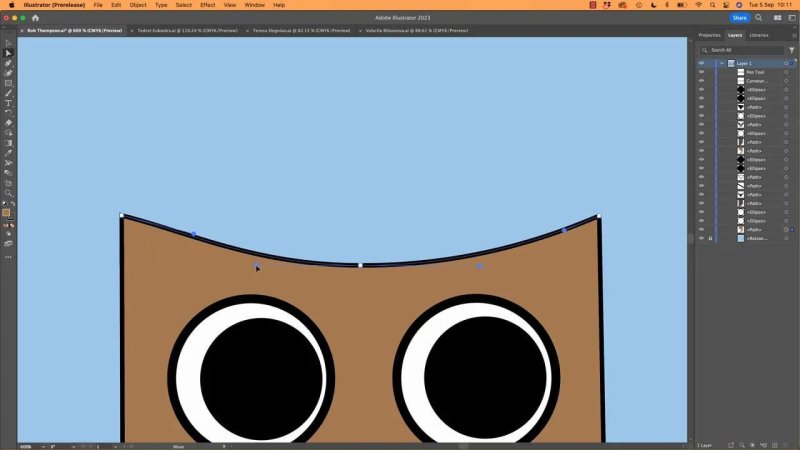
A shallow head curve needs fewer controls than you might expect.
The same approach helps with the curved edges around the owl’s wing and body. Sometimes removing a few anchors improves the line before you do anything else.
A common beginner instinct is to add another point wherever the line is not quite right. That works for pulling a small area into position, but repeated across a curve it creates a wiggly, detailed outline. Try extending or repositioning an existing handle before adding another anchor.
This is not a competition to use the fewest points possible. Keep the points the shape actually needs. The aim is to remove unnecessary control, not useful structure.
Join endpoints that only look connected
Another problem in Rob’s owl is a tiny notch at a corner. The endpoints sit close together, so the shape looks connected, but the path is not actually closed there.
Moving the endpoints apart briefly makes the problem much easier to see and fix:
Use the Direct Selection Tool to move one endpoint away from the other.
Press P for the Pen Tool.
Hover over the first endpoint. The cursor changes from its new-path indicator to an endpoint continuation indicator, shown here as a small slash.
Click the first endpoint, then click the other endpoint to connect them.
Remove any redundant point left by the repair and tidy the corner.
The useful distinction is close together versus actually connected. A filled shape can look convincing even when its path has an unfinished connection. If you find a mysterious little notch, check the endpoints before spending time adjusting handles.
Make neighbouring curves flow together
Once the obvious extra points are gone, look at the relationship between the remaining handles.
On Rob’s owl, the wing curve sits beside the outer body curve. If the corresponding handles run at very different angles, it is hard to make those edges feel as though they belong together.
I adjust them towards similar angles and comparable lengths. As the controls become more consistent, the curves start to flow together and the gap between them looks more deliberate.
Handle angle: Check whether the controls point in directions that support the intended flow.
Handle length: Look for one handle pulling much harder than its counterpart.
Anchor position: On related curves, place the controls in similar parts of the bend where that suits the drawing.
These are visual checks, not a rule that every handle must match exactly. You are looking for a relationship that makes sense for the shape. Similar controls are especially helpful when two edges are meant to run roughly parallel.
Smooth the transition between a straight edge and a curve
Tidral’s example brings up a trickier problem: making a straight section ease into a curved wing edge.
The points are placed sensibly, including a curve point around the middle of the bend. Yet the transition can still feel awkward. With the basic tools, start by pulling the middle point’s handle into a direction that smooths the flow from the straight section.
A slightly more advanced handle adjustment
You can also give the anchor at the end of the straight section curve handles, even though the surrounding shape still needs a definite corner or straight edge.
Select the relevant anchor with the Direct Selection Tool.
Use the point conversion controls in the Properties panel to give it curve handles.
Hold Shift while dragging the handle that needs to run vertically.
Align that handle with the straight section.
Adjust the handle on the curved side to ease the path into the bend.
The handle aligned with the straight edge preserves that direction, while the other gives you control over the curve. Holding Shift helps constrain the drag so you are not trying to judge a perfectly vertical direction by eye.
This takes a little practice. If it feels fiddly, that is because it is fiddly. Start with the simpler middle-handle adjustment, then use the extra control when you need it.
At the lower end of Tidral’s owl, another handle pulls the line away before the path has to make a sharp turn back. My first move is to remove the unnecessary anchor and shape that section with the remaining handle instead.
Sometimes good work only needs shorter handles
Teresa’s owl is already really nice. There is no reason to rebuild it or remove points just for the sake of it.
The small issue is familiar: two handles reach too far past each other and fight over the shallow head curve. I ease both back towards their anchors, and the line smooths out.
That is a useful reminder. Not every bump needs another point, and not every tidy-up needs fewer points. Sometimes the controls are simply doing too much. Shortening them is enough.
Convert a broken smooth point back into a curve
Valeria’s owl shows a different kind of kink. An anchor on the outer body curve behaves like a corner, with its handles no longer working together as a smooth pair.
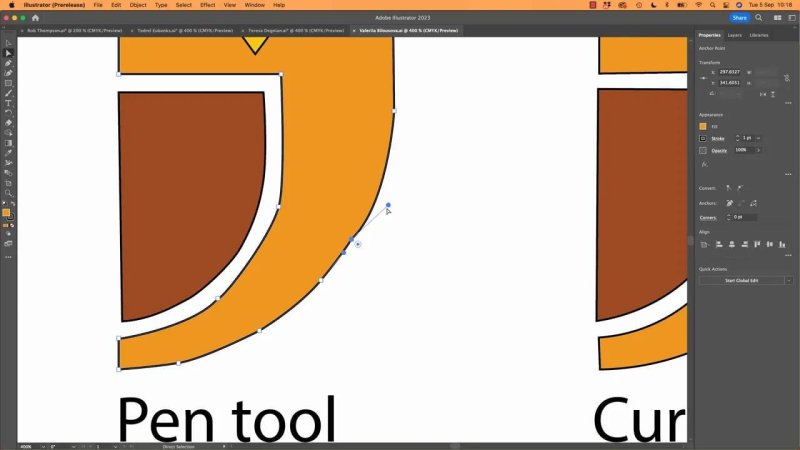
An unintended corner can interrupt an otherwise rounded body edge.
You could delete the point and put it back, but you do not necessarily need to. Select the anchor with A, then use Illustrator’s point conversion control to change it from a corner to a smooth curve point.
The handles now behave more like a seesaw: changing the direction on one side keeps the other side aligned. That gives you a better starting point for a continuous curve.
After converting the point, remove any nearby anchors that are no longer needed. Then reposition the remaining point and its handles so the outline flows naturally from the straighter body section into the lower bend.
Check the wing as well. A kink there may come from another point that has become a corner. Convert that point back to a curve where a smooth transition is intended.
Use arrow keys for small adjustments
For these final tweaks, dragging is not always the easiest option. Select an anchor and tap the keyboard arrow keys to nudge it around.
I prefer Smart Guides switched off for this kind of fine editing. That is a working preference, not a requirement. The useful part is having another way to make small positional changes when a mouse drag feels too much.
Keep enough points to preserve straight sections
Valeria’s wing also demonstrates the limit of the “fewer points” advice.
The original edge looks quite good, but it uses several anchors that have clearly taken time to align. I make a copy for comparison, then simplify the working version and try shaping the curve with fewer controls.
At first, I take away too much. The wing needs a short straight section before it bends. One curve control does not preserve that feature properly, so I add a point back with the Pen Tool.
With two useful controls, I can retain the straight section and manage the curve below it. I constrain the relevant handles vertically with Shift, line up the straight portion, then adjust the lower handle to pull the path through the bend.
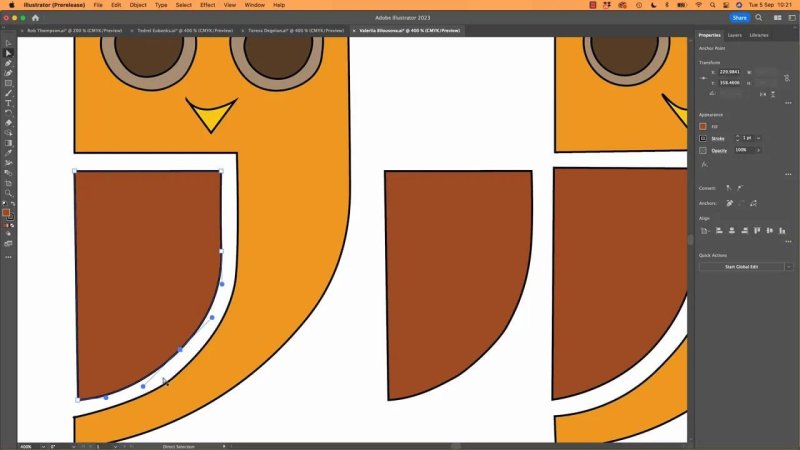
Keeping a separate comparison shape helps judge whether simplification has actually improved the edge.
Is the result dramatically better? Not necessarily. The original was already carefully adjusIllustrator Pen Tool Tidy Up: How to Fix Wobbly Curves and Anchor Pointsted. The difference is subtle, with little bumps becoming easier to find when the shapes sit close together.
That is the honest part of Pen Tool work. Simplification still needs judgement. You may remove a point, realise it was serving a purpose, and add one back.
A practical Pen Tool tidy-up routine
When I am helping students, or refining my own work, this is the order I come back to:
Inspect the wobble. Separate the anchors from their handles and work out which control is responsible.
Untangle the handles. Bring back controls that double back or pull too far past each other.
Reduce unnecessary anchors. Let the remaining handles do more of the shaping.
Check connections. Repair open endpoints that only appear joined.
Check point types. Use smooth points where the curve should continue without a corner.
Compare related edges. Adjust corresponding handle angles, lengths and anchor positions.
Preserve the intended shape. Keep or restore points needed for a straight section or genuine corner.
Zoom out and judge the result. A tidy path still needs to look right as a complete drawing.
The Pen Tool is tricky, and quite a lot of this comes from experience. But the main habit is simple: before adding another anchor, see whether the handles you already have can do the job. That is usually where the smoother line is hiding.
Key terms
Anchor point
A point on a vector path that helps define its shape. Its position and any attached handles influence the surrounding line.
Direction handle
A control extending from an anchor point that shapes a curve. Changing its angle or length changes how the path bends.
Corner point
An anchor that allows a sharp change in direction. It can create an unwanted kink if used where the outline should flow smoothly.
Smooth point
An anchor whose handles stay aligned to support a continuous curve through the point. It is useful for removing an unintended corner in a rounded edge.
Open and closed paths
An open path has endpoints that are not connected. A closed path has a complete connection around its outline, even if an open version looked nearly identical when filled.
FAQs
Why do my Illustrator Pen Tool curves look wobbly?
Common causes include too many anchor points, handles that pull against each other and corner points where you need a smooth curve. Inspect the handles first, then remove unnecessary anchors and adjust the remaining controls.
Should I always use fewer anchor points?
Use fewer unnecessary points, but keep the ones the shape needs. A straight section followed by a curve may require an extra point that a single flowing bend does not.
How do I fix an owl outline that looks joined but has a notch?
Check whether two endpoints are merely sitting close together. Move them apart briefly, connect them with the Pen Tool, then remove any redundant point and refine the corner.
Is the Curvature Tool easier than the Pen Tool?
It was easier for the students in these exercises to produce smooth owl outlines with the Curvature Tool. The Pen Tool offers more direct control, but learning to manage its anchors and handles takes practice.
Written by Daniel Walter Scott — Founder of Bring Your Own Laptop & Chief Instructor
