Align distribute rotation & math in fields - Impossible Triangle
Questions


Student Gallery
Course info
Overview
Get ready to dive into the mesmerizing world of Adobe Illustrator, where we'll craft stunning looking graphics. But we won't stop at just learning the tools; we're about to unleash our creative powers by creating real-world, practical, and portfolio-ready projects. Together we will learn to:
• Master the art of drawing with simple shapes and lines.- • Unleash your creativity by combining and subtracting shapes using the Shape Builder.
- • Create advanced custom logos and graphics.
- • Explore the world of creative brushes, lines, and strokes to elevate your designs to the next level.
- • Use the Width tool to enhance your lines and strokes adding a style.
- • Conquer the pen, pencil, and curvature tools like a pro.
- • Dive into the wonderful world of fonts and the art of mastering type.
- • Use the intertwine feature to create interesting overlapping illustrations.
- • Learn the art of masking images and graphics.
- • Discover the magic of distorting, bending, warping, and liquefying illustrations.
- • Select and use color combinations like a true master of design.
- • Craft your own unique repeating patterns.
- • Transform real drawings into captivating stencil-style images.
- • Export your creations for print, web, social media, and more.
- • Acquire the techniques used by professional graphic designers.
- • Work with your own mini-brief - creating a unique Farmer's Market brand and bringing it to life.
- • Harness the power of Adobe's Generative AI features to push your creative boundaries.
- • Working with mood boards to gather inspiration.
- • Create realistic mockups to enhance your designs even further.
- • Engage in a wealth of class projects to put your skills to the test.
- • Stay ahead with a handy printable PDF cheat sheet.
- • Access downloadable exercise files to help you practice and refine your skills.
- • Benefit from forum support provided by the BYOL Teaching Assistant Team.
- • Discover professional workflows and shortcuts to work more efficiently.
- • Gain access to a treasure trove of additional resources and websites to supercharge your career.
But that's not all! I'll unveil Illustrator's hidden gems that will transform you into a pro at discovering and utilizing breathtaking vector based graphics. We'll dive into the latest Illustrator tools, including the mind-blowing Generative AI features that allow us to craft illustrations that were once thought impossible.
Whether you've never even opened Illustrator or have struggled with it in the past, I'm here to show you the easy way to create breathtaking artwork and portfolio projects to be proud of. Join me as we go from Illustrator zeros, to Illustrator superheroes!
Who this course is for
• Absolutely no previous Adobe Illustrator experience is required.- • This course is designed for newcomers to Illustrator and design in general, so no prior design, drawing, or illustration experience is necessary.
- • This is a relaxed, well-paced introduction, perfect for producing a wide range of drawings, illustrations, logos, and portfolio projects. Only basic computer skills are necessary - if you can send emails and surf the internet, you're more than capable of mastering this course.
What you'll learn
- • Drawing with Shapes & Lines
- • Drawing with the Shape Builder
- • Creating a custom logo
- • Working with Brushes
- • Drawing with the pen, pencil & curvature tool
- • Learn how to work with type & fonts.
- • How to vectorise an image in Illustrator
- • How to curve text in illustrator
- • How to trace an image in illustrator
• How to warp text in illustrator
• How to embed images in illustrator
• How to mask images & graphics.
• How to distort, bend, warp & liquefy illustrations.
• How to make 3D illustrations.
• How to make your own repeating patterns.
• How to create stencil style images from real drawings.
• How to save, print & export for Print, web & social media.
• Lots of real world exercises for you to practice.
• Loads or class projects for you to complete.
• Printable Cheat sheet.
• You will get the finished files so you never fall behind.
• Downloadable exercise files.
• Techniques used by professional graphic designers.
• Professional workflows and shortcuts.
• A wealth of other resources and websites to help accelerate your career.

Daniel Walter Scott
Founder of Bring Your Own Laptop & Chief Instructor
I discovered the world of design as an art student when I stumbled upon a lab full of green & blue iMac G3’s. My initial curiosity around using the computer to create ‘art’ developed into a full-blown passion, eventually leading me to become a digital designer and founder of Bring Your Own Laptop.
Sharing and teaching are a huge part of who I am. As a certified Adobe instructor, I've had the honor of winning multiple Adobe teaching awards at their annual MAX conference. I see Bring Your Own Laptop as the supportive community I wished for when I was first starting out and intimidated by design. Through teaching, I hope to bring others along for the ride and empower my students to bring their stories, labors of love, and art into the world.
True to my Kiwi roots, I've lived in many places, and currently, I reside in Ireland with my wife and kids.
Certificates
We’re awarding certificates for this course!
Check out the How to earn your certificate video for instructions on how to earn yours and click the available certificate levels below for more information.
Downloads & Exercise files
How do you make an impossible triangle in Illustrator?
Make three evenly spaced parallel lines, duplicate and rotate the groups by 120 degrees, then connect the intersections and trim away the unwanted pieces with Shape Builder. The clever bit is using Illustrator’s Align, Distribute and maths fields to make the construction accurate without having to be brilliant at maths.
How to Align, Distribute and Rotate in Illustrator by Making an Impossible Triangle
This little project starts out as a pile of fairly boring lines and turns into a very cool impossible triangle. Along the way, it is a great excuse to learn some properly useful Illustrator essentials: aligning objects, distributing gaps evenly, rotating by exact amounts, entering maths directly into fields, and fixing Shape Builder when it gets a bit grumpy.
Also, fair warning: this is one of those projects where things can go a bit sideways. That is not a bad thing. Most Illustrator problems are not mysterious genius-level problems. They are usually a missed selection, a tiny gap, a locked layer, or an object with no visible stroke.
Set Up the Document and Layers
Create a new document at 1,000 by 1,000 pixels in RGB colour mode. A simple background rectangle is handy for seeing white lines clearly, but lock that background layer before beginning.
Create or select a foreground layer above it. This matters more than it sounds. If the active layer is locked, Illustrator will happily refuse to draw while making it feel like the tool is broken.
To grab the Line Segment Tool, click and hold the Rectangle Tool or whichever shape tool is currently visible in the toolbar, then choose Line Segment Tool from the flyout menu.
Draw a Line That Is Actually Visible
Drag out a horizontal line while holding Shift. Shift constrains the angle, giving you a clean horizontal, vertical or angled line rather than a slightly wonky near-horizontal thing.
If the line seems to vanish the moment you click away, it is probably still there. It just has no stroke. Lines are made from strokes, so a line with no stroke will not display or print.
Select the line with the black Selection Tool and give it a visible stroke, such as white, at around 2 pt. The exact width is not especially important at this stage. The important part is being able to see what you are building.
Align and Distribute Three Parallel Lines
Select the line, then copy and paste it twice so you have three identical lines. They may initially sit directly on top of one another, which is very Illustrator of them.
Move the copies apart roughly, and deliberately leave their spacing uneven for a moment. This makes the value of Distribute much clearer.
With the black Selection Tool, select all three lines. You do not need to drag a huge selection box around every line. You can drag across their end points and catch all three.
Use the Align Panel
In the Properties panel, find the Align controls. The basic buttons let you align objects to the left, centre or right. Since these lines are identical lengths, aligning their centres gives you a neatly stacked set.
For the even gaps, open the extra Align options using the small dots or panel menu. Illustrator hides a lot of useful controls in there to keep the interface from becoming a wall of tiny buttons.
Choose Vertical Distribute Center to create equal spacing between the three lines.
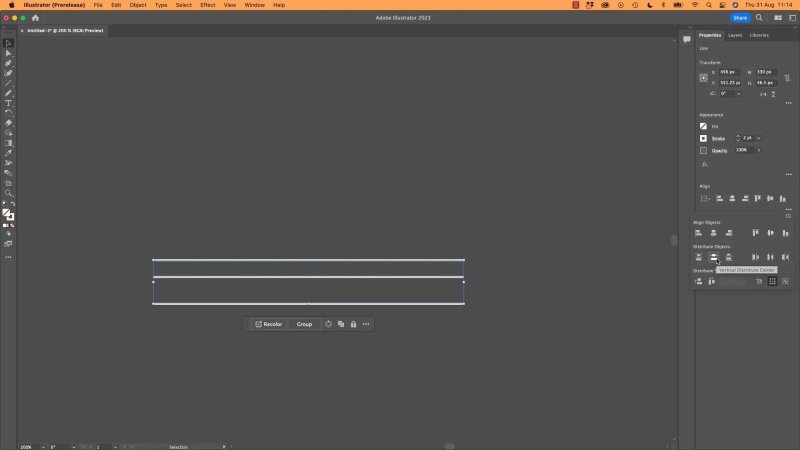
Three lines with even spacing become the building block for every side of the triangle.
The two outside lines determine the total height of the group. Move either outer line further away, run Distribute again, and Illustrator places the middle line exactly halfway between them. This is a fast way to tighten or loosen a repeating layout without eyeballing every gap.
Use Maths Directly in Illustrator Fields
Now copy and paste the group of three lines. The goal is to create two more sides of an equilateral triangle, rotated precisely around the original horizontal set.
A full rotation is 360 degrees. Because an equilateral triangle has three sides, divide 360 by 3:
360/3 gives you 120 degrees.
120*2 gives you 240 degrees.
Enter 360/3 in the Rotation field for one copied group. Then enter 120*2 for the other. Illustrator does the calculation for you.
The multiplication symbol in fields is an asterisk: *. You can also use plus, minus and division. It is one of those small Illustrator features that saves a surprising amount of mental energy.
Position the rotated groups roughly into a triangle. Do not stress about every end lining up perfectly yet. The lines simply need to overlap enough to create the framework.
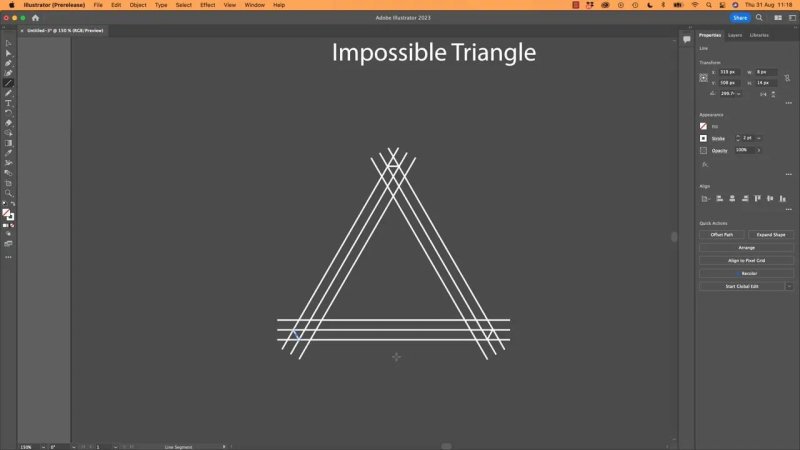
The rotated line groups create the raw geometry needed for the impossible triangle.
Connect the Intersections with Smart Guides
Turn on Smart Guides, then use the Line Segment Tool to draw the joining lines that complete the triangular grid. As you drag, look for the intersect cue so the new line snaps from one meaningful crossing point to another.
Use the Spacebar while dragging or working around the artwork to temporarily access the Hand Tool and pan around. It is much nicer than constantly switching tools when zoomed in.
At this point, the artwork should look like a complicated lattice of line segments. It may not look impressive yet, but that is exactly right. The Shape Builder step is where it starts behaving like an impossible triangle.
Select Everything Before Using Shape Builder
This is important: select every single line before using Shape Builder. Grab the black Selection Tool and drag around the entire construction.
It is easy to think everything is selected when some stray line segments are not. If part of the framework is missed, Shape Builder cannot include it in the operation, and awkward bits will remain behind.
Activate the Shape Builder Tool with Shift + M.
Trim Unwanted Segments
Hold Option on a Mac or Alt on a PC to switch Shape Builder into subtract mode. Then click or drag through the pieces you want to remove.
Dragging across multiple unwanted pieces is the magic move here. Instead of painstakingly cutting paths with the Scissors Tool or trying to trim individual overlaps, you can just sweep through a run of segments and clean them up quickly.
When Shape Builder Is Not Working: Check Tiny Gaps
If Shape Builder starts behaving strangely, do not panic and assume Illustrator is haunted. Zoom in closely and inspect the intersections.
A line that looks connected at normal zoom may stop just short of another line. Even a tiny gap can prevent Shape Builder from recognising the area correctly.
You have two options:
Undo and redraw the connecting line so it snaps directly from intersection to intersection.
Use Shape Builder’s Gap Detection setting.
Double-click the Shape Builder Tool to open its options. Turn on Gap Detection and begin with Small. If your paths are further apart, try Medium or Large.
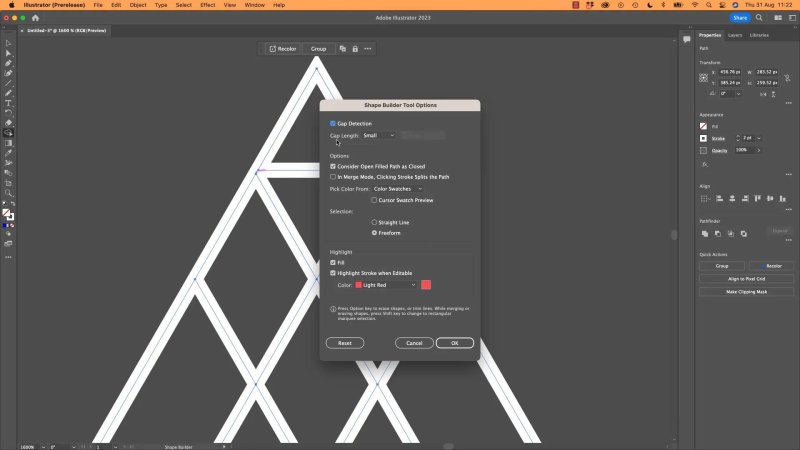
Gap Detection helps Shape Builder recognise areas even when two paths almost meet but do not quite touch.
Gap Detection is particularly useful later when working with more hand-drawn artwork, where small openings are common. For this geometric triangle, though, it is still best practice to draw accurate connecting lines wherever possible.
If you get completely lost while zooming around, use Command + 0 on Mac or Control + 0 on PC to fit the artwork back into the window.
Build the Impossible Triangle Path
With Shape Builder in its normal mode, the route through the construction is a bit of a brain teaser. The simplest way to remember it is this:
Start at an inner section.
Follow it all the way out to the outer edge.
Continue along the next side.
Repeat the same visual path around the triangle.
Think of the result as one continuous band that keeps passing over and under itself. Shape Builder lets you click and drag across adjoining pieces to combine them into that continuous form.
Finally, drag across the remaining pairs of adjoining sections to join them. Once the excess lines are removed and the correct segments are combined, the impossible triangle becomes obvious.
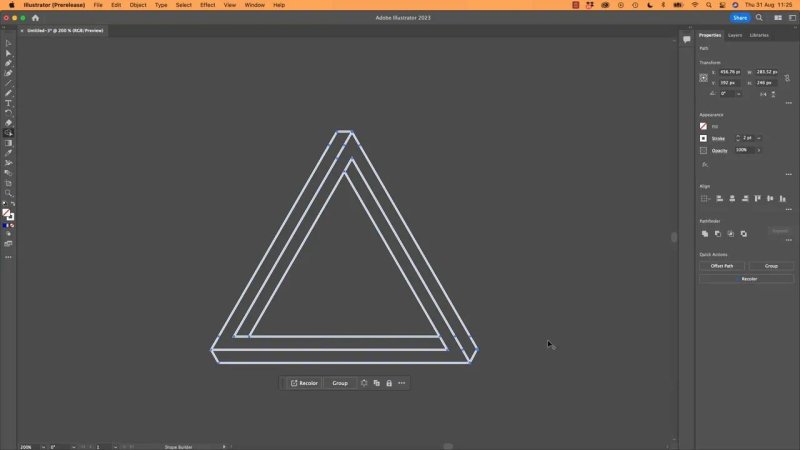
After the unwanted segments are trimmed, the connected band resolves into the impossible triangle illusion.
More Places to Use Maths in Illustrator
Maths is not limited to rotation. You can type calculations into almost any numerical field in Illustrator.
To move an object 10 pixels right, enter +10 in its X coordinate field.
To move it vertically, enter a value in the Y field.
To double or triple a stroke weight, type a calculation such as 2 or 3 in the Stroke field.
One small gotcha: make sure the object is selected with the black Selection Tool before changing object properties. If Shape Builder is active and nothing is selected, Illustrator has no idea which stroke you are trying to change.
Do not worry too much about the sharp little stroke corners in this exercise. Stroke joins and caps are a whole useful topic on their own. For now, you have built the geometry and learned a stack of skills that will keep turning up in Illustrator work.
Save the File
Save the artwork as Impossible Triangle. The construction is complete, and it is ready for the fun part next: applying colour and turning it into a small class project.
FAQs
Why can’t I see the line I drew in Illustrator?
The line probably has no stroke. Select it with the black Selection Tool, choose a stroke colour, and increase the stroke weight enough to make it visible.
How do I evenly space lines in Illustrator?
Select all the lines, align them as needed, then open the expanded Align options and use the appropriate Distribute control. The outside objects define the overall spacing, while Illustrator positions the objects between them evenly.
Can Illustrator calculate rotation angles for me?
Yes. Type calculations directly into numerical fields. For an equilateral triangle, entering 360/3 gives 120 degrees, and 120*2 gives 240 degrees.
Why is Shape Builder leaving parts of my artwork behind?
Check that every path is selected before activating Shape Builder. Then zoom in to inspect for tiny gaps between paths. If needed, enable Gap Detection in the Shape Builder Tool Options.
Written by Daniel Walter Scott — Founder of Bring Your Own Laptop & Chief Instructor
