Add Document Name Automatically To The Page In InDesign Using Text Variables
Questions


Student Gallery
Be the first to share something.
Course info
Overview
- You will need a copy of Adobe InDesign 2018 or above. But you find that 95% of all the features in this course will work with earlier version of InDesign (e.g. CS6). A free trial can be downloaded from Adobe.
What am I going to get from this course?
- 70 lectures 5+ hours of well structured content.
- Create PDF Forms
- Master Long Documents.
- Advanced Fonts
- Master Styles
- Shortcut Sheet
- Create Charts & Infographics
- Create Interactive Documents
- Workflow Tactics
- Shortcuts & Speed Tips
- Advanced Creative Cloud Features
- Tips for working with Photoshop & Illustrator
- Using Scripts
- Exporting, Prepress & Printing tricks
- You will get the finished files so you never fall behind.
- Downloadable exercise files & cheat sheet.
- Forum support from me and the rest of the BYOL crew.
- Techniques used by professional graphic designers.
- Professional workflows and shortcuts.
- A wealth of other resources and websites to help your accelerate your career.
What is the target audience?
- This course is for people who already know InDesign and want to take their skills and speed to the maximum level.
- This is an advanced InDesign course, so you’ll need basic InDesign skills to find this course useful.
- This course is perfect for anyone that already knows how to insert images & add text.
- If you a completely new to InDesign try my InDesign Essentials course before starting this one.
- This course is perfect for anyone that has completed my InDesign Essentials course.
Course duration 7 hours 45 mins + your study.

Daniel Walter Scott
Founder of Bring Your Own Laptop & Chief Instructor
I discovered the world of design as an art student when I stumbled upon a lab full of green & blue iMac G3’s. My initial curiosity around using the computer to create ‘art’ developed into a full-blown passion, eventually leading me to become a digital designer and founder of Bring Your Own Laptop.
Sharing and teaching are a huge part of who I am. As a certified Adobe instructor, I've had the honor of winning multiple Adobe teaching awards at their annual MAX conference. I see Bring Your Own Laptop as the supportive community I wished for when I was first starting out and intimidated by design. Through teaching, I hope to bring others along for the ride and empower my students to bring their stories, labors of love, and art into the world.
True to my Kiwi roots, I've lived in many places, and currently, I reside in Ireland with my wife and kids.
Downloads & Exercise files
How do you create running headers in Adobe InDesign?
Create a paragraph style for your section headings, define a Running Header text variable based on that style, then insert the variable into a text frame on a parent page. InDesign will automatically display the current section heading on each page, making long documents much easier to navigate.
How to Use Text Variables and Running Headers in Adobe InDesign
Text variables in InDesign have a pretty boring name, but they are genuinely useful. They let a document pull in changing information automatically, whether that is the current section title, the file name, or the date the file was last modified.
For long documents such as annual reports, catalogues, books, or reports, this is gold. A running header can tell you whether you are in the Oak, Ash, or Walnut section without hunting through the pages. File details in a footer can also help a team confirm that a printed proof is actually the right version.
Why text variables are useful
A text variable is a piece of automatic text that InDesign generates for you. Rather than typing a value manually and then remembering to update it later, you insert a variable that stays connected to the document.
Two particularly practical uses are:
Running headers: Display the current chapter or section name at the top of each page.
Document reference information: Show the file name and modification date in a footer, back page, or internal production area.
That second one may not be particularly exciting for a client, but it is handy internally. When someone has a printed document in front of them, the file name and last-modified date give a quick way to check which version they are dealing with.
Add the file name and modification date to a document
Start by deciding where the information should live. If it needs to appear consistently throughout the publication, add it to a parent page. If it is purely internal reference material, you might instead place it on an inside flap, a back page, or another less prominent location.
1. Open the parent page
Open the Pages panel and double-click the parent page you want to edit, such as the A-Parent. Anything placed here will appear on pages that use that parent.
2. Create a footer text frame
Use the Type tool to draw a text frame near the bottom edge of the page. For a discreet production note, keep the type small and out of the way. Around 8 pt can work for tight spaces, although it is fairly small, so make sure it remains legible for the intended output.
Align the text as needed. Right-aligned text works nicely when the footer needs to sit neatly against the outer edge of a page.
3. Insert the file name variable
Click inside the text frame so the text cursor is active, then choose:
Type > Text Variables > Insert Variable > File Name
InDesign inserts the name of the current InDesign file. This saves you from manually typing a file name that could later change or become incorrect.
4. Add a separator and the modification date
After the file name, add a separator. A pipe character works well, but a simple hyphen is absolutely fine too. Then insert the modification date through:
Type > Text Variables > Insert Variable > Modification Date
The completed footer might read like this:
MyReport.indd | 20 December 2017 10:40
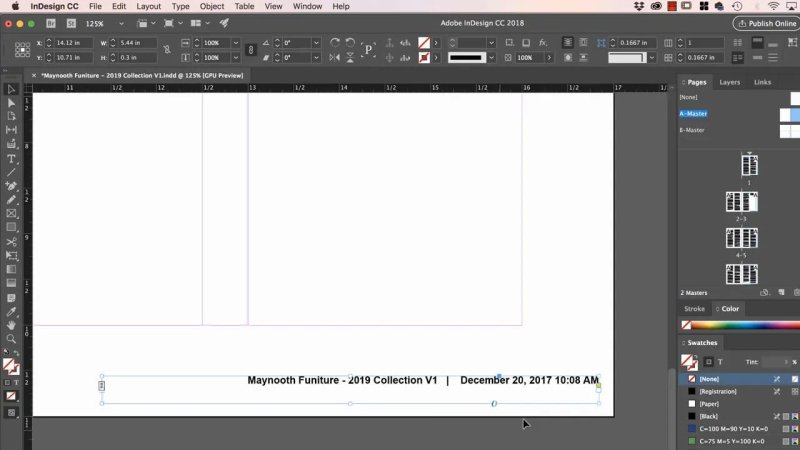
A small automatic footer gives the file name and its latest modification date for quick version checking.
The exact date format and file name will reflect the current document. When the file is updated, InDesign can keep that reference information current.
Create a running header from a paragraph style
The real winner for substantial documents is the running header. It automatically picks up the relevant section heading and displays it in a repeated position, usually at the top outside corner of each page.
Imagine a furniture catalogue with major sections called Oak, Ash, and Walnut. As you move through the document, the header changes to show the section you are currently in. The same setup works for chapters in a book, departments in an annual report, or periods in a financial forecast.
You need a paragraph style first
A running header is based on a paragraph style, not just text that happens to look like a heading. Before defining the variable, make sure the headings you want to use have a consistent paragraph style applied to them.
For example, the major section titles in the document could use a style named Heading 1. This is what tells InDesign which paragraphs should be considered section markers.
1. Draw a text frame on the parent page
Go to the parent page and create a text frame where the header should appear. Make it wide enough for your longest expected heading. A header that says “Forecasting for 2020” needs more room than one that says “Oak”.
Put it somewhere obvious but not distracting, such as the top right of the page. This is navigation text, so it should be easy to find at a glance.
2. Define the Running Header variable
Now define which paragraph style InDesign should use. Go to:
Type > Text Variables > Define
In the Text Variables dialog box, select Running Header and open its settings. Set the running header to use your heading paragraph style, such as Heading 1.
You can also choose to change the case. For instance, if you want the header to appear in uppercase even though the original heading is not uppercase, enable the change-case option and choose uppercase.
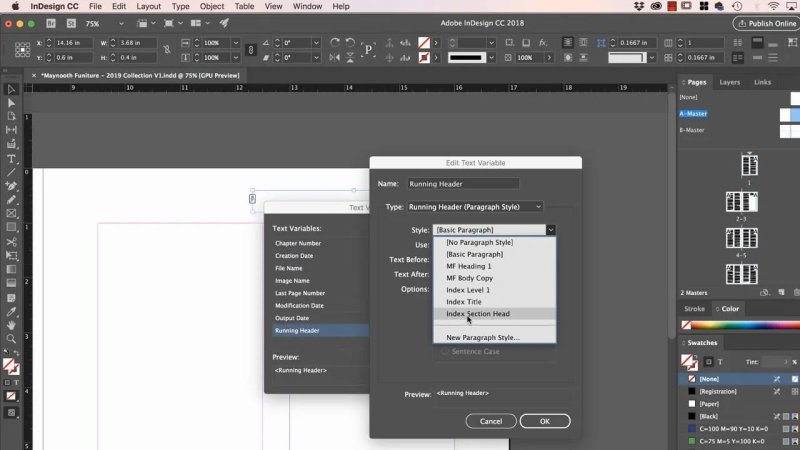
The running header is linked to a paragraph style, which is what makes section names update automatically.
Click Done when the variable is configured. At this point, nothing dramatic happens yet because you have only defined the variable. You still need to insert it into the header text frame.
3. Insert the Running Header variable
Place the text cursor inside the header frame on the parent page, then choose:
Type > Text Variables > Insert Variable > Running Header
While you are on the parent page, InDesign displays the placeholder text Running Header. That is normal, much like automatic page-number markers on a parent page.
4. Check the document pages
Move to a document page and the header will resolve to the appropriate text. On the opening pages it may show the first major collection heading. Further down, it updates to Oak, then Ash, then Walnut as each new Heading 1 paragraph is reached.
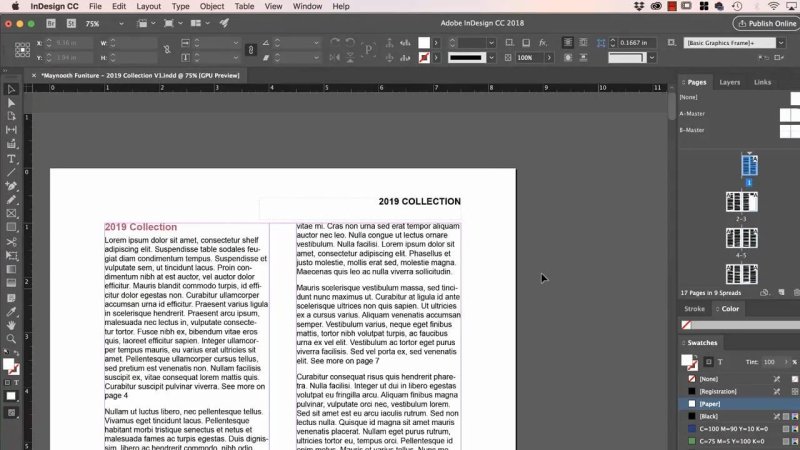
Once inserted on the parent page, the header displays the appropriate section name on document pages.
That is the whole point. Instead of manually changing headers throughout a long document, InDesign keeps them tied to the structure already created through paragraph styles.
Important things to get right
Use a real paragraph style: The running header needs a named paragraph style such as Heading 1. Manually formatted text will not give you a dependable workflow.
Apply the style consistently: Every section heading that should trigger a new header needs the same paragraph style.
Use a parent page for repeating content: This is what puts the variable in the same position throughout the document.
Allow enough space: Create a sufficiently wide text frame, especially if chapter or section titles vary in length.
Decide whether internal metadata belongs everywhere: File details are useful, but they may be better on a discreet production page than on every client-facing page.
Other InDesign text variables worth knowing
Running headers, file names, and modification dates are only a few of the available text variables. They all insert through the same general menu, so once you know the workflow, the other options are straightforward to explore.
Useful built-in options include:
Creation Date: The date the InDesign document was created.
File Name: The current document name.
Modification Date: The date the document was last changed.
Output Date: A date related to document output.
Last Page Number: Useful for text such as “Page 3 of 24”.
Image Name: Can pull the name of an image placed on the page into a text frame.
They are small features, but they take repetitive updates out of the layout process. For a document with dozens or hundreds of pages, that is a proper time saver and a good way to avoid silly version-control mistakes.
FAQ's
Why does my running header say Running Header on the parent page?
That is the expected placeholder on a parent page. Go to a normal document page to see the variable resolve to the heading text from that section.
Can I use any heading for an InDesign running header?
You can use headings assigned to the paragraph style selected when you define the Running Header variable. A consistent paragraph style is essential.
Where do I insert text variables in InDesign?
With the text cursor active in a text frame, choose Type, Text Variables, then Insert Variable. Use Define from the same menu when you need to configure a running header.
Written by Daniel Walter Scott — Founder of Bring Your Own Laptop & Chief Instructor
