How To Create A PDF Form Using Adobe InDesign CC
Questions


Student Gallery
Be the first to share something.
Course info
Overview
- You will need a copy of Adobe InDesign 2018 or above. But you find that 95% of all the features in this course will work with earlier version of InDesign (e.g. CS6). A free trial can be downloaded from Adobe.
What am I going to get from this course?
- 70 lectures 5+ hours of well structured content.
- Create PDF Forms
- Master Long Documents.
- Advanced Fonts
- Master Styles
- Shortcut Sheet
- Create Charts & Infographics
- Create Interactive Documents
- Workflow Tactics
- Shortcuts & Speed Tips
- Advanced Creative Cloud Features
- Tips for working with Photoshop & Illustrator
- Using Scripts
- Exporting, Prepress & Printing tricks
- You will get the finished files so you never fall behind.
- Downloadable exercise files & cheat sheet.
- Forum support from me and the rest of the BYOL crew.
- Techniques used by professional graphic designers.
- Professional workflows and shortcuts.
- A wealth of other resources and websites to help your accelerate your career.
What is the target audience?
- This course is for people who already know InDesign and want to take their skills and speed to the maximum level.
- This is an advanced InDesign course, so you’ll need basic InDesign skills to find this course useful.
- This course is perfect for anyone that already knows how to insert images & add text.
- If you a completely new to InDesign try my InDesign Essentials course before starting this one.
- This course is perfect for anyone that has completed my InDesign Essentials course.
Course duration 7 hours 45 mins + your study.

Daniel Walter Scott
Founder of Bring Your Own Laptop & Chief Instructor
I discovered the world of design as an art student when I stumbled upon a lab full of green & blue iMac G3’s. My initial curiosity around using the computer to create ‘art’ developed into a full-blown passion, eventually leading me to become a digital designer and founder of Bring Your Own Laptop.
Sharing and teaching are a huge part of who I am. As a certified Adobe instructor, I've had the honor of winning multiple Adobe teaching awards at their annual MAX conference. I see Bring Your Own Laptop as the supportive community I wished for when I was first starting out and intimidated by design. Through teaching, I hope to bring others along for the ride and empower my students to bring their stories, labors of love, and art into the world.
True to my Kiwi roots, I've lived in many places, and currently, I reside in Ireland with my wife and kids.
Downloads & Exercise files
Can you create a fillable PDF form in InDesign?
Yes. InDesign can turn a well-designed print form into an interactive PDF with text fields, checkboxes, radio buttons, drop-down menus, comments boxes, print controls and a submit button. It is ideal for smaller jobs such as event registrations and surveys, provided recipients use Adobe Acrobat or Acrobat Reader.
How to Create an Interactive PDF Form in InDesign
Interactive PDF forms in InDesign are pretty handy, especially when you need one document that works both digitally and on paper. Someone can type into the PDF, save it, print it, or send it back to you. That saves a lot of printing, scanning and posting about.
But forms in InDesign are not magic database machines. A submitted PDF does not automatically pull every answer into a spreadsheet or database. For that kind of job, you will need a developer-built workflow or a more purpose-built service.
Use an InDesign interactive form when:
You need a polished branded PDF that can also be printed and completed by hand.
You are collecting a manageable number of registrations, applications or survey responses.
You are happy receiving completed PDFs by email.
Your recipients are likely to use Acrobat or the free Acrobat Reader.
For a larger data-collection project, consider Adobe Acrobat Sign, which is designed for signatures, copies for all parties and database-based processes. For an online-only form, Google Forms is often quicker, mobile friendly and better for collecting responses and creating charts.
Design the printable form first
Start by laying out the page as a normal form. Add your labels, headings, instructions and any supporting imagery. The smart bit is making the layout work for paper first, because not everyone will be able to use the interactive controls.
For simple handwritten fields such as Name and Email, avoid drawing lots of individual lines with the Line tool. Use a paragraph rule instead.
Place the cursor in the text containing the field label.
Open the Paragraph Rules options.
Turn on Rule Below.
Set a light rule weight, such as 0.25 pt.
Set the rule width to span the column rather than just the label text.
Increase the offset until the line sits comfortably below the label.
For a longer form, turn this into a paragraph style. For just a couple of fields, copying the formatted text is perfectly fine. The result is a tidy printable line that does not look like it was hastily drawn on with the Line tool.
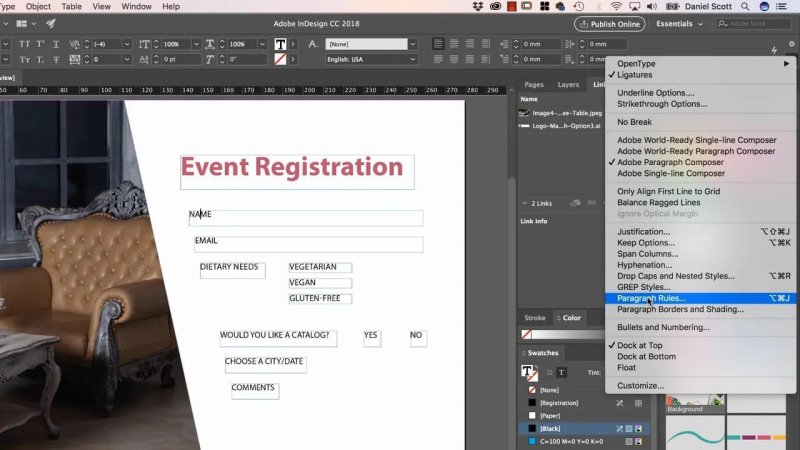
Paragraph Rules create clean handwriting lines without manually drawing them.
Open the Buttons and Forms panel
Most of the interactive work happens in Window > Interactive > Buttons and Forms. Draw or select the object that should become interactive, then choose its type from the panel.
The objects do not need to start life as anything special. A text frame can become a text field. A square can become a checkbox. A circle can become a radio button. A grouped rectangle and text label can become a button.
Create editable text fields
Draw a text frame over the printed line, then select it and set its type to Text Field in the Buttons and Forms panel.
Give every field a clear name. Use names such as Name, Email and Comments, rather than leaving generic names behind. Field names matter when the completed PDF is returned to you.
You can also add a description. This appears as a tooltip when someone hovers over the field in Acrobat. It is useful where the label needs clarification, such as “First and last name.” Do not add descriptions for things that are already obvious.
Useful text-field settings include:
Required: prevents the form being submitted until the field is completed.
Printable: controls whether the interactive field is included when the PDF is printed.
Scrollable: allows extra text to continue beyond the visible width of a single-line field.
Font size: can be set in InDesign, but the final font is often determined by Acrobat or the recipient’s PDF software.
Do not spend ages trying to force a particular input font. Acrobat commonly uses its own default font, and it is not always worth fighting. Make the field large enough, use a sensible font size, and let the PDF reader handle the input text.
Add a multiline comments box
For comments, draw a larger text frame and convert it to a Text Field in exactly the same way. Then enable Multiline. Name it something sensible, such as Comments, and it will behave like a proper multi-line response area.
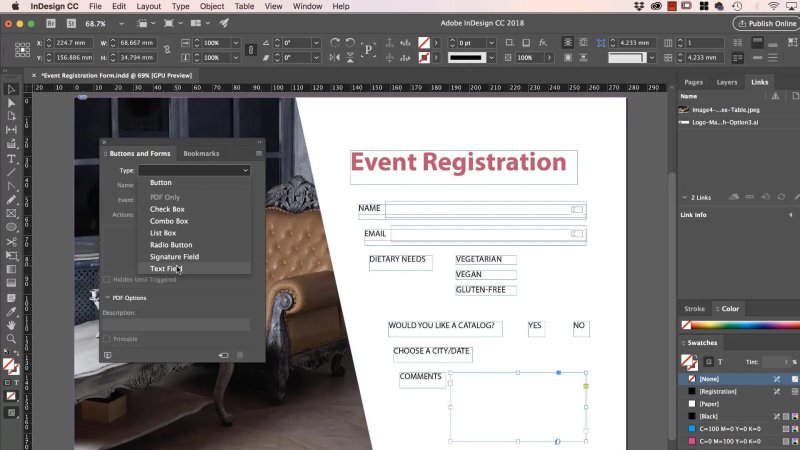
A larger text field with Multiline enabled gives people space for proper comments.
Use checkboxes for multiple selections
Checkboxes are for and choices. Someone might be vegetarian, vegan and gluten-free, so each option needs to be independently selectable.
Draw a small square using the Rectangle tool.
Use a black stroke and no fill.
Select the square and change its type to Checkbox.
Set the default state to Off.
Give the checkbox a field name and an appropriate button value.
Copy the checkbox for the other options, then rename each copied field.
Setting the default to Off is usually the right move. A pre-ticked box can look a bit suspicious, particularly for consent or marketing options. It also looks odd when the form is printed.
The button value is the result reported by that checkbox. For example, a Vegetarian field might return “Yes” when selected. Make sure copied checkboxes do not keep the same name by accident. Vegetarian, Vegan and Gluten-Free should be separate fields.
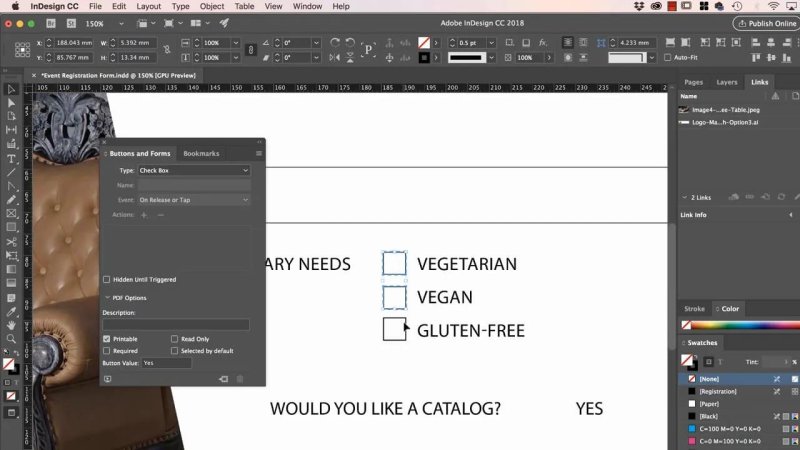
Checkboxes are the right choice when more than one answer can apply.
Use radio buttons for one-or-the-other choices
Radio buttons are for or choices. “Would you like a catalogue?” should allow Yes or No, but never both at once.
Draw a small circle with the Ellipse tool, give it a black stroke and no fill, then convert it to a Radio Button. Set the default state to Off.
The key to radio buttons is the naming:
Give every option in the same question the same field name, such as Catalogue.
Give each option a different choice value, such as Yes and No.
Because the buttons share a name, Acrobat treats them as a group. Selecting Yes turns No off, and selecting No turns Yes off. Nice and simple.
Add a drop-down menu with a combo box
InDesign calls a drop-down menu a Combo Box. Start with a text frame, select it and choose Combo Box in the Buttons and Forms panel.
Name the field, then build the options using the List Items area. For an event form, the choices might include:
Auckland, 21 December
London, 23 December
Las Vegas, 25 December
Choose a city
Add each choice with the plus button. You can drag choices into the order you want. They do not automatically sort alphabetically, so set the order deliberately.
Include a prompt such as Choose a city, and set that as the initial selected item. This gives people a clear cue that they need to interact with the control.
There is one important downside: a drop-down menu is not very useful on a printed form. The choices are hidden until the control is clicked, which cannot happen on paper. If your form must work equally well in print, consider using visible options instead, or provide a blank line where people can write the answer.
Export an interactive PDF and test it
To make the fields work, export the document as an interactive PDF:
Choose File > Export.
Select Adobe PDF Interactive.
Confirm that forms and media are included.
Export the PDF.
Open it in Adobe Acrobat or Acrobat Reader and test every field.
Do not wait until the whole form is finished before testing. Create one or two text fields, export, and make sure the size, positioning and scrolling behaviour work as expected. That catches little issues early, such as a field sitting too low or stopping text before the answer is complete.
Add Print and Submit buttons
Buttons make the form more practical, but include written instructions as a fallback. Some PDF readers will not support all interactive actions, so it is sensible to say something like: “When complete, save and email this form to us, or print and post it to this address.”
Create a Print button
Your Print button can be a rectangle with text, an icon or any other graphic element. Select it, change its type to Button, then add an action:
Open the Actions area in Buttons and Forms.
Click the plus button.
Choose Print Form.
Consider turning off the button’s Printable setting. There is no great need to print a button that only works on screen. The same thinking applies to a combo box, which may not make sense on the paper version.
Create a Submit button that emails the completed PDF
Select the Submit artwork, convert it to a Button, then add the Submit Form action. Enter the destination in this format:
mailto:[email protected]
The mailto: part and the colon are important. When the button is used, the recipient’s default email application opens with the completed PDF attached and addressed to you.
This is excellent for smaller response volumes. A hundred completed forms can be filed in a folder and dealt with manually. Ten thousand completed PDFs arriving in an inbox would be a different sort of party, and not the fun kind. For large-scale collection, use a dedicated form or database system instead.
Keep the form familiar and usable
InDesign includes a Sample Buttons and Forms library, but it is full of rather dated options. You may find glossy glass buttons, diamond radio buttons and other treasures from a very different era of interface design.
Stick with conventions people already know:
Use squares for checkboxes.
Use circles for radio buttons.
Use clear labels close to each control.
Use obvious button text such as Print and Submit.
Keep the print version readable and fillable by hand.
There is no need to get clever with form controls. Familiar is better. A clean, simple interactive PDF form is easier to complete, easier to return and much less likely to confuse people.
Final checklist for an InDesign PDF form
Does the page still work when printed?
Does every field have a meaningful name?
Are required fields set only where genuinely necessary?
Are checkbox names unique?
Do radio-button options share one name but use different choice values?
Does every combo box have a useful initial prompt?
Have you tested the PDF in Acrobat or Acrobat Reader?
Do the Print and Submit actions work?
Do you provide a manual email or print-and-post fallback?
That is the sweet spot for InDesign forms: a professionally designed PDF that can be completed electronically by most people, while still being usable when someone needs to go old school and print it out.
FAQs
Do interactive PDF forms made in InDesign work in every PDF reader?
No. Acrobat and the free Acrobat Reader are the most reliable options. Some other PDF readers may not support form fields, buttons or submit actions properly, so provide a printable fallback.
Can an InDesign form automatically save responses into a spreadsheet?
Not by itself. InDesign can create the form and email completed PDFs through a Submit Form action, but automatic database or spreadsheet collection requires a developer-built solution or a dedicated platform.
What is the difference between checkboxes and radio buttons in an InDesign form?
Checkboxes allow multiple selections, making them suitable for options that can all apply. Radio buttons allow only one choice in a group, making them suitable for Yes or No questions.
How do I send a completed interactive PDF form by email?
Create a Submit button, add the Submit Form action, and enter a destination using the mailto: format followed by your email address. The action opens the recipient’s default email application with the completed PDF attached.
Written by Daniel Walter Scott — Founder of Bring Your Own Laptop & Chief Instructor
